The Mirrored Tower
This adventure is about an ancient, remote tower, that once hosted a group of scribes, researching the different planes of the multiverse. Led by the wizard Galata Heavytome, the researchers managed to both prove their existence, as well as creating a portal to both the Shadowfell and Feywild. The two planes are known for their opposing polarities, one being a dark, empty and apathic, the other bright, lively and emotional.
However, as time went on, the researchers stumbled upon knowledge of things men can't comprehend , the far realms. One by one, each scribe either went mad from failed experiments, unbearable knowledge, or simply left. The only one to prevail was Heavytome himself, gradually spiraling into madness and eventually morphing into a Nothic.
One hundred years later, one of Heavytome's relatives, by the name of Andor Heavytome, stumbles upon information about an ancient tower, full of arcane secrets. As a loremaster he wishes to know more, and to collect artifacts from the place.
Adventure synopsis
This adventure is designed for a 3rd level party, but can easily be upscaled by adding more or harder monsters, and increasing loot.
1. Town
Where to start the adventure is entirely up to you, but the players need to have some sort of contact with Andor Heavytome. He can be introduced via an adventurers guild, a ship's captain, or another NPC.
2. Tower
The players arrive at the tower, which guarded by two arcane golems, and by finding Galata, they will get access to the basement. By
3/4. Feywild
In the fey mirroring, the tower is replaced with a tree, inhabited by a group of elves. It is a beautiful place, and might charm the players to not leave. The key lies beyond a magical door, and a sphinx. solving a puzzle, the players are able to travel to the two mirror planes to retrieve two keys.
4/3. Shadowfell
The "dark" reflection of the material plane, located in a null-magic field. Here the tower is replaced with a spire hanging from underneath a cliff, and the players must overcome a maze, undead and weightlessness.
5. Resolution
With the two keys, the players can now enter a secret room in the basement, and learn the truth about Galata, and the tower.
Adapting the adventure
This section is here to provide you with examples and ideas of where to place the Tower and make Andor fit your campaign.
Tower
The location of the tower is important to determine before giving the players the quest. Use the table below to pick or randomly chose where it lies. Note that it should be fairly hidden, and might require the players to search for it.
| d6 | Tower location |
|---|---|
| 1 | On an Island |
| 2 | Forest grove |
| 3 | Cave |
| 4 | Cirque in a valley |
| 5 | Ruins of a town/city |
| 6 | Hidden with a spell |
Andor & Galata
Andor is related to Galata, who happens to be his great grandfather. He knows stories about him from his family, but is unaware that the information about The Mirrored Tower is related to him. Galatas death is still a mystery to his family, since he never died in the first place, merely became something else.
In this adventure, Andor takes up the role as wizard, loremaster and researcher. He is a bearded old human, usually dressed in comfortable woolen robes with pockets for ink and paper, and almost always carries a book. Andor is always pleasant to talk to, and is very fond of a nice bottle of wine and a good conversation. His position is really flexible, and he can be put into almost any setting as the "brains" of a group. He has been used both as a counsellor to the captain of a royal ship, as well as scribe at an adventurers guild.
Galata himself is never hostile towards the players, even in his cursed form as a Nothic (MM p. 236). He is maddened, and conversations with him are accompanied by his confusion, dementia and fractured mind. His only desire is to retrieve a "golden heart". He can't remember its function, but knows that it lies somewhere in the basement. Galata does however remember the name "Heavytome", which is the first hint of the relation between the two.
Note that these two characters can easily be replaced by any two other NPCs in a campaign, or Galata could even be related to one of the players, leaving Andor (or someone else) as a simple questgiver.
Running the adventure
1) Town
Through seeking Andor himself, or by being introduced to him, the players will meet him in a fitting location, like his study or private library. He informs the players that he has recently come across some information about a group of wizards that suddenly disappeared after discovering ancient knowledge. His only clue is that the wizards researched the planes of the multiverse, and the location of the tower.
To make it harder to find the tower, the location might only be accessable at a certain time of the year/day, or it requires a command word to be revealed. This is up to you as a DM, and whether or not you want to make the hunt more difficult for the players. In that case, Andor might supply the required hints and maps to the players.
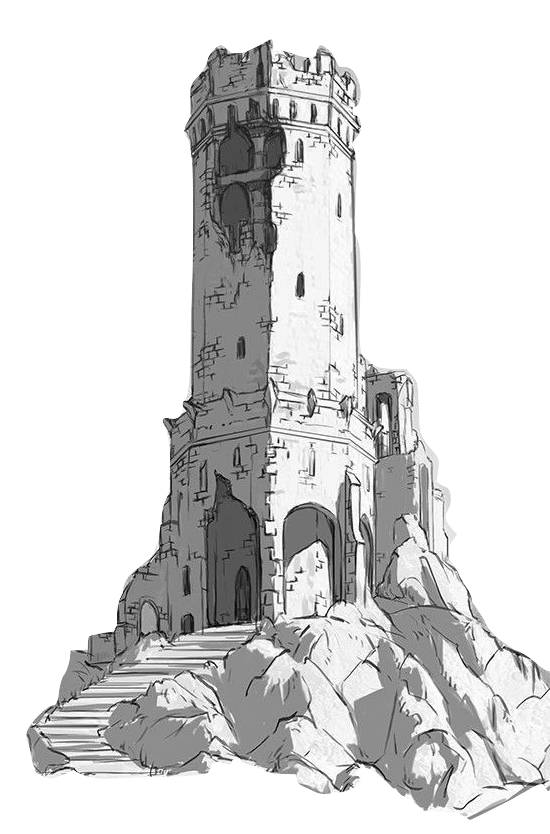
2) Tower - Material Plane
The tower rises three floors up from the ground, built from mortared stones, though visibly weathered with parts of the walls missing here and there. The top floor is halfway torn apart, leaving it open to the elements.
Galata resides at the top of the tower, while two golems guard the second floor. The entrance to the basement is through a locked trapdoor in the main room.
1 Main floor
All the books in the bookcases are ruined, and no
information can be retrieved from them. A DC 10
survival/investigation check, will reveal that the
firepit haven't been used in a long time. With a
successful DC 10 perception check, the players can
locate the trapdoor to the basement among the
rubble.
The trapdoor is closed with a magical lock, and
the key or a successful DC 30 skill check with
thiefs tools, is required to bypass the lock. A spell
like detect magic will reveal that the lock is magical
and enchanted with transmutation magic.
Climbing to the second floor requires a DC 10
athletics or acrobatics check
2 Second floor
After ascending the broken staicase, you now see the omnious look of two stone statues staring into empty space, among more ruined bookcases and shelves filled with jars containing preserved body parts from both monsters and animals. At the opposite side of the room, a ladder blocked by a statue rises towards the next floor.
A spell like detect magic will reveal that the statues are enchanted Stone Golems (MM p. 170), and a DC 15 arcana or history check might reveal that it's common for arcanists to protect their knowledge with constructs like golems.
If a player goes within 5ft of one of the golems, they will wake up both of them, and inscriptions on them will light up to indicate this. The golems will attempt to hit the nearets player. Whether or not the attack hits, a 10 by 10 feet portion of the floor, centered on the golem, will be destroyed. Anyone within the area falls towards the room below, and must succeed a DC 15 dexterity saving throw, or take 1d6 bludgeoning damage. If the save fails by 5 or more, the target is also prone upon landing.
For the stats of the Stone Golems, use the one from MM p.170, and consider changing the physical damage immunities to resistances, lower AC, spell save DC, hit points and weapon damage, depending on the party.
3 Top floor
A large section of the wall of the top floor has collapsed, and opens up to the elements outside. In the middle of the room is a lit brazier, and a broken bookcase lines the wall among some rubble. On the other side of the room by a table, a massive eye peeks curiously in your direction while holding a dead bird.
Upon entering the top floor, Galata will eye the players curiously, and unless threatened, he will approach the players carefully and ask why they are here. Galata always acts like he is confused about everything, and speaks with a thin voice.
He might also use his ability to gain a secret from one of the players if he succeeds.
Galata only knows a few things:
- That his name is Heavytome.
- The golems in the floor below are his friends "Rocky" and "Balboa".
- He is waiting for someone to bring him his heart
- The location of the key to the basement
He will keep talking about "his heart", and ask if the players can retrieve it for him. Upon agreeing, he will go get a golden key from his broken bookcase, and give it to the players.
If the players try to fight Galata, he will attempt to escape by climbing around the shell of the tower. Are the players successful in killing him, the key can be found with a DC 15 investigation check.
4 Basement access
The room below the trapdor, isn't more than an unlit hallway, with a cobblestone floor and stone brick walls. A staircase leads down to a door further down
The basement is always colder than outside during hot seasons, and warmer during cold seasons.
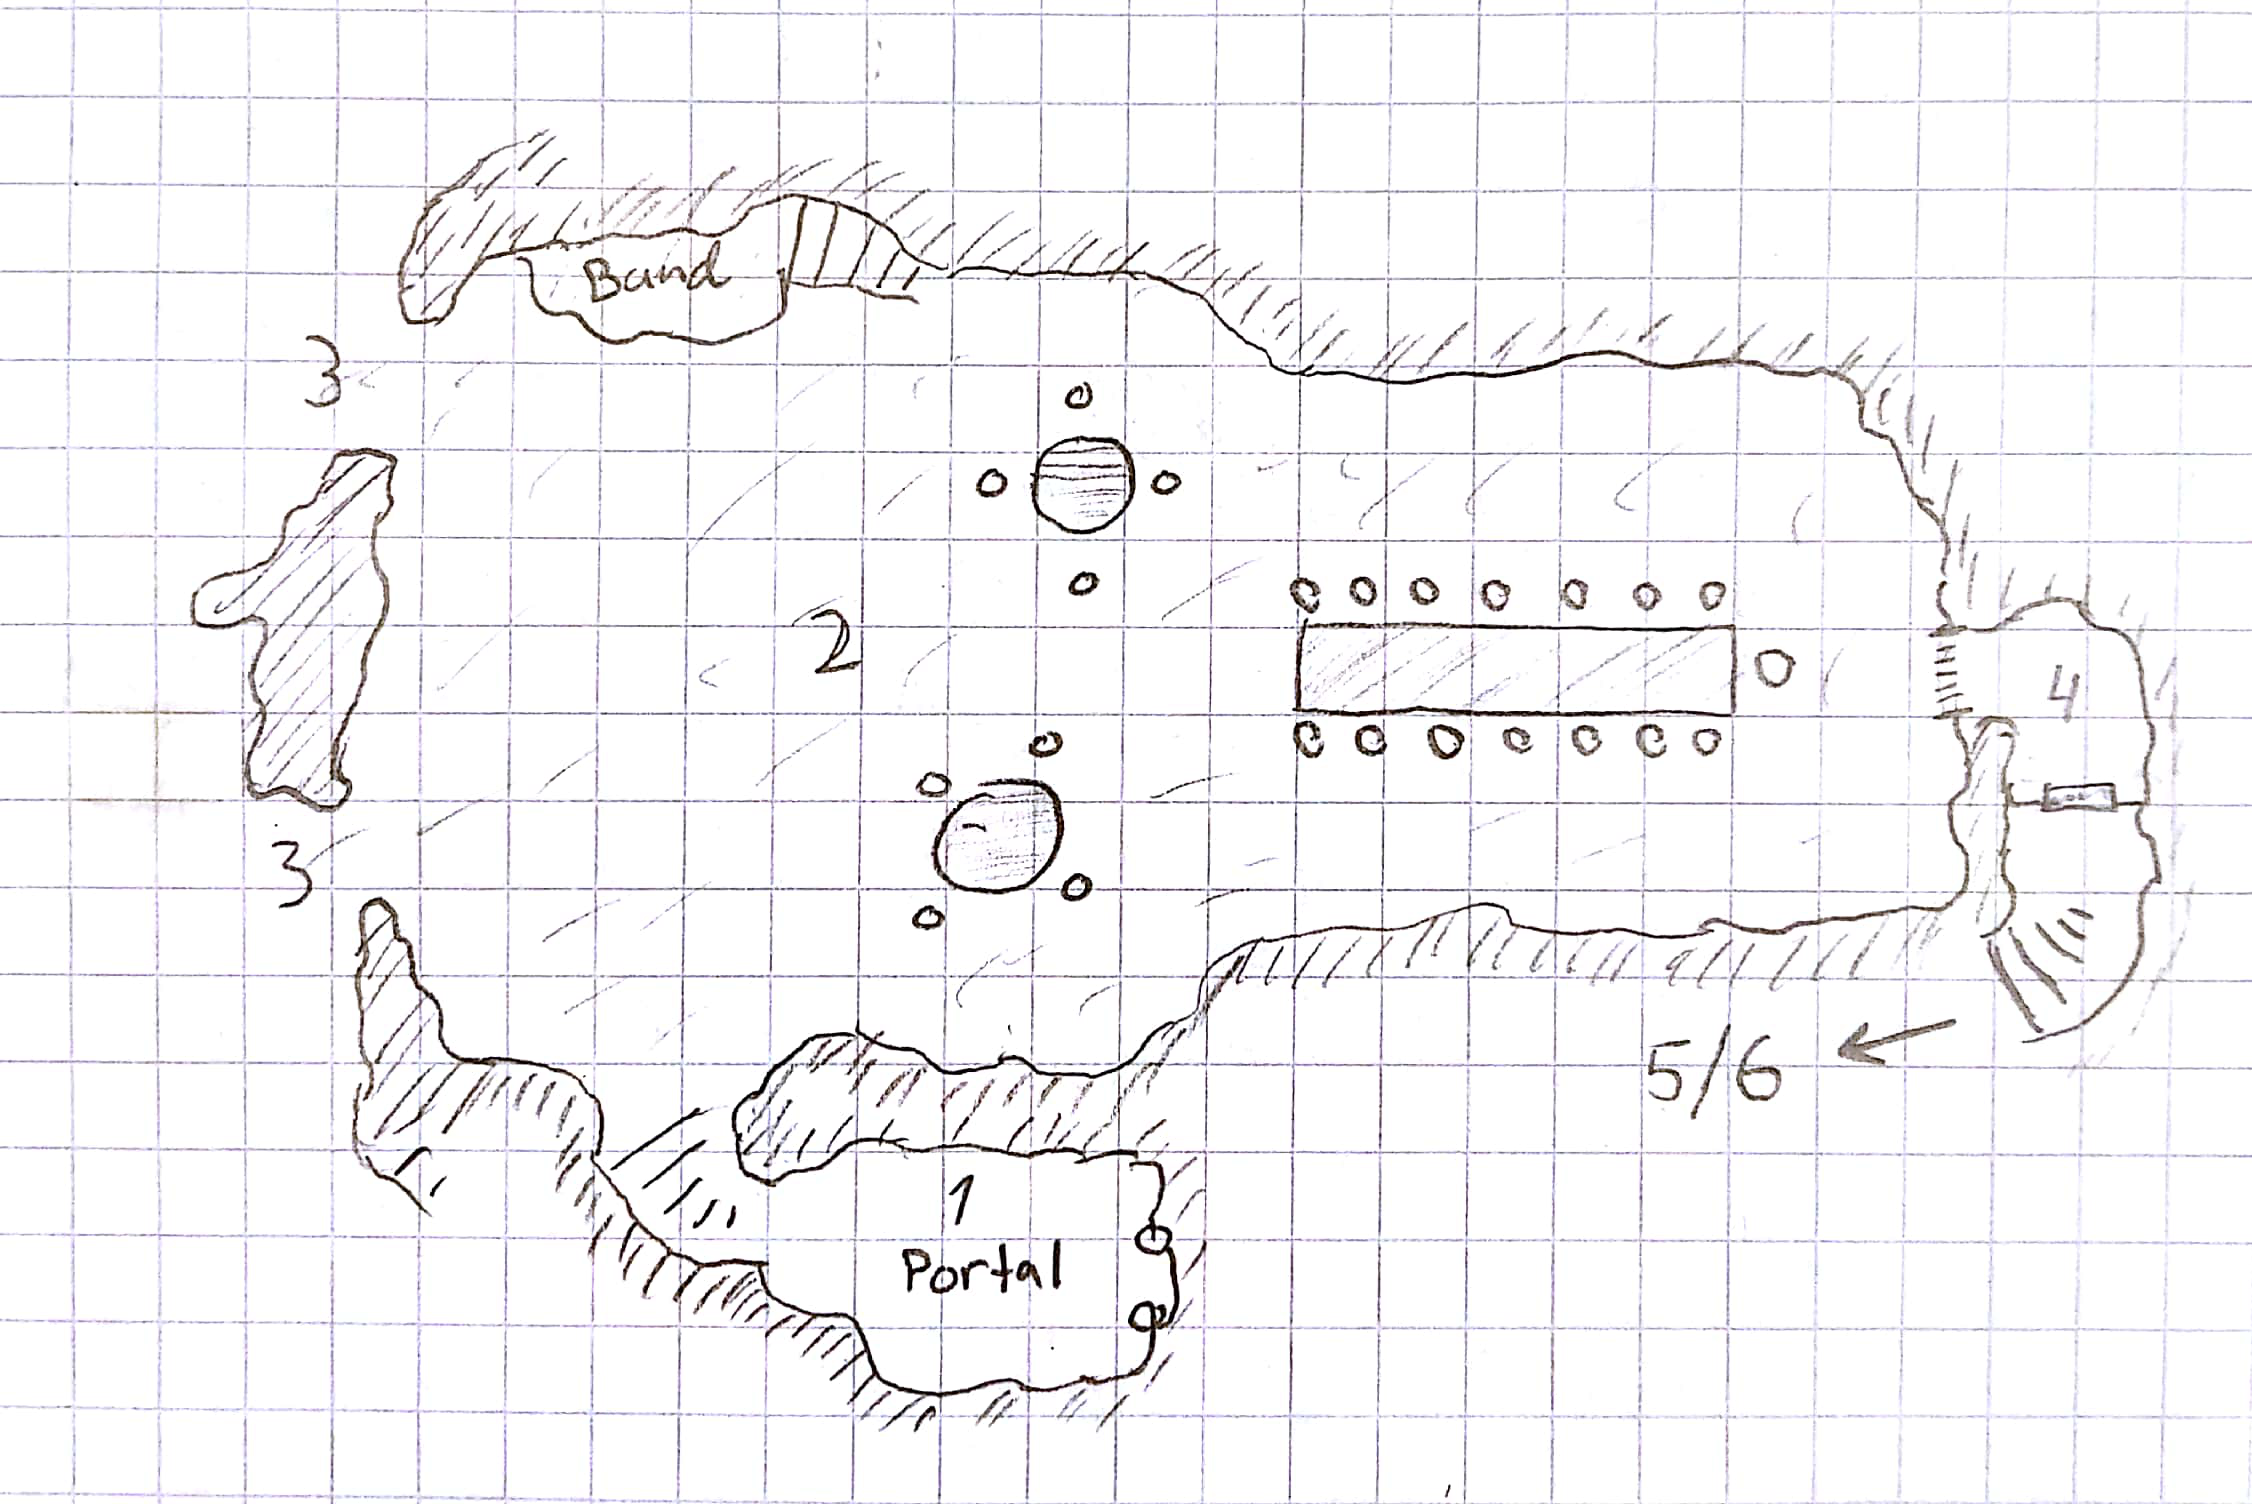
5 Planar research lab
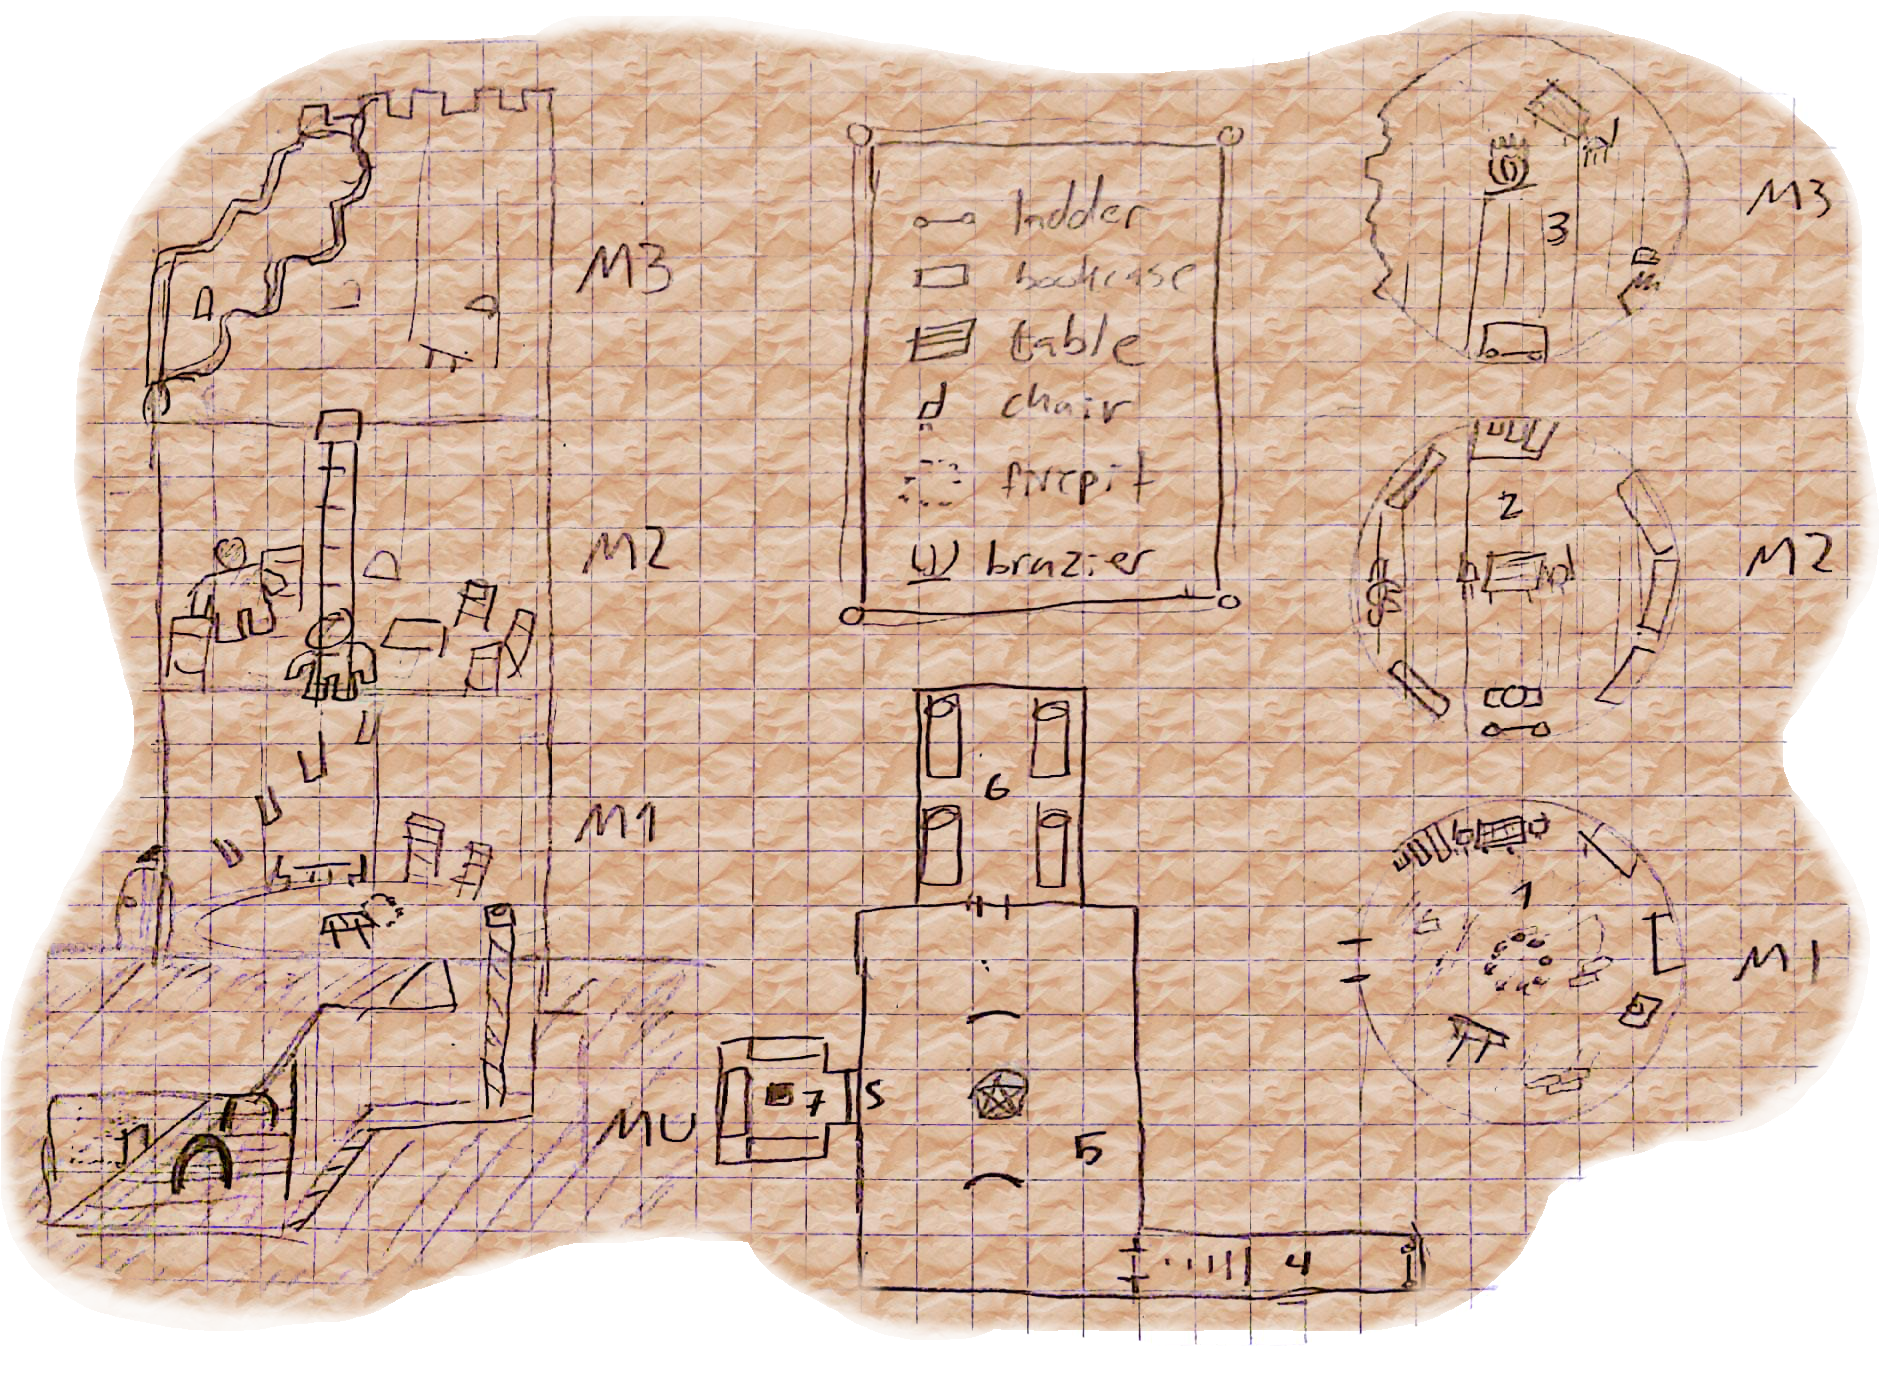
Darkness shrouds the main room of the basement. Two carved stone portals stand in the middle of it, one roughly hammered into the shape of a jagged cliff, the other beautifully carved as if a tree had grown out of the ground and into it again. Between them stands a stone table, with a pentagram cut into it.
The door in the end of the room is unlocked, and leads to the sleeping quarters. Any attempt to detect magic in the room, will show that the pentagram table and both portals are enchanted with conjurgation magic, and that a section of the western wall has an aura of transmutation. The door has three holes, a heart shaped one, an upside down cross, and a keyhole. A DC 10 investigation check will reveal that the keyhole is similar to the lock for the basement.
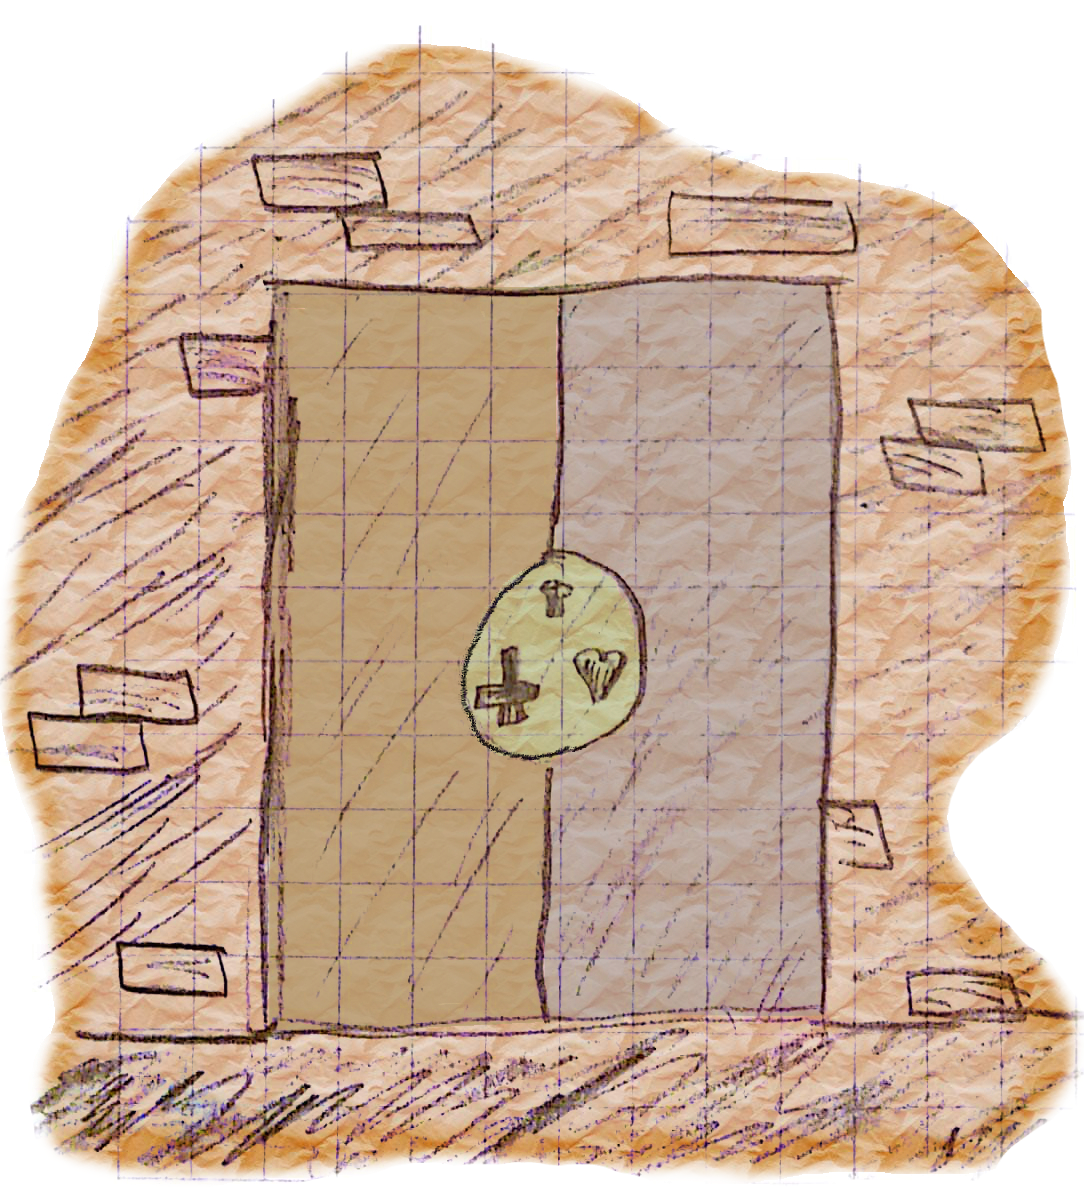
Puzzle If the key is inserted and turned, three illusory flames will be lit in the nearby pentagram in the pattern seen below, and shed dim light for 5ft. Next to each flame a stone button protrudes from the table. Upon pushing the button next to an unlit hole, it will light up, and the two opposing will change from lit to unlit, or vice versa. Pushing the button next to a lit hole will do nothing. When all five flames are lit the two portals will activate. The tree-portal to the feywild fills with a surface resembling a hazy, silvery mirror, while the jagged one to the shadowfell fills with a black tar-like substance.
If the key is ever removed from the door, both portals will close, and the puzzle will reset.
Solution: If we number the circles, starting with 1 on the top, then 2,3,4 and 5 clockwise, a solution is: 5, 3, 1, 4, 1, 2
6 Sleeping quarters
Four bunk beds, each with three beds, are crammed into this room. They have no mattresses, and seem to be in bad condition
Treasure A DC 10 investigation check will net 2 silver and 16 copper coins among rubble on the floor. Succeeding with 5 or more will reveal an additional golden coin.
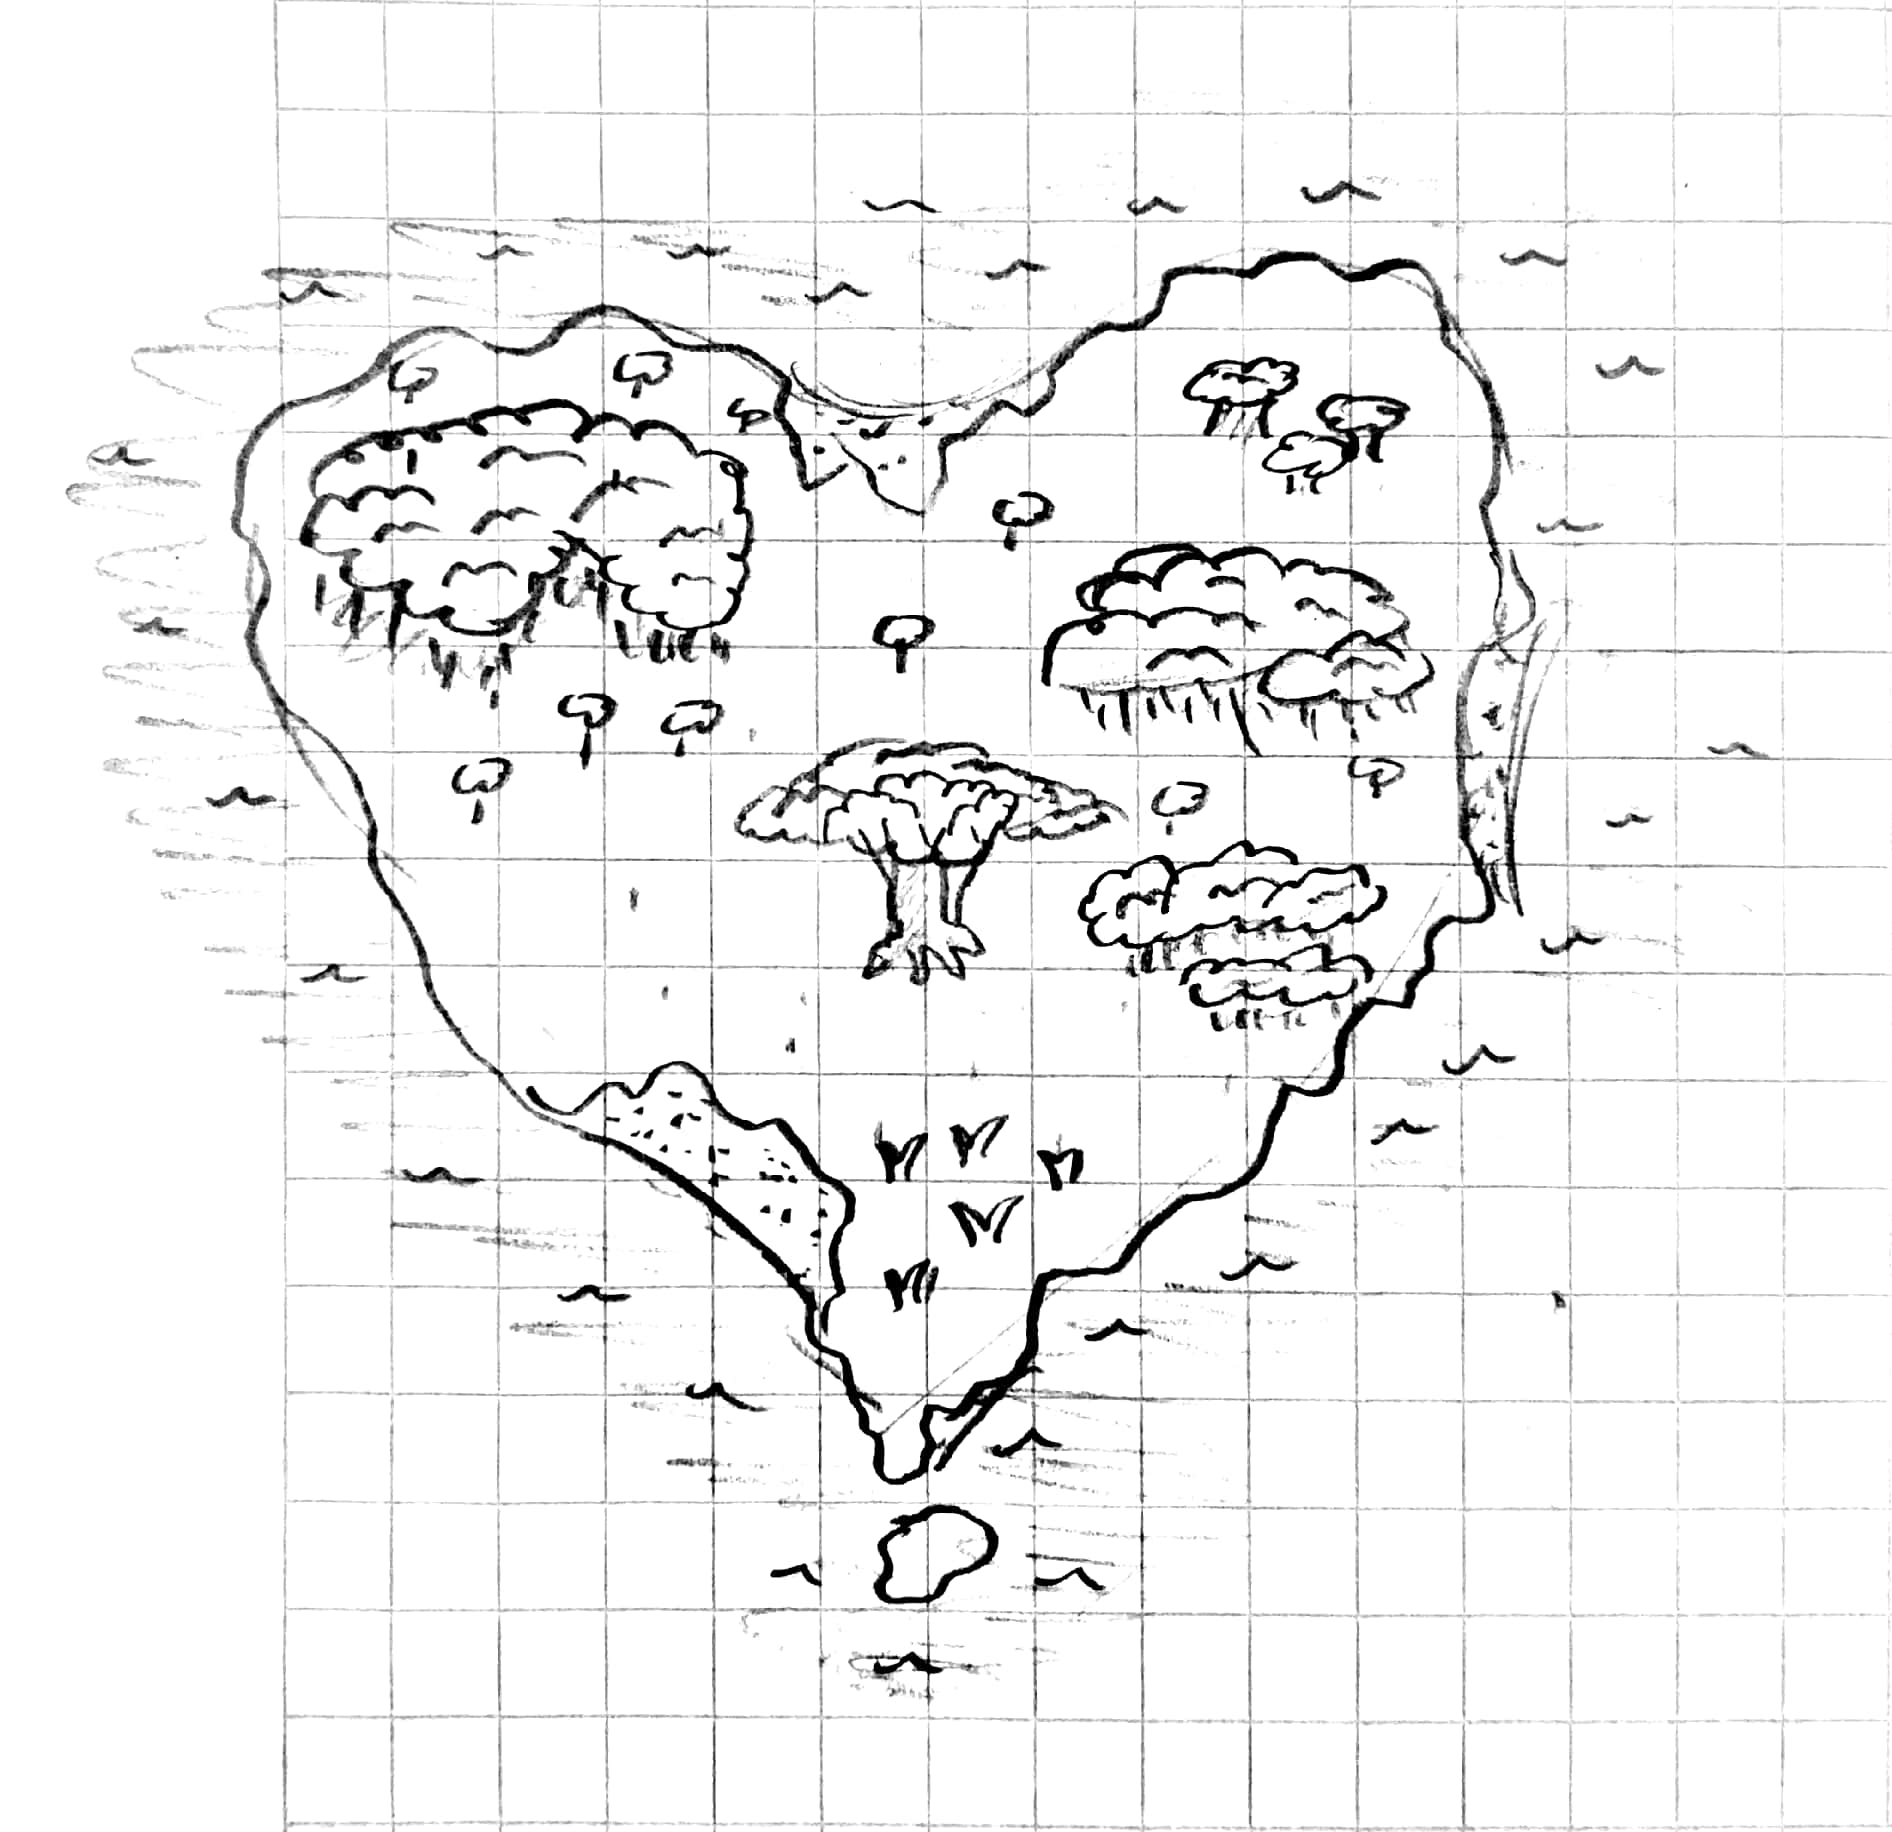
3/4) Finrendor's retreat - Feywild
The fey version of the tower is a large tree located on an island, grown magically to house lord Finrendor and his subjects. The players are more than welcome here, and Finrendor himself is an exceptional host. Initially the main goal is to ignore the temptations, and focus on the task ahead, to climb the inside of the tree.
Beyond this a sphinx stands between the players and their treasure, requiring riddles to be answered.
OPTIONAL RULE: It is common for time to move differently in the Feywild compared to the material plane, and if you want to impose this problem on your players, making days into months is a good idea. That way, any delays from any charms might be eating up time valuable to the players, or it might add a challenge as it is already winter by the time they emerge unprepared.
1 Root cellar
Upon inspection the kegs are filled with different types of fruit wine, and the crystals are made with some sort of conjurgation magic.
2 The feast hall
The music gets louder, and as you step into the next room, you can see several well dressed elves dancing and laughing, wearing heart shaped medallions around their necks. In the middle of the room, which seems to be the inside of a tree, is a long feast table grown out of the ground. Bowls of fresh fruit, wine pitchers, salads and unknown dishes cover the table. At the end of the table, an elf sits on a throne, with a curtain of leaves behind him.
 None of the elves will mind the players entering, and shortly after Finrendor will greet the players. He is a tall, handsome elf, dressed in green robes, wearing a crown of branches. After inviting the players to his table, he will offer them food, drink, stories, dancing or whatever they wish.
After entering the feast hall, each player must succeed a DC 12 wisdom saving throw, or be charmed, leaving them unwilling to leave the plane. Eating food or drinking wine, requires a DC 17 save.
These are some of the things Finrendor knows and will discuss with the players:
- He is over 500 years old.
- The other elves are referred to as his "children".
- Galata is an old friend of him, and they happened to meet when the portal connected their homes. He is unaware of Heavytome's fate however.
- His fishing stories
- How great the island is
If asked about the key, or how to ascend the tower, he will try to avert the question.
Should the players decide to fight the elves, use the Druid statblock for Finrendor (MM p. 346), and 3-5 Scouts (MM p. 349), depending on party size, will be among the guests. Any other NPCs will attempt to flee the scene.
3 Outside the tree
Venturing outside, will reveal elves playing games, swimming in the lake the island is located in, or relaxing in hammocks among the trees. It is possible to climb the main tree, but it won't net anything else than a view of the vast forest surrounding the massive lake. Strolling around the island or seeing it from above will reveal that it is heart shaped.
4 Behind the curtain
To pass the door, the player must simply draw a simple heart shape on the chalkboard. Any other shape will fade out and disappear a few seconds after the player stops drawing. Upon drawing the correct shape, the door will open, and reveal a staircase spiraling upwards.
5 The Sphinx's Riddles
After climbing the stairs for a while, it opens up to a grown hollow inside the tree, lit with the same blue crystals as previously. At the end of the room, a large Sphinx rests at the ground with an attentive gaze. Behind it, one can spot a door
If the players engage in conversation with the Gynosphinx (MM p. 282), it will give the players three riddles that they must solve to pass through the door behind them. There are no consequences for giving the wrong answer, but all three must be solved. Should the players try to force themselves past the Sphinx it will engage in combat with them, but will only attempt to knock the players unconscious, unless mortally wounded.
You can use the riddles you want, but here are three suggested ones:
-
"A wanderers salvation, and the sailors demise."
Solution: Water -
"Lay us on our backs, and open up our stomachs. You'll be the wisest of men, though at start a lummox."
Solution: Books -
"Round, yet flat. Altar of the lupine lords. Gem on velvet black. Pearl in the sea. Unchanged, yet everchanging. Eternally."
Solution: The Moon
6 Finrendor's Chambers
Beyond another spiraling staircase, lies a small crystal lit room. It is decorated like a simple bedroom, with a leafy mattress, a desk and a chair, as well as a small chest in one of the corners
By the time the players enter, Finrendor, if still alive, will have noticed, and will leave the main room to go up and meet the players to tell them that they are now free to leave the tree by their own free will, if he can deduce that the players mean to use the treasure for good. Otherwise he will attempt to
stop the players.
- A heart shaped key
- 3 Moonstones (translucent white with pale blue glow) worth 50gp each.
- Tear of Finrendor
Tear of Finrendor
Wondrous item, rare
This tear shaped blue glass bottle contains a light blue liquid with healing properties, and functions as a regular potion in terms of usage. Drinking from the bottle restores 1d4 + 1 hit points per charge, and several charges may be used at once. The bottle has 4 charges and regains 1d4 charges at dawn.
4/3) The Inverted Spire - Shadowfell
The dark version of the tower is inverted in the shadowfell, and is located inside a massive granite stalactite hanging from an overhang above a seemingly bottomless void. The atmosphere is dank, and completely devoid of emotion and energy.
OPTIONAL RULE: To emphasize the apathic atmosphere of the shadowfell, consider making the tower a null-magic-zone, preventing the casting of any spells
1 Devouring darkness
As you pass through the tar-like veil, you can feel an almost choking, thick, dank atmosphere around you, in a pitch black room.
Upon passing through the portal, any light sources will be extinguished, and upon relighting, one will find that the radius of any light is halved, as if consumed by the darkness. The range of darkvision is also halved. This effect permeates the whole tower, and is always present until stopped in the final room.
The room is completely bare apart from the portal set into the wall, and a pair of stairs leading to the next room.
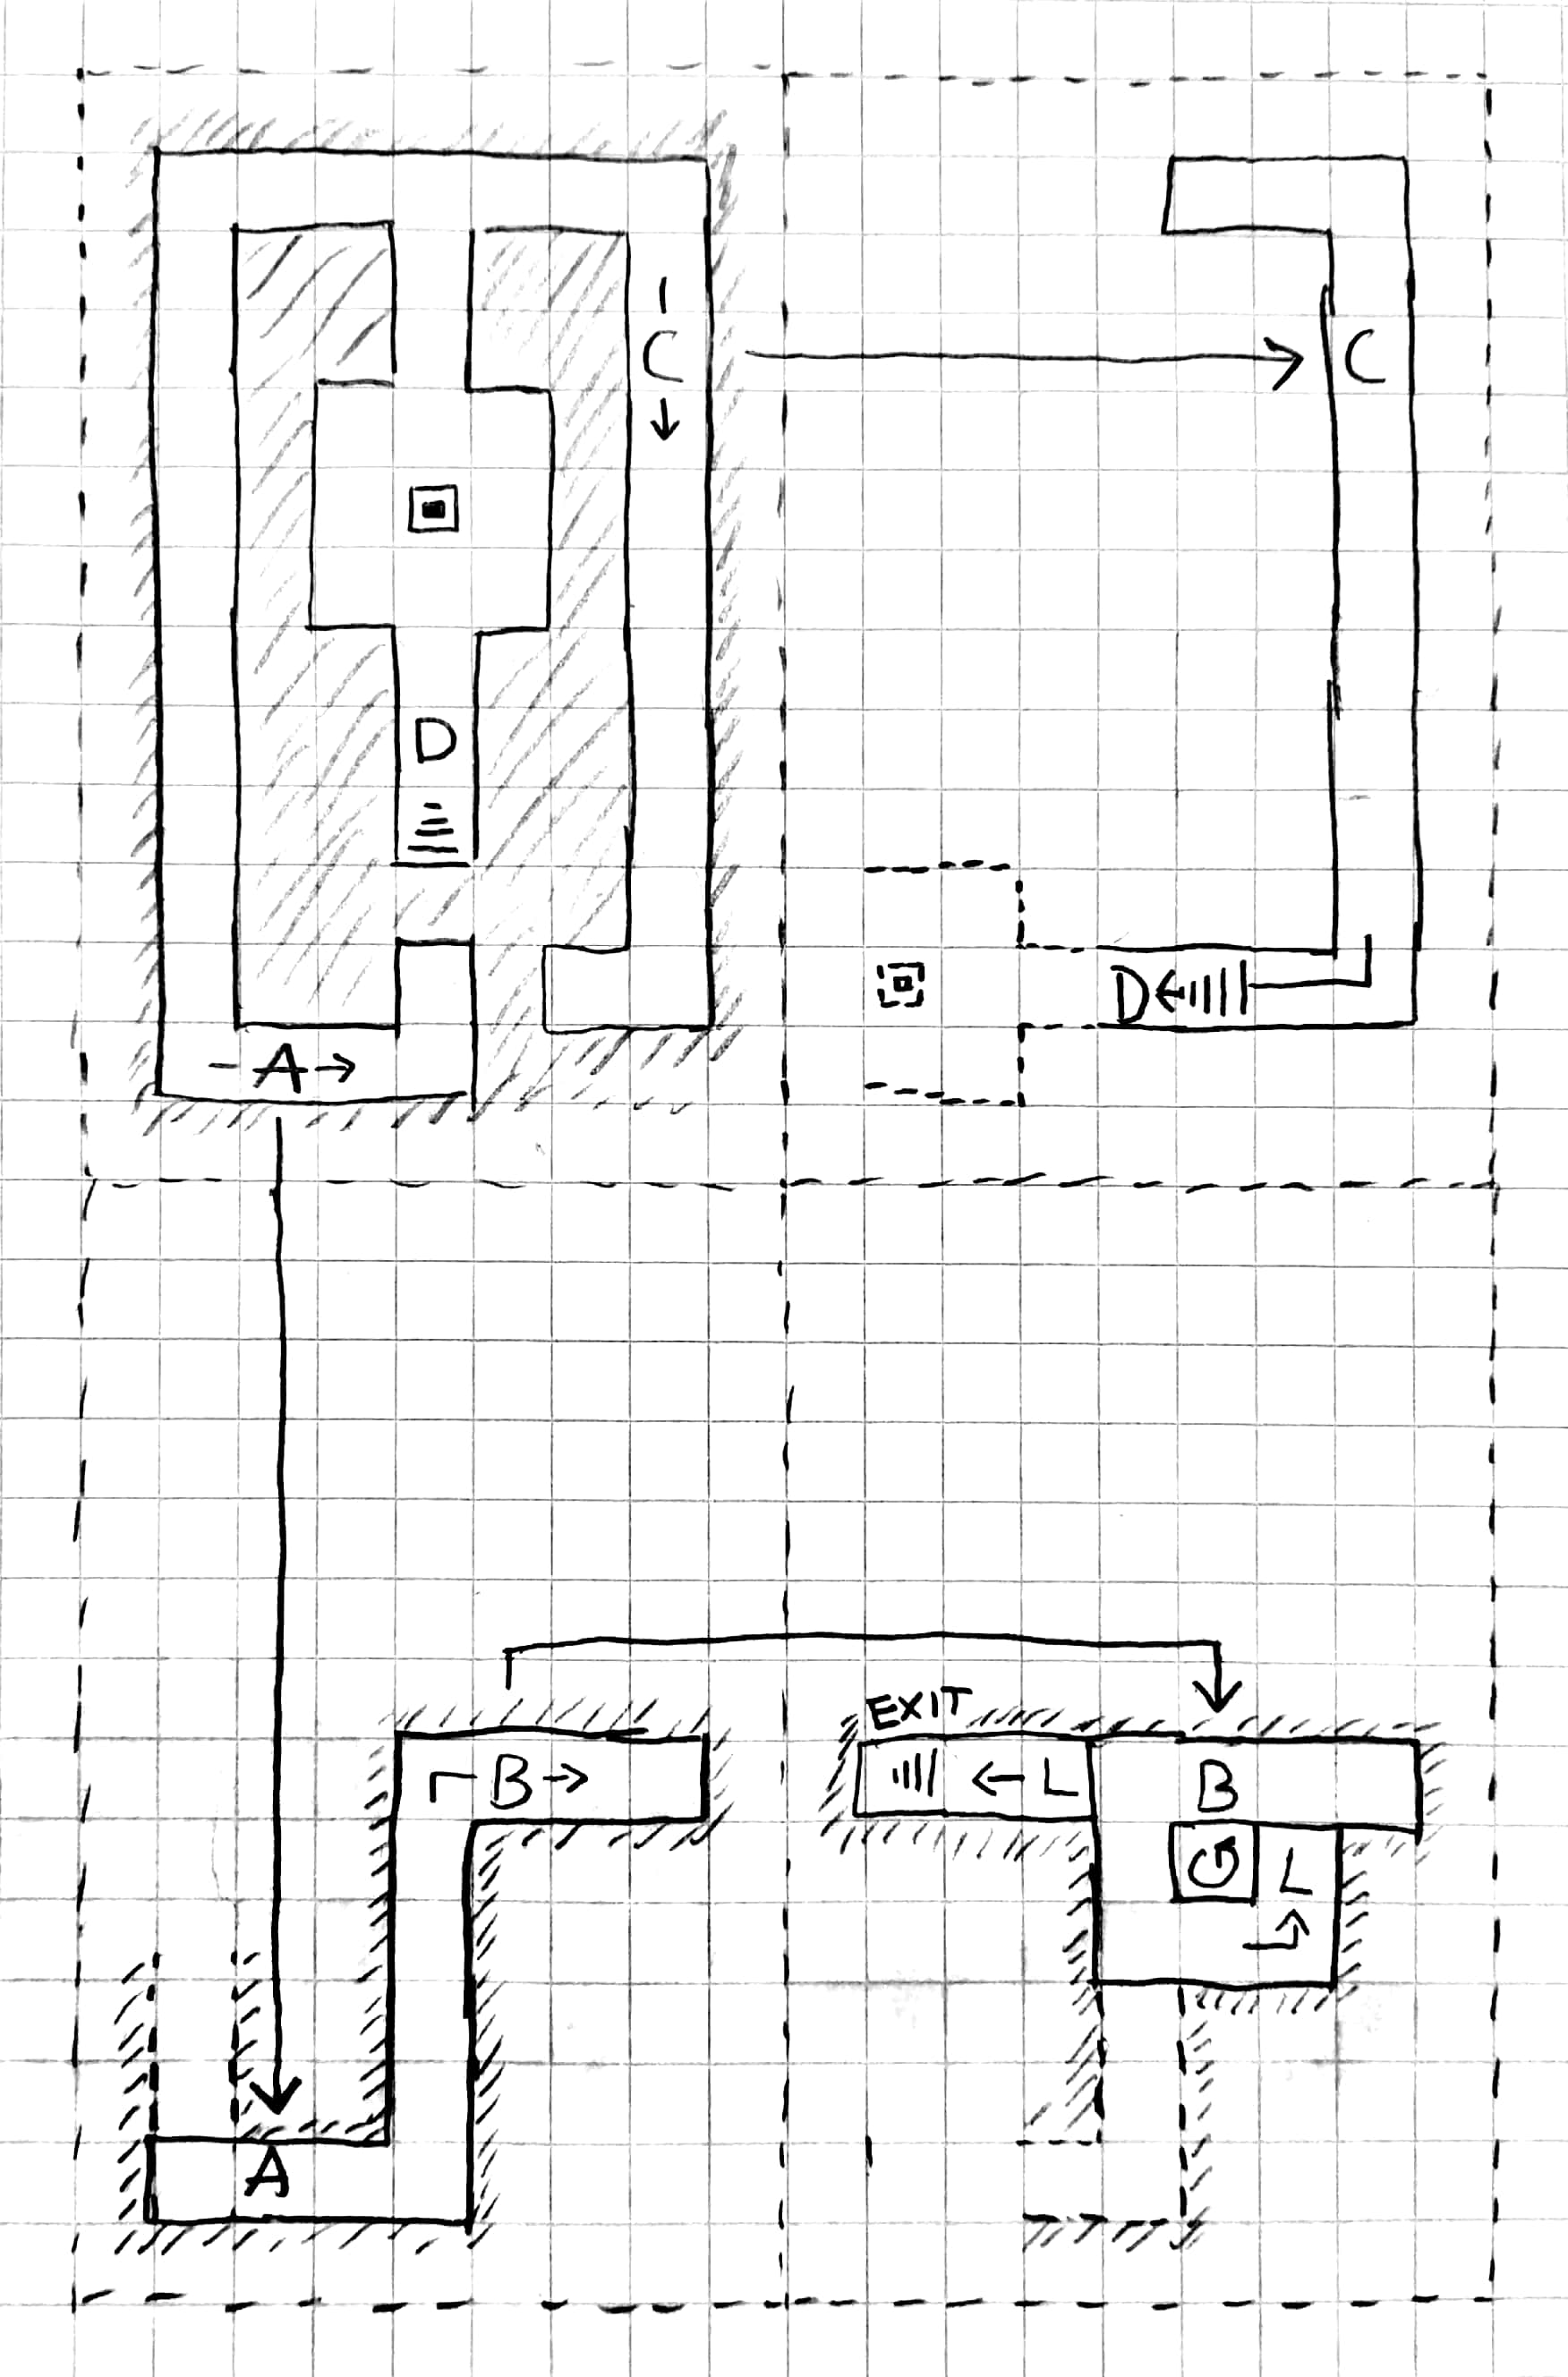
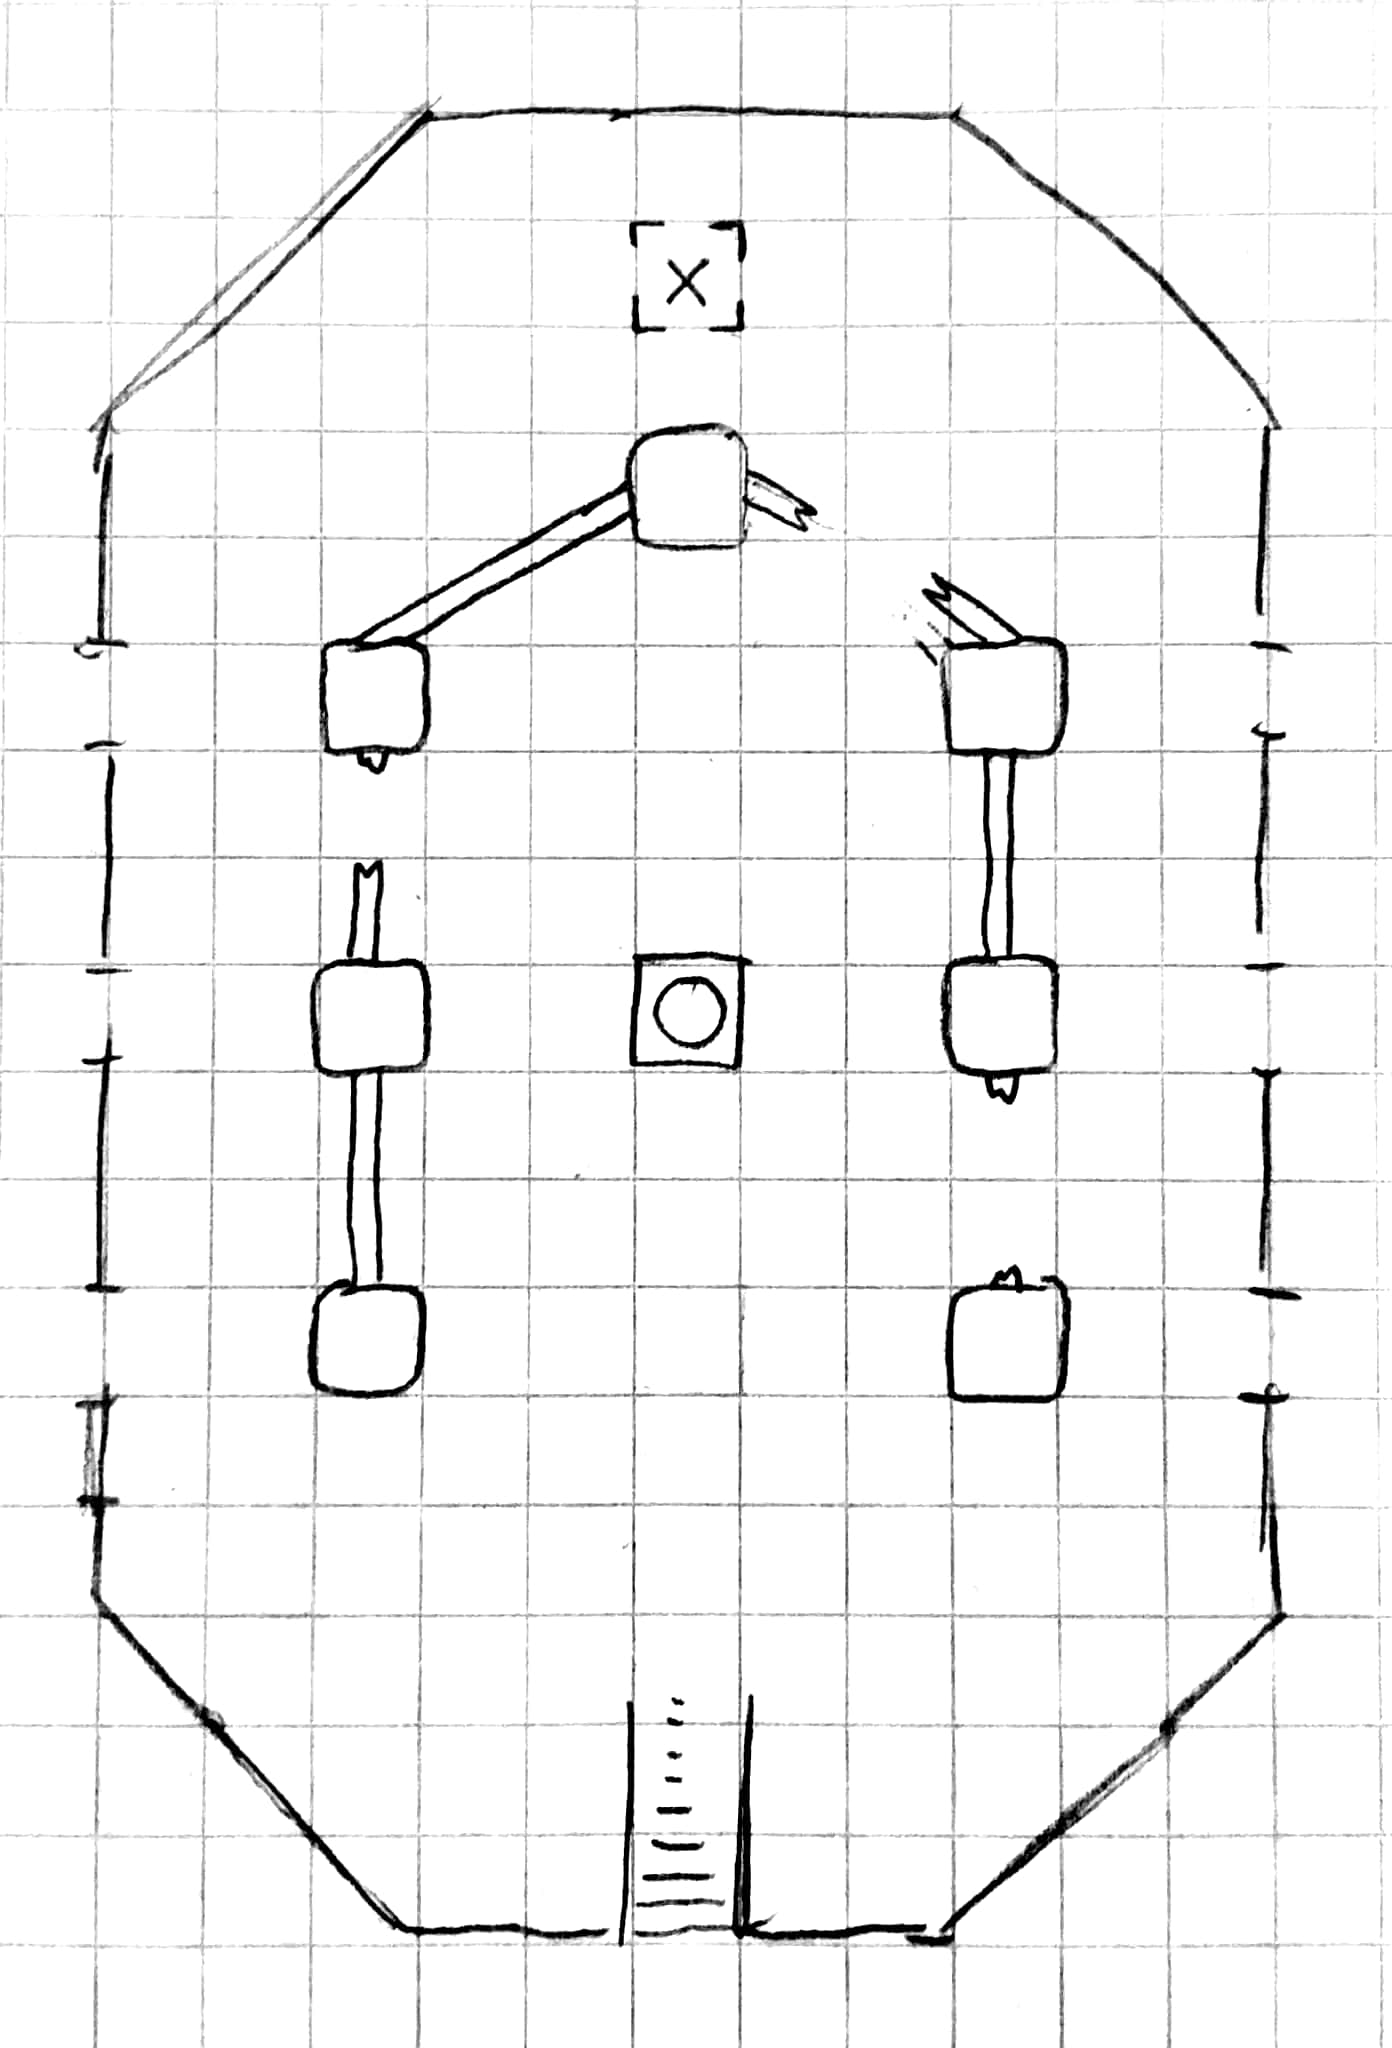
2 The non euclidean maze
The staircase leads you into a small square room, completely empty apart from a sculpture of an upside down cross, and a tunnel that splits ahead.
Puzzle The goal of this puzzle is to get to the end of the maze. However, the hallways are able to twist space in strange ways. Each square on the map is 5 feet. Upon passing the checkpoints marked with A, B, C, D and L the following effects will occur:
- A, B, C - After passing the area marked with the corresponding letter, facing in the direction of the arrow, the player will be transported to the linked room. For bystanders, it will seem as if one walked through an invisible portal.
- D - After walking down the stairs, the players will enter the first room, as if coming from room 1
- L - The hallway here loops around three times, but each round is in it's own space, so an object placed in the same location won't be rediscovered on subsequent loops. Should one decide to walk clockwise, a pair of stairs will appear in location B, leading back to the first room.
- Exit - Leads to room 3. Returning up these stars will function as if one walked up the stairs leading to room 1.
Solution: Pass through A, pass through B, turn around, walk around counterclockwise past first L three times, exit down stairs.
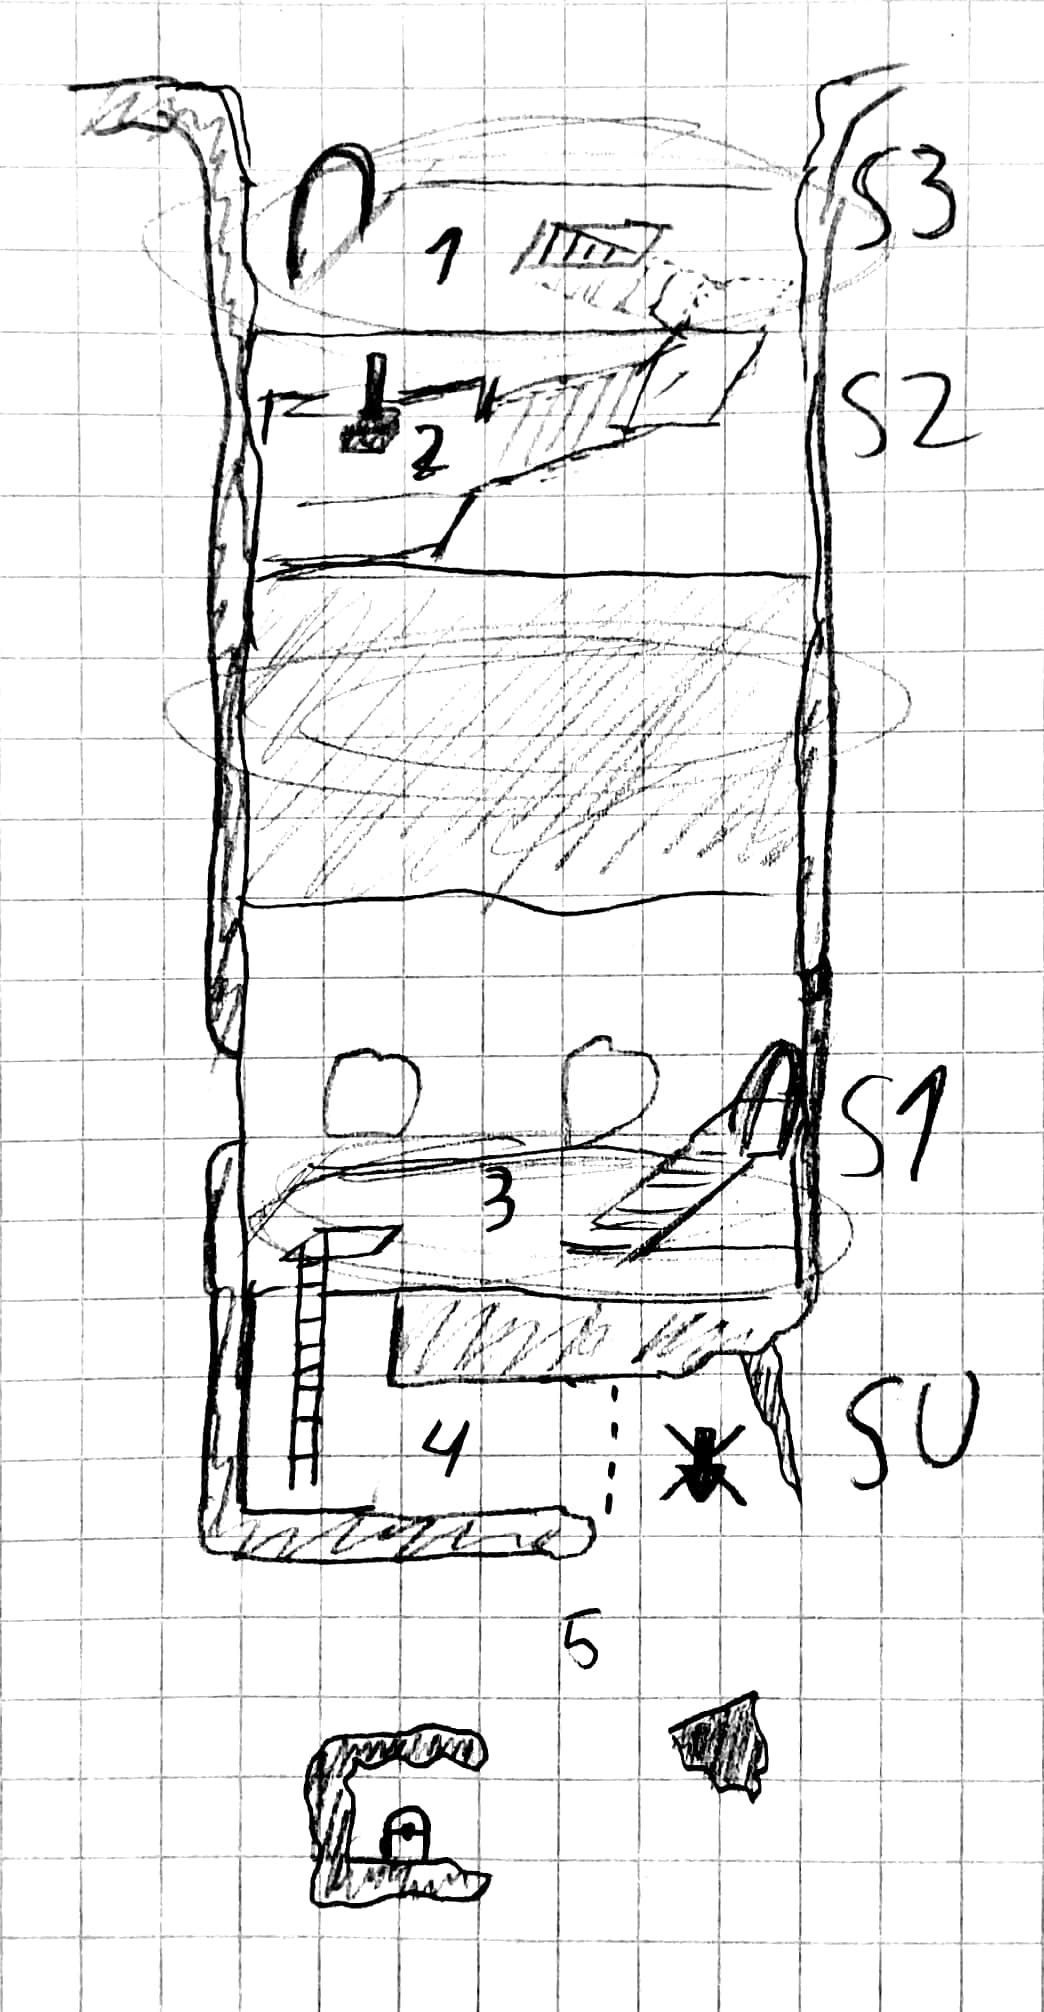
3 Chamber of blood
A ramp of stairs leads into a pitch black chamber. Walking further reveals several pillars with broken walkways between them, and a large stone goblet stands in between them. The room is lined with windows, looking out into an empty abyss
Puzzle The goblet in the middle of the room has the word "blood" inscribed on it in draconic. Any drop of blood dropped into the goblet will make it glow with a dim, red light in a 5ft radius. 6 Skeletons (MM p. 272) are summoned on the pillars, and 6 The Wretched (MToF p. 233, can be switched for Zombies MM p. 316) will materialize around the goblet. Note that the darkvision of the enemies is also halved. Upon defeating all of the enemies, a glowing trapdoor will appear in the location marked with X on the map. Below is a ladder leading to room 4.
4 Broken hallway
Stepping off the ladder, you notice a hallway that stretches forward, until it end abruptly, the rest of it simply broken off. Beyond the hallway, you only see the colorless void stretching seemingly infinitely ahead and below.
If the players walk off the edge of the hallway, or try to drop an object, they will see or feel that there is no gravity beyond the end of the hall. 30 feet below is a floating floorpiece, but requires darkvision or 30+ feet of light to be spotted with a DC10 perception check.
5 Floating rubble
Floating in the darkness, you manage to spot the rest of the hallway, floating around as rubble in the void, some pieces larger than others
Below there is a piece of the floor, as well as an offbroken room, both completely static. Should one push too hard from any surface, it is possible to simply drift away into the empty void. The offbroken room floats 30ft beyond the floating floorpiece. With enough light, and care, one might reach the room, where a tresure chest is located, containing the following items:
- A cross shaped key
- 3 Obsidian pieces worth 50gp each.
- An Eversmoking Bottle (DMG p. 168)
Removing the bottle from the chest and stopping with the stopper, will slowly dispel the darkness, allowing light to work normally. A player might also discover this with a DC14 arcana check. Otherwise the bottle will work as if opened normally when returning to the material plane.
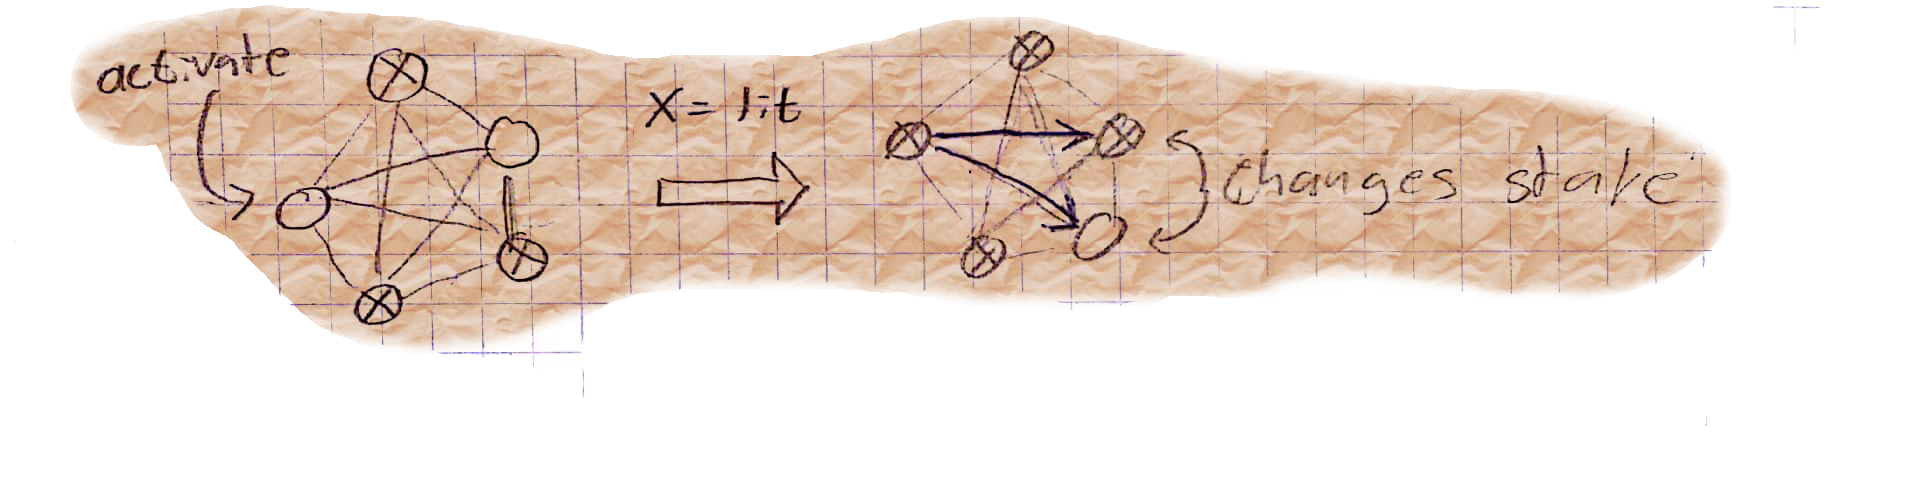
5) Resolution
Upon returning with all the keys, and inserting them into the holes in the door, it will slide sideways, opening up the final room of the adventure