Zassan the Slaver
A 4-6 Hour Adventure for 5th Level Characters

INTRO
Adventure Primer
Background
-
Every year for the past five years, Whitetree has to sacrifice a child as tribute to a fiery salamander slaver, Zassan.
-
Zassan has been carrying out these raids on a dozen or so small coastal towns and villages, disappearing afterwards for another year in his metal-clad ship, The Scarlet Whip, named for the fiery whip Zassan wields.
-
If a town does not comply, Zassan threatens to raze it to the ground. So far, only Willowdale has dared resist ... and Zassan proved true to his word. (See Adventure Hook #4)
Synopsis
-
At the beginning of the adventure, the party arrives in Whitetree immediately after Zassan's envoy has left. They choose either immediate pursuit or to gather information for the fight ahead.
-
The players may discover that the village of Rivercross plans to resist, and is next on Zassan's hit list. They must choose either to stop Zassan's envoy before it reaches the town or focus on finding and defeating Zassan.
-
At Whisper Wharf, the party must infiltrate the forge where the children are being held and rescue them ... but if they don't hurry there, they might find the children gone or being transported to The Scarlet Whip.
-
On board The Scarlet Whip, the players confront and (hopefully) defeat Zassan.
-
DM Note: An NPC cheat sheet can be found in Appendix D to help you keep everyone straight.
Using this Module
This adventure is designed to be a tough challenge for a party of 5th level characters, and is more or less setting-agnostic. You can basically drop it into any world that has good villages and fiery bad guys. It works best, of course, if Zassan has some small coastal towns to raid, but there's nothing stopping you from having a good-sized river that he's about to depart down instead of the high seas.
You'll notice things are usually in bulleted lists instead of long, flowery text, and room/setting description is kept to a minimum. Embellish to your heart's content! Also, to make this easier to run, I've tried to avoid having you flip pages whenever possible, sometimes at the expense of repeating things.
.
Finally, this particular module makes use of two unusual mechanics. First is a race against time. Long resting comes with a significant consequence - I'll include a few helps for parties particularly light on healing when it's relevant. To make this mechanic easier, you don't need to keep track of time along the way, just take note of which parts of the adventure the players choose to engage. Failure is definitely a possibility if the heroes are too slow, so I recommend stressing the passage of time throughout.The second funky mechanic is a skill challenge. The idea comes from 4th edition D&D. If you want more information, I recommend Matt Colville's YouTube video on the subject, "Skill Challenges! Running the Game #21". However, you don't need that to run this adventure; all you need will be right here in these pages.
Enjoy!
Adventure Hooks
You can drop this into pretty much any situation where your players are entering a town. It's that easy. But if you need some incentive for your players to go to a town or are running this as a oneshot and need some background information, here are a few options:
-
In a tavern, the players hear low whisperings of pity for Whitetree, Rivercross and the other towns in the area. "It's a shame," says one patron. "Someone ought to do something!" says another.
-
The players have been encountering a large number of refugees on the roads lately, all families with children. When questioned, the parents say strange things like, "I won't let Zassan take my Ludwina!"
-
If your players have a family member in the area, they receive a frantic letter: "Zassan's returned and your daughter/niece/little sister has been chosen this year - you must come help!"
-
If you're really desperate, maybe the players simply see a column of smoke on the horizon. If they ask someone what it is, that person might respond with a shudder, "That was Willowdale ... they were planning on standing up to Zassan. Looks like they did."
PART 1
Worry at Whitetree
Opening Scene: Whitetree
When the players arrive at Whitetree, they see the following:
A small crowd of people is dispersing slowly. In the middle of the town, a woman on her knees sobs uncontrollably, comforted by a few.
Off to one side in front of a larger building, you see a leather-aproned man standing, fists clenched in anger, holding a hammer in one hand and shortsword in the other. A well-dressed dwarf seems to be trying to calm the man down.
-
The woman is Avalynn Baker. Her daughter, Pixiebelle was just taken by Zassan's envoy, maybe half an hour ago.
-
The players can easily get the story: Zassan the slaver takes a child every year, and Pixiebelle was chosen this year.
-
The man is Phenry Blackstone and the dwarf is Fargrim Silverbeard.
Phenry Blackstone
His son was taken five years ago, and he's never been the same. Every year, he tries to encourage the town to fight back, but nobody is willing. ("Bunch of cowards!")
- When the players show interest, Phenry urges them to depart now, to catch Zassan's minions and make them pay. ("Rescue Pixiebelle before it's too late!")
Fargrim Silverbeard
A retired merchant (and who knows what before that), he is the mayor of Whitetree, and the burden of responsibility weighs visibly on him. ("I must consider what's best for the entire town.")
- A well-dressed dwarf chides Phenry. This is Fargrim Silverbeard. He urges the players to caution, saying that rash action could be the death of Pixiebelle, the other children and even the whole town. ("Take a minute. Hear me out. A thoughtful plan is better than running headlong into death.")
.
Player Options:
Do the players choose to chase after Zassan's envoy immediately or stay and gather information in the town first?
- If the players choose to chase the envoy immediately, go to pg. 6.
- If the players choose to investigate, go to pg. 5.
About Whitetree
You can use any town in place of Whitetree, but here's a little flavor if you like:
- The town named after a grove of white-barked sycamores, in the middle of which lies the old market square.
- It's primarily agricultural, and most of its citizens don't live in town but in the farmlands surrounding it.
- A biweekly market is when everyone gets together and All the Things happen.
- While the market has been going on for time immemorial, Whitetree as a town is only about 60 years old.
For healing-light parties
For parties that are light on healing, Fargrim can offer a few potions of healing, either now or if the players return to the town licking their wounds at any point. Sort of a "chug this down and get back out there!" thing. Use as needed.
Investigation
Scene: Whitetree
Fargrim then encourages the players to ask around town, gather more information, and then plan a coordinated attack on Zassan. He starts by volunteering information himself, then directing the players to visit Phenry Blackstone, the town blacksmith, and Quelenna Firahel, an elderly retired wizard who lives just outside town.
Fargrim
Fargrim seems weighed down with the burden of responsibility for what's happening to the town. He feels he should have done something by now, but is paralyzed by fear of what would happen if Whitetree resists. (Primary emotion: Helplessness)
-
Zassan has been coming for five years now.
-
We draw lots to see who goes. My own child, Bryn, was taken last year.
-
Phenry is the most vocal. His child was taken the first year, without warning and without drawing lots. If it was up to him, we'd have been up in arms and gotten ourselves killed years ago.
-
(Why he hasn't done anything) If we resist, Zassan will burn the entire town to the ground and maybe enslave us all. He's already done it once, to Willowdale. We didn't find any survivors.
-
(Why not leave) All the surrounding towns in the area are in the same position. Some have left, but we can't all leave ... where would we go?
Phenry
When the players arrive at the smithy, Phenry is furiously hammering away at a piece of metal. He's not even making anything, just letting the frustration out. (Primary emotion: Anger & frustration)
-
You should go get Zassan now!
-
We only saw Zassan the first year. He's a fiery salamander. Since then, his lackeys show up instead.
-
The group that just departed with Pixiebelle was made of an ashy-skinned dwarf and a few fiery lizard people. ("Nothing you couldn't take!")
-
Rivercross has some guts, at least. I've heard they're standing up to Zassan this year. His envoy is scheduled to show up there this evening. That's their last stop, then they leave tomorrow for another year. Rivercross will probably burn, but at least they'll go down fighting.
-
I followed them once. They take the children to Zassan's ship, The Scarlet Whip. It's docked at Whisper Wharf, a half-day's journey from here.
Where is Whisper Wharf?
There are only a few ways for players to find the location of Whisper Wharf. One is to talk to Phenry here. Other options include tracking Pixiebelle's captors or interrogating them (or other slaver prisoners). Pixiebelle herself knows the location, though not by name (see the note on the next page).
Rivercross
If the players ask Fargrim or Quelenna about Rivercross standing up to Zassan, the NPCs appear horrified. If it's true, the small village faces the same fate as Willowdale (burned to a crisp), unless the players stop the envoy before it reaches Rivercross.
Quelenna Firahel
Quelenna is an elderly, kindly, slightly deaf elf woman, a former adventuring wizard who retired to the countryside to finish out her old age and read a good book or two. That was a hundred years ago. She's not terribly worried about Zassan, but it's hard to figure out if it's because she doesn't care or if it's because she doesn't understand. (Primary emotion: "What's that again, dear?")
-
Zassan ... rather an unpleasant young man.
-
Oh, he's a salamander? That explains the fire thing.
-
(Key information:) Salamanders are vulnerable to cold damage, you know. I helped fight one once, a few hundred years ago.
-
I hear he has a magical fire whip. If you bring it to me, I'll make it worth your while. Say ... 1,000gp?
-
(If asked to help) Hmm ... I think I've got something here somewhere. One sec, dearie ... Here. This might help. (Gives players a Scroll of Magic Weapon - see Appendix C for description)
-
(If asked to accompany) Oh I couldn't possibly. My memory's not what it used to be. I'm afraid I'd get my spells all mixed up and accidentally turn someone into a newt.
Player Options:
Will the players chase after the envoy that has taken Pixiebelle (pg. 6), ambush the envoy to Rivercross (pg. 7) or go directly to Whisper Wharf (pg. 9)?
PART 2
The Hunt
Scene: Road
You find yourself on the road heading toward the coast, in hot pursuit of Pixiebelle's captors.
Skill Challenge
This particular part of the adventure is a DC 13 skill challenge. Player use a series of skill checks to track and pursue Zassan's lackeys:
- Players must accumulate four or five successes before three failures. (Require as many successes as you have players.)
- Players can only use a skill in which they're proficient.
- Once someone has used one skill, nobody else can use it.
For example, if Alice uses Survival to track the envoy, Bob can't use that same skill. He could, however, use maybe an Athletics check to run quickly and gain some ground.
Reward creative ways your players use their skills!
-
If the players fail, they are unable to catch or track the envoy. If they've already talked to Phenry in Whitetree, they may know the envoy's final destination: Whisper Wharf. If they've not yet investigated, they'll need to return to town for more information.
-
If the players succeed, proceed to the following encounter:
The Chase
On the road ahead, you see a ashy-skinned dwarf and three firenewts. One of them holds a chain, at the end of which stumbles a small child.
The child, of course, is Pixiebelle Baker, and the envoy is comprised of a duergar and three firenewt slavers.
Tactics
The slavers first attempt to capture the players, throwing their nets, then closing to melee with their scimitars. The duergar uses his Enlarge ability in the first round and his war pick after that. Once two of the monsters die, the other two attempt to flee, the duergar using his invisibility to help.
The monsters' passive Perception is 10.
.
Development
The players can either kill all the enemies or leave one or more alive for questioning. If they choose the latter, they'll gain the following information:
-
The slavers are on their way to the Whisper Wharf (players also learn its location, three or so hours' march toward the coast).
-
Tonight, the children from a dozen surrounding towns are being transferred from the forge at Whisper Wharf to The Scarlet Whip, which is docked there and departs in the morning.
-
Zassan's most trusted lieutenant is an azer named Kathrek, who oversees the forge at Whisper Wharf.
-
Another envoy is headed to Rivercross to burn it in retribution for standing up to Zassan. (If the players are quick, they can cut them off.)
"What's it's name?"
Players being players, sometimes you'll get asked what a monster's name is. Here are a few for you: Duergar: Dalgal, Fallthra, Nordak, Kilvar, Osskar Firenewt Slavers: Gilkass, Medrash, Vrondiss, Nala
Pixiebelle
If the players spend the time to roleplay with Pixiebelle, she might offer to show them a shortcut through the woods, either to cut off the Rivercross envoy or to get to Whisper Wharf more quickly (she doesn't know it by name, only as "that big stone building with the docks"). If so, make note of it for later.
Player Options:
Do the players continue on to Zassan's headquarters at Whisper Wharf, or will they hunt the envoy headed to Rivercross? What will they do with Pixiebelle?
-
If the players know its location, they can continue on to Whisper Wharf (pg. 9).
-
If the players know about and choose to hunt the Rivercross envoy, turn to pg. 7.
-
If the players return to Whitetree with Pixiebelle, they can either investigate there (if they haven't yet done so), or choose from the two options above.
Rivercross
Scene: Forest Path
You rush through the forest, hoping to intercept Zassan's envoy before it reaches ... and burns ... Rivercross.
If you'd like to do another skill challenge here, follow the same rules as in Part 3. This time, however, instead of trying to track and hunt, the players are simply trying to get there first and/or set an ambush. If your players didn't find the skill challenge fun or if you're pressed for time (or just don't feel like it), you can have your players make one single DC 13 Wisdom (Survival) check.
-
If the players fail, they catch up to the marauders on the road without enough time to set a proper ambush.
-
If the players succeed, they are able to set up an ambush on the forest path leading to Rivercross.
Marching grimly down the path are a number of firenewt slavers, lead by a pair of thicker-looking firenewts with heavy morningstars hefted across their shoulders. Two of the slavers are holding chained sets of manacles, enough for a dozen prisoners each.
The party consists of six firenewt slavers and two firenewt warlocks of Imix.
Tactics
The slavers first attempt to capture the players, throwing their nets, then closing to melee with their scimitars. The warlocks already have mage armor active. They cast scorching ray on the first round, then use their morningstars and fire bolt cantrips. They save their second spell slot for hellish rebuke or an opportune burning hands (remember - their fellow newts are immune to fire). Unlike the other envoy, this group fights to the death.
The monsters' passive Perception is 10.
Development
If the players defeat the marauders, they can either head back to Whitetree (or Rivercross) to report back, or head directly to Whisper Wharf (players should know its location by now).
If captured and questioned, these slavers can convey the following information (same as on the previous page, except this group might take more "convincing"):
-
The slavers are on their way to the Whisper Wharf (players also learn its location, three or so hours' march toward the coast).
-
Tonight, the children from a dozen surrounding towns are being transferred from the forge at Whisper Wharf to The Scarlet Whip, which is docked there and departs in the morning.
-
Zassan's most trusted lieutenant is an azer named Kathrek, who oversees the forge at Whisper Wharf.
-
Another envoy is headed to Rivercross to burn it in retribution for standing up to Zassan. (If the players are quick, they can cut them off.)
Remind the players:
It's getting into the late afternoon. The Scarlet Whip is to sail in the morning, and Whisper Wharf is still several hours away.
Player Options:
Do the players continue to Whisper Wharf? Will they get there in time to stop Zassan from leaving with the children he's stolen?
note
I don't expect that your players will want to do anything except continue on to Whisper Wharf. That's really all that's left. Remind them of the time pressure and hope for the best!
If they do decide to do something else, the party receives one extra "time point" (you'll see what I mean on the next page).
Race Against Time
Time Mechanic
At this point in the adventure, take a quick pause and figure out the consequences of your players' actions.
For each of the following parts of the adventure that your players engaged in, they receive one "time point":
| Part |
|---|
| Investigation in Whitetree (pg. 5) |
| Rescuing Pixiebelle (pg. 6) |
| Saving Rivercross (pg. 7) |
If for some reason your players skipped one part (they got information more speedily or they ignored a threat for the sake of greater speed), they don't receive a time point for that section.
If your players took a long rest, add one time point.
If your players took time to roleplay with Pixiebelle after rescuing her and she showed them a shortcut, deduct one time point (you can't drop below zero).
Consequences
| Time Points | Consequences |
|---|---|
| 1 | The children are in the cell at Whisper Wharf when the players arrive early that evening. |
| 2 | The players arrive late at night. The captive children are being moved onto The Scarlet Whip, and enemies at Whisper Wharf have advantage on Perception checks to detect the players. |
| 3 | The players arrive in the wee hours of the following morning. They must make a Constitution saving throw (DC 13) to avoid taking a level of exhaustion. The children are on The Scarlet Whip. If an enemy in Whisper Wharf escapes combat to warn Zassan, the players have 10 minutes before the ship embarks. |
| 4 | The players arrive at Whisper Wharf ... but The Scarlet Whip is gone, along with the children, having embarked just a couple hours earlier. |
Failure
It is entirely possible that, if the adventurers take too long to rescue Pixiebelle and the other children, they'll arrive at Whisper Wharf too late.
In this particular adventure, failure is an option.
Naturally, that's not a fun outcome, so it's important to stress this race against time throughout the module. Also, players can still fight (or bribe or charm or or or) their way through the forge at Whisper Wharf and exact vengeance on Zassan's minions that are left, and can probably barter passage on a ship to chase Zassan down, leading to future adventures if desired.
PART 3
At Whisper Wharf
Scene: Whisper Wharf
For scene-setting description, refer to the table on page 8 to find out what time it is.
Ahead of you lies Whisper Wharf. The small docks complex is dominated by a large building off to one side. Moored there, you see a two-masted, metal-hulled ship: The Scarlet Whip.
The building, of course, is the forge at Whisper Wharf. (Refer to the map in Appendix A.)
Tactics
Firenewt slavers will fight until things look bad, then attempt to flee to warn Kathrek or Zassan. Duergar fight to the death, and use a war hammer instead of a war pick. Kathrek will fight to the death.
Outer Guards
The forge has two doors: one in the front facing the public and one in the back leading out onto the dock. There are two firenewt slavers standing guard at each door. If the players arrive while the children are being moved, there are four guards at the back door.
1. Forged Goods Shop
Forged goods stock the shelves of this small shop area. It's mostly farming and sailing equipment, but you also see weapons and a few suits of armor. Behind the counter, you see a closed door.
The front room of the forge is where Kathrek sells the goods he makes. If the players touch anything, one of the armor suits and some of the weapons animate. (1x animated armor, 4x flying sword). If the players don't touch any of the goods for sale or Kathrek's strongbox, they are unaccosted. The strongbox behind the counter contains 200sp and 300cp.
2. Firenewt Quarters
If the players arrive before the move, four firenewt slavers are relaxing here before the move. If the players come while the children are being moved, this room is empty. After the move, the four firenewt slavers are sleeping. There is a key in the desk.
.
Four double bunks stand in this room, and a desk has been pushed all the way up against the right-hand wall. Through a closed door in the left-hand wall, you hear the sounds of hammering.
Secret Door
On a successful DC 15 Perception check, a character will notice that the paneling on a section the back wall of the room, behind the firenewts' bunks, seems newer than the rest. A successful DC 15 Investigation check will find a secret door, which can be opened with a successful DC 15 check (Athletics to force or Thieves' Tools to pick), or with the key from the desk.
In the small closet behind the door, players find some of Kathrek's more valuable work: An adamantine chain shirt and either 20 pieces of +1 ammunition OR a +1 dagger, depending on your group's composition (see Appendix B for player handouts). If your group is in dire straits, you could throw in a greater potion of healing or two.
3. The Forge
This large room is dominated by a massive forge surrounded by four anvils and a large bellows. The glow from the forge's heat lights the room. On the floor along the right wall of the room, you see a large lever labeled "EMERGENCY ONLY". Across the room, an archway opens into the side of a hallway.
The forge is active no matter when the players arrive. The anvils are manned by four duergar, while four bored firenewt slavers look on.
The Lever
A creature can use its attack to pull the lever, which douses the forge with saltwater pumped from below the docks outside. The room is plunged into darkness, and a thick cloud of steam renders the entire room heavily obscured for 5 rounds. A character within 5 feet of the forge must make a DC 12 Constitution saving throw or take 6 (1d10) fire damage from the steam.
The Hallway
If the players arrive while the children are being moved, two firenewt slavers are in the hallway overseeing the process, and will join the battle in The Forge after 2 rounds. The hallway has two interior doors that open off of it, and one exterior door that leads to the docks.
4. Kathrek's Quarters
The iron door opens to reveal a very warm room, along with a dwarf whose hair is literally fire. Also a stocky firenewt with a morningstar. And five firenewt slavers. The room appears to be a bedroom and study, and has all-metal furniture.
In this room is Kathrek, an azer, a firenewt warlock of Imix and five firenewt slavers. They're discussing the move, whether before, during or after. If the adventurers make a lot of noise in the hall or just outside the building, or if a slaver gets away to warn Kathrek & Zassan, the group will emerge to investigate.
Kathrek's Desk
Kathrek has a metal desk locked with a key he keeps on his person. Under a drawer's false bottom (DC 15) he keeps a box. It contains 140gp, a simple gold ring worth 10gp, and a silver locket with a small drawing of a female azer.
5. The Captives' Cell
This iron door opens on a small, bare room with a stone floor and walls. A bucket of filth stands in the corner, but it overflowed long ago.
Freeing the Children
The children are of varying ages, from 4 or 5 to mid teens. When they see their liberators, some might make a racket, but their slavers largely ignore it. Some of the older children might want to fight; it's up to the players whether they want tagalongs. When freed, the children will need a way to get home, since they all come from different towns and villages along the coast. If the players were unable to overtake Pixiebelle's captors earlier, she is here.
During the Move
If the players arrive during the move, manacled children will be located as follows, all eventually making their way toward The Scarlet Whip:
- Three on board The Scarlet Whip (including Pixiebelle if you want to be particularly rough!)
- Two on the docks
- Two in the hallway
- The remainder in the cell
During the move, enemies will have advantage on Perception checks to notice the players. If you think your players will like the dramatic tension, you can have the firenewt slavers threaten the children a couple rounds into a fight, demanding in Draconic for the adventurers to drop their weapons, particularly if you're open to turning things into a longer campaign. If you're playing this as a oneshot, though, I would advise against it and keep things simple.
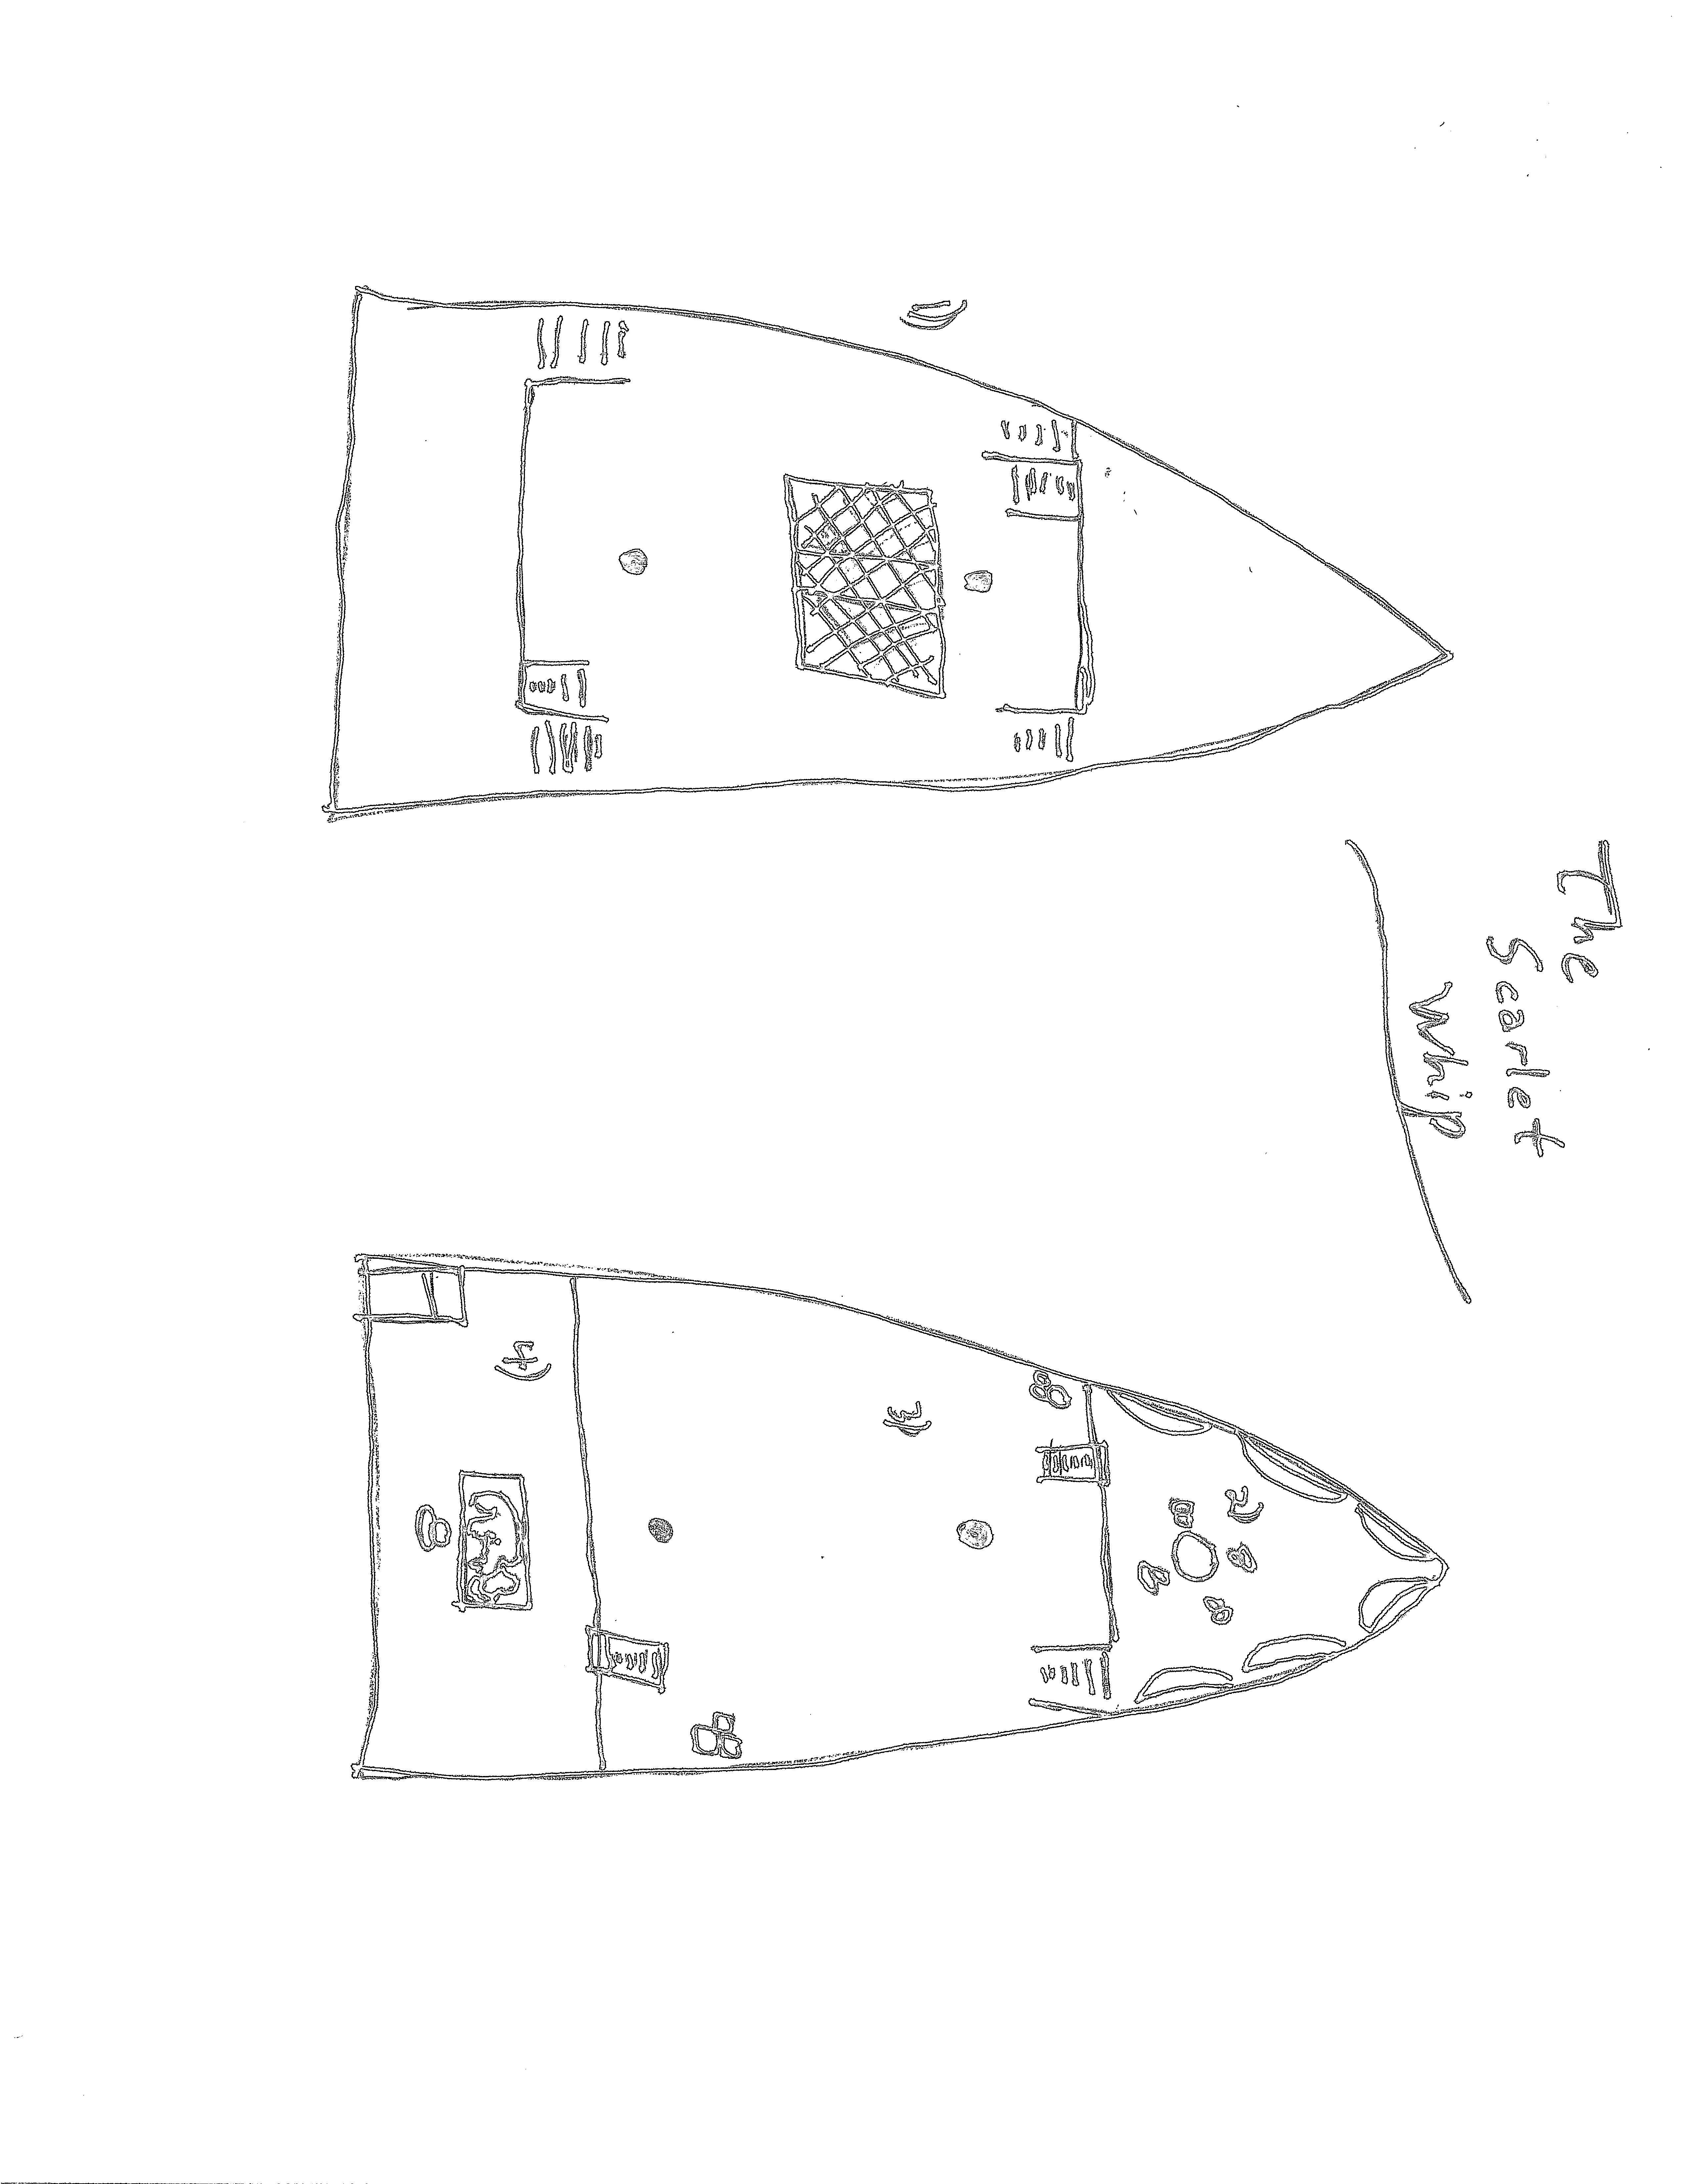
Scene: The Scarlet Whip
For scene-setting description, refer to the table on page 8 to find out what time it is.
The Scarlet Whip sits at her moorings. A large grate in the center of her deck opens to the hold below. She's a two-masted ship and has raised fore and aft decks, each with a small staircase leading up to the top and a door leading down underneath.
1. The Deck
There are a total of nine firenewt slavers on the deck, three on the fore deck, three aft and three in the middle. A gangway leads to the center of the ship from the dock, but players could leap on board with a successful DC 15 Athletics check. Your players can approach the situation however they choose; it's certainly possible to sneak aboard and pick the slavers off one small group at a time. Their passive Perception is 10.
2. Under the Forecastle
You duck to enter the small door leading downwards under the deck. The wooden steps give way to a smooth metal floor. Ahead in the dim light you see a small, round table with four chairs surrounding it. Hammocks line the walls.
This is where the firenewt slavers off duty spend their time. There are currently four firenewt slavers here. Depending on the time of day, they may be sleeping in the hammocks (metal nets, basically), or relaxing at the table.
3. The Hold
Speckled light filters in dimly from the grating above. You see a few barrels and crates in the darker corners of the metal hold.
The hold may either be empty or contain the enslaved children. If the children are here, they are chained to rings in the wall, able to move to a filth bucket but not much beyond that.
4. Captain's Quarters
In the center of this room stands a metal table with a sailor's map of the region etched into it. The room is dimly lit by an oil lamp on the table and is very warm. A metal cot is tucked in the corner.
Zassan is here, along with two fire snakes that he keeps as pets for his enjoyment. Under the cot is a small chest containing 150gp worth of assorted valuables and gems. Players can also take his Scarlet Whip (If they investigated in town, Quelenna has also offered them 1,000gp for it).
Tactics
Zassan is intelligent - if players have made it this far, he knows he and his business are ruined, and he'll fight to the death. He'll keep on the far side of the table and use his whip across it to stay at range as long as possible, while his fire snakes do their best to aid him. He won't outright kill the players, preferring to take them as slaves instead.
Optional: If the fight turns against Zassan quickly, he can use a "legendary lair reaction" once he hits half health to shatter the oil lamp on the table with his whip, igniting the oil that splashes around the room. Players within 10 ft. take 7 (2d6) fire damage, halved by succeeding on a DC 13 Dexterity saving throw.
Note
This is a deadly fight for 5th level characters, and can wipe a party if things go wrong. If your players are looking particularly weak going into it, feel free to adjust it by removing one or both of the fire snakes, or giving them only 1 hit point.
Conclusion
If the players have defeated Zassan and rescued the children, the towns and villages in the area are immensely grateful. While Whitetree isn't a rich town, they do throw a sumptuous feast in the character's honor and give them each 500sp as thanks. If the players spoke to her before leaving, Quelenna follows through on her offer and gives them 1,000gp in exchange for Zassan's whip. If the players so choose, they could also claim Zassan's ship, The Scarlet Whip, particularly if you are interested in a nautical-themed campaign.
If the players are unable to defeat Zassan, he escapes ... possibly with them in chains below deck.
Either way, if your players are interested, they can continue the adventure in the southern islands (it's not too hard to read Zassan's table map), attempting to free previously captured children from slavery ... or possibly themselves.
Appendix A: Maps
So ... I'm a really bad artist. And I can't draw boats. Sorry.
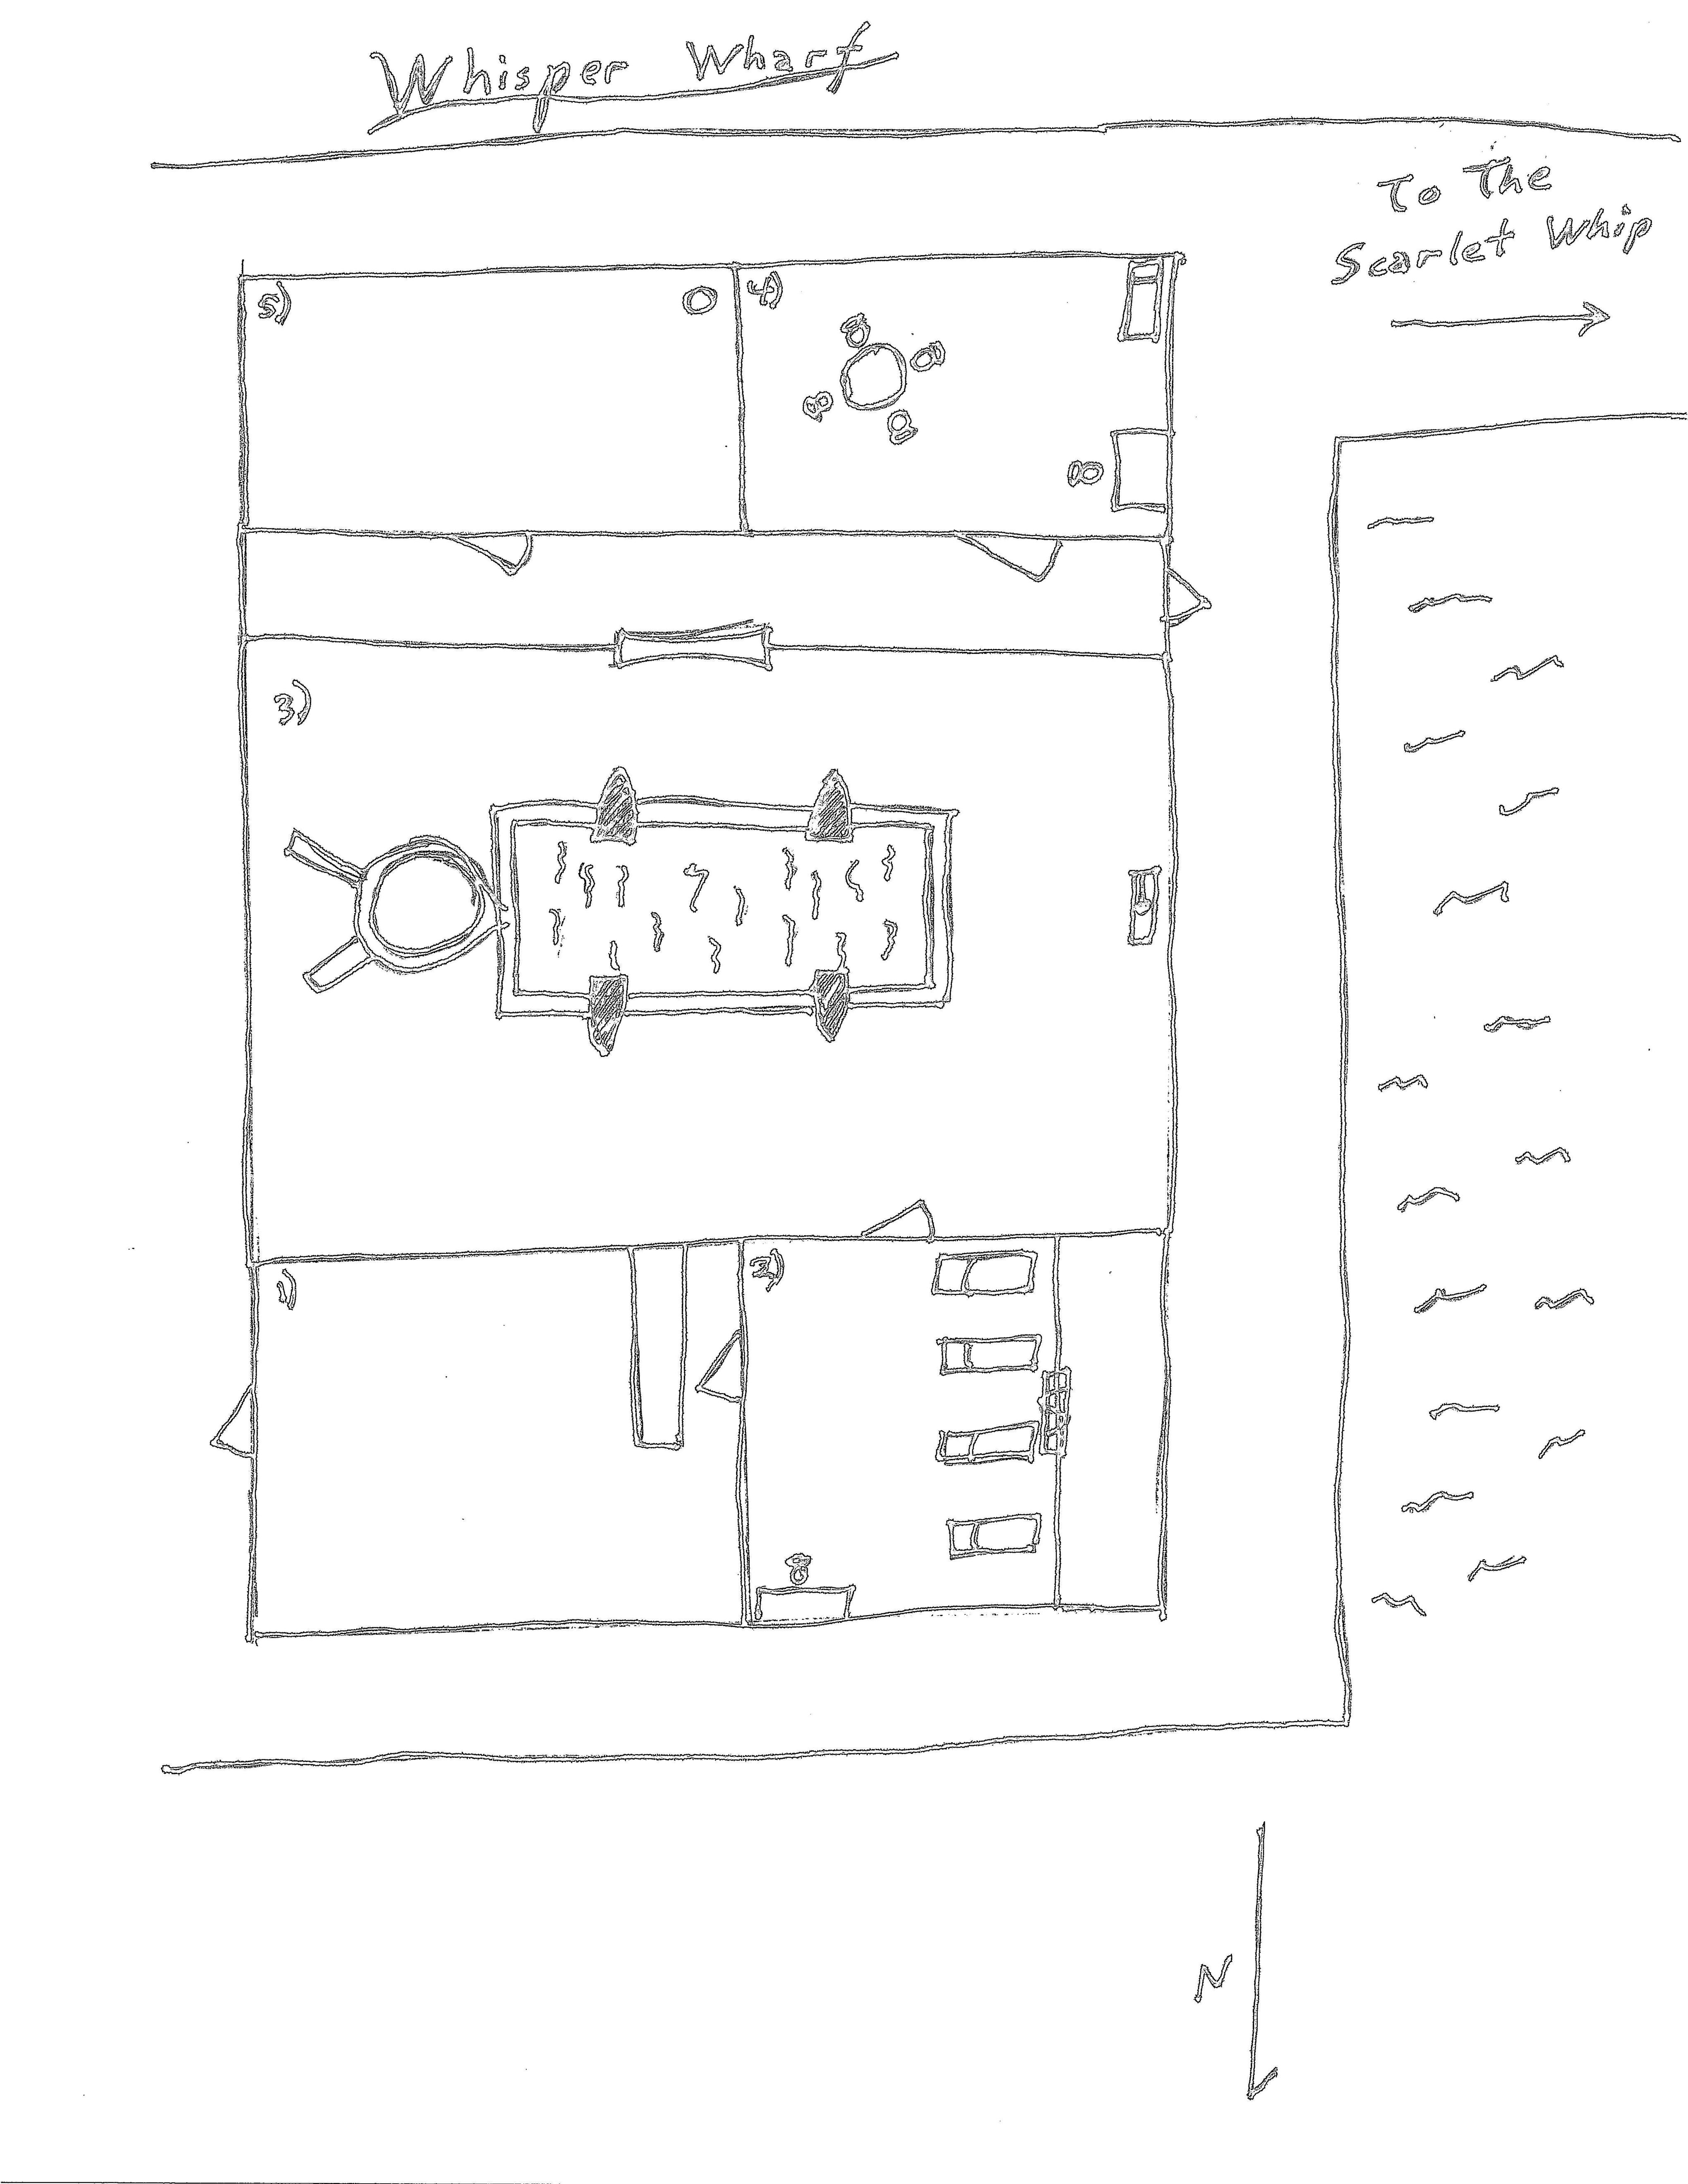
(See?)
Appendix B: Monster Statistics
Firenewt Slaver
Medium humanoid, neutral evil
- Armor Class 16 (chain shirt, shield)
- Hit Points 22 (4d8+4)
- Speed 30 ft.
STR DEX CON INT WIS CHA 10 (+0) 13 (+1) 12 (+1) 7 (-2) 11 (+0) 8 (-1)
- Damage Immunities Fire
- Senses Passive Perception 10
- Languages Draconic, Ignan
- Challenge 1/2 (100 XP)
Amphibious. The firenewt can breathe air and water.
Actions
Multiattack. The firenewt makes two attacks with its scimitar.
Net. Thrown: +3 to hit, range 5/15 ft., one target. Hit: Target is restrained until it is freed. A creature can use its action to make a DC 10 Strength check, freeing itself or another creature within its reach on a success. Dealing 5 slashing damage to the net (AC 10) also frees the creature without harming it, ending the effect and destroying the net.
Scimitar. Melee Weapon Attack: +3 to hit, reach 5 ft., one target. Hit: 4 (1d6+1) slashing damage.
Spit Fire (Recharges after a Short or Long Rest). The firenewt spits fire at a creature within 10 feet of it. The creature must make a DC 11 Dexterity saving throw, taking 9 (2d8) fire damage on a failed save, or half as much damage on a successful one.
.
Duergar
Medium humanoid, lawful evil
- Armor Class 16 (scale mail, shield)
- Hit Points 26 (4d8+8)
- Speed 25 ft.
STR DEX CON INT WIS CHA 14 (+2) 11 (+0) 14 (+2) 11 (+0) 10 (+0) 9 (-1)
- Damage Resistances Poison
- Senses Darkvision 120 ft., Passive Perception 10
- Languages Dwarvish, Undercommon
- Challenge 1 (200 XP)
Actions
Enlarge (Recharges after a Short or Long Rest). For 1 minute, the duergar magically increases in size, along with anything it is wearing or carrying. While enlarged, the duergar is Large, doubles its damage dice on Strength-based weapon attacks (included in the attacks), and makes Strength checks and Strength saving throws with advantage. If the duergar lacks the room to become Large, it attains the maximum size possible in the space available.
War Hammer. Melee Weapon Attack: +4 to hit, reach 5 ft., one target. Hit: 6 (1d8+2) bludgeoning damage, or 11 (2d8+2) bludgeoning damage when enlarged.
Javelin. Melee or Ranged Weapon Attack: +4 to hit, reach 5 ft. or range 30/120 ft., one target. Hit: 5 (1d6 + 2) piercing damage, or 9 (2d6 + 2) piercing damage while enlarged.
Invisibility (Recharges after a Short or Long Rest). The duergar magically turns invisible until it attacks, casts a spell, or uses its Enlarge, or until its concentration is broken, up to 1 hour (as if concentrating on a spell). Any equipment the duergar wears or carries is invisible with it.
Firenewt Warlock of Imix
Medium humanoid, neutral evil
- Armor Class 10 (13 with Mage Armor)
- Hit Points 33 (6d8+6)
- Speed 30 ft.
STR DEX CON INT WIS CHA 13 (+1) 11 (+0) 12 (+1) 9 (-1) 11 (+0) 14 (+2)
- Damage Immunities Fire
- Senses Darkvision 120 ft. (penetrates magical darkness), Passive Perception 10
- Languages Draconic, Ignan
- Challenge 1 (200 XP)
Amphibious. The firenewt can breathe air and water.
Innate Spellcasting. The firenewt’s innate spellcasting ability is Charisma. It can innately cast mage armor (self only) at will, requiring no material components.
Spellcasting. The firenewt is a 3rd-level spellcaster. Its spellcasting ability is Charisma (spell save DC 12, +4 to hit with spell attacks). It regains its expended spell slots when it finishes a short or long rest. It knows the following warlock spells:
Cantrips (at will): fire bolt, guidance, light, mage hand, prestidigitation
1st–2nd level (2 2nd-level slots): burning hands, flaming sphere, hellish rebuke, scorching ray
Imix’s Blessing. When the firenewt reduces an enemy to 0 hit points, the firenewt gains 5 temporary hit points.
Actions
Morningstar. Melee Weapon Attack: +3 to hit, reach 5 ft., one target. Hit: 5 (1d8 + 1) piercing damage.
Common Spells
-
Fire Bolt - action, 120 ft. range - attack roll, 1d10 fire damage on hit.
-
Burning Hands - action, 15 ft. cone - 4d6 fire damage, halved on a DC 12 Dexterity saving throw.
-
Hellish Rebuke - reaction when damaged by someone within 60 ft. you can see - 3d10 fire damage, halved on a DC 12 Dexterity saving throw.
-
Scorching Ray - action, 120 ft. range - attack rolls for three rays of fire, each of which does 2d6 damage.
Animated Armor
Medium Construct, unaligned
- Armor Class 18 (Natural Armor)
- Hit Points 33 (6d8+6)
- Speed 25 ft.
STR DEX CON INT WIS CHA 14 (+2) 11 (+0) 13 (+1) 1 (-5) 3 (-4) 1 (-5)
- Damage Immunities Poison, Psychic
- Condition Immunities Blinded, Charmed, Deafened, Exhaustion, Frightened, Paralyzed, Petrified, Poisoned
- Senses Blindsight 60 ft. (blind beyond this radius), Passive Perception 6
- Languages --
- Challenge 1 (200 XP)
Antimagic Susceptibility. The armor is incapacitated while in the area of an antimagic field. If targeted by dispel magic, the armor must succeed on a Constitution saving throw against the caster's spell save DC or fall unconscious for 1 minute.
False Appearance. While the armor remains motionless, it is indistinguishable from a normal suit of armor.
Actions
Multiattack. The armor makes two melee attacks.
Slam. Melee Weapon Attack: +4 to hit, reach 5 ft., one target. Hit: 5 (1d6 + 2) bludgeoning damage.
Flying Sword
Small construct, unaligned
- Armor Class 17 (Natural Armor)
- Hit Points 17 (5d6)
- Speed 0 ft., fly 50 ft. (hover)
STR DEX CON INT WIS CHA 12 (+1) 15 (+2) 11 (+0) 1 (-5) 5 (-3) 1 (-5)
- Saving Throws DEX +4
- Damage Immunities Poison, Psychic
- Condition Immunities Blinded, Charmed, Deafened, Frightened, Paralyzed, Petrified, Poisoned
- Senses Blindsight 60 ft. (blind beyond this radius), Passive Perception 7
- Languages --
- Challenge 1/4 (50 XP)
Antimagic Susceptibility. The sword is incapacitated while in the area of an antimagic field. If targeted by dispel magic, the sword must succeed on a Constitution saving throw against the caster's spell save DC or fall unconscious for 1 minute.
False Appearance. While the sword remains motionless and isn't flying, it is indistinguishable from a normal sword.
Actions
Longsword. Melee Weapon Attack: +3 to hit, reach 5 ft., one target. Hit: 5 (1d8 + 1) slashing damage.
Kathrek (Azer)
Medium elemental, lawful neutral
- Armor Class 17 (Natural Armor, Shield)
- Hit Points 39 (6d8+12)
- Speed 30 ft.
STR DEX CON INT WIS CHA 17 (+3) 12 (+1) 15 (+2) 12 (+1) 13 (+1) 10 (+0)
- Saving Throws CON +4
- Damage Immunities Fire, Poison
- Condition Immunities Poisoned
- Senses Passive Perception 11
- Languages Ignan
- Challenge 2 (450 XP)
Heated Body. A creature that touches the azer or hits it with a melee attack while within 5 feet of it takes 5 (1d10) fire damage.
Heated Weapons. When the azer hits with a metal melee weapon, it deals an extra 3 (1d6) fire damage (included in the attack).
Illumination. The azer sheds bright light in a 10-foot radius and dim light for an additional 10 feet.
Actions
Warhammer. Melee Weapon Attack: +5 to hit, reach 5 ft., one target. Hit: 7 (1d8 + 3) bludgeoning damage, or 8 (1d10 + 3) bludgeoning damage if used with two hands to make a melee attack, plus 3 (1d6) fire damage.
Zassan the Slaver (Salamander)
Large elemental, neutral evil
- Armor Class 15 (Natural armor)
- Hit Points 90 (12d10+24)
- Speed 30 ft.
STR DEX CON INT WIS CHA 18 (+4) 14 (+2) 15 (+2) 11 (+0) 10 (+0) 12 (+1)
- Damage Vulnerabilities Cold
- Damage Resistances Bludgeoning, Piercing, and Slashing from Nonmagical Attacks
- Damage Immunities Fire
- Senses Darkvision 60 ft., Passive Perception 10
- Languages Ignan
- Challenge 5 (1,800 XP)
Heated Body. A creature that touches the salamander or hits it with a melee attack while within 5 feet of it takes 7 (2d6) fire damage.
Heated Weapons. Any metal melee weapon the salamander wields deals an extra 3 (1d6) fire damage on a hit (included in the attack). (This also includes his magical fire whip.)
Actions
Multiattack. Zassan makes two attacks: one with his Scarlet Whip and one with his tail.
Scarlet Whip. Melee Weapon Attack: +7 to hit, reach 10 ft., one target. Hit: 14 (3d6+4) fire damage.
Tail. Melee Weapon Attack: +7 to hit, reach 10 ft., one target. Hit: 11 (2d6 + 4) bludgeoning damage plus 7 (2d6) fire damage, and the target is grappled (escape DC 14). Until this grapple ends, the target is restrained, the salamander can automatically hit the target with its tail, and the salamander can't make tail attacks against other targets.
Optional: If the fight turns against Zassan quickly, he can use a "legendary lair reaction" once he hits half health to shatter the oil lamp on the table with his whip, igniting the oil that splashes around the room. Players within 10 ft. take 7 (2d6) fire damage, halved by succeeding on a DC 13 Dexterity saving throw.
Appendix C: Item Descriptions
+1 Ammunition
Weapon, uncommon
You have a +1 bonus to attack and damage rolls made with this piece of magic ammunition. Once it hits a target, the ammunition is no longer magical.
+1 Dagger
Weapon, uncommon
You have a +1 bonus to attack and damage rolls made with this magic weapon.
Adamantine Chain Shirt
Armor, uncommon
This chain shirt is reinforced with adamantine, one of the hardest substances in existence. While you're wearing it, any critical hit against you becomes a normal hit.
Scroll of Magic Weapon
Scroll, uncommon
You touch a nonmagical weapon. Until the spell ends, that weapon becomes a magic weapon with a +1 bonus to attack rolls and damage rolls. Duration 1 hr; requires concentration.
If the spell is on your class’s spell list (Wizard; Paladin; War, Arcana & Forge Domain Cleric), you can read the scroll and cast its spell without providing any material components. Otherwise, the scroll is unintelligible. Casting the spell by reading the scroll requires the spell’s normal casting time (1 Bonus Action). Once the spell is cast, the words on the scroll fade, and it crumbles to dust. If the casting is interrupted, the scroll is not lost.
Zassan's Scarlet Whip
Weapon (whip), uncommon
This whip looks like a simple leather handle until a button is pressed on the tip. When the button is pressed, a 15-foot whip of fire bursts from the handle, lasting until the button is pressed again.
It grants a +1 bonus to attack rolls and deals 2d6 fire damage instead of the normal slashing damage.
Proficiency with a whip allows you to add your proficiency bonus to the attack roll for any attack you make with it.
Appendix D: NPC Summary
Friendly
-
Avalynn Baker - Pixiebelle's mother. She's inconsolable when the players first meet her. Later, she's the town baker (naturally), and is a determined, hardworking single mother who will do anything to get her Pixie back.
-
Fargrim Silverbeard - A retired dwarf merchant (and who knows what before that), he is the mayor of Whitetree, and the burden of responsibility weighs visibly on him. His son, Bryn, was taken last year.
-
Phenry Blackstone - Whitetree's short-tempered and impatient blacksmith. Phenry's son was taken five years ago, and he's never been the same. Every year, he tries to encourage the town to fight back, but nobody is willing.
-
Pixiebelle Baker - Avalynn's six-year-old daughter, who was chosen this year to be Zassan's victim. Usually a happy, outgoing child, she shrinks in fear from strangers after what's happened.
-
Quelenna Firahel - Elderly, kindly, slightly deaf elf woman. She's a wizard who retired to the area a hundred years ago to live out the rest of her days in peace.
Enemy
-
Kathrek - An azer smith, who has partnered with Zassan. In exchange for a cut of the business, he lets Zassan use his dockside forge as a prison and staging area.
-
Zassan - A salamander slaver, Zassan is business-minded. He uses the fear of his natural fiery ability to intimidate the towns in the area into giving him free slaves. He then transports them to the southern isles, sells them, and lives off the profits.
Credits & Legal
Design: Maximilian Hart
Many thanks especially to Ashley Warren for her RPG Writer's Workshop, along with Matt Evans, Anthony Alipio and 2cgIcepick for valuable feedback. Also, thank you to Matt Colville and The Angry GM, without whom I'd probably not have the confidence to even begin to design anything.
I'll also take this opportunity to plug my website: DungeonMasterDaily.com. It's a daily email that includes a super-short, applicable-tonight DMing tip along with a roundup of all the DM advice, info and resources published that day. Go check it out!
For Herb
DUNGEONS & DRAGONS, D&D, Wizards of the Coast, Forgotten Realms, Ravenloft, Eberron, the dragon ampersand, and all other Wizards of the Coast product names, and their respective logos are trademarks of Wizards of the Coast in the USA and other countries.
This work contains material that is copyright Wizards of the Coast and/or other authors. Such material is used with permission under the Community Content Agreement for Dungeon Masters Guild.
All other original material in this work is copyright 2018 by Maximilian Hart, LLC, and published under the Community Content Agreement for Dungeon Masters Guild.
Created with GMBinder.