Installing a Font
GMBinder uses CSS to control the look of the end product of your brew. Therefore, we can install webfonts via CSS.
Warning. It does create a huge block of CSS that goes in your STYLE block at the top of the brew.
Step 1: Find Your Font
The first step is to find your font. It needs to be in a usable format. For the purposes of this little guide, we'll be using this font. I chose this font entirely at random, to test this process. The font itself doesn't really matter, as long as its in a readable format for the website in Step 2.
Once you've chosen the font, download it and save it in a place where you'll be able to find it (they usually come in zip files, which you'll need to obviously extract elsewhere). It'll probably look something like Figure 1.
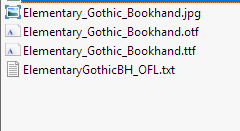
Figure 1
Step 2: FontSquirrel
Go to this website. You should see something like Figure 2.
First thing to click on is "Expert..." Don't be afraid of it, because you only need to change two things.
Step 2.1
Upload your font by clicking "Upload Fonts," as shown in Figure 2.
Step 2.2
First, deselect WOFF and WOFF2 from "Font Formats," and select "TrueType." It should look like Figure 3 on page 2.
Step 2.3
Second, scroll down until you see "CSS." You'll need to select "Base64 Encode." It should look like Figure 4 on page 2. Then, select "Yes, the fonts I'm uploading are legally eligible for web embedding." This guide assumes that you legally have that right.
Lastly, hit "Download Your Kit" at the bottom.
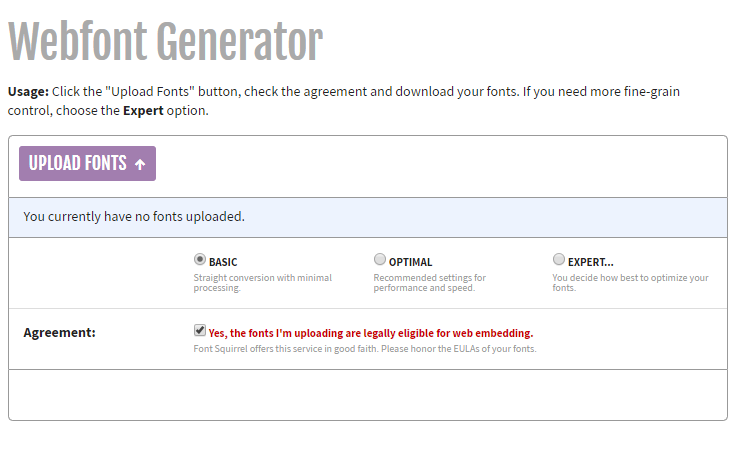
Figure 2

Figure 3

Figure 4

Figure 5

Figure 6

Figure 7
Step 3: Open the ZIP File
Save the .zip file somewhere you can easily find it, and open it up! The only thing of interest you'll need out of there is a file called "stylesheet.css" (see Figure 5 on page 2). Open the CSS file, and you'll see a really, really, really long piece of gibberish. That's the base64 code that you need to copy into your STYLE section at the top of your brew. Here's a link, just in case.. Place it in between the two STYLE tags at the beginning (or add them as needed; see Figure 6).
Step 4: Using your Font
The last thing to do is use your font! You do this by wrapping the text you want formatted into its own DIV:
<div style='font-family:font-name; ' >
Insert your text here.
</div>
You change the "font-name" to whatever font you're using, which is generated automatically (unless you change it) by FontSquirrel and is listed at the top of the CSS you took from the stylesheet.css file. See Figured 7 on page 2.
For the purposes of this guide, this is "elemental_gothicregular."
<div style='font-family:elemental_gothicregular; ' >
Insert your text here.
</div>
If everything worked right, the font should appear in this section.
Several other fonts I've included here are below:
Here's a font called UnZialish.
They're taking the hobbits to Isengard!
Hopefully, this will have been useful!