Acknowledgments
This adventure adapts the classic Dungeons and Dragons 5th Edition adventure Lost Mines of Phandelver to the fan made star wars conversion, SW5e.
All content in here was adapted from the adventure and other Dungeons and Dragons 5e source by me or was shamelessly borrowed from other SW5e resources.
All of the statblocks were borrowed directly from the Scum and Villiany book or Legobis Codex. Many of them have been renamed to be less era specific, but their attributes and abilities have not changed.
All art, maps, and such have been drawn by me, some of which have been more heavily borrowed from Lost Mines of Phandelver than others. If anyone reads this and wants the maps adjusts to include their own names, locations, or ideas please give me a message on discord, I'll try and make those adjustments for you!
To the SW5e development team, thank you, this conversion would not have been possible without the work done before me.
To the SW5e discord and subreddit, again thank you for the inspiration and constant discussion.
To Lucasarts and Dungeons and Dragons, above all, a tremendous thank you. They have provided me with years of fond memories and incredible entertainment. Without Star Wars and D&D, my world would be radically different and I am eternally grateful to them.
I truly hope you enjoy this adventure, I've spent many many hours working on it. Finally, a thank you to you, the reader. It is the players that make this game enjoyable, after all.
Thanks for reading, I sincerely hope you enjoy this adventure,
Matthias Weisfeld, mswlik#7925 on discord
Table of Contents
-
Introduction . . . . . . . . . . . . . . . . . . . . . . . . . . . . 3
-
Part 1: Raiders . . . . . . . . . . . . . . . . . . . . . . . . . . . 7
-
Part 2: Formos . . . . . . . . . . . . . . . . . . . . . . . . . . 15
Introduction
This book is written for the Dungeon Master. It contains a complete SW5e adventure, as well as descriptions for every creature and enhanced item that appears in the adventure. It also introduces the world of Star Wars, one of the Science Fiction's most enduring settings, and it teaches you how to run a SW5e D&D game.
Running The Adventure
Lost Mine of Kessel is an adventure for four to five characters of 1st level. During the course of the adventure, the characters will advance to 5th level. The adventure is set a short distance from the city of Huttspace in the Outer Rim region of the Star Wars setting. The Outer Rim is a vast realm of free settlements surrounded by wilderness and adventure. You don't need to be a Star Wars expert to run the adventure; everything you need to know about the setting is contained in this book.
If this is your first time running a D&D adventure, read "The Dungeon Master" section; it will help you better understand your role and responsibilities.
The "Background" section tells you everything you need to know to set up the adventure. The "Overview" section describes how the adventure is expected to run and gives you a broad sense of what the player characters should be doing at any given time.
The Game Master
The Game Master (GM) has a special role in the DUNGEONS & DRAGONS game.
The GM is a referee. When it's not clear what ought to happen next, the GM decides how to apply the rules and keep the story going.
The GM is a narrator. The GM sets the pace of the story and presents the various challenges and encounters the players must overcome. The GM is the players' interface to the D&D world, as well as the one who reads (and sometimes also writes) the adventure and describes what happens in response to the characters' actions.
The GM plays monsters. The GM plays the monsters and villains the adventurers battle against, choosing their actions and rolling dice for their attacks. The GM also plays the part of all the other characters the players meet in the course of their adventures, like the prisoner in the tusken raider lair or the barkeeper in town.
Who should be the GM for your gaming group? Whoever wants to be! The person who has the most drive to pull a group together and start up a game often ends up being the GM by default, but that doesn't have to be the case.
Although the GM controls the monsters and villains - the adventure, the relationship between the players and the GM isn't adversarial. The GM's job is to challenge the characters with interesting encounters and tests, keep me game moving, and apply the rules fairly.
The most important thing to remember about being a good GM is that the rules are a tool to help you have a good time. The rules aren't in charge. You're the DM - you're in charge of the game. Guide the play experience and the use of the rules so that everybody has fun.
Many players of DUNGEONS & DRAGONS find that being the GM is the best part of the game. With the information in this adventure, you'll be prepared to take on that role for your group.
Rules to Game By
As the Game Master, you are the final authority when it comes to rules questions or disputes during the game. Here are some guidelines to help you arbitrate issues as they come up.
When in doubt, make it up! It's better to keep the game moving than to get bogged down in the rules.
It's not a competition. The GM isn't competing against the player characters. You're there to run the monsters, referee the rules, and keep the story moving.
It's a shared story. It's the group's story, so let the players contribute to the outcome through the actions of their characters. DUNGEONS & DRAGONS is about imagination and coming together to tell a story as a group. Let the players participate in the storytelling.
Be consistent. If you decide that a rule works a certain way in one session, make sure it works that way the next time it comes into play.
Make sure everyone is involved. Ensure every character has a chance to shine. If some players are reluctant to speak up, remember to ask them what their characters are doing.
Be fair. Use your powers as Game Master only for good. Treat the rules and the players in a fair and impartial manner.
Pay attention. Make sure you look around the table occasionally to see if the game is going well. If everyone seems to be having fun, relax and keep going. If the fun is waning, it might be time for a break, or you can try to liven things up.
Improvising Ability Checks
The adventure often tells you what ability checks characters might try in a certain situation and the Difficulty Class (DC) of those checks. Sometimes adventurers try things that the adventure can't possibly anticipate. It's up to you to decide whether their attempts are successful. If it seems like anyone should have an easy time doing it, don't ask for an ability check; just tell the player what happens. Likewise, if there's no way anyone could accomplish the task, just tell the player it doesn't work.
Otherwise, answer these three simple questions:
- What kind of ability check?
- How hard is it?
- What's the result?
The galaxy, as relevant to this campaign:

Use the descriptions of the ability scores and their associated skills in the rulebook to help you decide what kind of ability check to use. Then determine how hard the task is so that you can set the DC for the check. The higher the DC, the more difficult the task. The easiest way to set a DC is to decide whether the task's difficulty is easy, moderate, or hard, and use these three DCs:
- Easy (DC 10). An easy task requires a minimal level of competence or a modicum of luck to accomplish.
- Moderate (DC 15). A moderate task requires a slightly higher level of competence to accomplish. A character with a combination of natural aptitude and specialized training can accomplish a moderate task more often than not.
- Hard (DC 20). Hard tasks include any effort that is beyond the capabilities of most people without aid or exceptional ability. Even with aptitude and training, a character needs some amount of luck - or a lot of specialized training - to pull off a hard task.
The outcome of a successful check is usually easy to determine: the character succeeds at whatever he or she set out to accomplish, within reason. It's usually equally easy to figure out what happens when a character fails a check: the character simply doesn't succeed.
Glossary
The adventure uses terms that might be unfamiliar to you. A few of these terms are described here. For descriptions of rules-specific terms, see the rulebook.
Characters. This term refers to the adventurers run by the players. They are the protagonists in any D&D adventure. A group of characters or adventurers is called a party.
Nonplayer Characters (NPCs). This term refers to characters run by the DM. How an NPC behaves is dictated by the adventure and by the DM.
Boxed Text. At various places, the adventure presents descriptive text that's meant to be read or paraphrased aloud to players. This read-aloud text is offset in boxes. Boxed text is most commonly used to describe rooms or present bits of scripted dialogue.
Stat Block. Any monster or NPC that is likely to be involved in combat requires game statistics so that the DM can run it effectively. These statistics are presented in a format called a statistics block, or stat block. You'll find the stat blocks needed for this adventure in the appendix.
Enhanced Items and Monsters
Whenever the text refers to a magic item, its name is presented in italic type. For a description of the item and its magical properties, see either the Player's Handbook, Wretched Hives or the sw5e website.
Similarly, whenever the adventure text presents a creature's name in bold type, that's a visual cue directing you to the creature's game statistics in the appendix.
Abbreviations
The following abbreviations are used in this adventure
DC = difficulty class
XP = Experience Points
HP = Hit Points
Background
Located just outside of Huttspace, the legendary planet of Kessel has long been known as a mining center in the galaxy, of both the illicit Spice and coveted Coaxium. Mining often required boring deep caves into the surface of the planet. The nearby systems became staging posts for mining excursions, among them was the planet of Formos.
Kessel is not a planet without conflict. Often times, mines were built and worked through slave labor. Revolts were common, as were assaults aiming to conquer these mines.
Through conflict, the exact locations of many of these mines have become lost. Every so often, rumors of buried mines with untold riches have attracted prospectors and investors alike. Gundark Roksek and his brothers claims to have found an entrance to the legendary Wave Echo Mine, and he intends to reopen the mine.
Unfortunately for the Rokseks, they are not the only ones interested in Wave Echo Mine. A mysterious villain known as the Black Rancor controls a network of bandit gangs in the area, and his agents have followed the Rokseks to their prize. Now the Black Rancor wants Wave Echo Mine for himself, and he is taking steps to make sure no one else knows where it is.
Overview
Lost Mine of Kessel is divided into four parts, In part 1, "Raiders," the adventurers are traveling to the planet of Formos when they stumble into a bandit ambush. They discover that raiders have captured their quarren friend Gundark Roksek and his escort, a human warrior named Syl Ordo. The characters must deal with the ambushers and then follow their trail back to the bandits' hideout. They rescue Syl and learn from him that Gundark and his brothers discovered a famous lost mine. Syl knows only that Gundark and his map have been taken to somewhere called "Arthek Castle."
In part 2, "Formos," the characters arrive on Formos to find it terrorized by the Redbrands, a gang of miscreants led by a mysterious figure called Deshstaff. A number of interesting NPCs can also be found on Formos, laying the hooks for short adventures in part 3. The Redbrands try to run the characters out of town, so the characters return the favor and storm the Redbrand lair. In a hidden stronghold beneath an old manor, they find that Jorel "Deshstaff" Jinn, the leader of the Redbrands, is taking his orders from someone called the Black Rancor - and that the Black Rancor wants the characters out of the picture.
Part 3, "The Rancor's Net," provides the characters with several short adventures in the region around Formos as they search for more information about the Black Rancor and the quarren's lost mine. The clues the characters picked up on Formos can lead them to spy on a mysterious scavenger at the ruins of a derelict sandcrawler, seek the advice of a dangerous force spirit, oust a band of disgraced mandalorians hiding on the asteroid base of Gara Station, and investigate the ruins of a settlement on Norval II.
Several of these leads point to Arthek Castle, which is the stronghold of Dovin Arthek, leader of the bandits that have been terrorizing the local systems. Here the characters discover that the Black Rancor is a cathar force-weilder named Nysnar, and that the bandits work for him. More importantly, they recover Gundark Roksek navigational charts to the lost mine, or learn the mine's location from one of the other leads they unearth during part 3.
Following the map or the directions to the lost mine brings the characters to part 4, "Wave Echo Mine." That lost underground complex is now overrun by strange monsters. Nysnar the Black Rancor is there with his loyal followers, exploring the mines and searching for a lost legendary cache of stabilized coaxium. The adventurers have the opportunity to avenge Gundark Roksek, to ensure the prosperity and security of Formos by clearing the rich mine of its monsters, and to put an end to the troublemaking of the Black Rancor - if they can survive the dangers of the Lost Mine of Kessel.
Adventure Hook
You can let you players invent their own reason for visiting Formos, or you can use the following adventure hook. The backgrounds and secondary goals on the character sheets also provide characters with motivations for visiting Formos.
Meet me on Formos. The characters are on the city moon Nar Shaddaa when their quarren friend, Gundark Roksek, hires them to crew his ship and escort the supplies aboard. Gundark has gone ahead with his mercenary companion, Syl Ordo, to attend to business on the planet while the characters follow with his goods. The characters will be paid 100 credits each by the owner of Bartleby's Provisions on Formos when they deliver the ship safely to that trading post.
The World of Star Wars
This module assumes the players are familiar with the basics of the Star Wars world. It does not, however, require any in depth knowledge of Star Wars Lore.
Players should be familiar with the basic principals of Star Wars: Jedi and Lightsabers, the Force, and the continual battle between followers of both sides of the Force.
This module has been designed so that it can be set during any era of the Star Wars world and does not make any specific mentions of timeline or era. Ultimately, decisions to include these details are up to the GM.
This adventure primarily takes place in the outer rim of the galaxy, a section of the Star Wars world known as much for its remoteness, as its lawlessness. If the GM wishes to add more details, it is recommended to review Star Wars lore, but this is most definitely not necessary.
ROLEPLAYING AND INSPIRATION
One of the things that you can do as the DM is reward players for roleplaying their characters well.
Characters have personality traits, both positive and negative, and ideals, bonds, and flaws. These elements can make the characters easier and more fun to roleplay. Personality traits provide a glimpse into the character's likes, dislikes, accomplishments, fears, attitude, or mannerisms. An ideal is something that the character believes in or strives for above all else. A character's bond represents a connection to a person, place, or event in the world - someone the character cares about, a place the holds a special connection, or a treasured possession. A flaw is a characteristic that someone else can exploit to bring the character to ruin or cause the character to act against his or her best interests.
When a player roleplays a negative personality trait or gives in to a drawback presented by a bond or a flaw, you can give that player's character one inspiration as a reward. The player can then spend it when his or her character makes an ability check, an attack roll, or a saving throw. Spending inspiration gives the character advantage on the roll. A clever player might spend the inspiration to counteract disadvantage on a roll.
A character can have only one inspiration at a time.
Part 1: Raiders
The adventure begins as the player characters are crewing a G9 Rigger-class light freighter filled with provisions and supplies from Nar Shaddaa to Formos. The journey takes them through Huttspace and into the outer-rim territories. When they have almost reached Formos, they run into trouble with a local gang of raiders.
Read the boxed text when you're ready to start. If you create a different adventure hook, skip to the second paragraph and adjust the details as necessary, ignoring the information about flying the ship.
Before continuing with the adventure, take a few minutes to do the following:
- Encourage the players to introduce their characters to each other if they haven't done so already.
- Ask the players to think about how their characters came to know their quarren patron, Gundark Roksek. Let the players concoct their own stories. If a player is hard-pressed to think of anything, suggest something simple. For example, Gundark could be a childhood friend or someone who helped the player's character get out of a tough scrape. This exercise is a great opportunity for the players to contribute to the hero's backstory.
- Ask the players choose their deployment. Who's in piloting the ship, and who's manning the guns? If the characters are escorting Gundarks's supplies, then one characters needs to be piloting their ship. The rest of the characters can be relaxing, performing maintenance, or manning guns, as they like.
The ship is packed full of an assortment of mining supplies and food. This includes a dozen sacks of Kodari-rice, several casks of preserved veg-meat, two barrels of mineral water, mining lases, and excavating tools (about a dozen each), and five lanterns with a small power cell each. The total value of the cargo is 1000 credits. When you're ready, continue with the "Ambush" section.
Ambush
Read the following boxed text to start the encounter:
As the party approaches, any character who makes closer investigation, can identify the ship as belonging to Gundark Roksek and Syl Ordo. It's clear that the ship was largely destroyed by blaster fire, and then boarded and looted. When the characters inspect the scene closer, read the following:
As the party explores the ship, they slowly make their way to the bridge. There, two ruffians are hiding, one on each side of the entrance, some distance from the door. They wait until someone enters the bridge and then attack.
This will likely be the first of many combat encounters in the adventure. Here are the steps you should follow to run it effectively:
-
Review the ruffian statblock in the appendix and on the following page. Since the ruffians are hiding, you'll need to know their Stealth skill modifier: +0.
-
Check to see who, if anyone, is surprised. The party cannot surprise the ruffians, but the ruffians might surprise some or all the characters. Make a Dexterity (Stealth) check for the ruffians, rolling once for all of them. Roll a d20, add the ruffians' Stealth skill modifier (+)) to the roll, and compare the result to the characters' passive Wisdom (Perception) scores. Any character whose score is lower than the ruffians' check result is surprised and loses his or her turn during the first round of combat (see "Surprise" in the rulebook).
-
Use the initiative rules in the rulebook to determine who acts first, second, third, and so on. Keep track of everyone's initiative count.
-
When the time comes for the ruffian to act, one of them rushes forward and makes melee attacks while one ruffian stands 30 feet away from the party and makes ranged attacks. The ruffians' stat block contains the information you need to resolve these attacks. For more information on what the ruffians can do on their turn, see chapter 2, "Combat," in the rulebook.
-
When the ruffians are defeated, one of them drops a datapad.
Ruffian
Medium Humanoid, neutral dark
- Armor Class 14 (weave armor)
- Hit Points 13 (2d8+4)
- Speed 30 ft.
STR DEX CON INT WIS CHA 12 (+1) 11 (+0) 13 (+1) 10 (+0) 9 (-1) 12 (+1)
- Skills Intimidation +3
- Senses passive Perception 9
- Languages Basic, Huttese
- Challenge 1/2 (100 XP)
Actions
Heavy Pistol Ranged Weapon Attack: +4, range 40/160 ft., one target. Hit: 6 (1d6+2) energy damage.
Vibrobaton Melee Weapon Attack: +4 to hit, reach 5 ft., one target. Hit: 6 (2d4 + 2) kinetic damage.
Developments
In the unlikely event that the ruffians defeat the heroes, they leave them unconscious, loot them and the ship, then head back to the bandit hideout. The characters can continue on to Formos, buy new gear at Bartleby's Provisions, return to the ambush site, and find the dropped datapad.
The characters might capture one or both of the ruffians by knocking them unconscious instead of killing them. A character can use any weapon to knock a ruffian unconscious, succeeding if the attack deals enough damage to drop the goblin to 0 hit points. Once it regains consciousness after a few minutes, a captured ruffian can be convinced to share what it knows (see the "What the Bandits Know" sidebar on page 10). A ruffian can also be persuaded to lead the party to the bandit hideout while avoiding traps along the way (see the "The Datapad" section).
The characters might not find the thugs' trail, or they could decide to continue to Formos. In that case, skip ahead to part 2, "Formos." Elmer Bartleby (the owner of Bartleby's Provisions) seeks out the characters and informs them that Gundark Roksek never arrived. He recounts the bandit troubles and suggests that the characters return to the derelict ship to investigate further (after they rest). Bartleby also tells the party that Linene Tillo of the Santhe Corporation (see page 19) can provide more information on the bandit attacks.
Rests
The party might need to rest after the ambush, depending on how the battle plays out. See the rulebook for more information on short rests and long rests.
The Datapad
After the characters defeat the bandits, an inspection of the area will show clear signs of combat. A character who succeeds on a DC 10 Wisdom (Survival) check recognizes that at least half a dozen combatants where involved in the fight. Reading through the thug's dropped data pad, the party learns that a group of bandits have been staging raids out of a nearby space station. The datapad includes basic directions for how to find it.
The players can easily dock at the space station, it appears to be mostly unoccupied. As the party disembarks their ship, ask them to determine their marching order. The order is important because the bandits have set traps to thwart any unannounced visitors.
Snare. About 10 minutes after entering the space station, a party on the path encounters a hidden snare. If the characters are searching for traps, the character in the lead spots the trap automatically if his or her passive Wisdom (Perception) score is 12 or higher. Otherwise, the character must succeed on a DC 12 Wisdom (Perception) check to notice the trap. If the character fails to notice the trap, he or she triggers the snare and must succeed on a DC 10 Dexterity saving throw. On a failure, the character is suspended upside down 10 feet above the ground. The character is restrained until 1 or more kinetic damage is dealt to the snare's cord. (See the the rulebook for the effect of being restrained.) A character who isn't carefully lowered down takes 1d6 kinetic damage from the fall.
Pit. Another 10 minutes exploring the station is a pit the thugs have camouflaged. The pit is 6 feet wide, 10 feet deep, and it triggers when a creature moves across it. The character in the lead spots the hidden pit automatically if his or her passive Wisdom (Perception) score is 15 or higher. Otherwise, the character must succeed on a DC 15 Wisdom (Perception) check to spot the hidden pit. If the trap isn't detected, the lead character must succeed on a DC 10 Dexterity saving throw or fall in, taking 1d6 kinetic damage. The pit's walls are not steep, so no ability check is required to scramble out.
Awarding Experience Points
Defeating the ambushers and finding the bandit hideout completes a story milestone. When the party arrives at the hideout, award each character 75 XP. Make sure the players record this gain on their character sheets.
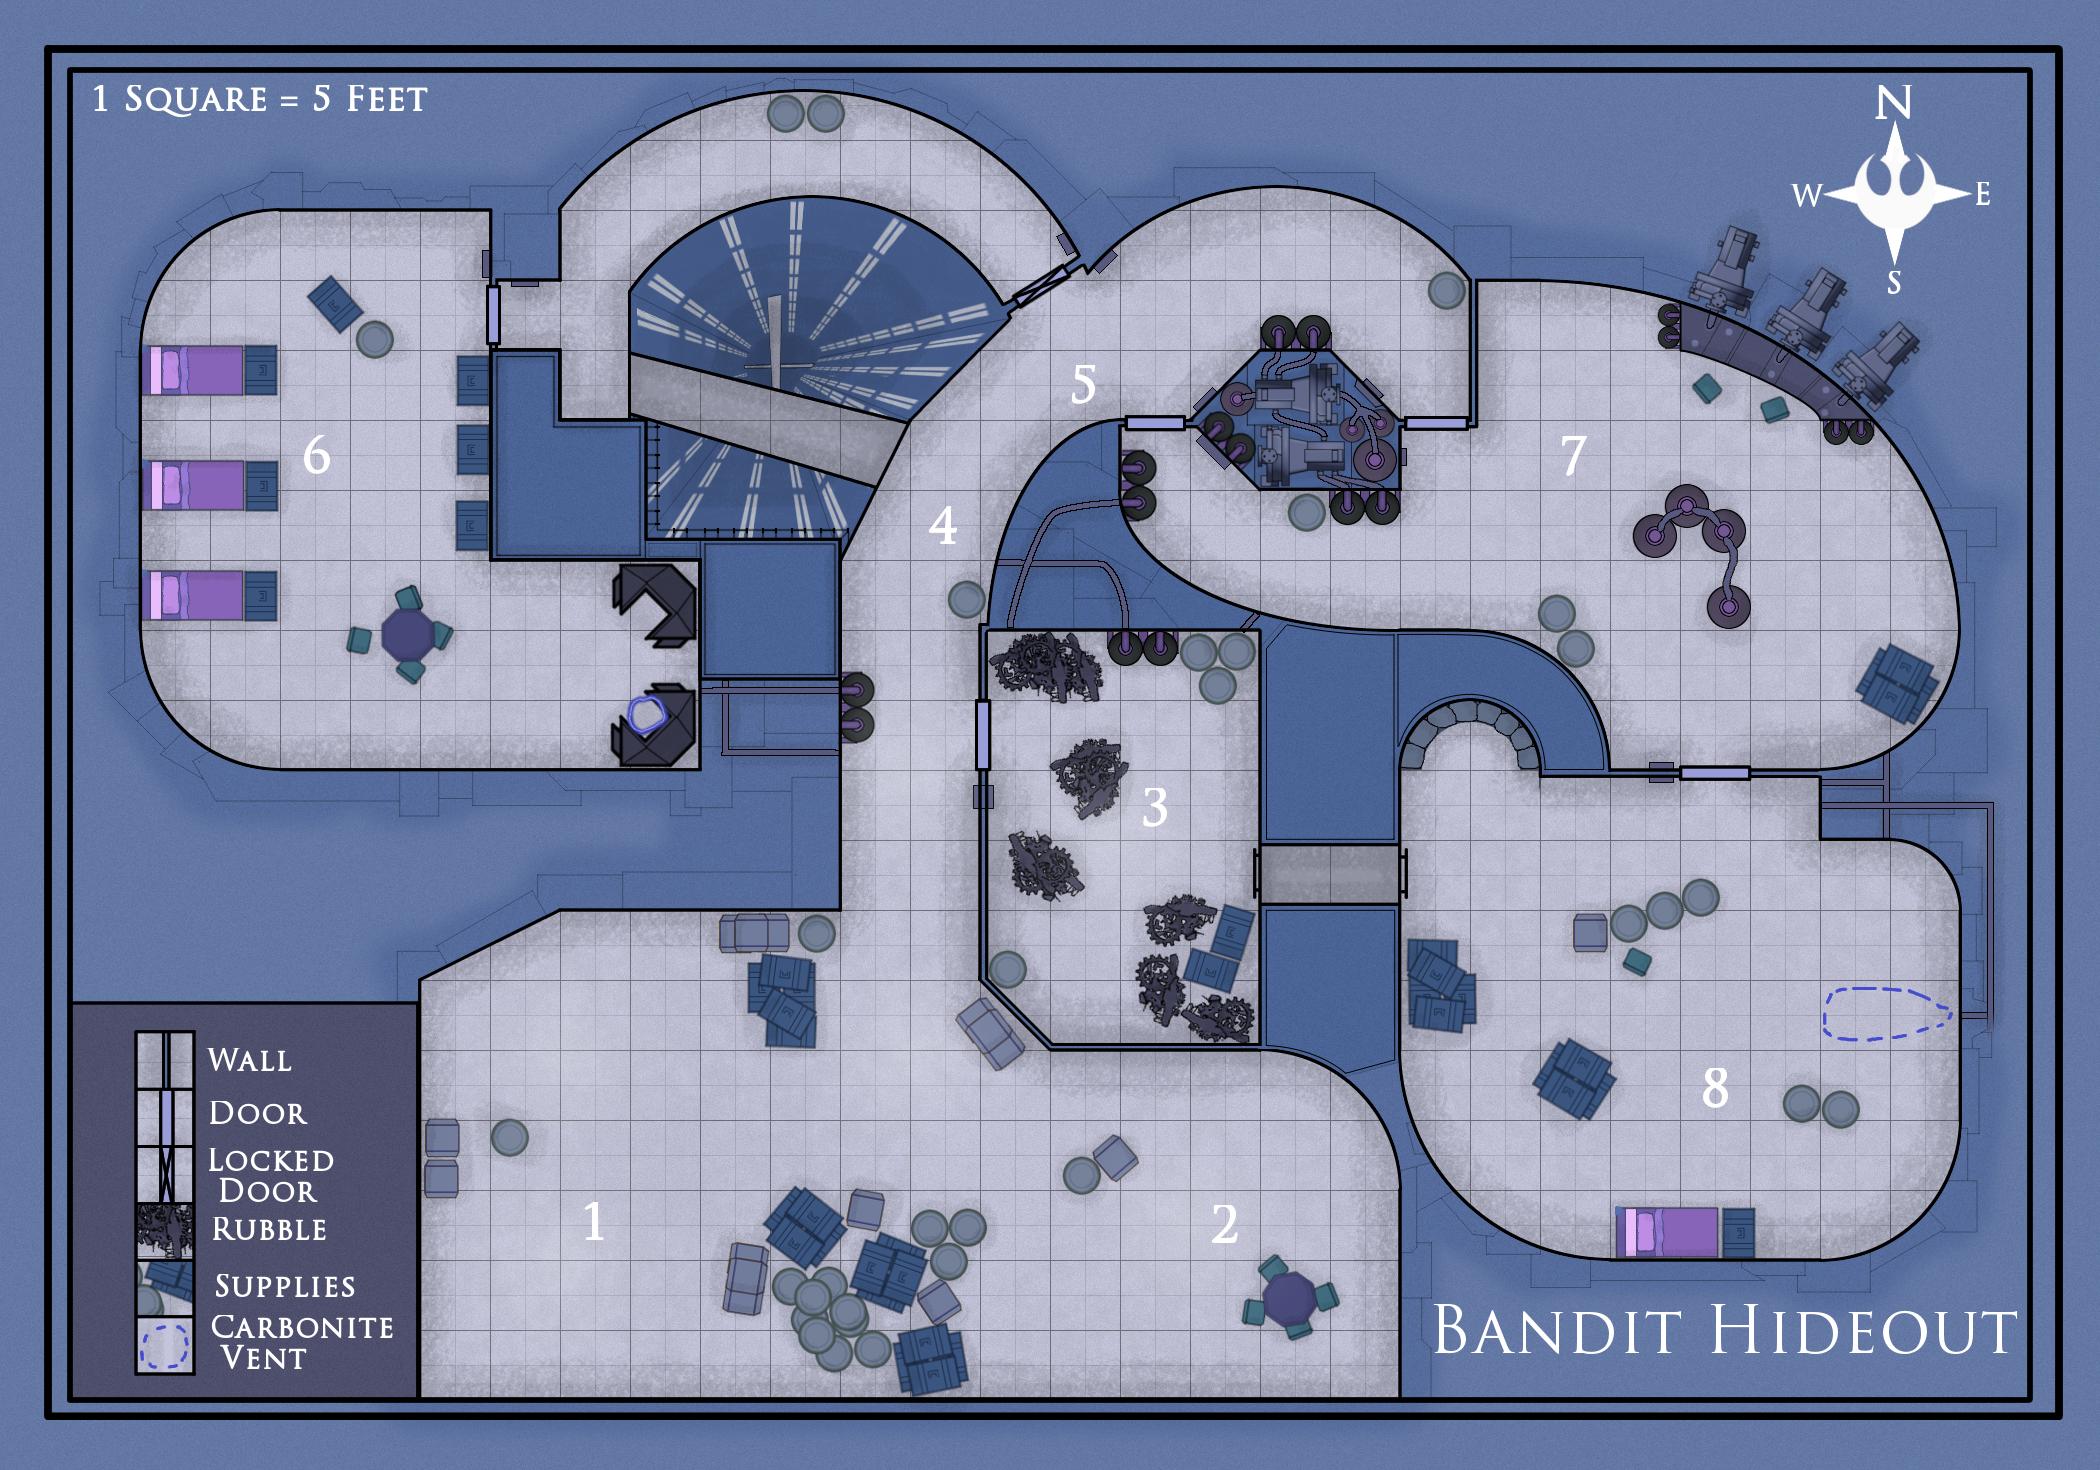
The Bandit Hideout
The bandits have established a hideout from which they can easily harass and plunder traffic moving outside on the path to Formos or outside Huttspace. These bandits must be particularly fearsome to survive raiding the Hutts.
The leader of the bandits lairing here is an aquilash named Klee, who has orders from the chief of the bandit gang to plunder any poorly defended ships or travelers that come this way. A few days ago, a messenger from Arthek Castle brought new instructions: Waylay the quarren Gundark Roksek and anyone traveling with him.
General Features
The space station is large enough to approach unnoticed, and filled with densely packed rooms and narrow corridors.
Ceilings. Most of the rooms and hallways have high sloping ceilings, oftentimes with exposed wiring and damaged interior panels.
Light. Areas one, two, and three are illuminated. The rest of the complex is dark unless stated otherwise. The boxed text for those locations assumes that the characters have darkvision or a light source.
Rubble. Areas of crumbling structures and walls are difficult terrain (see "Difficult Terrain" in the rulebook).
Sound. Sound the space station is muffled. Creatures can make a DC 15 Wisdom (Perception) check to attempt to hear activity in nearby chambers.
Cover. Old storage crates and lockers, as well as damage wall panels and pillars can provide cover (see "Cover" in the rulebook).
What the Bandits Know
If the characters capture or charm any of the bandits here, the bandit can be persuaded to divulge some useful information:
- Fewer than 10 bandits currently live in the station.
- Their leader is an aquilash named Klee. He answers to Dovin Arthek head of bandit gang, who commands from a fortress on Lowick. (the ruffians can provide basic directions to the fortress on Lowick.)
- Klee received a messenger from Dovin Arthek a few days ago. The messenger told him that someone named the The Black Rancor was paying the raiders to watch out for the quarren Gundark Roksek, capture him, and send him and anything he was carrying back to Arthek. Klee followed his orders. Gundark was ambushed and taken along with his personal effects, including navigational charts.
- The quarren and his charts were delivered to Arthek, as instructed. The quarren's human companion is being held in a makeshift jail attached to the living area (area 6).
1. Entrance Area
After wandering through the empty space station, the hallways eventually lead into a larger opening room.
The barrels are impenetrable from the west side of the room.
Developments
The bandits in area 2 are supposed to be keeping watch on this area, but they are not paying attention. However, if the characters make a lot of noise here - for example, loudly arguing about what to do next, setting up a camp, moving barrels, and so on - the ruffians in area 2 notice and attack them through the fortification, which provides the ruffians with three-quarters cover (see the rule book for rules on cover).
2. Guard Room
When the characters cross the barrier to the east side of the room, they can see around the barrels to area 2. This is a guard room, though the thugs here are not paying attention.
Two ruffians are stationed here. If the ruffians notice intruders in area 1, they open fire with their blaster rifles, probably catching the characters by surprise. If the ruffians don't notice the characters in area 1, they spot them when they cross the barrier and neither are surprised.
Characters moving carefully or scouting ahead might be able to surprise the lookouts. Have each character who moves ahead make a Dexterity (Stealth) check contested by the ruffians' passive Wisdom (Perception) score to avoid being surprised. See the rulebook for more information on ability check contests.
3. Droid Station
The bandits have a stockpile of damaged and abused droids, oftentimes striped for parts or left in a dangerous state.
The room contains three different droids. There is one junk droid, one interrogation droid, and one astromech droid.
A character who tries to calm the droids can attempt a DC 12 Intelligence (Technology) check. On a success, the droids allow the character to move throughout the room.
Maintenance Shaft. A narrow opening in the east wall leads to a repair shaft that climbs 30 feet to area 8. At the base of the shaft is rubbish that's been discarded through the opening above. A character attempting to ascend or descend the shaft must make a DC 10 Strength (Athletics) check. If the check succeeds, the character moves at half speed up or down the shaft, as desired. On a check result of 6-9, the character neither gains nor loses ground; on a result of 5 or less, the character falls and takes 1d6 bludgeoning damage per 10 feet fallen, landing prone at the base of the shaft.
Astromech Droid
Small droid, unaligned
- Armor Class 12 (armor plating)
- Hit Points 7 (2d6)
- Speed 25 ft.
STR DEX CON INT WIS CHA 6 (-2) 13 (+1) 11 (+0) 16 (+3) 12 (+2) 5 (-3)
- Skills Perception +3, Technology +5, Piloting +5
- Damage Vulnerabilities Ion
- Damage Resistances Necrotic, Poison, Psychic
- Condition Immunities poison, disease
- Senses Darkvision 60 Ft., passive Perception 13
- Languages Speaks binary, understands Basic
- Challenge 1/8 (25 XP)
Circuitry. The droid has disadvantage on saving throws against effects that would deal ion or lightning damage.
Keen Hearing and Sight. The astromech droid has advantage on Wisdom (Perception) checks that rely on hearing or sight.
Rocket Boost (1/day). The astromech droid leaps up to 40 feet in any direction.Actions
Shockprod. Melee Weapon Attack: +3 to hit, reach 5 ft., one target. Hit: 3 (1d4+1) lightning damage.
Interrogation Droid
Tiny droid, unaligned
- Armor Class 11
- Hit Points 6 (4d4-4)
- Speed 0 ft, fly 40 ft. (hover)
STR DEX CON INT WIS CHA 3 (-4) 10 (+0) 8 (-1) 6 (-2) 10 (+0) 12 (+1)
- Skills Intimidation +5, Insight +4
- Damage Vulnerabilities Ion, Lightning
- Damage Resistances Poisoned, diseased
- Condition Immunities poison, disease
- Senses Passive Perception 13, passive Insight 14
- Languages Speaks binary, understands Basic
- Challenge 1/4 (50 XP)
- Flyby. The droid doesn't provoke opportunity attacks when it flies out of an enemy's reach.
Actions
Dart Launcher. Ranged Weapon Attack: +3 to hit, range 15/60 ft., one target. Hit: 1 kinetic damage plus 7 (2d6) poison damage. On a hit, the target must succeed on a Con. saving throw (DC 12) or become stunned for one round.
Junk Droid
Medium droid, unaligned
- Armor Class 13 (armor scraps)
- Hit Points 13 (2d8+4)
- Speed 30 ft.
STR DEX CON INT WIS CHA 10 (+0) 14 (+2) 15 (+2) 6 (-2) 8 (-1) 5 (-3)
- Damage Vulnerabilities Ion
- Damage Resistances Necrotic, Poison, Psychic
- Condition Immunities poison, disease
- Languages Speaks binary, Galactic Basic
- Challenge 1/4 (50 XP)
- Circuitry. The droid has disadvantage on saving throws against effects that would deal ion or lightning damage.
Actions
Multiattack. The junkyard droid makes two blaster carbine attacks or two vibroblade attacks.
Blaster Carbine. Ranged Weapon Attack: +4 to hit, range 60/240 ft., one target. Hit: 5 (1d6+2) energy damage.
Vibroblade. Melee Weapon Attack: +4 to hit, reach 5ft., one target. Hit: 5 (1d6+2) kinetic damage.
Developments
If the droids are goaded by enemies beyond their reach, they are driven into a frenzy that allows them to yank their restraints out of the floor. Each round that any character remains in sight, the droids attempt a single DC 15 Strength check. On the first success, they loosen the restraint and the DC drops to 10. On a second success, they yank the restraint loose, so that they are freed. A bandit can use its action to release one droid from its restraint.
4. Narrow Passage
From this point on, characters without darkvision will need light to see their surroundings.
Characters using light or darkvision to look farther down the passage into area 5 might spot a ruffian on guard there. Doing so requires a Wisdom (Perception) check contested by the ruffians's Dexterity (Stealth) check result.
The ruffian notices the characters if they carry any light or don't use stealth as they approach the bridge. The ruffian does not attack. Instead, it attempts to sneak away to the east to inform its companions in area 7 to release a cloud of debilitating gas (see the "Gas!" section of area 5). The ruffian moves undetected if its Dexterity (Stealth) check exceeds the passive Wisdom (Perception) score of any character who might notice its movements.
Western Passage. This passage is choked with rubble. Treat the area as difficult terrain (see "Difficult Terrain" in the player's handbook). The floor between the room and the hallway is fragile. Any weight in excess of 100 pounds loosens the whole mass and sends it tumbling down. Any creature on the ledge when it falls must make a DC 10 Dexterity saving throw, taking 2d6 bludgeoning damage on a failure, or half as much damage on a success. The creature also falls prone on a failed save (see "Being Prone" in the rulebook).
5. Guarded Crossing
The bandits have set up a smaller guarded post, from which they can see most people traveling into their encampment.
One ruffian stands watch in the crossing. It is hiding, and characters can spot it by succeeding on a Wisdom (Perception) check contested by the ruffian's Dexterity (Stealth) check. This guard is lazy and inattentive. If no characters are using light sources, each character can attempt a Dexterity (Stealth) check against the ruffian's passive Wisdom (Perception) score to creep by without being noticed.
If the ruffian spots the adventurers, it signals the bandits in area 7 to release debilitating gas (see the "Gas!" section), then shoots at the characters with its blaster rifle.
Locked Door. A locked door blocks further passage to the north. The door can be forced open with a DC 15 Strength check or hacked open with a DC 15 Intelligence (Technology) check. The door has an Armor Class (AC) of 5 and 10 hit points. If the hit points are reduced to 0, it collapses. The key to the door can be obtained from Klee's Quarters in area 8.
Gas!
Ventilation machinery in area 7 can be configured to vent debilitating gas into the passageway. If the ruffians in area 7 are signaled by the lookout in 5, they start venting debilitating gas. In the following round, on the ruffians' initiative, gas begins to flow into the passageway.
The gas threatens all creatures in the passageway. Creatures in the western ventilation shaft are safe, as are creatures in other rooms, unless they have broken down the northern door, in which case area 6 is also affected. Any creature can attempt a DC 10 Constitution saving throw versus poison. Any character that fails is poisoned for 2 rounds. See the rulebook for more information on poison and other conditions.
6. Living Quarters
The raiders stationed in the hideout use this area as a common room and barracks.
Three ruffians currently inhabit the room and one of them is a leader with 18 hit points. The ordinary ruffians sit playing pazaak near the entrance. The leader reclines near the containment chamber.
Syl Ordo, a human mercenary, is held prisoner in the holding cell in this room. The thugs have been beating and tormenting him, so he is weak and at 1 hit point.
The ruffian leader, Vexa, is second-in-command of the whole hideout. If she sees that the characters are getting the upper hand, she releases and grabs Syl and points her blaster at him. "Truce, or this human dies!" she shouts.
Vexa wants to oust Klee and become the new boss. If the characters agree to parley, Vexa tries to convince them to kill Klee in area 8, promsing to release Syl when they bring back the aquilash's head. Syl groggily warns the characters that they shouldn't trust the bandit, and he's right. If the characters take the deal, Vexa tries to force them to pay a rich ransom for Syl even after they complete their part of the bargain.
If the characters refuse to parley, Vexa shoots Syl and continues with the fight. Syl takes 1d6 energy damage from the shot, which is enough to drop him to 0 hit points. Quick-acting characters can try to stabilize him before he dies (see "Damage, Healing, and Dying" in the rulebook).
Roleplaying Syl
Syl Ordo is a grizzled human male of nearly fifty years who holds a notable reputation as a very accomplished soldier and later mercenary. He is a member of the Bounty Hunter's Guild, a coalition of bounty hunting groups often hired to provide muscle or preform a more delicate or difficult assassination.
Syl met Gundark in Nar Shaddaa and agreed to accompany him back to Formos. Syl wants to investigate the fate of Jorel Jinn, a diplomat, who disappeared shortly after arriving on Formos. Syl hopes to learn what happened to Jorel, assist Gundark in reopening the old mine, and help restore Formos to a civilized center.
Syl Ordo
Medium humanoid (human), neutral light
- Armor Class 16
- Hit Points 27 (5d8+5)
- Speed 30 ft.
STR DEX CON INT WIS CHA 13 (+1) 10 (+0) 12 (+1) 10 (+0) 11 (+0) 10 (+0)
- Saving Throws Str +3, Con +3
- Skills Perception +2
- Senses passive Perception 12
- Languages Galactic Basic
- Challenge 1 (200 XP)
Actions
Multiattack. The Syl makes two and melee attacks.
Vibroblade. Melee Weapon Attack: +3 to hit, reach 5 ft., one target. Hit: 5 (ld8 + 1) kinetic damage.
Assault Cannon. Ranged Weapon Attack: +2 to hit, range 100 ft./400 ft., one target. Hit: 5 (ldl0) energy damage.
Syl provides the characters with four pieces of useful information:
- The three Roksek clan siblings (Gundark, Terdark, and Nundark) recently located an entrance to the long-lost Wave Echo Mine, rumored to be one of the largest spice mines ever discovered on Kessel. (Share the information in the first two paragraphs of the "Background" section to the players at this time.)
- Klee, the aquilash who leads this raider band, had orders to waylay Gundark. Syl heard from the thugs that the The Black Rancor sent word that the quarren was to be brought to him. Syl doesn't know who or what the Black Rancor is.
- Gundark had navigational charts showing the secret location of Wave Echo Mine, but the bandits took it when they captured him. Syl believes that Klee sent the map and the quarren to the chief of the bandits at a place called Arthek Castle. Syl doesn't know where that might be, but he suggests someone on Formos might know. (It doesn't occur to Syl immediately, but a captured bandit might also be persuaded to divulge the castle's location. See the "What the Bandits Know" sidebar on page 10.)
- Syl's contact on Formos is a human diplomat named Jorel Jinn. The diplomat traveled to the planet two months ago to help establish order there. After the he received no word from Jorel, Syl decided to investigate.
Syl tells the characters that he intends to continue on to Formos, since it's the nearest settlement. He offers to pay the party 500 credits to provide escort. Although he has no money on him, Syl can secure a loan to pay the characters within a day after arriving on Formos. First, he hopes they'll put a stop to the bandit raids by clearing out the space station.
NPC Party Members
An NPC might join the party, if only for a short time. Here are some tips to help you run an NPC party member:
- Let the characters make the important decisions. They are the protagonists of the adventure. If the characters ask an NPC party member for advice or direction, remember that NPCs make mistakes too.
- An NPC won't deliberately put himself or herself in harm's way unless there's a good reason to do so.
- An NPC won't treat all party members the same way, which can create some fun friction. As an NPC gets to know the characters, think about which characters the NPC likes most and which ones the NPC likes least, and let those likes and dislikes affect how the NPC interacts with the party members.
- In a combat encounter, keep the NPC's actions simple and straightforward. Also, look for things that the NPC can do besides fighting. For example, an NPC might stabilize a dying character, guard a prisoner, or help barricade a door.
- If an NPC contributes greatly to the party's success in a battle, the NPC should receive an equal share of the XP earned for the encounter. (The characters receive less XP as a consequence.)
- NPCs have their own lives and goals. Consequently, an NPC should remain with the party only as long as doing so makes sense for those goals.
Developments
If he is rescued and healed, Syl Ordo remains with the party but is anxious to reach Formos as quickly as possible. He doesn't have any weapons or armor, but he can take a heavy pistol and vibrobaton from a defeated ruffian or use a weapon loaned to him by a character.
If Syl joins the party, see the "NPC Party Members" sidebar for tips on how to run him.
Treasure
Vexa carries various valuables worth 45 credits in total. Syl's gear, along with Gundark Roksek, was taken to Arthek Castle.
7. Ventilation Room
The ventilation systems for the complex can be controlled through complex machinery here.
Two ruffians guard the room. If the ruffians in area 5 spotted the characters and warned the bandits here, they are ready for trouble. The noise of the ventilation pumps means that the creatures in area 8 can't hear any fighting that takes place here, and vice versa. Therefore, as soon as a fight breaks out here, one ruffian radios to warn Klee in area 8.
Venitaltion Machines. The ventilation machines control some level of air flow into the different rooms in the complex. If the bandits had released gas into any other room, then the pumps will be depleted and unable to introduce effective quantities of gas anywhere.
8. Klee's Quarters
The leader of the bandits insists on keeping the bulk of the raiders' stolen goods in his den. The plunder from the last month of raiding and ambushing is here.
Klee the bandit leader shares this room with his pet junk droid and one ruffian. The aquilash is filled with delusions of grandeur and views himself as a mighty warlord just beginning his career of conquest. He is not entirely sane, referring to himself in the third person ("Who dares defy Klee?" or "Klee will build a throne from your bones, puny ones!"). The thugs under his command resent his bullying.
Carbonite Vent. The carbonite vent sprays out in a 10 ft by 5 ft rectangle adjacent to the eastern wall. Any character that comes in contact with the venting carbonite takes 1 cold damage or 1d6 cold damage to any creature that falls prone there. A creature can take each type of damage only once per round.
Maintenance Shaft A niche in the western wall forms the top of a shaft that descends 30 feet to area 3. See that area for information on climbing the shaft.
Supplies. The piles of sacks and crates can provide half cover to any creature fighting or hiding behind them. Most are marked with the words "Santhe Corporation", a merchant corporation with a warehouse and trading post on Formos. Hidden among the supplies is an unlocked chest belonging to Klee (see the "Treasure" section) and a key that unlocks the door to area 6. Any character who searches the supplies finds both the key and chest.
Bandit Leader
Medium humanoid, neutral dark
- Armor Class 16 (weave armor)
- Hit Points 26 (4d8 + 8)
- Speed 30 ft.
STR DEX CON INT WIS CHA 13 (+1) 16 (+3) 14 (+2) 11 (+0) 11 (+0) 12 (+1)
- Skills Athletics +3, Perception +2, Persuasion +3
- Senses darkvision 60 ft., passive Perception 11
- Languages Galactic Basic, aquilash, shyriiwook
- Challenge 1 (200 XP)
Actions
Multiattack. The Bandit Leader makes two blaster rifle or stock strike attacks.
Blaster Rifle. Ranged Weapon Attack: +5 to hit, range 60/240 ft., one target. Hit: 7 (1d6 + 3) energy damage.
Stock Strike. Melee Weapon Attack: +3 to hit, reach 5 ft., one target. Hit: 3 (1d4 + 1) kinetic damage.
Thermal Grenade (1/day). The bandit leader throws a grenade, choosing a point within 40 feet. Each creature within 10 feet must make a DC 14 Dexterity saving throw. A creature takes 2d6 fire and 2d6 kinetic damage on a failed save, or half as much as on a successful one. Additionally, on a failed save, the creature is knocked prone.
Developments
If Klee is warned by the ruffians in area 7 that the hideout is under attack, he, his droid, and the ruffian hide behind the piles of supplies, hoping to ambush the characters when they enter the cave.
If Klee and company are not warned about possible attackers, the characters have a good chance to surprise them. The easiest way for the characters to achieve this is to climb through the maintenance shaft from area 3, since Klee does not expect an attack from that direction.
If the droid is destroyed, the aquilash attempts to climb down the chimney to area 3 and flee the cave complex.
Treasure
The captured stores are bulky, and the characters will have difficulty transporting them. If they return the supplies to the Santhe Corporation outpost on Formos (see part 2, "Formos''), they earn a reward of 500 credits and the friendship of Linene and her company.
In addition to the stolen provisions, Klee has a chest that contains 170 credits, two medpacs, and a statuette of a frog with tiny golden orbs for eyes (400 credits). The frog statuette is small enough to fit in a pocket or pouch.
What's Next?
The next stage of the adventure takes place on Formos. The characters should have plenty of reasons to visit the planet:
- If the characters began with the "Meet Me on Formos" adventure hook, they can be paid by Bartleby's Provisions for delivering the shipment of supplies.
- If the characters rescued Syl Ordo, the wounded warrior would appreciate an escort to Formos (and will pay 500 credits for the service).
- Details contained within the characters' backgrounds might prompt them to seek out specific NPCs on the planet.
It's also possible that players might decide to do something different, such as striking out in search of Arthek Castle (in part 3 of the adventure). If that's the case, skip ahead to that section.
Awarding Experience Points
Exploring the bandit hideout and defeating Klee and his allies completes a story milestone; Award each character 275 XP. This should provide enough XP for the characters to attain 2nd level. Make sure they've recorded their XP totals on their character sheets.
In the next part of the adventure, you'll award XP differently. The characters will earn experience points based on the monsters and traps they overcome, the NPCs they interact with, and the goals they accomplish.
If the adventurers come up with a nonviolent way to neutralize the threat that a monster poses, award them experience points as if they had defeated it.
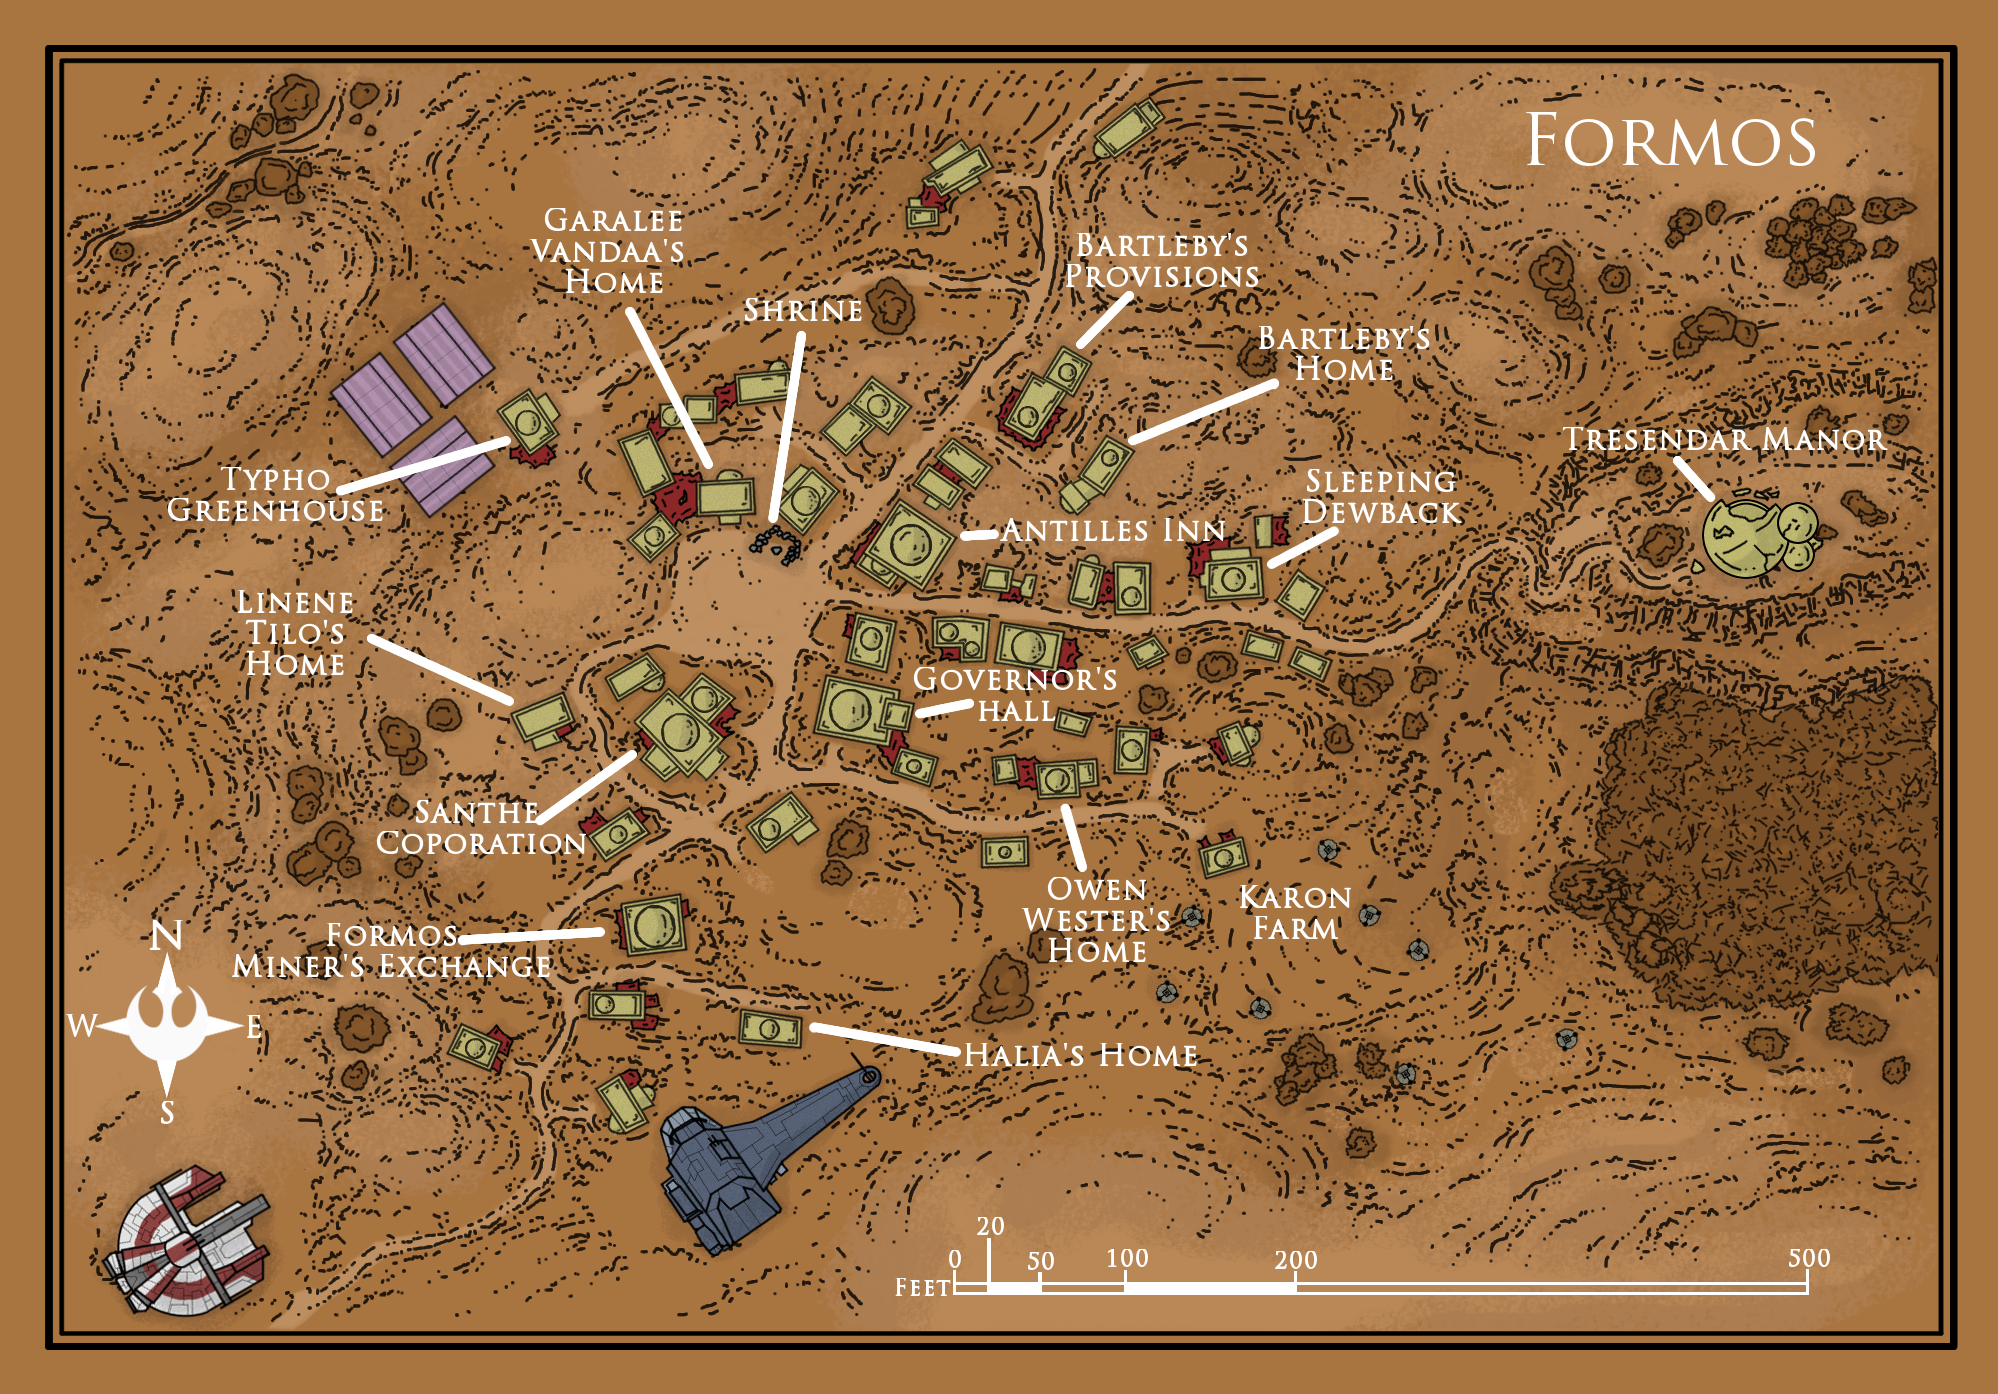
Part 2: Formos
The frontier planet of Formos has been inhabited for hundered, if not thousands, of years. When Kessel was first discovered, Formos quick becake a thriving settlement. Unfortunately, with the rise in wealth, came an accompanying rise in greed and violence. Mercenaries and bandits laid wast to the settlement, and it became a backwater outpost, a shade of its former glory.
In the last three or four years, hardy settlers from inner rims and Huttspace have begun the hard work of reclaiming the ruins of Formos. A bustling frontier settlement has grown up on the site of the old town, and is home now to farmers, traders, miner and prospectors drawn by stories of spice and coaxium in the nearby systems. Unfortunately, more than a few bandits and brigands have settled here as well, taking advantage of the fact that the area has no local governor or authority to chase them off. A gang known as the Redbrands has controlled Formos for the past two months, extorting and bullying everyone in settlement. The gang is led by a mysterious figure known to the townsfolk as Deshstaff.
When the characters first arrive on Formos, read:
If Syl Ordo is with the party, add:
Syl's plan is to get some rest at the Antilles Inn, then search Formos for signs of the missing diplomat, Jorel Jinn. When his investigation hits a dead end, he sets up a meeting with Townmaster Owen Wester (see the "Governor's Hall" section).
During this part of the adventure, the characters can visit the various locations on Formos and talk to the NPCs there. (See the "Settlement Description" section for details.) The settlement is small enough that it takes only a few minutes to stroll from one end to the other. However, the characters arrive late in the day and can't get to more than one or two locations before it's time to seek lodgings for the night.
Some locales the characters should visit include the following:
- Bartleby's Provisions. If the characters have the cargo load of supplies from the "Meet Me on Formos" adventure hook, they are meant to deliver it to this shop.
- Santhe Corporation. If the characters retrieved the stolen goods from the bandit hideout, they might want to return them to the rightful owner.
- Antilles Inn. If the characters have Syl Ordo with them, the mercenary suggests heading for this inn to find lodgings. If the characters are otherwise looking for a place to eat and sleep, they discover that the Antilles Inn appears to be the best available option.
Encounters on Formos
When the characters explore Formos, you don't need to keep track of how much time is spent at each location. Instead, imagine that you're directing an old-style western movie. Your goal is to present several scenes in which the characters walk into a store or saloon and meet the people there. By interacting with these NPCs, the characters learn what the NPCs need or what information they want to share, then can move on to the next location. These scenes are a series of roleplaying encounters that take place over the course of a couple of days of game time.
To begin, ask the players where they want to go and what they want to do in town. For example, you could tell them, "There's an inn, a town hall, a shrine, general stores and trading posts, and a few other homes and businesses. Where do you want to go?" When the players pick a spot, refer to the description in the following section, introduce the NPCs there, and let the interaction begin.
The Antilles Inn. If the players aren't sure what their characters should do, encourage them to begin at the Antilles Inn. The NPCs there are "pointers" who can direct the characters toward the various adventure opportunities and important rumors that can be found in other parts of the town. By visiting the inn, the characters learn what other places they should visit.
Redbrand Ruffians. Sooner or later, the characters run into the thugs who run Formos. All you need to do is choose when the ruffians appear. After the characters have had a chance to visit several locations in town and talk to the townsfolk, they might decide to go looking for the Redbrands. When they do, run the "Redbrand Ruffians" encounter. Alternatively, if the characters are reluctant to seek out the ruffians, the Redbrands can come looking for them at a time of your choosing.
Finding Arthek Castle. The characters might want to seek out Arthek Castle to find and rescue Gundark Roksek. Most of the townsfolk are preoccupied with the Redbrands, and no one in town knows the location of Arthek Castle. Kua Karon, Syl Ordo, and Halia Graven can offer suggestions on how the party might find someone who knows the location.
Important NPCs
Here is a quick summary of the most important NPCs on Formos, and their relevance to the adventure.
Tobin Antilles Innkeeper
Elmer Bartleby Owns a trading post; owes money to the party if you are using the "Meet Me on Formos" adventure hook
Daran Typho Member of the Sector Rangers with a quest for the party
Linene Tilo Runs a trading post and offers a reward for retrieving her supplies
Halia Graven Member of the Czerka Corporation with a quest for the party
Kua Karon Helpful ardennian farmer whose son, Carp, knows a secret way into the Redbrands' hideout
Garalee Vandaa A female chagrian member of the Jedi Order with a quest for the party
Owen Wester Governor of Formos with a quest for the party
Syl Ordo Member of the Bounty Hunter's Guild with two quests for the party
Roleplaying Formos NPCs
If you're not sure how to run an NPC, a good way to start is to have the character introduce himself or herself, welcome the characters to Formos, and ask who they are and what they want. You don't need to be an actor or stand-up comedian to get good drama or humor out of your NPCs, but if you want to ham it up, here's some advice:
- Relax. Don't worry about impressing your players with your thespian skills (or lack thereof).
- Get inside the NPCs' minds. Imagine how they might react to the characters, and strive to be realistic.
- Mug it up. Scowl, smile, snarl, flutter your eyelashes, pout, cross your eyes, rub your hands together - whatever it takes to make your NPCs come to life.
- Try different voices. Borrow distinctive speech patterns from real life, movies, and television. Adjust the volume as appropriate. An NPC can be loud, soft-spoken, or something in between.
- Keep the game moving. Let the players steer the interactions with the NPCs.
The characters have no reason to fight ordinary townsfolk. Hence, no game statistics are provided for them. If statistics become necessary, use the commoner stat block to represent an adult NPC of any race.
Town Description
The settlement on Formos is small, so the characters can visit multiple locations and NPCs throughout a given day. If the players choose to have their characters split up, they can cover more ground, but you'll have to take turns running each interaction for each player. Splitting the party also makes the "Redbrand Ruffians" encounter potentially more dangerous.
The following sections detail specific locations in town.
Antilles Inn
This modest inn has six rooms for rent (Syl Ordo takes one). If the characters decide to stay here, see "Food, Drink, and Lodging" in the rulebook for pricing. (The characters' other alternative for lodging is to camp outside the town, or to persuade a farmer such as Daran Typho or Kua Karon to let them sleep in a hayloft.)
The proprietor is a short, friendly young human male named Tobin Antilles. Tobin is a native of the Nar Shaddaa. He came to Formos to prospect, but soon realized that he knew a lot more about running an inn than he did about mining. The new town offered a good opportunity to become established. Tobin is upset that the Redbrands have been allowed to terrorize the town, and that Owen Wester, the governor, has done nothing to curtail them. However, he tries not to stir up trouble for fear that the Redbrands might retaliate against his wife and children.
Rumors. Spending a little time in the common room and chatting up the townspeople can provide the characters with a number of good leads to explore in and around town. NPCs present in the Antilles Inn and the rumors they pass on include:
- Narth, an old farmer: "Garalee Vandaa, who oversees the local shrine, recently left town for a few days, then returned wounded and exhausted." (See the "Force Shrine" section for more information.)
- Elsa, a gossipy barmaid: "Daran Typho, the greenhouse keeper, used to be a soldier." (See the "Typho Greenhouse" section for more information.)
- Lanar, a miner: "Mandos have been seen in the nearby systems. The governor is looking for someone to run them off." (See the "Governor's Hall" section for more information.)
- Trilena, the innkeeper's wife: "Thel Dendrar, a local droid mechanic, stood up to the Redbrands a ten day ago when they came by his shop and leered at his wife. The ruffians murdered him. Several townsfolk saw it happen. The Redbrands grabbed his body, and now his wife, daughter, and son have gone missing too." (Unknown to Trilena and the other townsfolk, the Redbrands took Thel's wife and children to their secret hideout.)
- Pip, Tobin's young son: "Kua Karon's son Carp said he found a secret outside of town, but Redbrands almost caught him." (See the "Karon Farm" section for more information.)
- Freda, a fabric trader: "The Redbrands hassle every business in town, except for the Formos Miner's Exchange. They don't want trouble with Halia Graven, who runs it." (See the "Formos Miner's Exchange" section for more information.)
These leads should point the characters toward opportunities for adventure on and around Formos. In addition, any NPC at the inn can tell the characters that the Redbrands frequent the Sleeping Dewback tap house at the east end of town - and that the ruffians are trouble.
Bartleby's Provisions
Bartleby's is the biggest trading post on Formos. Its shelves stock most ordinary goods and supplies, including survival gear and rations. The place is open from sunup to sundown. Bartleby's does not stock weapons or armor, but characters can purchase other gear here, with the exception of items that cost more than 250 credits. (For prices, see "Equipment" in the rulebook.) Characters in need of weapons or armor are directed to the Santhe Corporation outpost (see that section).
The proprietor is Elmer Bartleby, a lean and balding human male shopkeeper of fifty years with a kindly manner. He employs a couple young clerks (Ander and Thistle) who help load cargo, and who wait on customers when Bartleby isn't around.
Delivering the Supplies. If the characters began play with the "Meet Me on Formos" adventure hook, their orders are to deliver the shipload of supplies to Bartleby's. Bartleby pays the agreed amount (100 credits to each character) and takes possession of the supplies. If the characters tell him of Gundark Roksek's capture, Bartleby is saddened by the news and encourages the party to find and rescue the quarren. He considers Gundark a friend and was excited by talk of discovering the lost mine on the nearby Kessel. If the party hasn't already learned details of the mine from Syld Ordo, a character who succeeds on a DC 15 Intelligence (Lore) check can relate the information from the first two paragraphs of the "Background" section at the start of the adventure.
Bartleby also mentions that two more Roksek brothers, Nundark and Terdark, are camped somewhere outside town. Bartleby hasn't seen them in a ten day and expects the brothers to return "any day now" to resupply. What Bartleby doesn't know is that Terdark is dead and Nundark is a prisoner in the mine. See part 4, the "Wave Echo Mine" section, for more information.
Bartleby's News. If the characters ask Bartleby how business is going, the merchant tells them that the Redbrands are making it hard on everyone, shaking down local businesses and flouting the governor's authority. If the characters seem of a mind to do something about it, he tells them that the Redbrands frequent the Sleeping Dewback tap house.
Typho Greenhouse
Daran Typho is a retired Sector Ranger who lives in a small building beside a complex of greenhouses. A fit, aging chiss, Daran is a fighter who served as a ranger for many years in the inner rims of the galaxy. Upon retiring, he returned to the Formos region, his original home.
Daran is a member of the Sector Rangers, a vigilant group that seeks to preserve law throughout the galaxy. The order is always vigilant, ready to enforce justice and enact retribution against any who violate the laws. Though he is no longer active in the order, he keeps an eye on happenings around Formos. He is happy to trade news with fellow veterans, especially those who appear to hold to these virtues.
Daran is concerned about the Redbrands, and he would like to see a group of adventurers teach the ruffians a lesson. He tells the characters that it's time someone took a stand against the Redbrands' leader, Deshstaff. Daran knows the Redbrands hang around the Sleeping Dewback tap house, but he can also tell the characters that the main Redbrand safe house lies under Tresendar Manor, the ruin at the east edge of town. (See the "Tresendar Manor" section for more information.)
Quest: The Derelict Sandcrawler. Daran has heard stories someone digging around in the ruins of a derelict sandcrawler on Formos. More disturbingly, several prospectors have reported being chased from the area by droids. He asks the characters to visit the ruins and find out who's there and what they're up to. Daran knows that the ruins are potentially quite valuable and there may be dangerous technology dormant there. If the party pursues this quest, see "The Derelict Sandcrawler" (page 32).
Joining the Sector Rangers
If the party deals with the Redbrands and investigates the ruined sandcrawler, Daran Typho privately approaches certain members of the group to urge them to join the Sector Rangers. He speaks with those who exemplify the virtues of the order, such as martial prowess and lawfullness. If a character agrees, Daran awards the person the title of Ranger.
Santhe Corporation
This building is owned by the Santhe Corporation, a merchant company operating throughout the galaxy. They ship finished goods to Formos and other small settlements throughout the region, but this outpost has been hard hit by banditry. The most recent Santhe shipment due on Formos never arrived. (It was attacked and its cargo captured by the Arthek Raiders.)
The master of the Formos post is a sharp-tongued human woman of thirty-five named Linene Tilo. She knows that bandits have raided Santhe caravans, but she doesn't know who is responsible.
In a back room, Linene keeps a supply of armor and weapons, all of which are for sale to interested buyers. (For prices, see "Equipment" in the rulebook.) Linene has a few scruples, however, and won't sell weapons to anyone she thinks might be a threat to the settlement. Among those with whom she refuses to do business are the Redbrands. She warns the characters that the ruffians are trouble and advises them to avoid the Sleeping Dewback tap house.
Recovered Goods. If the characters return the stolen goods found in area 8 of the Bandit hideout (or if they left the goods but reveal where they can be found), Linene gives them a reward of 500 credits and promises to help the characters any way she can.
Formos Miners Exchange
The Miner's Exchange is a trading post where local miners have their valuable finds weighed, measured, and paid out. In the absence of any local lord or authority, the exchange also serves as an unofficial records office, registering claims to various mines and excavations throughout the local systems. There isn't any real spice or coaxium rush on Formos, but enough wealth is hidden in the nearby systems to support a good number of independent prospectors.
The exchange is a great place to meet people who spend a lot of time out and about in the local systems surrounding Formos. The guildmaster is an ambitious and calculating human woman named Halia Graven. In her attempts to establish the Miner's Exchange as the closest thing the town has to a governing authority, she acts as more than a simple merchant. She is also an agent of the Czerka Corporation, a powerful organization that seeks to exert secret control over the galaxy through wealth and influence. Halia is working slowly to bring Formos under her control, and can become a valuable patron to the characters if they don't cross her.
Halia doesn't know the location of Arthek Castle, but she has heard that the Redbrands have had wookiee bandits working for them recently. She suggests the wookiees might know the location. She leverages this information to try to persuade the characters into helping her deal with the Redbrands.
Quest: Halia's Job Offer. If approached by characters she believes she can control, Halia explains that the Redbrands are a problem. She tells how the ruffians loiter around the Sleeping Dewback tap house and have a base under Tresendar Manor, on the east edge of town. She then offers the characters 1000 credits to eliminate the Redbrand leader, whom the outlaws call Deshstaff, and bring her any correspondence found in the leader's quarters. Halia doesn't reveal that she wants to take over the Redbrand operation herself. A DC 15 Wisdom (Insight) check indicates she has ulterior motives for wanting the Redbrand leader dead.
Joining the Czerka Corporation
If the party disposes of the Redbrand leader, Halia Graven approaches certain members of the group to urge them to join the Czerka Corporation. She speaks with those who share Czerka's pursuits, such as wealth and power. Even if the party wipes out the Redbrand gang, Halia might still extend the offer in an effort to gain friends (and spies) within the party. If a character agrees, Halia gives the individual the title of Czerka Agent.
Karon Farm
A wise female ardennian, Kua Karon is a pragmatic moisture farmer who seems to know everything that goes on in town. She is a kind host, and is willing to let the characters stay on her farm if they don't want to stay at the Antilles Inn.
Carp's Story. Kua's son, Carp, is a spirited and precocious ardenian lad. He is enchanted by the idea of being a soldier and says that he was playing in the woods near Tresendar Manor when he found a secret tunnel in a thicket. A couple of "big ugly bandits"came out of the tunnel when he was there, and met with a pair of Redbrands. They didn't see him, but it was close. Carp thinks that the bandits have a secret lair under the old manor house. He can take the characters to the tunnel or provide them with directions to the location. The tunnel leads to area 8 in the Redbrand hideout.
Quest: Reidoth the Sage. Kua is a longtime friend of a mystic named Reidoth. If she figures out that the characters are looking for specific sites in the area, such as Arthek Castle or Wave Echo Mine, she suggests that they visit Reidoth and ask for his help, "since there's not a planet he doesn't know." She tells the characters that Reidoth recently set out for the ruins on the planet of Norval II. The ruins are in a nearby ststem, and she provides directions so the characters can easily find the place. If the party pursues this quest, see "Ruins of Norval II" (page 34).
The Force Shrine
Formos's only temple is a small shrine made of stones taken from the nearby ruins. Most inhabitants are not fully sure what it is dedicated to, but often find comfort there somehow.
The shrine is in the care of a scholarly acolyte named Garalee Vandaa, a zealous chagrain who despairs of ever ridding Formos of the Redbrands. Garalee is a member of the jedi order, a group of lighside force users who advocate equality and often covertly oppose the abuse of power. The Jedi gather information throughout the land to thwart tyrants and those that fall to the dark side of the force. They aid the weak, the poor, and the oppressed. Garalee regularly reports to her superiors on events in and around Formos.
Quest: The Ghost's Bargain. Recently, Garalee's superiors asked her to undertake a delicate mission. They wanted her to persuade a force ghost named Agatha to answer a question about a holocron. Garalee sought out Agatha in her lair on Formos' forest moon, but the creature did not appear for her.
Garalee desires an intermediary to bring Agatha a suitable gift, a jeweled silver comb, and persuade the ghost to tell what she knows about the location of a holocron belonging to a legendary jedi named Shan. Garalee believes that a character who flatters Agatha's vanity might be able to trade the comb for an answer. She offers the quest to the characters and offers them three medpacs as payment for their efforts. If the party pursues this quest, see "Agatha's Lair" (page 32).
Joining the Jedi Order
If the party helps Garaele learn the fate of Shan's holocron, the chagrian privately approaches certain members of the group to urge them to join the Jedi, if they are not already affiliated. She speaks with those who exemplify the virtues of the order and possess a desire to enact positive change through the force. If a character agrees, Garalee suggests they seek out Jedi Masters for training (not included in this campaign, this could be a hook for future adventures).
The Sleeping Dewback
This rundown tap house is a dirty, dangerous watering hole at the end of Formos's main street. It is frequented by Redbrand thugs and operated by a surly female gran named Grista. If the characters choose to visit the place, run the "Redbrand Ruffians" encounter.
Governor's Hall
Formos has no functioning government, but the townsfolk elect someone to serve as governor each year. The governor serves as a judge in minor disputes and keeps any records that need to be kept. The current governor is a male human banker named Owen Wester - a fat, pompous old fool. Completely intimidated by the Redbrands, he claims that they're "just a mercenary guild, and not all that much trouble, really."
The governor's hall has a small but serviceable jail in the cellar. The jail consists of two cells, and Owen carries keys to the cell doors.
Quest: Mando Trouble. Wester is looking for someone to head to the Gara Station orbiting near Eadu, where travelers have reported trouble with a band of Mandalorians. He offers 1000 credits to any group that can take care of the problem. If the party pursues this quest, see "Gara Station" (page 40).
Quest: Finding Arthek Castle. After resting at the Antilles Inn, Syl Ordo establishes himself at the governor's hall. As an agent of the Bounty Hunter's Guild, his goal is to help the Roksek brothers and put Wave Echo Mine back into production, believing that bringing prosperity to the region will help civilize the planet, and help the guild overall.
Syl also encourages the characters to keep up the pressure on the Arthek Bandits. He offers the party a 5000 credit reward if they can locate Arthek Castle and defeat or drive off the bandit's chieftain. Syl suggests the party might find the castle by searching the local systems for more raiding parties (see "Space Encounters" in the "Triellus Trade Route" section of part 3).
Quest: Finding Jorel. After questioning several locals, Syl learns that Jorel Jinn, a fellow member of the Bounty Hunter's Guild, disappeared while exploring the area around Tresendar Manor about two months ago, shortly after arriving on Formos. Syl asks the characters to investigate the manor and the surrounding area to find and bring back Jorel - or what's left of him, if something killed him. Syl describes Jorel as "a short, dark-bearded human in his thirties."
Unknown to Syl, Jorel created the Redbrands, installed himself as their leader, and took the alias Deshstaff to conceal his identity. (The Redbrands call him that because he carries a staff infused with Desh, a rare and valuable metal.) Once he learns the truth about Jorel, Syl expresses a desire to have the man captured and transported to the Guild to face the judgment of a higher authority. Regardless of Jorel's fate, Syl rewards the party with 2000 credits for eliminating the Redbrand threat.
Joining the Bounty Hunter's Guild
If the party eliminates the bandit threat from Arthek Castle or uncovers Jorel's treachery, Syl Ordo privately approaches certain members of the group to urge them to join the Bounty Hunter's Guild. He speaks with those who exemplify a desire for civilization and commitment to action. If a character agrees, Syl Ordo awards the individual the title of Hunter.
Tresendar Manor
More a castle than a house, Tresendar Manor stands at the east edge of town on a low hillside amid woods and thickets. The ancient manor has long been abandoned, but its cellars have been converted into a Redbrand stronghold. If the characters investigate this place, they find the entrance to the Redbrand hideout.
Redbrand Ruffians
Within a day or so of the characters' arrival on Formos, a confrontation with the Redbrands becomes inevitable. This can happen in a number of different ways:
- After speaking with a number of NPCs in town, the characters decide to confront the Redbrands at the Sleeping Dewback tap house.
- The characters decide to investigate Tresendar Manor. Skip the encounter and go straight to "Redbrand Hideout."
- If the characters show no interest in the Redbrands, a gang of the ruffians seeks them out and picks a fight in street. Run this encounter as the characters are leaving one of the locations in the town.
Confrontation
If the characters confront the Redbrands at the Sleeping Dewback, read:
If the Redbrands confront the characters in the street, read:
Continue the insults and baiting as long as you like. The Redbrands attack in a round or two if the characters don't. Neither side is surprised, because it's obvious that a fight is brewing.
The group consists of four Redbrand ruffians. If three of them are defeated, the last one flees toward Tresendar Manor.
Redbrand Ruffian
Medium humanoid (human), neutral dark
- Armor Class 14 (weave armor)
- Hit Points 16 (3d8 + 3)
- Speed 30 ft.
STR DEX CON INT WIS CHA 11 (+0) 14 (+2) 12 (+1) 9 (-1) 9 (-1) 11 (+0)
- Skills Intimidation +2
- Senses passive Perception 9
- Languages Basic
- Challenge 1/2 (100 XP)
Actions
Multiattack. The ruffian makes either two melee attacks with their techblade or two ranged attacks with their blaster carbine.
Techblade. Melee Weapon Attack: +4 to hit, reach 5 ft., one target. Hit: 5 (1d6 + 2) kinetic damage.
Blaster Carbine. Ranged Weapon Attack: +4 bonus to hit, range 100/400 ft., one target. Hit: 5 (1d6+2) energy damage.
Developments
Redbrands who are captured or charmed by the characters can impart useful information. (See the "What the Redbrands Know" sidebar on this page.) Governor Owen Wester won't want to keep Redbrand prisoners until he knows the whole gang has been defeated, but the characters can easily persuade or intimidate him into locking up any prisoners they capture for at least a few days.
If the characters kill the ruffians, most members of the settlement are grateful. One exception is the governor, who fears Redbrand retaliation. Wester doesn't punish the characters but warns them not to cause trouble.
Awarding Experience Points
Divide 400 XP equally among the characters if the party defeats the ruffians.
Do the Players Need Direction?
After the "Redbrand Ruffians" encounter, the players should feel it's time to deal with the rest of the gang. If they aren't clear that investigating the Redbrand hideout should be their next move, have one of the NPCs they've already met in town make the suggestion directly and point them toward Tresendar Manor. If the players want to follow other leads in the area, it's okay to move on to part 3 of the adventure and let the ruffians wait. The next time the characters return to Formos, make it clear that the Redbrands are causing even more trouble, and that they need to be dealt with.
Redbrand Hideout
The Redbrands' base on Formos is a dungeon complex under Tresendar Manor. Before the manor was ruined, its cellars served as safe storage for food and water in the event that the estate was attacked, while an adjoining crypt provided a resting place for the deceased members of the Tresendar family. The Redbrands have since expanded the cellars to suit their own purposes, adding slave pens, workshops, and barracks.
If the characters begin their search at Tresendar Manor, they enter the dungeon in area 1. If they instead follow Carp Karon to the secret tunnel the lad found, they enter the dungeon by way of area 8.
General Features
The hideout consists of well-built dungeon chambers with flagstone floors and walls of dressed stone blocks. The western end of the complex is lower than the eastern end, with stairs leading down as the characters explore.
Ceilings. Passages and chambers are 10 feet high unless otherwise indicated.
Doors. All doors are made of wood with metal handles, hinges, and built-in locks. They are unlocked unless the text states otherwise. Jorel Jinn (area 12) and a wookiee named Mosk (area 9) each carry a key card that can lock or unlock every door in the complex.
A locked door can be picked with a security kit and a successful DC 10 Dexterity check. A door can also be broken down with a successful DC 20 Strength check.
What the Redbrands Know
If the characters charm or successfully question any of the Redbrands, they can learn the location of their hideout under Tresendar Manor as well as the following useful information:
- The leader of the Redbrands is a human known as Deshstaff, so named because his staff is made of Desh, a somewhat rare metal. (Only Jorel Jinn and the Black Rancor know Deshstaff's real name.) Deshstaff's chambers are in the western end of the stronghold (see areas 11 and 12).
- A mysterious figure called the Black Rancor has hired the Redbrands to frighten off people and intimidate the locals, for reasons unknown. The Black Rancor has sent wookiees to reinforce the Redbrands and provide extra muscle (see area 9).
- The lower part of the complex is guarded by a massive spider like droid (see area 8).
- The Redbrands have a handful of captives in a holding area "near the old crypts," which are guarded by ancient droids (see areas 4 and 5).
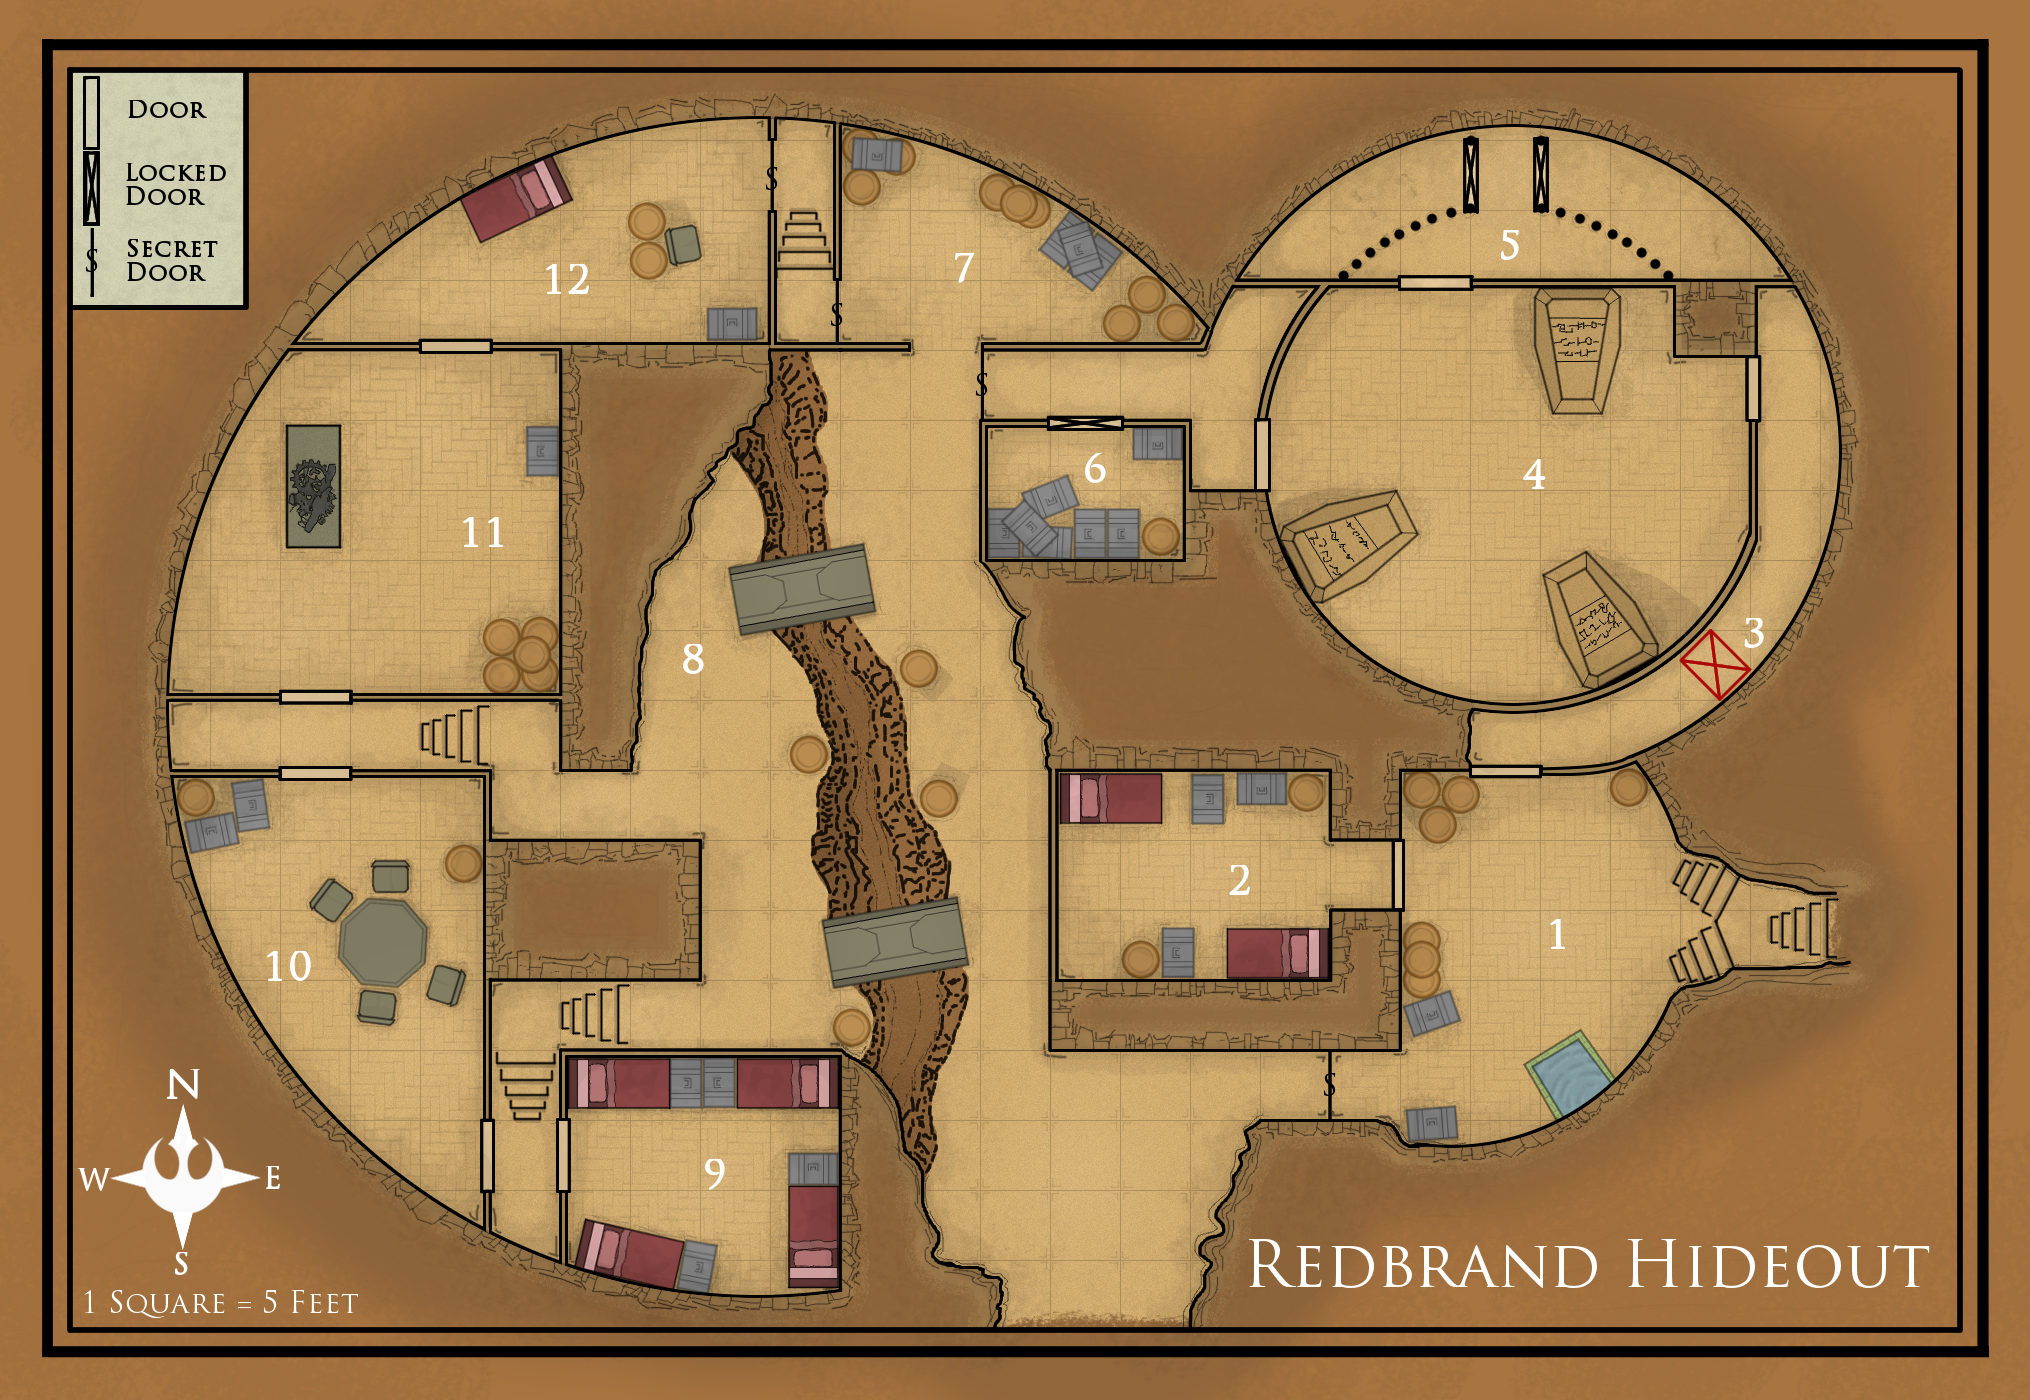
Secret Doors. An "S" on the Redbrand Hideout map indicates the location of a secret door.
Secret doors are made of stone and blend in with the surrounding walls. Spotting a secret door from a distance of no more than 10 feet without actively searching for it requires a passive Wisdom (Perception) score of 15 or higher, whereas a character who takes the time to search the wall can find the secret door with a successful DC 10 Wisdom (Perception) check. Secret doors swing open on hidden iron hinges and are not locked.
Light. Most areas are brightly lit by wall and ceiling mounted lights.
1. Cellar
Any exploration of the manor grounds finds it deserted, but with plenty of tracks leading to a stone staircase just off the empty ruin of a large kitchen. At the bottom of the stairs stands an unlocked door with a cellar beyond.
When the characters open the door, read the following:
This room appears to be a large storage cellar, exactly the sort of thing one might expect to find beneath an old manor. The Redbrands want to keep their base of operations hidden, so other than the barrels filled with fresh provisions, nothing in this room gives away their presence.
The barrels contain food and water. Moving barrels around to thoroughly search them is a noisy activity that attracts the attention of the Redbrands in area 2.
Cistern. This rectangular reservoir is clean and filled with cold, fresh water. It is 10 feet deep with a rim 2 feet higher than the surrounding floor (so that the bottom of the cistern is 8 feet below the floor). Drain pipes from the roof of the old manor above fill the cistern with water. A waterproof satchel hangs from a submerged rope attached along the western wall of the cistern, about 2 feet below the surface of the water. It's not visible from above the water, but can be found with a successful DC 15 Wisdom (Perception) check or automatically by a character probing the cistern with a pole or jumping in. The satchel contains some valuable items (see the "Treasure" section).
Secret Door. A secret door is located in the southwest corner of the room. See the "General Features" section for more information on secret doors.
Developments
No monsters or villains are found in this area, but the ruffians in area 2 take notice if the characters make a lot of noise here. They creep into the room, gaining surprise if the characters don't hear them (see "Surprise" in the rulebook). If the ruffians fight in this area and two are defeated, the last ruffian might reveal the secret door by fleeing in that direction.
Treasure
The satchel hidden in the cistern is waterproof and contains a medpac, a basic computer spike, a basic security spike, 500 credits, and a clean set of ordinary travel clothing. This is a getaway kit that Jorel keeps here in case of an emergency.
2. Barracks
Most of the Redbrands' human members have lodgings on Formos. This barracks is a good place to lie low after shaking down local miners and traders.
Three Redbrand ruffians are resting in this room. If they hear a good deal of noise in area 1 (including loud voices or barrels being rolled around), they prepare themselves for a fight and try to surprise intruders.
The barrels here contain similar provisions to those in area 1.
Redbrand Ruffian
Medium humanoid (human), neutral dark
- Armor Class 14 (weave armor)
- Hit Points 16 (3d8 + 3)
- Speed 30 ft.
STR DEX CON INT WIS CHA 11 (+0) 14 (+2) 12 (+2) 9 (-1) 9 (-1) 11 (+0)
- Skills Intimidation +2
- Senses passive Perception 9
- Languages Basic
- Challenge 1/2 (100 XP)
Actions
Multiattack. The ruffian makes either two melee attacks with their techblade or two ranged attacks with their blaster carbine.
Techblade. Melee Weapon Attack: +4 to hit, reach 5 ft., one target. Hit: 5 (1d6 + 2) kinetic damage.
Blaster Carbine. Ranged Weapon Attack: +4 bonus to hit, range 100/400 ft., one target. Hit: 5 (1d6+2) energy damage.
Treasure
All three Redbrands wear belt pouches holding treasure. The first holds 86 credits; the second, 62 credits; and the third, 30 credits and two gemstones (100 credits each). Additionally, three dirty scarlet cloaks hang from the bunks.
Awarding Experience Points
Divide 300 XP equally among the characters if the party defeats the ruffians.
3. Trapped Hall
This area was part of Tresendar Manor's original cellars. The Redbrands dug out the dirt beneath the stone floor, creating a hidden pit trap.
The pit trap in the middle of the hallway is hidden under a false floor consisting of loose stone tiles laid atop breakaway timbers. The tiles and timbers collapse under 100 or more pounds of weight. A character searching the hall for traps can spot the covered pit with a successful DC 15 Wisdom (Perception) check. A successful check also reveals narrow ledges on the north and south sides of the pit. A creature attempting to skirt around the pit using one of these ledges must succeed on a DC 10 Dexterity (Acrobatics) check.
A creature that triggers the trap or fails the Dexterity check to skirt around the edge of the pit must attempt a DC 15 Dexterity saving throw to catch the edge. On a failed save, the creature falls 20 feet to the dirt floor of the pit, taking 2d6 kinetic damage and landing prone.
Awarding Experience Points
Divide 100 XP equally among the characters if the party avoids or survives the pit trap.
4. Tresendar Crypts
The elders of the long-gone Tresendar family were once laid to rest in this mausoleum.
The three Junk Droids guard the sarcophagi, they attack any creature that comes within 10 feet of the door leading to area 5 or the door leading to area 6, unless that creature is wearing the scarlet cloak of the Redbrands.
The stone lid of each sarcophagus is carved to depict the person entombed within - two human males and one human female, all of noble bearing. If opened, the tombs contain mostly moldering bones and scraps of clothing, but see the "Treasure" section.
Developments
Fighting in this room alerts the Redbrands in area 5 that trouble is on the way.
Treasure
Amid the bones in each sarcophagus is a valuable signet ring (500 credits).
Awarding Experience Points
Divide 150 XP equally among the characters if the party defeats the droids.
Junk Droid
Medium droid, unaligned
- Armor Class 13 (armor scraps)
- Hit Points 13 (2d8+4)
- Speed 30 ft.
STR DEX CON INT WIS CHA 10 (+0) 14 (+2) 15 (+2) 6 (-2) 8 (-1) 5 (-3)
- Damage Vulnerabilities Ion
- Damage Resistances Necrotic, Poison, Psychic
- Condition Immunities poison, disease
- Languages Speaks binary, Galactic Basic
- Challenge 1/4 (50 XP)
- Circuitry. The droid has disadvantage on saving throws against effects that would deal ion or lightning damage.
Actions
Multiattack. The junkyard droid makes two blaster carbine attacks or two vibroblade attacks.
Blaster Carbine. Ranged Weapon Attack: +4 to hit, range 60/240 ft., one target. Hit: 5 (1d6+2) energy damage.
Vibroblade. Melee Weapon Attack: +4 to hit, reach 5ft., one target. Hit: 5 (1d6+2) kinetic damage.
5. Slave Pens
For the past two months, the Redbrands have been capturing travelers in the area and holding them in these pens until they can be sold into slavery.
Two Redbrand ruffians in scarlet cloaks stand guard here, though they spend most of their time taunting the hapless prisoners (see the "Captives" section). If they hear fighting in area 5, they take up positions against the wall near the door, then try to surprise intruders. The captives are too intimidated to shout warnings or call for help.
The heap of clothing belongs to the various captives who have been housed here over the last two months - at least a dozen people to judge by the size of the pile.
Cell Doors. The cell doors feature simple locks requiring a security kit and a successful DC 10 Dexterity check to pick. The doors can also be wrenched open by brute force with a successful DC 22 Strength check.
Captives
The three human commoners imprisoned here are Mirna Dendrar and her two teenage children, thirteen-year-old Nars and eighteen-year-old Nilsa. A few days ago, the Redbrands murdered Mirna's husband, Thel, for defying them. (His corpse can be found in area 8.) That night, the gang returned and abducted the family from their home. The gang plans to sell the family into slavery. The Dendrars are grateful to the characters for rescuing them, but they can't provide much information about the Redbrand hideout. All they know is that the boss is a engineer (though they haven't met him and don't know his name), and that he has "tall, furry monsters" (wookiee berserkers) working for him.
Side Quest: Mirna's Heirloom. Though her family has nothing to offer as a reward, Mirna tells the characters that she might know where a valuable heirloom is hidden. When she was a young girl, she and her family fled from a settlement on Norval II after droids overran the place. Her family had an Medical Supplies shop, inside of which a case containing a valuable necklace was hidden beneath a section of storage shelves. She never dared to return and retrieve it. The shop was in the southeast part of the settlement. If the characters decide to explore the ruins of Norval II, see part 3 of the adventure.
Awarding Experience Points
Divide 200 XP equally among the characters if the party defeats the ruffians. Divide 100 XP equally among the characters if the Dendrars make it back to town alive.
6. Armory
The door to this room is locked from the outside. Next to the locked door is a secret door that leads to area 7. For more information on locked doors and secret doors, see the "General Features" section (page 22).
The Redbrands have ambitious plans to expand their numbers in the near future, so they have been stockpiling arms and armor.
The weapon racks hold twelve vibrospears, six light pistols, four vibroblades, six blaster rifles, and eight powercells.
7. Storeroom and Work Area
In this chamber, the Redbrands take stock of their stolen wares, either shipping them out through the cavern to the south or packaging them for storage in the stronghold.
This room contains one secret door, leading to area 12. See the "General Features" section (page 22) for more information on secret doors.
Treasure
Most of the provisions and goods here aren't valuable, but lying among them are animal pelts (20 credits each). They were looted from a ship a few days ago.
8. Crevasse
The characters arrive here by one of three routes: the tunnel from area 1, the passage above area 6, or the rough-hewn passage to the south, which continues off the map for about one hundred feet and emerges from a tunnel in the woods south of Tresendar Manor. The passage is an excellent way to smuggle people or goods in and out of Formos without being seen, and is thus perfect for a gang of slavers and thieves.
The guardian of this cave is a Spider Droid - an insane large four legged droid. The creature was occupying the area when the Redbrands moved in. Jorel managed to strike a bargain with the monster, convincing it to help guard the stronghold in exchange for treasure and the occasional gift. Still, the spider droid is untrustworthy.
The droid lurks near the west ends of the two bridges. If it notices intruders entering the cave, it hides at the opposite end of the room, attempting to observe the characters.
If detected, the droid prefers to negotiate and isn't above betraying the Redbrands for the right incentive, such as the promise of food. When roleplaying the droid, consider throwing in some mad cackles and bits of gibberish, as well as the occasional whirring binary noise. The droid knows everything the Redbrands know; see the "What the Redbrands Know" sidebar on page 22.
Bridges. These bridges are made of durasteel sheets and have no rails. The south one is rigged to collapse when a creature weighing more than 50 pounds moves across it. A character next to the bridge can discern that the construction is faulty with a successful DC 15 Intelligence (Investigation) check. Any creature can use an action to dislodge one end of either bridge, dropping it into the crevasse.
Crevasse. This steep-sided fissure is 5 to 10 feet wide and 20 feet deep. Its rough walls are easily climbed without an ability check. A creature that falls into the crevasse takes 2d6 kinetic damage and lands prone in a jumble of rubble that is difficult terrain (see "Difficult Terrain" in the rulebook).
The bottom of the crevasse feels unnaturally cold. Force sensitive characters feel an odd connection here, almost as if the force moves slower than normal.
Currently heaped at the bottom among broken and well-gnawed bones is the half-eaten body of Thel Dendrar, who was murdered by the Redbrands. The outlaws left his corpse here for unseen creatures to feed on.
Spider Droid
Large Droid, unaligned
- Armor Class 16 (armor plating)
- Hit Points 35 (5d10+5)
- Speed 40 ft, climb 40 ft.
STR DEX CON INT WIS CHA 15 (+2) 16 (+3) 12 (+1) 10 (+0) 10 (+0) 9 (-1)
- Skills Perception +4
- Damage Vulnerabilities Ion
- Damage Resistances Necrotic, Poison, Psychic
- Condition Immunities Poison, Disease
- Senses truesight 120 ft, passive Perception 14
- Languages Binary, Galactic Basic
- Challenge 2 (450 XP)
Circuity The spider droid has disadvantage on saving throws against effects that would deal ion or lightning damage.
Spider Climb The spider droid can climb difficult surfaces, including upside down on ceilings, without needing to make an ability check.
Actions
Blaster Cannon. Ranged Weapon Attack: +5 to hit, range 100/400 ft., one target. Hit: 9 (1d12+3) energy damage.
Burst The spider droid sprays a 10-foot-cube area within normal range with shots. Each creature in the area must make a DC 13 Dexterity saving throw, taking 9 (1d12+3) energy damage on a failed save, or half as much on a successful one.
Claw Melee Weapon Attack. +4 to hit, reach 5 ft., one target. Hit: 5 (1d6+2) kinetic damage.
Self-Destruct. When the spider droid is reduced to half of its hit point maximum and is within 20 feet of a hostile creature, it attempts to self-destruct. Each creature within 20 feet of it must make a DC 13 Dexterity saving throw, taking 6d6 fire damage on a failed save, or half as much on a successful one.
Treasure
The droid keeps its hoard in a battered chest hidden in a cubbyhole at the bottom of the crevasse, under the north bridge. The chest can't be seen from the edge of the crevasse, but is obvious to any character who descends into the fissure. The chest contains 1360 credits, five gems (150 credits each), two medpacs, and a repair kit.
The chest also holds a premium vibroblade in a silver-chased scabbard. The sword is inscribed with the name "Talon," and its hilt is worked in the shape of a bird of prey with outspread wings. It once belonged to Aldith Tresendar, known as the Black Hawk. A character who succeeds on a DC 15 Intelligence (Lore) check recognizes the sword and recalls this lore.
Aldith died fighting off the invaders that attacked through the hidden caverns below his manor. Talon was lost here until the droid found it.
Awarding Experience Points
Divide 450 XP equally among the characters if the party defeats the Spider Droid or negotiates a truce with it.
9. Guard Barracks
A character who listens at this door with a successful DC 10 Wisdom (Perception) check hears several gruff voices issuing demeaning commands in the Shyriiwook. examples include "Lick the floor!" and "Roll like a dog!" The Wookies here are bullying their jawa slave.
Jawa Scrapper
Small humanoid, chaotic balanced
- Armor Class 12
- Hit Points 13 (3d6+3)
- Speed 30 ft.
STR DEX CON INT WIS CHA 8 (-1) 14 (+2) 12 (+1) 11 (+0) 10 (+0) 8 (-1)
- Skills Stealth +6
- Senses darkvision 60 ft., passive Perception 10
- Languages Jawaese, understands but doesn't speak Galactic Basic
- Challenge 1/2 (100 XP)
Nimble Escape. The jawa can take the Disengage or Hide action as a bonus action on each of its turns.
Actions
Ion Blaster. Ranged Weapon Attack: +4 to hit, range 40/160 ft., one creature. Hit 3 (1d4 + 2) ion damage.
Ion Grenade (3/day). The jawa throws a grenade at a point it can see within 20 feet Each creature within 10 feet must make a DC 12 Dexterity saving throw. A creature takes 2d4 ion damage on a failed save, or half as much as on a successful one. Any electronics within the blast radius are disabled until rebooted.
Three wookiee berserkers and one jawa scrapper are present. The jawa, Droop, falls unconscious at the sight of the party, but another creature can use an action to wake him. Otherwise, Droop remains unconscious for ld10 minutes.
The wookiees work for the Black Rancor and were sent here to help Jorel keep the Redbrands and the citizens of Formos in line. The leader is named Mosk. He wears a jeweled eye patch even though he has both his eyes. Mosk wears the eye patch because he thinks it's fancy.
Wookiee Berserker
Medium humanoid, unaligned
- Armor Class 14 (hide)
- Hit Points 30 (4d8+12)
- Speed 30 ft, climb 30 ft.
STR DEX CON INT WIS CHA 16 (+3) 12 (+1) 17 (+3) 7 (-2) 11 (+0) 10 (+0)
- Skills Athletics +5, Intimidation +5
- Senses darkvision 60 ft., passive Perception 10
- Languages Galactic Basic, Shyriiwook
- Challenge 1 (200 XP)
Aggressive. As a bonus action, the wookiee can move up to its speed toward a hostile creature that it can see.The Creature Name makes Number and type of attacks
Reckless. At the start of its turn, the wookiee can can gain advantage on all melee weapon attack rolls during that turn, but attack rolls against it have advantage until the start of its next turn.
Blood Rage. When a creature within 5 feet of the wookiee hits it with an attack, the wookiee may use its reaction to immediately make a melee weapon attack with advantage against that creature.
Actions
Vibroaxe. Melee Weapon Attack: +5 to hit, one target. Hit: 9 (1d12 + 3) kinetic damage.
The wookiees avoid the human members of the Redbrands. If the characters are wearing scarlet cloaks taken from elsewhere, the wookiees assume that they serve Jorel. Clever characters might even persuade the wookies to help deal with "traitors" or "impostors" elsewhere in the dungeon. If you don't think the players are doing a great job roleplaying the deception, you can have the character who is doing most of the talking make a DC 15 Charisma (Deception) check to convince the wookiees to do what the party wants.
Roleplaying Droop
The jawa, Droop, is not a threat to the party. He has been cowed by the wookiees and follows their orders until someone stronger comes along.
If he regains consciousness during combat, Droop hides and avoids the fight. He is such a coward that if he is ordered to fight, he does so with disadvantage (as explained in the rulebook).
Droop knows the general layout of the Redbrand hideout, as well as the location of its secret doors and traps. He doesn't think to offer up the information, but if prompted, he reveals as much as he can remember in an attempt to be useful to the party. Some of the details might be confusing or mixed up. He is a jawa, after all and does not speak basic.
If the wookiees are dispatched, Droop tries to ingratiate himself with the party. He doesn't remember the route to Arthek Castle, but he knows it's on Lowick. He also knows that Arthek raiders patrol around Formos, and he suggests the characters might be able to capture a patrol to learn more about the castle.
Characters might be inclined to keep Droop around for a while. See the "NPC Party Members" sidebar (page 14) for advice on how to run Droop as a member of the party.
Developments
The wookiees are the only ones in the Redbrand hideout who know the location of Wave Echo Mine. They won't willingly divulge this information, since they fear the Black Rancor more than they fear the characters.
The wookiees also know the location of Arthek Castle, but again, they don't share this information readily. A character who interrogates a captured wookiee can pry the information loose with a successful DC 15 Charisma (Intimidation) check.
Treasure
Mosk carries a belt pouch containing 33 credits and wears an eye patch made of black leather set with semiprecious stones (500 credits). He also has an key card that locks and unlocks all the doors in the Redbrand hideout.
Awarding Experience Points
Divide 600 XP equally among the characters if the party defeats the wookiees.
10. Common Room
This area serves as the headquarters and meeting room for the Redbrands. When there is no official business to discuss, it doubles as a common room where the stronghold guards can relax while off duty.
A character who listens at the door with a successful DC 10 Wisdom (Perception) check hears the villains within engaged in a game of knucklebones. This makes for a mysterious rattling sound, followed by shouts and groans and a sudden gabble of voices as wagers are paid. If the characters burst into the room, they automatically surprise its occupants.
Four Redbrand ruffians are drinking and playing sabacc when the characters enter. The game isn't far from turning acrimonious, as most of them do. The dice are loaded, and the ruffian to which they belong is naturally winning. All four have been drinking heavily, and they are poisoned (see the appendix in the rule book for the effects of being poisoned).
The Redbrands immediately recognize characters wearing scarlet cloaks as impostors. However, fast-talking characters might still be able to pass themselves off as "new recruits," especially if they offer to join the game. If you don't think the players are doing a great job roleplaying the deception, you can have the character who is doing most of the talking make a DC 10 Charisma (Deception) check to fool the Redbrands.
Treasure
The wealth in the room is all on the table, having been bet in the game. (Knocking over the table or mixing up all the enemies' loot is a great way to distract them for a short time.) The total amounts to 257 credits and a gold earring set with a tiny ruby (300 credits).
Awarding Experience Points
Divide 400 XP equally among the characters if the party defeats the Redbrands in this room.
11. Workshop
Faint bubbling and dripping sounds can be heard through either door of this room with a successful DC 15 Wisdom (Perception) check.
Jorel has left his pet mouse droid here to watch for intruders. The droid shares a communications link with its master, and it sends a brief warning message to Jorel as soon as it detects intruders. The mouse droid moves at a speed of 20 feet and has AC 10, 1 hit point, and no effective attacks.
If the characters leave the droid unharmed, it follows them around as though curious. It remains absolutely loyal to Jorel,
Datapads and Notes. The datapads and notes scattered around the room are basic texts on various engineering theories. Any character proficient in Technology can see that Jorel's apparatus appears to not be functional.
Among the books is a tome written in Quarren. The journal of a prospector named Urmon, it describes the history of the Lost Mine of Kessel. (Share the information in the first and second paragraph of the "Background" section if you have not already done so.) In addition, Urmon records that a mace named Lightbringer was commissioned from the smiths working with the miners. The mace was lost when Wave Echo Mine vanished from history. (Characters might find the mace in part 4, "Wave Echo Mine.")
Developments
Because Jorel and his mouse droid share a communication link, Jorel (in area 12) knows the characters are coming and has time to prepare for them.
Treasure
Most of the materials in this room have no value, but three small cannisters hold rare materials. These are worth 250 credits each to the right mechanic.
12. Deshstaff's Quarters
If the characters approach this room through the secret passage from area 7, they can surprise the leader of the Redbrands - Jorel "Deshsataff" Jinn. Otherwise, his mouse droid warns him of any who approach through area 11, and he flees before the characters arrive.
If Jorel is surprised, add the following paragraph:
If the mouse droid in area 11 warns him that trouble is approaching, Jorel the combat engineer, junior grabs his electrostaff and the grenades in his chest (see the "Treasure" section), and flees through the secret door in the northeast corner of the room. In his haste, Jorel leaves behind a letter from the Black Rancor (see the "Developments" section) and neglects to make sure the secret door is closed all the way. Characters gain advantage on ability checks made to find the slightly ajar secret door (see "Advantage and Disadvantage" in the rulebook). For more information on secret doors, see the "General Features" section (page 22).
If he manages to escape, Jorel flees to area 1 (through areas 7 and 8) and grabs the satchel hidden in the cistern there. If the Spider Droid is still alive in area 8, Jorel instructs it to waylay any pursuers. Jorel flees the hideout. At your discretion, he could reappear later in the adventure.
Combat Engineer, Junior
Medium humanoid, unaligned
- Armor Class 12
- Hit Points 16 (3d8+3)
- Speed 30 ft.
STR DEX CON INT WIS CHA 10 (+0) 12 (+1) 12 (+1) 14 (+2) 11 (+0) 10 (+0)
- Skills Technology +4
- Senses Passive Perception 10
- Languages Galactic Basic
- Challenge 1 (200 XP)
Techcasting. The junior engineer is a 3rd-level techcaster. Its techcasting ability is Intelligence (power save DC 12, +4 to hit with tech attacks) and it has 14 tech points. The junior engineer knows the following tech powers:
- At-will: electro shock, encrypted message, rime shot
- 1st-level: energy shield, homing rockets, repair droid, smoke cloud
- 2nd-level: acid dart, magnetic field
Actions
Blaster Carbine. Ranged Weapon Attack: +3 to hit, range 60/240 ft., one target. Hit: 4 (1d6 + 1) energy damage.
Electrostaff. Melee Weapon Attack: +0 to hit, Reach 5 ft., one target. Hit: 3 (1d6) kinetic damag eand make a DC 13 constitution saving throw or take 1d4 lightning damage and gain the shocked condition.
Roleplaying Jorel
A former member of the Bounty Hunters Guild, Jorel seized an opportunity on Formos to line his own pockets. Originally tasked with setting up a guild post, the guildsman instead assembled a group of outlaws and local ruffians to secure his own position in town.
Jorel knew of the Black Rancor through his contacts in the Bounty Hunters Guild and brokered a meeting. The cathar promised to share the secrets and wealth of Wave Echo Mine with the Jorel in exchange for his help and loyalty.
Jorel puts on airs of gentility and courteous manners, addressing his ruffians as "my good gentlemen," and referring to sordid acts such as kidnapping or arson as "that unpleasant little business" or "those unfortunate events." He refers to the characters as "guests" and expresses regret that he cannot provide suitable entertainment for their visit. Beneath his genteel demeanor, however, Jorel is just as thuggish and arrogant as any Redbrand outlaws.
If threatened, Jorel uses his techcasting abilities to defend himself. If attacked he uses his reaction to cast energy shield. He has both an electrostaff, capable of shocking anybody hit by it and a blaster carbine. He casts offensive spells at enemies he can see. Jorel's stat block contains a list of the tech powers he has prepared. For descriptions of those powers and their effects, see the rule book.
If he is reduced to 6 or fewer hit points and has no avenues of escape, Jorel surrenders. He values his life more than anything, and he remains a model prisoner in the hopes that the Black Rancor will somehow learn of his predicament and "arrange for his freedom."
If he is questioned while in captivity, Jorel relates the following information, all of which is true:
- The Black Rancor is a Cathar
- The Black Rancor sent three wookiees to help Jorel keep the population of Formos under control, but the Redbrands have managed without them. The wookiees know the way to Wave Echo Mine, but Jorel does not.
- The Black Rancor is searching Wave Echo Mine for an enormous lost cache of stabilized coaxium
- No other members of the Bounty Hunters Guild know of Jorel's betrayal.
Developments
Various papers and notes are stacked neatly on the desk, mostly consisting of Jorel's written orders to nearby settlements for more materials for his workshop. The characters also find a letter signed with the Black Rancor's symbol.
My spies on Nar Shaddaa tell me that strangers are due to arrive on Formos. They could be working for the quarrens. Capture them if you can, kill them if you must, but don't allow them to upset our plans. See that any maps in their possession are delivered to me with haste. I'm counting on you, Jorel. Don't disappoint me.
If Jorel is taken into custody, Syl Ordo arranges to have the wizard incarcerated in the governor's hall until he can be safely transported back to Nar Shaddaa. Whether Jorel stands trial for his crimes is beyond the scope of this adventure. The Black Rancor is too preoccupied to meddle in the engineer's fate.
Treasure
Within Jorel's quarters is a chest holding the best pickings of the Redbrands' loot over the last two months. It contains 1480 credits, and a silk pouch containing five carnelians (100 credits each), two peridots (150 credits each), and one krayt pearl (1000 credits). It also contains a fragmentation grenade and an ion grenade.
Jorel also wields a premium electrostaff.
Awarding Experience Points
Divide 200 XP equally among the characters if the party slays Jorel Jinn. Double the XP award if they capture Jorel and deliver him to Syl Ordo.
What's Next?
The next stage of the adventure continues with part 3, "The Rancor's Net," in which the characters undertake a number of short adventures that advance the story. At some point during part 2, the characters are likely to advance to 3rd level, so make sure the players are keeping track of their XP.
Part 3: The Rancor's Net
In this part of the adventure, the characters follow up on existing leads and lines of inquiry. They can't learn much more on Formos, so they need to set out into the surrounding systems to uncover the larger plots they are caught up in. The characters are not required to visit all the locations in this section.
Depending on which NPCs the characters met and which quests or clues they picked up, some or all the following information might be known to them:
- Garalee Vandaa wants the characters to seek out the banshee Agatha in the ruined settlement on Formos' moon and ask her about Shan's holocron.
- Daran Typho wants the characters to find out who is lurking near the ruins of the derelict sandcrawler.
- Kua Karon has suggested that the characters go to the ruined settlement of Norval II and consult with the sage Reidoth, who might know the whereabouts of Arthek Castle, Wave Echo Mine, or both.
- Governor Owen Wester wants the characters to seek out a Mandalorian encampment near Gara Station and chase the Mandalorians away from the area.
- Syl Ordo wants the characters to find Arthek Castle, search for Gundark Roksek, rescue the quarren, and retrieve his navigational charts.
Each of these possible quests has its own section in this part of the adventure. The characters can remain in Formos long enough to rest up and purchase supplies. When they're done, have them pick a storyline to investigate, then set out for the appropriate destination.
Triellus Trade Route
Formos lies in a part of the Outer Rim Territories known as "the Triellus Trade Route." The route covers much of the space beyond Hutt controlled territory, stretching far in both directions. Formos lies directly on the intersection with the Pabol Sleheyron, another trade route, connecting Formos to Kessel and Hutt space.
Describe the party's space travels as vividly as you like, but keep the story moving.
Using the Galaxy Map
During this part of the adventure, the characters will frequently be traveling through space from one point of interest to another. As can be seen on the regional galaxy map on page 5, some of these areas require several days of travel to reach the next adventure site. The G9 Rigger Light Freighter comes equipped with a class 3 hyperdrive (more information can be found in the rulebook and Starships of the Galaxy).
Travel Time. It takes around 24 hours to travel completely across one grid tile for a class 1 hyperdrive. A class 3 hyperdrive travels at one third the speed of a class 1, and therefore should take approximately three days to travel directly through one tile. This number could be adjusted based on the actual destination and path the starship takes. Larger trade routes would have faster travel times, whereas traveling off of a known hyperspace route requires more calculations and is far slower. Travel could also be slowed by a failed astrogation roll (See the Starships of the Galaxy Rulebook).
Space Encounters
Ask the players to tell you their deployments on board their ship so you know who is piloting, who is manning a gun, and so on. This information is important if the party encounters something dangerous.
The outer rim territories are not safe. Characters traveling through the area might stumble across greedy bandits, vicious monsters, or something else entirely. Check for encounters once or twice per tile by rolling a d20. On a roll of 17-20, an encounter takes place. Roll a d10 and consult the Space Encounters table to determine what the party meets.
When an encounter occurs, and the characters gain XP if they defeat the monsters. Each stat block has the XP value for one enemy of that sort. Multiply that value by the number of that type of enemy encountered, then divide the total equally among the characters.
Wilderness Encounters
| d10 | Result |
|---|---|
| 1-2 | 1d3 Tier 0 Tiny Ships |
| 3-4 | 1d2 Tier 0 Small Ships |
| 5-6 | 1 Tier 1 Small Ship |
| 7-8 | 1 Tier 0 Medium Ship |
| 9-10 | Unexpected Debris or Asteroid Field |
Tiny Ships. These ships exceptionally small and unmanned. Perhaps they are being employed by a space station as a small defense force or maybe they are patrolling a route the party got too close to.
Small Ships. Small ships have a pilot and are slightly larger than tiny ships. They may be employed as a security force or even be in use by a military organization. A Tier 1 small ship is notably more advanced than a Tier 0 ship.
Medium Ships. Medium ships are capable of transporting good and people. Perhaps they are shipping supplies to an offworld moon, or maybe they are a bounty hunter that has mistaken the party for a target.
Debris and Asteroids. As the party drops out of hyperspace temporarily, the run into some unexpected debris, whether that be the remnants of a damaged starship, jettisoned cargo, or an asteroid field. Perhaps they need to make some skillful piloting maneuvers to avoid any collision.
Arthek Castle. Any of these encounters may produce directions to Arthek Castle. When the encounter begins, roll a D20, on a 10 or above, the party can find directions to Arthek Castle, either by obtaining their navigational data, capturing the pilot themselves, or other means.
Agatha's Lair
The settlement was sacked years ago and now lies in ruins. It is the only settlement on Formos' largest moon, thus finding it is easy. Agatha's lair is located a few miles outside of the settlement.
If the characters exercise caution and remember what they've come for, they will be able to speak with the ghost. When the characters enter the shelter, read the following:
Agatha senses the characters' intrusion and manifests shortly after they enter her home.
If the characters are rude, disrespectful, or threatening, Agatha scowls and disappears. She does not attack them, nor does she return if the characters call out to her.
Dealing with Agatha
If the characters are respectful and polite, Agatha can be persuaded to help them with a successful DC 15 Charisma (Persuasion) check. The player whose character takes the lead in speaking with the ghost makes the check. If that player role plays the encounter well, allow him or her to make the check with advantage. If any character has Garalee Vandaa's silver comb and presents it to Agatha as a gift, the check is automatically successful.
If the characters ask about Shan's holocron, Agatha tells them that she traded the holocron to a jedi named Tsernoth from the planet of Coruscant more than a hundred years ago. She does not know what became of the holocron afterward. Her answer is truthful, and it is all the information Garalee Vandaa needs resume the search.
The characters might instead choose to ask Agatha about something else - for example, the location of Arthek Castle, the location of Wave Echo Mine, the identity of the Black Rancor, or Hamun Kost's question about the derelict sandcrawler (see that section). Agatha is well informed and a capable diviner, so she can answer almost any single question pertaining to the adventure that the characters think to ask. However, the ghost answers only one question, so the characters should choose it carefully.
Awarding Experience Points
The characters gain experience for successfully persuading Agatha to answer a question. If they do, divide 200 XP equally among the characters.
Where's the Map
No maps are provided for Agatha's lair, the derelict sandcrawler, or Gara Station. These adventure locations contain only one or two points of interest, and you don't need maps to run the encounters effectively. If you feel the need for a map, create your own using the adventure text as a guide.
The Derelict Sandcrawler
The destroyed Sandcrawler has lain derelict for hundereds of years, nobody knows exactly when it was first noticed. The sandcrawler lies in the wild and rugged hills south on the opposite side of Formos. The site is relatively easy to find, and any NPC on Formos can provide directions to the ruins.
Recently, prospectors in the area have noted that someone has set up a campsite at the sandcrawler, and that droid guardians have been posted to keep intruders out.
The ruins are currently occupied by a scavenger who is busy exploring the site in the hope of technological artifacts left behind by its builders. The characters can enter the site from any direction, either following old footpaths or scrambling up the slope and finding a gap in the surrounding walls of rubble.
Combat Engineer, Junior
Medium humanoid, unaligned
- Armor Class 12
- Hit Points 16 (3d8+3)
- Speed 30 ft.
STR DEX CON INT WIS CHA 10 (+0) 12 (+1) 12 (+1) 14 (+2) 11 (+0) 10 (+0)
- Skills Technology +4
- Senses Passive Perception 10
- Languages Galactic Basic
- Challenge 1 (200 XP)
Techcasting. The junior engineer is a 3rd-level techcaster. Its techcasting ability is Intelligence (power save DC 12, +4 to hit with tech attacks) and it has 14 tech points. The junior engineer knows the following tech powers:
- At-will: electro shock, encrypted message, rime shot
- 1st-level: energy shield, homing rockets, repair droid, smoke cloud
- 2nd-level: acid dart, magnetic field
Actions
Blaster Carbine. Ranged Weapon Attack: +3 to hit, range 60/240 ft., one target. Hit: 4 (1d6 + 1) energy damage.
Electrostaff. Melee Weapon Attack: +0 to hit, Reach 5 ft., one target. Hit: 3 (1d6) kinetic damag eand make a DC 13 constitution saving throw or take 1d4 lightning damage and gain the shocked condition.
Six battle droids lurk inside the crumbled shell of the old sandcrawler and can't be seen from outside. Any character with a passive Wisdom (Perception) score of 10 or greater notices a distinct mechanical whir emanating from the sandcrawler's direction. When characters approach the sandcrawler or the tent, the battle droids hobble out of the sandcrawler.
If a battle erupts, Hamun Kost, the combat engineer, junior, emerges from his tent and asks, "What is the meaning of this?"
Kost is a stout, robed figure with sallow skin, a shaved scalp, and a black tattoo on his forehead. A character who succeeds on a DC 10 Intelligence (Lore) check recognizes Kost's tattoo as a symbol of the Exchange.
If any character attempts to talk to Kost, even by calling out a greeting or answering his questions during combat, he temporarily calls off his droids. The scavenger is not particularly aggressive, and he is willing to strike a deal that advances his interests.
Kost stays tight-lipped about the reason for his presence in the region. He is, however, willing to provide information the party needs if they do a favor for him. If the characters give Kost some indication of what they want, he shares one or both of these requests:
Battle Droid
Medium droid, unaligned
- Armor Class 15 (armor plating)
- Hit Points 16 (3d8+3)
- Speed 30 ft.
STR DEX CON INT WIS CHA 11 (+0) 16 (+3) 12 (+1) 14 (+2) 10 (+0) 9 (-1)
- Skills Perception +2
- Damage Vulnerabilities Ion
- Damage Immunities Necrotic, Poison, Psychic
- Condition Immunities poison, disease
- Senses darkvision 60 ft., passive Perception 12
- Languages Binary, Galactic Basic
- Challenge 1/2 (100 XP)
Battle Droid Swarm. When an ally of the battle droid hits a hostile creature that it can see with a weapon attack, the battle droid can use its reaction to make one weapon attack against that creature.
Circuitry. The droid has disadvantage on saving throws against effects that would deal ion or lightning damage.
Actions
Blaster Pistol. Ranged Weapon Attack: +5 to hit, range 40/160 ft., one target. Hit: 6 (1d6+3) energy damage.
Stock Strike. Melee Weapon Attack: +2 to hit, reach 5 ft., one target. Hit: 2 (1d4) kinetic damage.
Reactions
Redirect Attack. When a creature the battle droid can see targets it with an attack, the battle droid chooses another battle droid within 5 feet of it. The two battle droids swap places, and the chosen battle droid becomes the target instead.
- He wants the Mandalorians at Gara Station removed, since they seem inclined to cause him trouble.
- He wants to ask a question of Agatha the force ghost: "Why was the sandcrawler abandoned?" Kost won't risk the ghost's anger, but the characters could ask the question for him. (Agatha knows the answer: It was damaged in electrical storms)
Treasure
Hamun Kost's tent contains a comfortable traveling suite, including a cot, a chair, a writing desk, supplies, and a chest of clothes. In the chest is a bag containing 5275 credits, one pearl (1000 credits), a tiny jeweled box (250 credits), a medpac, a physical barrier, and an environmental barrier.
Awarding Experience Points
Learning about the scavenger's presence at the derelict sandcrawler completes a quest given to the party by Daran Typho on Formos. Divide 200 XP equally among the characters if the party parleys with Hamun Kost and reports back to Daran. Divide 800 XP equally among the characters if the party defeats Hamun Kost and his droids.
The Ruins of Norval II
To the galactic north of Kessel and Formos lies the abandoned planet of Norval II. Once, this was a prosperous community on the outskirts of the forest, wealthy from the work. Then many years ago, the eruption of volcanoes devastated the settlement. In the wake of the natural disaster, a plague of strange droids swept over the area, killing or driving off those who survived the eruptions.
Though most of the droids have long since crumbled to dust, the local vegetation has mutated into new and dangerous forms. Few people dare to venture into the ruined village now, and those who do so seldom stay long - with two notable exceptions. The sage Reidoth (see area 4) visits Norval II from time to time, keeping a wary eye on its dangers. Cultists have also arrived recently (see area 13) to treat with a force wanderer that claims Norval II as his domain (see area 7).
As the party approaches the ruins, read the following:
Reidoth placed the sign to discourage bands of treasure seekers from stirring up the monsters in the area.
General Features
Many of Norval's buildings have crumbled and rusted in the years since the town was abandoned, even as nature threatens to swallow what remains.
Buildings. A building on Norval II is either ruined or intact, as shown on the map.
Ruined buildings are empty shells with stone walls 5 to 8 feet high. Their roofs are gone, leaving piles of debris inside the walls. The debris is difficult terrain (see "Difficult Terrain" in the rulebook).
Intact buildings are rundown, ramshackle metal cottages that are otherwise still standing. Their doors are swollen and require a successful DC 10 Strength check to force open. The windows of any intact building are 2 feet wide and covered by shutters containing 6-inch wide slits. Creatures on one side of an arrow gain three-quarters cover against attacks from the other side (see "Cover" in the rulebook). Dusty old furnishings such as simple chairs and tables remain in most intact buildings.
Trees and Brush. Trees average 30 to 40 feet tall and provide cover. Brush consists of large bushes that count as difficult terrain.
1. Westernmost Building
This building has seen better days.
Two rock warts hide among the weeds that flank the cottage's open doorway. Make a Dexterity (Stealth) check for the warts, and compare the result to the passive Wisdom (Perception) scores of the characters to determine if the warts are spotted.
The warts do not attack on their own (except in self-defense) but quickly come to the aid of the rock warts in area 2 if combat erupts there.
Awarding Experience Points
Divide 50 XP equally among the characters if the party destroys the rock warts.
Rock Wart
Small beast, unaligned
- Armor Class 12 (natural armor)
- Hit Points 13 (3d8)
- Speed 30 ft., climb 30 ft.
STR DEX CON INT WIS CHA 13 (+1) 15 (+2) 11 (+0) 1 (-5) 9 (-1) 3 (-4)
- Skills Stealth +4
- Senses blindsight 30 ft., passive Perception 9
- Languages -
- Challenge 1/8 (25 XP)
Actions
Bite. Melee Weapon Attack: +3 to hit, Reach 5 ft., one target. Hit: 1 (1d3-1) kinetic damage, and the target must make a Constitution saving throw (DC 14). On a success, the creature is unaffected by the venom. On a failure, the creature loses 1d6 Strength, then must attempt another save 1 minute (10 rounds) later. If the second save fails, the creature loses an additional 1d6 Strength. If this reduces the creature's Strength to 0 or lower, it dies.
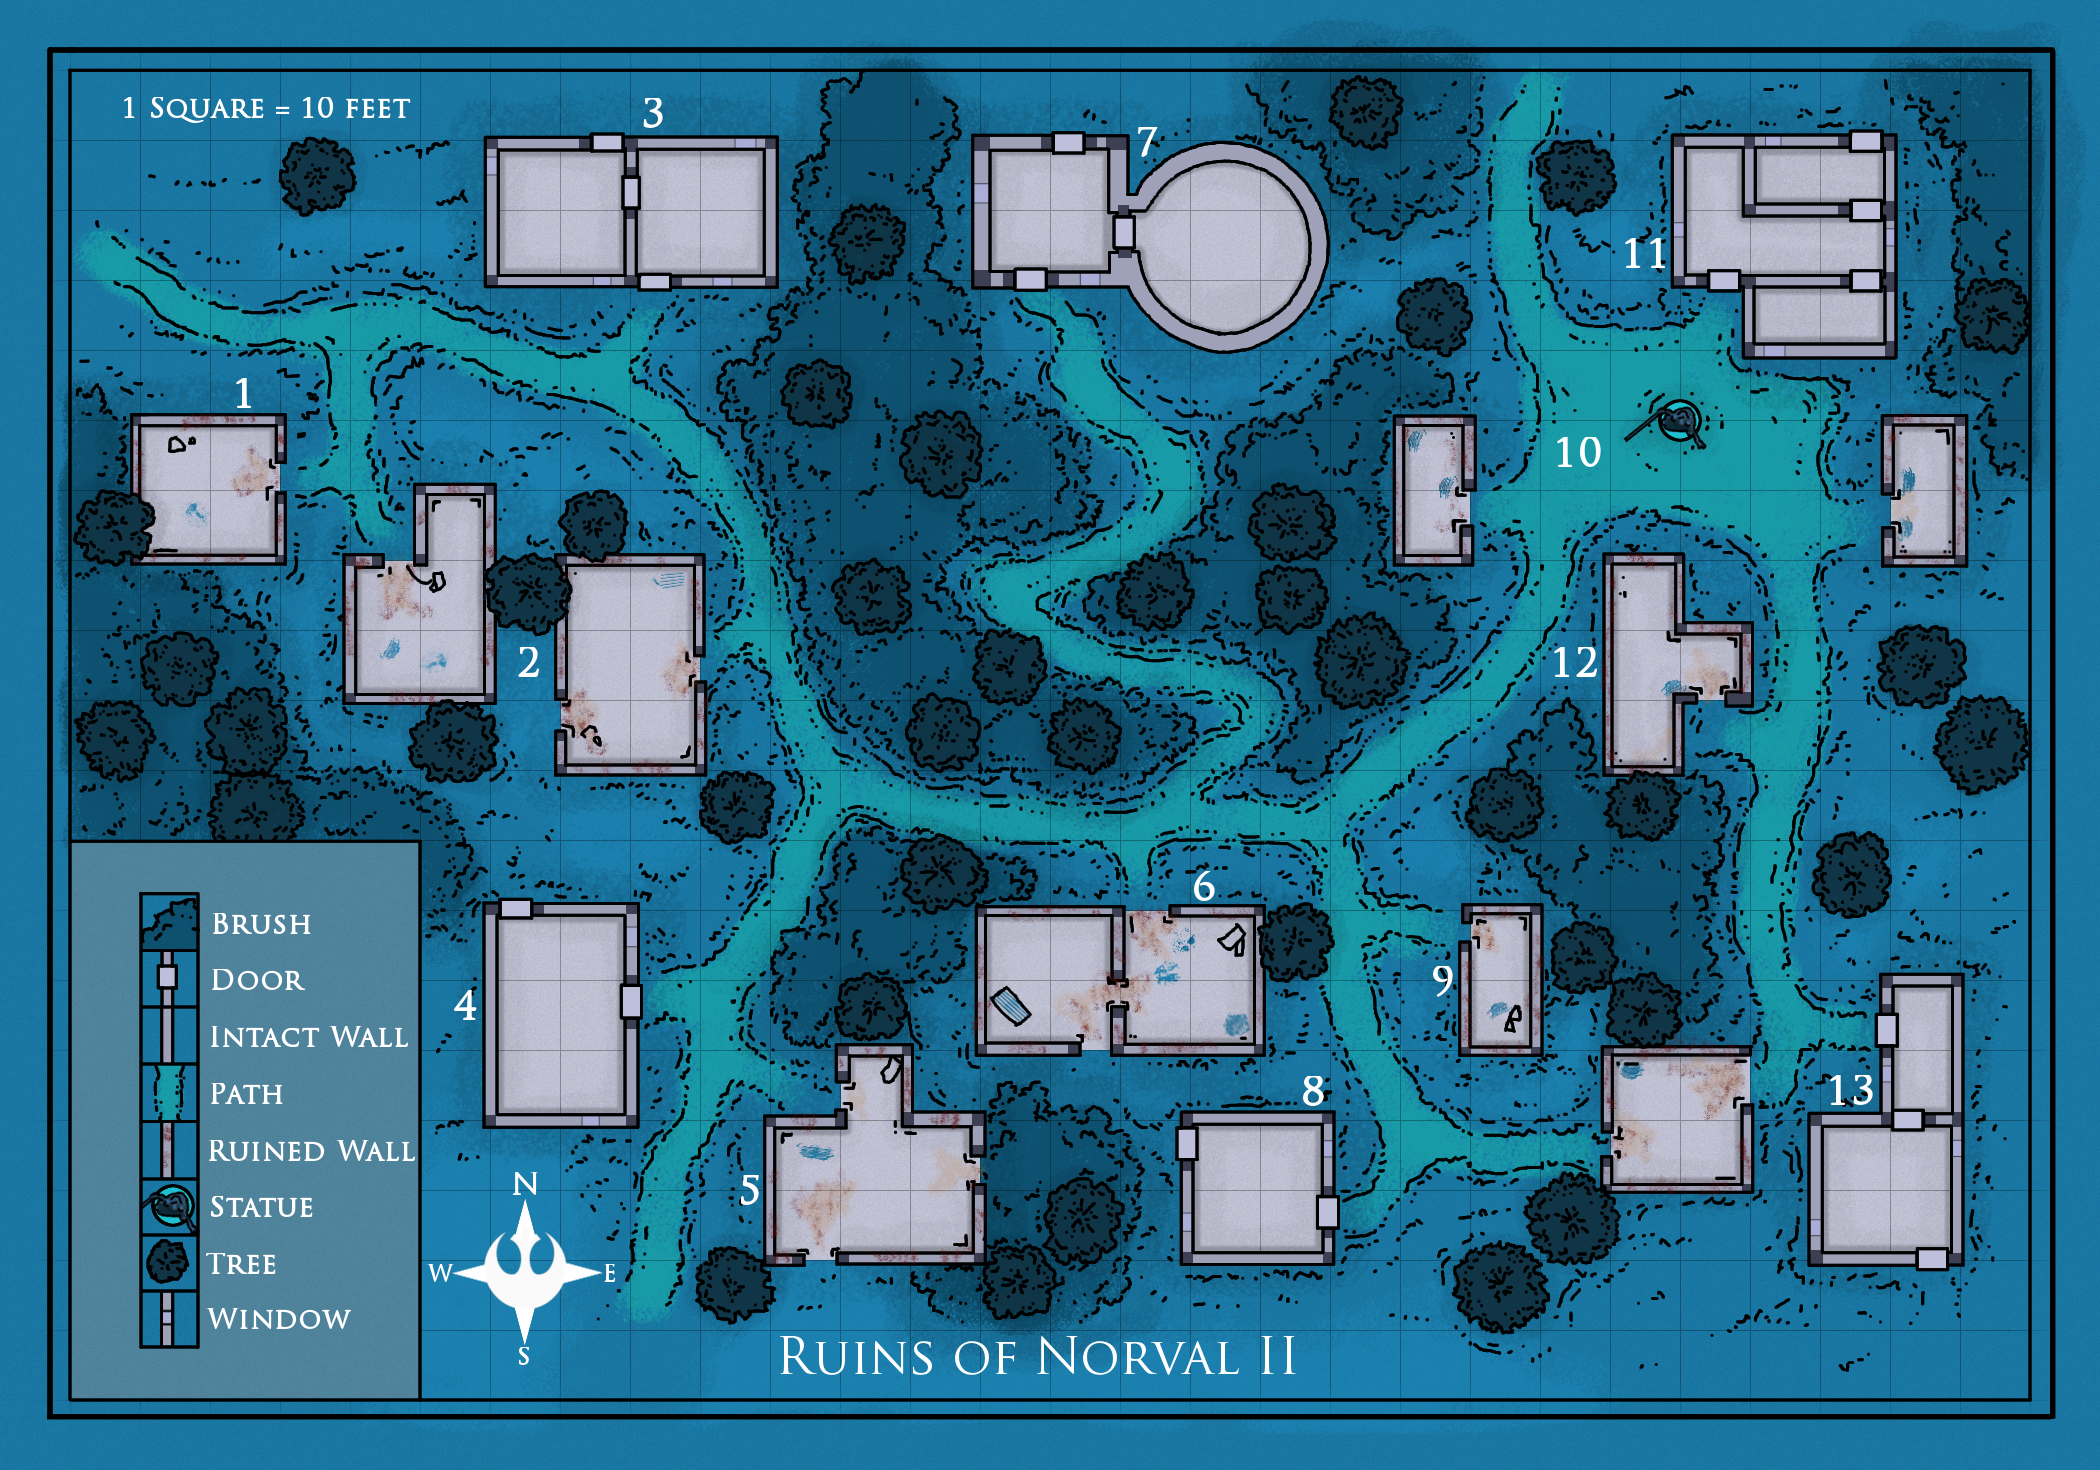
2. Blighted Buildings
Wind and weather have done their work here, and little remains of these houses or their former contents.
The overgrowth conceals a deadly threat - six rock warts lurking among the ordinary stones. Spotting them requires a successful Wisdom (Perception) check challenged by the warts' Dexterity (Stealth) check.
These monsters are hungry and fight until destroyed. One round after they attack, the rock warts in area 1 join the fray.
Treasure
A merchant who once lived here had a chest full of credits hidden under the floor of his home. A thorough search of the interior of the building cottage and a successful DC 10 Wisdom (Perception) check reveals the old chest among the roots of the tree growing up through the house. The chest contains 1130 credits.
Awarding Experience Points
Divide 50 XP equally among the characters if the party destroys these rock warts.
Junk Droid
Medium droid, unaligned
- Armor Class 13 (armor scraps)
- Hit Points 13 (2d8+4)
- Speed 30 ft.
STR DEX CON INT WIS CHA 10 (+0) 14 (+2) 15 (+2) 6 (-2) 8 (-1) 5 (-3)
- Damage Vulnerabilities Ion
- Damage Resistances Necrotic, Poison, Psychic
- Condition Immunities poison, disease
- Languages Speaks binary, Galactic Basic
- Challenge 1/4 (50 XP)
- Circuitry. The droid has disadvantage on saving throws against effects that would deal ion or lightning damage.
Actions
Multiattack. The junkyard droid makes two blaster carbine attacks or two vibroblade attacks.
Blaster Carbine. Ranged Weapon Attack: +4 to hit, range 60/240 ft., one target. Hit: 5 (1d6+2) energy damage.
Vibroblade. Melee Weapon Attack: +4 to hit, reach 5ft., one target. Hit: 5 (1d6+2) kinetic damage.
3. The Brown Bantha
This was formerly the Brown Bantha, a cantina renowned for its excellent intoxicants.
Four damaged junk droids (see the "Damaged Junk Droid" sidebar) lurk in the shadows in this building, slumped against the walls or under the bar. When living creatures enter, the droids groan and stir, slowly climbing to their feet (spending half their speed to do so-see the "Being Prone" section in the rulebook). They pursue any characters they see, attacking until destroyed.
The eastern half of the building is the old common room, while the western portion held the kitchens and vats. Huge storage tanks stand to the west, and a faint smell of spice still permeates the air. The contents are long gone.
Awarding Experience Points
Divide 200 XP equally among the characters if the party destroys the damaged junk droids.
Damaged Junk Droids
These droids use the junk droid statblock with the following additional trait.
Smoking Circuit. The first time the junk droid takes damage, any living creature within 5 feet of the droid must succeed on a DC 10 Constitution saving throw or gain disadvantage on attack rolls, saving throws, and ability checks for 1 minute. A creature can repeat the saving throw at the end of each of its turns, ending the effect on it early with a successful save.
4. Sage's Watch
When Reidoth visits Norvall II, this is where he makes camp.
Reidoth is a gaunt, white-bearded human who doesn't use two words when one word will do. Though he receives very few visitors, he is reasonably hospitable.
Reidoth is adept at staying away from the junk droids that overrun the village, as well as avoiding the area's monstrous fauna. He knows that dangerous spiders lurk in the ruins at the base of the hill, and he suspects that someone is hiding out on the eastern side of town - he's seen "folk in black masks and cloaks" (the cultists) skulking around. However, he is currently most concerned by the fact that a dangerous force wielder has moved into the tower (area 7) since the last time he was here. He warns the characters of all these threats, and suggests that they leave Norval II before they get themselves killed.
Developments
If the characters ask about Arthek Castle, Reidoth gladly provides directions. He is a member of the StarFlora corporation, a widespread group of farmers, survivalists, and agricultural scientists who seek to preserve the natural order. The enclave works to restore and preserve the natural order by keeping the elemental forces of the world in check, preventing civilization and the wilderness from destroying one another, and helping others survive the perils of the wilds. The raiders are a threat to the delicate balance.
If the characters ask Reidoth about Wave Echo Mine, he will not divulge its location but will offer to guide the party there in exchange for a favor: he wants them to chase off the force wielder in area 7. If they succeed, Reidoth will honor his part of the agreement but will not accompany the party inside the mine.
If the characters attack him for any reason, Reidoth transforms into a small rodent and scurries out of the building through a crack in the wall. He vanishes into the woods, then waits for the hostile characters to leave. His watch post contains nothing of value.
Joining the StarFlora Corporation
If the party helps Reidoth by chasing off Horne, the sage privately approaches certain members of the group and urges them to join the StarFlora corporation. He speaks with those who exemplify the ideal of protecting the natural order. If a character agrees, Reidoth gives the individual the title of Warden.
5. Blighted Farmhouse
To its south, this farm abuts a field with thick patches of gorse and briars.
The thicket east of this ruin is crawling with eight rock warts. Any disturbance in the ruined farmhouse (for example, characters rooting around in the rubble) draws the warts' ire.
Each round for 3 rounds, two twig blights head for the south doorway leading into the farmhouse while two more head for the north doorway. The blights attack until destroyed.
Awarding Experience Points
Divide 200 XP equally among the characters if the party destroys the rock warts.
6. Ruined Store
This former general store is not a complete ruin yet, with portions of its tile roof still intact.
Two knobby white spiderlings hide on the inner walls in this ruined building, so they are not visible from outside. Trailing lines from the webs in the lane allow the spiders to sense when prey is moving through the webs, at which point they nimbly scuttle over the wall and attack. The alert spiders surprise any character whose passive Wisdom (Perception) score is less than 17.
Knobby White Spiderling
Tiny plant, unaligned
- Armor Class 11
- Hit Points 10 (4d4)
- Speed 20 ft.
STR DEX CON INT WIS CHA 11 (+0) 12 (+1) 11 (+0) 2 (-4) 10 (+0) 5 (-3)
- Skills Stealth +3
- Damage Vulnerabilities Fire
- Senses darkvision 60 ft., passive Perception 10
- Languages -
- Challenge 1 (200 XP)
Distress Spores. When the spider takes damage, all other spiders within 240 feet of it can sense its pain.
Actions
Slam. Melee Weapon Attack: +2 to hit, reach 5 ft., one target. Hit: 2 (1d4) kinetic damage.
Stinger. Melee Weapon Attack: +4 to hit, reach 5 ft., one target. Hit: 3 (1d6) kinetic damage, and the target must make a DC 14 Constitution saving throw, taking 9 (2d8) poison damage on a failed save, or half as much damage on a successful one. If the poison damage reduces the target to 0 hit points, the target is stable but poisoned for 1 hour, even after regaining hit points, and is paralyzed while poisoned in this way.
Webs. The webs fill two squares north of the doorway and the northern doorway square itself. They are difficult terrain, and a creature trying to move through them must succeed on a DC 10 Strength (Athletics) check. On a failure, the creature is restrained in the webs (see the rule book for the effects of being restrained). A snared creature can take an action each round to attempt to break free with a DC 12 Strength check, or it can try to cut its way free by using a light weapon that deals kinetic or energy damage. The webs have AC 10, 5 hit points, vulnerability to fire damage, and immunity to poison, and psychic damage (see "Damage Resistance and Vulnerability" in the rulebook for how vulnerability works).
Going around the webs is difficult because of the thickets on the north side of the road. Going around the ruined building to the south leads to the rock warts in area 5.
Treasure
The corpse of an unfortunate person is cocooned in spider silk in the western half of the building. The body is shriveled up and sucked dry, but appears to have been a male twi'lek. The body wears a durafiber combat suit and a bolt-thrower at its hip. A careful search also yields a medpac in a belt pouch, along with 265 credits.
Awarding Experience Points
Divide 400 XP equally among the characters if the party defeats the giant spiders.
7. Ruined Tower
This tower was formerly the home of a human operative, who was killed fighting the junk droids that overran Norval II thirty years ago.
A force wanderer named Horne has recently claimed the tower, having passed through Norval while searching for a suitable hideout. The giant spider corpses are the former residents of the tower, killed by the wanderer. Since then, Horne has been laying low.
Tower. The wanderer lives in the tower - a single room with a 40-foot-high ceiling. A 5-foot-wide staircase circles the interior, rising to the now-opened rooftop. Heavy beams and stair supports crisscross the tower interior.
Horne does not want to give up such a promising hideout, but if the characters reduce the force wielder to half his hit points, he climbs to the top of the tower and flees to fight another day.
Force Wanderer
Medium humanoid, lawful dark
- Armor Class 16 (fiber armor)
- Hit Points 110 (20d8 + 20)
- Speed 30 ft.
STR DEX CON INT WIS CHA 11 (+0) 18 (+4) 12 (+1) 13 (+1) 12 (+1) 17 (+3)
- Saving Throws Dex +7, Cha +6
- Skills Acrobatics +7, Intimidation +6, perception +4
- Senses darkvision 60 ft., passive Perception 14
- Languages Galactic Basic, two more of your choice
- Challenge 8 (3,900 XP)
Forcecasting. The wanderer is a 10th-level forcecaster. It's forcecasting ability is Charisma (force save DC 14, +6 to hit with power attacks). The wanderer has 33 force points and knows the following force powers:
- At-Will: denounce, force disarm, force push/pull, mind trick, saber throw, slow
- 1st level: dark side tendrils, force jump, sap vitality, sense force
- 2nd level: animate weapon, drain vitality, force sight, stun
- 3rd level: improved dark side tendrils, choke, force suppression, sever force
- 4th level: drain life
Force Resistance. The wanderer has advantage on saving throws against force powers.
War Casting. When the wanderer uses an action to cast a force power, they can use a bonus action to make a Double Saber attack.Actions
Spinning Double Saber. Melee Weapon Attack: +7 to hit, reach 5 ft., one target. Hit: 17 (3d8 + 4) energy damage.
Double Saber. Melee Weapon Attack: +7 to hit, reach 5 ft., one target. Hit: 8 (1d8 + 4) energy damage.
Dark Lightning. Ranged Power Attack: +6 to hit, range 120 ft., one or two targets. Hit: 14 (4d6) necrotic damage. The target must succeed on a DC 16 Strength saving throw or become restrained until the end of the wanderer's next turn.
Building. The building contains dusty furniture draped in webbing, but nothing of value. If the characters make a lot of noise in the cottage, the force wielder hears them and steels itself for a fight.
Treasure
An old chest broken open on the tower floor holds the last of the dead operative's treasure: 2300 credits, four valuable goblets set with gemstones (600 credits each), a battle adrenal, and a grenade, electrostun. Horne spends much of its time greedily admiring the loot.
The force user has barely noticed the most interesting item in its hoard. Beneath the coins is an old techaxe of mandalorian manufacture. Writing in mando'a on the axe head read, "Hew". Hew is a premium techaxe that deals maximum damage when the wielder hits a plant creature or an object made of a plant material. The axe's creator was a mandalorian smith. Whoever carries the axe feels uneasy whenever he or she travels through a forest.
Awarding Experience Points
Divide 2,000 XP equally among the characters if the party drives away Horne. Given their level, the characters aren't likely to slay the force wielder, but it is worth 3,900 XP.
8. Old Smithy
This smithy was abandoned long ago.
Two damaged junk droids (see the "Damaged Junk Droids" sidebar) are slumped on the floor. When the characters enter, the droids climb to their feet (spending half their speed to do so - see the "Being Prone" section in chapter 2 of the rulebook). Then they attack. When the droids have caught sight of the characters, they pursue them no matter where they go.
A variety of old tools - tongs, hammers, and a pair of forges - are scattered around the interior of this building.
Awarding Experience Points
Divide 100 XP equally among the characters if the party destroys the damaged junk droids.
9. Medic's Shop
This was an herb and alchemy shop belonging to the family of Mirna Dendrar, now a resident on Formos (see encounter 5 in the "Redbrand Hideout" section).
All the supplies here have long since been ruined, and the diagrams are unreadable masses of rot. However, a small case is hidden in a compartment beneath the storage shelves. A character searching through the wreckage can find the case with a successful DC 15 Wisdom (Perception) check. The check succeeds automatically if Mirna sent the party to find the heirloom.
Treasure
The case is worthless but contains a necklace with a fine emerald green pendant (2000 credits).
Awarding Experience Points
Divide 200 XP equally among the characters if the party returns the necklace to Mirna instead of keeping it.
10. Town Square
Encroaching underbrush has yet to engulf the square.
The statue depicts a warrior who was involved in the founding of the settlement on Norval II. A character who studies the statue recognizes the depiction with a successful DC 15 Intelligence (Lore) check. The statue can be knocked over with a successful DC 20 Strength check.
11. Old Garrison
For the residents of Norval II, living in the outer rim demanded constant vigilance.
Five damaged junk droids (see the "Damaged Junk Droids" sidebar) lurk within this building. The droids animate and attack if any creature disturbs their rest.
The interior of the building still contains furnishings, and the main room has a ladder leading through a trapdoor to the roof. The chamber to the north contains two double bunks, while the chamber to the south has three double bunks, providing quarters for ten soldiers altogether. To the northwest of the main area of the barracks was a kitchen and pantry, now containing piles of well-rotted crates and barrels that once held veg-meat. All the foodstuffs have long since been devoured by vermin.
Awarding Experience Points
Divide 250 XP equally among the characters if the party destroys the damaged junk droids.
12. Weaver's Cottage
This fallen cottage is a lure for the creatures that lair nearby.
Six rock warts lurk in the thicket south of this ruin. Allow each character to attempt a Wisdom (Perception) check contested by the warts' Dexterity (Stealth) check to avoid being surprised by them.
Developments
Any loud noises here alert the cultists in area 13, who quietly and cautiously investigate.
Awarding Experience Points
Divide 150 XP equally among the characters if the party destroys the rock warts.
13. Force Cultists
A group calling itself the Cult of the Force seeks to forge alliances with powerful people of the outer rim. Toward that end, four cultists recently tracked a force wielder to Norval II (see area 7) and are waiting for the right moment to approach the force wielder and broker an alliance. They have been spying on the force wielder from afar, trying to gauge its demeanor and needs.
The doors to this cottage are barred from the inside, requiring a successful DC 20 Strength check to force open. The shutters are also barred from inside and can be forced with a successful DC 15 Strength check.
Six human cultists are hiding in the house. Four stand guard (two in each room) while the others rest in the larger chamber. The cultists wear black cloaks, and black leather masks with stylized horns.
The interior of the house is dusty and strung with cobwebs. The only furnishings are a small cooking stations, a table, two chairs, and a bunk (which the cultists share).
Cultist
Medium humanoid, any nonlight alignment
- Armor Class 12
- Hit Points 9 (2d8)
- Speed 30 ft.
STR DEX CON INT WIS CHA 11 (+0) 12 (+1) 10 (+0) 10 (+0) 11 (+0) 10 (+0)
- Skills Deception +2, Lore +2
- Senses passive Perception 10
- Languages Basic
- Challenge 1/8 (25 XP)
Devotion. The cultist has advantage on saving throws against being charmed or frightened.
Actions
Techblade. Melee Weapon Attack: +3 to hit, reach 5 ft., one target. Hit: 4 (ld6 + 1) kinetic damage.
Roleplaying the Cultists
The cultists are not interested in fighting anyone and prefer to be left alone. The leader of the group is an evil and ambitious young man named Favric, who hopes to rise through the ranks quickly by earning the allegiance of the force wielder in area 7. His fellow cultists lack Favric's ambition and flee if he is captured or killed.
If the characters talk to the cultists, Favric explains that they have come to treat with the force wielder (whose name he doesn't know). If the characters express a similar desire, Favric suggests an alliance. He really plans to offer the characters to the force wielder as part of his tribute, and if a fight ensues, the cultists side with the force wielder.
Treasure
In the main room, Favric has a small coffer containing tribute: three diamonds (1000 credits each). He also carries an alacrity adrenal in his belt.
Awarding Experience Points
Divide 150 XP equally among the characters if the party defeats or drives away the cultists.
Gara Station
This outpost is a prominent in the space surrounding Formos, and is easily found orbiting near the planet of Eadu. People outside huttspace frequently pass by Gara Station. The space station was formerly an asteroid mining base, but was deserted when the mines stopped producing. Bandits and raiders lair here from time to time. Gara Station's current squatters include a band of mandalorians and their horned kath hound pet.
The mandalorians are a renegade band of disgraced warriors, no longer feeling a strong allegiance to the greater mandalorian culture. These mandalorians often roam into the more civilized areas of the galaxy, spying out settlements, waylaying travelers, and looting and plundering as opportunities present themselves. Stories of new settlers near Formos and renewed traffic in the region drew this band to the area. Their leader is a savage brute who is more interested in murdering and looting than scouting.
Mandalorian Camp
Gara Station is built in an asteroid cluster. Searching for the hidden mandalorian camp takes time. The party can attempt one DC 15 Wisdom (Perception) check or DC 10 Wisdom (Survival) check per hour to find the camp.
When the characters find the camp, read the following:
If the characters can quietly and expeditiously take out the lone mandalorian recruit, they have a chance to surprise the mandalorians in the cave. If the sentry spots the characters sneaking up, or if it is not silenced during the surprise round, the mandalorian retreats back to the cave to warn the others.
Horned Kath Hound
Medium beast, unaligned
- Armor Class 13 (natutal armor)
- Hit Points 22 (4d8 + 4)
- Speed 40 ft.
STR DEX CON INT WIS CHA 14 (+2) 15 (+2) 12 (+1) 3 (-4) 12 (+1) 6 (-2)
- Skills Perception +3
- Senses darkvision 30 ft., passive Perception 13
- Languages -
- Challenge 2 (450 XP)
Keen Hearing and Smell. The hound has advantage on Wisdom (Perception) checks that rely on hearing or smell.
Charge. If the hound moves at least 20 feet straight toward a creature and then hits it with a bite attack on the same turn, that target must succeed on a DC 13 Strength saving throw or be knocked prone. If the target is prone, the hound can make another attack with its tusks against it as a bonus action.
Pack Tactics. The hound has advantage on an attack roll against a creature if at least one of the hound's allies is within 5 feet of the creature and the ally isn't incapacitated.
Actions
Multiattack. Melee Weapon Attack: +4 to hit, reach 5 ft., one target. Hit: 7 (2d4 + 2) kinetic damage.
Tusk. Melee Weapon Attack: +4 to hit, reach 5 ft., one target. Hit: 9 (2d6 + 2) kinetic damage.
The marauders in the cave include their leader (a mandalorian with 40 hit points), six ordinary mandalorians, and a filthy horned kath hound named Gog. Gog fights until slain, while the mandalorians fight until their leader is killed, at which point any remaining mandalorians flee.
Treasure
The mandalorian raider band plundered several homesteads on their way to Gara Station. An unlocked chest in the cave holds 677 credits and three vials of perfume (100 credits each).
Mandalorian Recruit
Medium Humanoid, lawful neutral
- Armor Class 16 (weave armor)
- Hit Points 33 (6d8+6)
- Speed 30 ft.
STR DEX CON INT WIS CHA 12 (+1) 14 (+2) 12 (+1) 12 (+1) 10 (+0) 10 (+0)
- Saving Throws Dexterity +5
- Skills Survival +3
- Senses darkvision 60 ft, passive Perception 11
- Languages Galactic Basic, Mando'a
- Challenge 1 (200 XP)
Actions
Multiattack. The Mandalorian Recruit makes two weapon attacks.
Blaster Carbine. Ranged Weapon Attack: +5 bonus to hit, range 100/400 ft., one target. Hit: 6 (1d6+3) energy damage.
Techblade. Melee Weapon Attack: +5 to hit, reach 5 ft., one target. Hit: 5 (1d6 + 2) kinetic damage.
Awarding Experience Points
Defeating the mandalorians at Gara Station completes a quest given to the party by Governor Owen Wester on Formos, and it delivers on a promise to Hamun Kost at the derelict sandcrawler. Divide 1,250 XP equally among the characters if the party deals with the mandalorians and the horned kath hound.
Arthek Castle
The Arthek bandits consists of marauding bands and rival raider groups scattered throughout the nearby sectors and the Huttspace outer rim area. However, one chieftain is grudgingly recognized by all others as supreme: Dovin Arthek of Arthek Castle.
Arthek Castle is not a ramshackle construction, nor is that the structure's original name. Raised by a talented noble, the stronghold consists of seven overlapping towers; however, its upper levels have long since collapsed to heaps of crumbling masonry. Only the ground floor is still sound enough to be habitable.
General Features
The centuries have not been kind to Arthek Castle. The bandits have shored up the weakest areas beneath its falling towers with crude repairs, but it's only a matter of time before the structure collapses completely.
Ceilings. Ceilings are 15 feet high unless noted otherwise.
Doors. Interior doors are made of weak durasteel. They have neither locks nor keyholes. It takes a successful DC 15 Strength check to break down a door that is barricaded shut.
Floors. Cracked and uneven flagstones conceal a dirt floor underneath.
Light. A small amount of natural light filters through the loopholes around the castle. During the day, this provides dim light in most areas. At night, all areas are dark.
Walls. Exterior walls and load-bearing interior walls are 5 feet thick, with 3 feet of mortared fill sandwiched between 1-foot-thick courses of hard stone blocks. Interior walls are 1-foot-thick worked stone.
Loopholes in the castle walls are 10 feet above the outside ground level, 4 feet above the interior floor level, 8 inches wide, and 4 feet high. A creature on one side of a loophole gains three-quarters cover against attacks from the other side (see "Cover" in the rulebook).
1. Castle Entrance
The main gates between areas 1 and 2 are corroded and rusted open.
No monsters dwell here, but the bandit sentries in area 3 are supposed to be keeping watch. They glance only occasionally out of the slits, however, so characters who move quietly might be able to creep past them. Have each character make a Dexterity (Stealth) check. The lowest check is the DC for the bandits' Wisdom checks to notice the party.
Disguised Characters
Rather than storm Arthek Castle with weapons in hand, clever characters might try to talk their way inside. For example, they might don the scarlet cloaks of the Redbrands and claim to be emissaries sent by Jorel "Deshstaff" Jinn, the Redbrand leader, to meet with Dovin Arthek. A good DM rewards this kind of clever thinking by giving the characters a chance to succeed.
It's okay if the characters circumvent combat and talk their way past castle defenders. Both the Arthek group and the Redbrands work for the Black Rancor, so the bandits aren't likely to attack the party if they claim to be working in the Black Rancors's interest.
If the characters try to perpetrate a deception as a group, have them each make a Charisma (Deception) check contested by the bandits' Wisdom (Insight) checks, and give the characters advantage on their checks if the deception is particularly well planned or roleplayed. If at least one character wins the contest, the deception is a success. You may award XP for bandits fooled by the deception. As the party makes its way deeper into the castle, additional checks might be required, at your discretion.
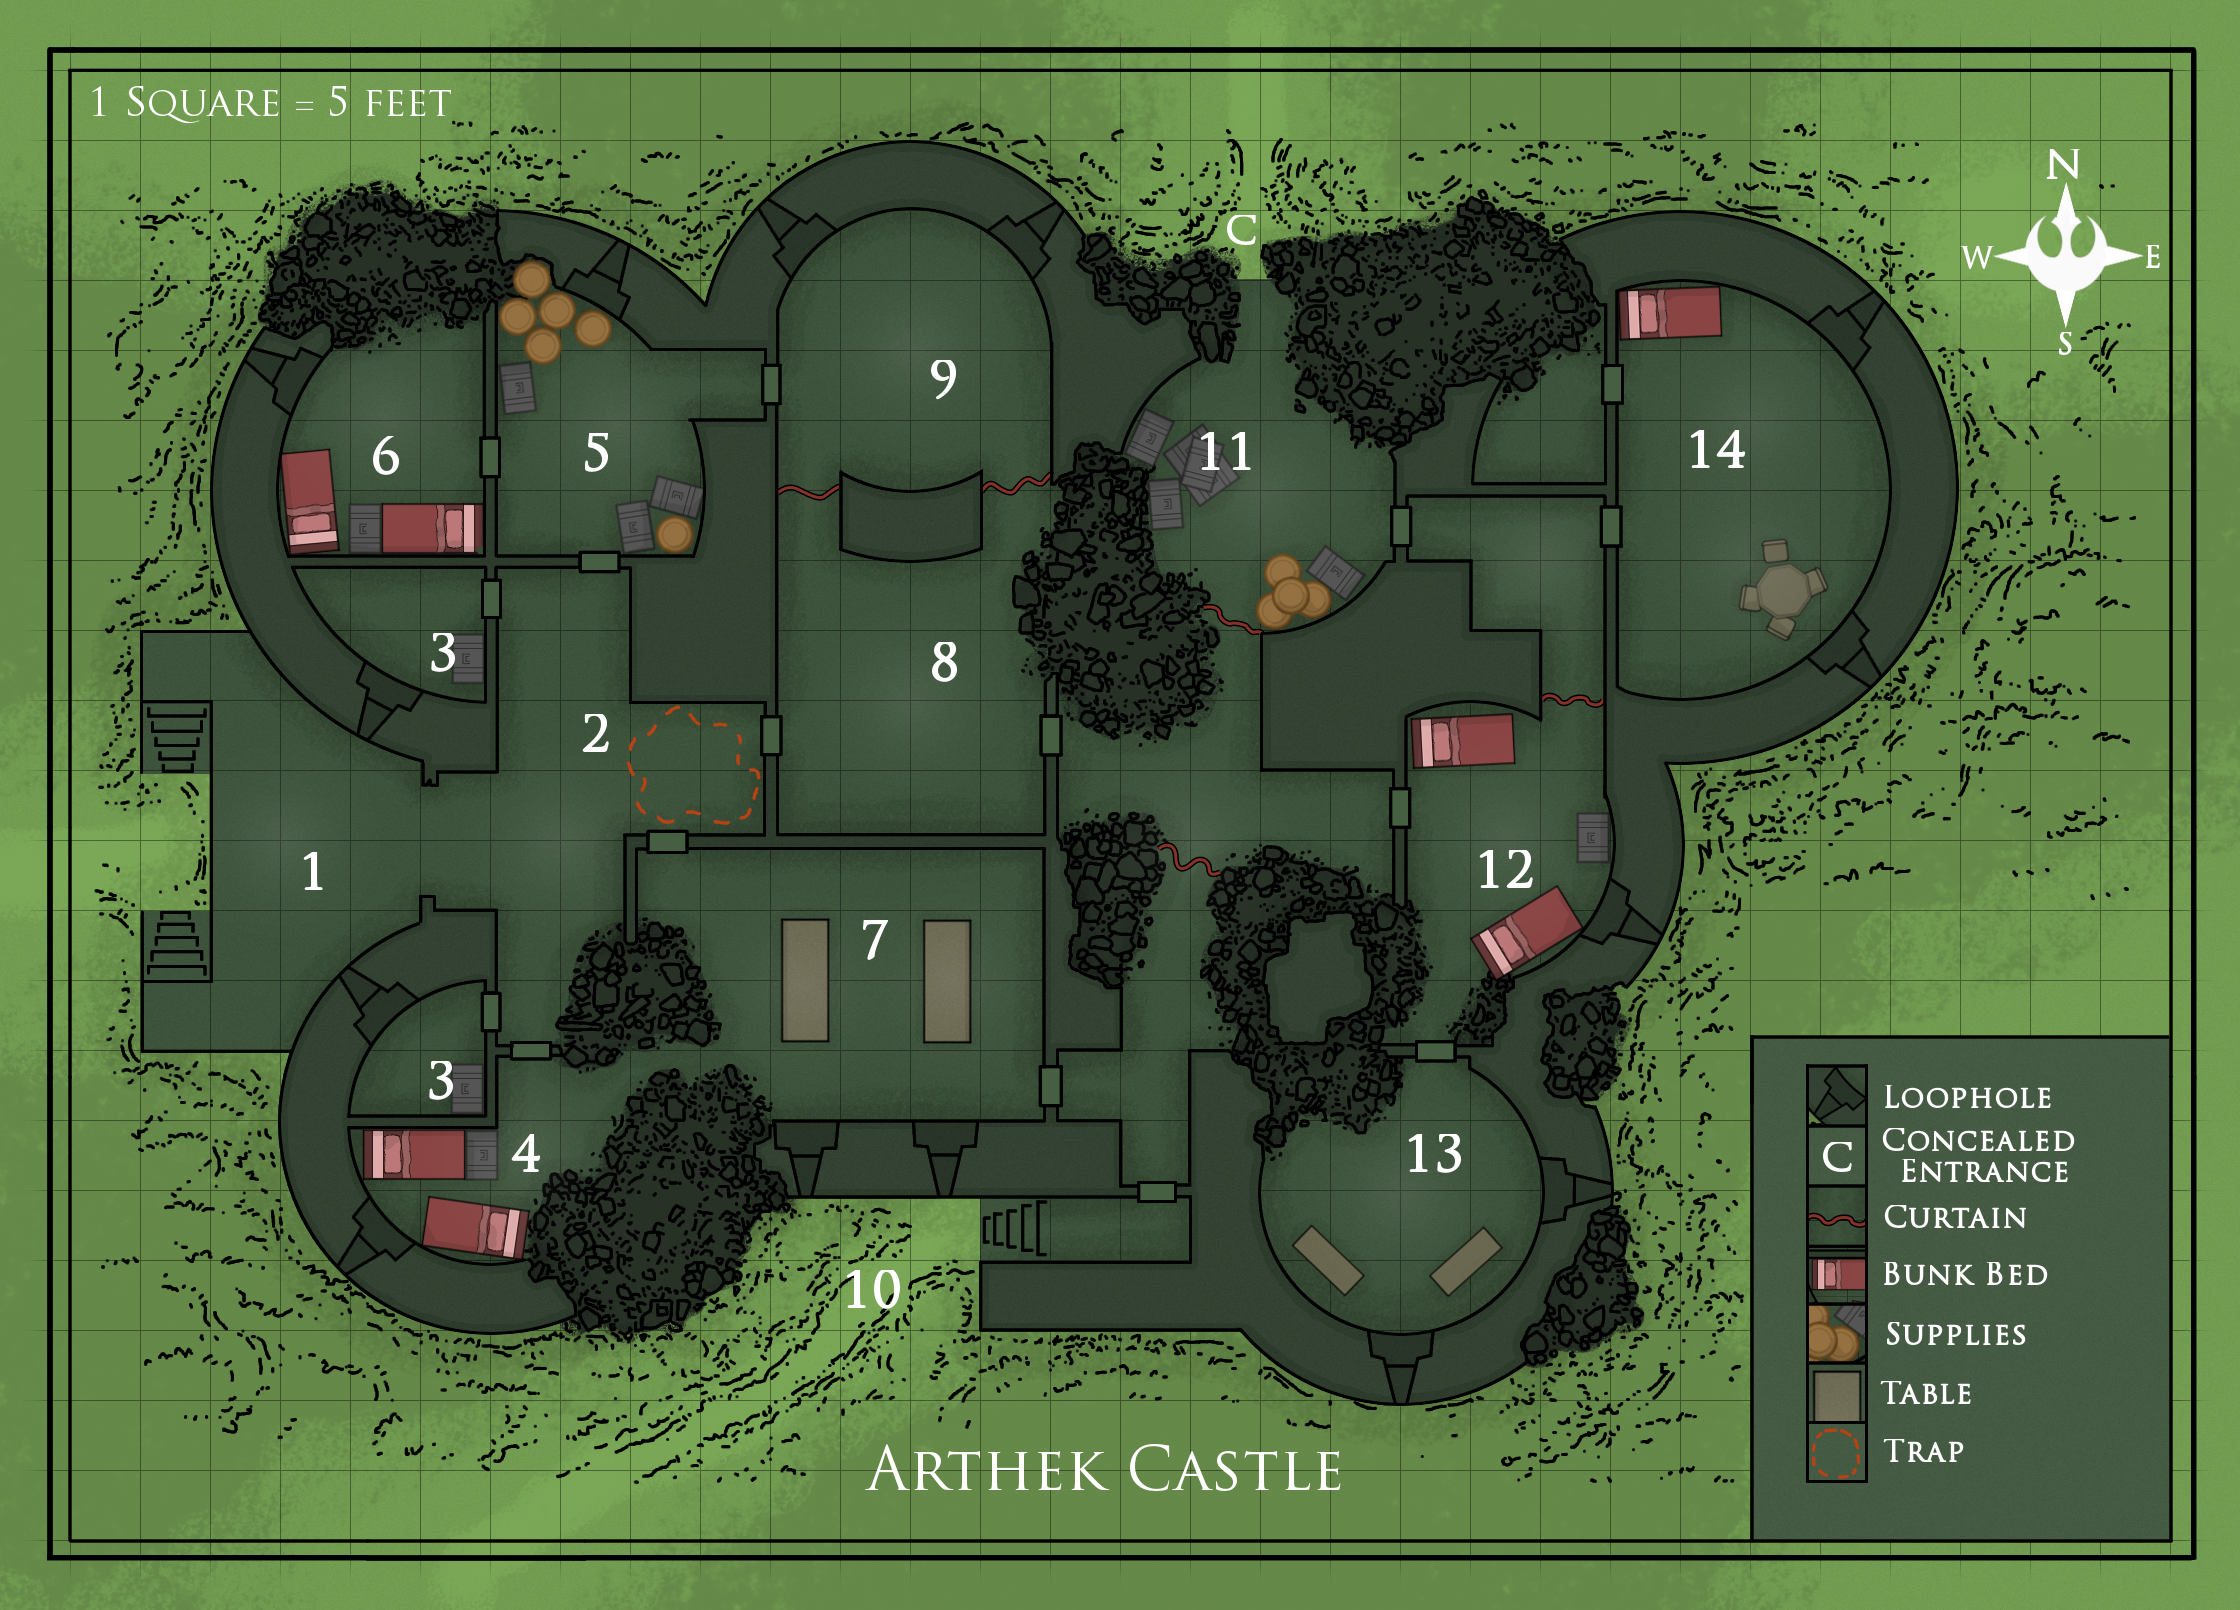
Developments
If the bandits spot the characters (or if the characters approach openly), the bandits fire from behind the loopholes. However, they can't fire directly at enemies at or past the broken gate. The bandits also shout loudly enough to alert their comrades in areas 4 and 6 that the castle is under attack.
2. Trapped Hall
Once the castle's foyer, this wide hall makes a dangerous battleground.
If the bandit sentries in area 3 raised the alarm, the bandits and deserter troopers in areas 4 and 6 come running out of the north and south doors at the same time. They attack from both directions, trying to overwhelm the characters and drive them out of the castle.
Trap. The dusty plaster and rubble in front of the door leading to area 8 conceals a tripwire connected to linchpins hidden in the ruined ceiling. Spotting the tripwire requires a passive Wisdom (Perception) score of at least 20, or a successful DC 10 Wisdom (Perception) check if characters are actively searching for traps in the area. Once spotted, the tripwire is easily avoided and disarmed (no ability check required).
Any creature that walks over or through the rubble without avoiding the tripwire triggers a cave-in of wooden beams and heavy stones. (The area of the collapse is marked on the map.) Any creature in the area when the trap triggers must succeed on a DC 10 Dexterity saving throw or take 3d6 bludgeoning damage from the falling rubble (half as much damage on a successful save). The noise of the collapse puts the monsters in areas 3, 7, 8, and 9 on alert.
Awarding Experience Points
Divide 100 XP equally among the characters if the party detects or survives the trap.
3. Watch Post
Arthek Castle's main defenses are its secret location and the appearance of having been abandoned. In addition, Dovin Arthek posts sentries to drive off intruders who get too close.
Ruffian
Medium Humanoid, neutral dark
- Armor Class 14 (weave armor)
- Hit Points 13 (2d8+4)
- Speed 30 ft.
STR DEX CON INT WIS CHA 12 (+1) 11 (+0) 13 (+1) 10 (+0) 9 (-1) 12 (+1)
- Skills Intimidation +3
- Senses passive Perception 9
- Languages Basic, Huttese
- Challenge 1/2 (100 XP)
Actions
Heavy Pistol Ranged Weapon Attack: +4, range 40/160 ft., one target. Hit: 6 (1d6+2) energy damage.
Vibrobaton Melee Weapon Attack: +4 to hit, reach 5 ft., one target. Hit: 6 (2d4 + 2) kinetic damage.
One ruffian occupies each of these two rooms. When characters enter the room, the bandits drop their blasters and draw their melee weapons.
Awarding Experience Points
Divide 100 XP equally among the characters for each bandit the party defeats.
4. Ruined Barracks
The bandits make use of every bit of available space in the castle.
Two ruffians bunk here. Though the rubble appears dangerous, the tower is stable, and the eastern passage is safe.
Developments
Any loud noises here attract the attention of the bandits in area 7. One ruffian comes to investigate the disturbance. If it doesn't return, or if it spots trouble and sounds the alarm, the others investigate.
Awarding Experience Points
Divide 200 XP equally among the characters if the party defeats these bandits.
5. Storeroom
Ships and supply caravans raided by the bandits supply provisions for the castle.
Though the stores here do not look particularly edible, the bandits can tolerate them when fresher food isn't available.
One small cask is filled with an exceptional mon calamari ale, which the goblins overlooked because of its size. the cask contains the equivalent of twenty glasses. A character who imbibes a glass of ale regains 1 hit point, but a character who drinks two glasses within 1 hour becomes poisoned for 1 hour.
Syl's Gear. The armor and virbroblade belong to Syl Ordo. Syl is grateful if at least his vibroblade is returned to him.
6. Trooper Barracks Room
The bandits are a mixed tribe of species, with a handful of stronger individuals lording over larger numbers of miserable lessers and a few ex military deserted troopers. The troopers plan to dispose of the leaders and take over someday, but for now, they are too strong a threat.
Four troopers are quartered in this room. Because their bandit neighbors are always getting into fights, they don't pay attention to noise in areas 2 or 3. However, they are quick to defend their tower if any intruders appear, or to respond to an alarm raised by the sentries.
Treasure
Mounted to the walls are five vibrospears, four vibroblades, three blaster rifles, two vibroswords, and a premium electrostaff. The electrostaff is engraved with stylized feathers, is surprisingly light (llb.), and worth 100 credits.
Awarding Experience Points
Divide 400 XP equally among the characters if the party defeats the troopers in this room.
Trooper
Medium humanoid, any alignment
- Armor Class 15 (mesh armor)
- Hit Points 13 (2d8 + 4)
- Speed 30 ft.
STR DEX CON INT WIS CHA 13 (+1) 16 (+3) 15 (+2) 9 (-1) 11 (+0) 10 (+0)
- Senses darkvision 60 ft., passive Perception 10
- Languages Galactic Basic, one other
- Challenge 1/2 (100 XP)
Actions
Blaster Rifle. Ranged Weapon Attack: +5 to hit, range 100/400 ft., one target. Hit: 7 (1d8 + 3) energy damage.
Stock Strike. Melee Weapon Attack: +3 to hit, reach 5 ft., one target. Hit: 3 (1d4 + 1) kinetic damage.
This hall holds three miserable ruffians and their leader-a fat, cantankerous bandit with 16 hit points named Yegg. Yegg is the chief cook for the bandits, and he viciously bullies his unwilling assistants as they go about the work of putting food on the group's table. If Yegg is killed, any bandits left alive flee to the east or west, avoiding the north door because of the trap in area 2.
Awarding Experience Points
Divide 400 XP equally among the characters if the party defeats the bandits in this room.
8. Dark Hall
Even by day, this area has no exterior light. The boxed text assumes that the characters have darkvision or a light source.
This chamber contains a mucous salamander - the special pet of the bandit Lhupo (area 9). The mucous salamander likes to climb up to a ledge hidden in the shadows of the statuary in the higher reaches of the room. It quietly observes intruders that enter the area before dropping down to strike. Compare the salamander's Dexterity (Stealth) check to the characters' Wisdom (Perception) checks (or their passive scores) to determine who among them is surprised. The salamander knows that bandits are not to be eaten unless Lhupo says so. The rest of the bandits are terrified of Lhupo's pet and hurry through this room, preferably in twos or threes.
Developments
If combat erupts here, the bandits in area 9 cannot be surprised.
Treasure
Buried under the rubble is a gold statuette of a sun twi'lek (1000 credits) wrapped in crimson cloth. A bandit hid the figurine here, hoping his fellow bandits wouldn't steal it from him.
Mucous Salamander
Medium beast, unaligned
- Armor Class 13 (15 natural armor in solid form)
- Hit Points 44 (8d8 + 8)
- Speed 30 ft., climb 30 ft. (solid form), swim 50 ft. (liquid form)
STR DEX CON INT WIS CHA 16 (+3) 17 (+3) 13 (+1) 3 (-4) 12 (+1) 5 (-3)
- Skills Athletics +5, Stealth +5
- Damage Vulnerabilities lightning in liquid form
- Damage Resistances Energy, Ion, and kinetic from unenhanced weapons in solid form
- Condition Immunities Prone, Grappled, restrained in liquid form
- Senses passive Perception 11
- Languages -
- Challenge 2 (450 XP)
Shifting Molecules. When the salamander enters or exits water, it changes the form of its molecular structure to mimic its surroundings. Other than its AC, its statistics are the same in each form. Any object it is wearing or carrying isn't transformed.
Amphibious. The salamander can breathe air and water.
Diffuse Body (Liquid Form Only). The salamander can move through other creatures and objects no more than 10 feet in diameter as if they were difficult terrain. It takes 5 (1d10) kinetic damage if it ends its turn inside an object.
Spider Climb (Solid Form Only). The salamander can climb difficult surfaces, including upside down on ceilings, without needing to make an ability check.
Spiked Hide (Solid Form Only). Any creature that grapples the salamander takes 3 (1d6) kinetic damage at the end of its turn.
Watery Stealth (Liquid Form Only). While underwater, the salamander has advantage on Dexterity (Stealth) checks made to hide, and it can take the Hide action as a bonus action.
Actions
Bite. Melee Weapon Attack: +5 to hit, reach 5 ft., one target. Hit: 7 (1d8 + 2) kinetic damage.
Claw (Solid Form Only). Melee Weapon Attack: +5 to hit, reach 5 ft., one target. Hit: 8 (1d10 + 3) kinetic damage.
Any force sensitive creature grasping the statue can use it to cast Beacon of Hope (see the rulebook for a description of this spell). Once a creature has cast the spell, it can never activate the statuette again.
Awarding Experience Points
Divide 450 XP equally among the characters if the party defeats the mucous salamander.
9. Bandit Shrine
The bandits have dedicated this place to a variety of different local gods.
This shrine is home to Lhupo (a ruffian with 16 hit points) and one ordinary ruffian that serves as his "acolyte." They all wear filthy robes over their armor. Lhupo claims to hear his god speaking to him. If the bandits heard the characters fighting the mucous salamander in area 8, they hide behind the altar and attempt to surprise the characters. Otherwise, both bandits are kneeling before the altar, praying to their god.
The black cloth completely covers the altar, the sides of which are engraved with images of the various gods reflected in the decor found in area 8.
Treasure
The ritual implements are a chalice, a knife, and a censer. They are human-made art objects worth 1500 credits, 600 credits, and 1200 credits, respectively.
Awarding Experience Points
Divide 200 XP equally among the characters if the party defeats the bandits.
10. Postern Gate
This side entrance to the castle is locked but unguarded.
The metal door is locked. It can be opened with security kit and a successful DC 15 Intelligence check, or knocked down with a successful DC 25 Strength check.
Loopholes. Any character who pauses and listens near the loopholes hears, from area 7, an occasional clatter of crockery and angry bandits arguing over whether the dishes need cleaning. The bandits aren't keeping watch from these loopholes. However, if the characters make a lot of noise or commotion, such as knocking down the door, the bandits come and look. If they see intruders outside, they shout an alarm.
11. Ruined Tower
Dusty canvas (marked with a "C" on the map) hides the northern entrance to this area, blending in with the surrounding stonework and rubble. A character who succeeds on a DC 15 Wisdom (Perception) check spots a footpath leading up to the hidden entrance. If the characters are actively searching the outside of the castle for a hidden entrance, they can make a DC 10 Wisdom (Perception) check to spot the canvas "door."
12. Guard Barracks
The creatures here keep watch from the loopholes, so any characters creeping around the east side of the castle are likely to be spotted and attacked.
Two troopers stand guard in this room. They are smart, tough, and loyal to Dovin Arthek. At the start of combat, one trooper runs to warn the chief in area 14, then returns 2 rounds later to rejoin the fray.
This area was once a parlor for the castle's occupants, though its rotted furnishings were destroyed over time.
Awarding Experience Points
Divide 200 XP equally among the characters if the party defeats the troopers.
13. Wampa Tower
The door to this room is held shut with a heavy wooden bar - a subtle warning that danger lies beyond. When the bar is lifted, the creature in the room awakens and lets out a terrible roar.
The loopholes here are shuttered, leaving the room dark. The boxed text assumes that the characters have darkvision or a light source.
The bandits have captured a snow wampa and confined it to this tower. The room is kept dark to keep the beast calm, but Dovin Arthek doesn't know what to do with it yet. If a character throws it fresh meat, the wampa devours the food. Otherwise, it attacks the first creature it sees in the doorway.
This room was once a library and workshop, but nothing of its original contents remains intact.
Developments
If the characters open the door and stay out of the wampa's way, it flees the castle (most likely through area 11). The creature attacks anything that gets in its way.
Snow Wampa
Large beast, unaligned
- Armor Class 12 (natural armor)
- Hit Points 51 (6d10 + 18)
- Speed 40 ft.
STR DEX CON INT WIS CHA 19 (+4) 13 (+1) 16 (+3) 5 (-3) 12 (+1) 11 (+0)
- Skills Perception +3, Stealth +3
- Damage Immunities Cold
- Senses darkvision 60 ft., passive Perception 13
- Languages -
- Challenge 3 (700 XP)
Fear of Fire. If the wampa takes fire damage, it has disadvantage on attack rolls and ability checks until the end of its next turn.
Keen Smell. The wampa has advantage on Wisdom (Perception) checks that rely on smell.
Snow Camouflage. The wampa has advantage on Dexterity (Stealth) checks made to hide in snowy terrain.
Actions
Multiattack. The wampa makes two attacks, one with its claw and one with its bite.
Claw. Melee Weapon Attack: +6 to hit, reach 5 ft., one target. Hit: 12 (2d6+5) kinetic damage.
Bite. Melee Weapon Attack: +6 to hit, reach 5 ft., one creature. Hit: 7 (1d10+2) kinetic damage. The target is grappled (escape DC 14) Until this grapple ends, the target is restrained, and the Snow Wampa can't bite another target.
Treasure
All that remains of the tower's second floor is a jagged ledge, upon which sits a battered chest. The chest is hard to see from the floor, requiring a successful DC 15 Wisdom (Perception) check to notice. The chest is unlocked and contains 1380 credits, a medpac, a repair kit, and a traumakit.
Awarding Experience Points
Divide 700 XP equally among the characters if the party defeats the snow wampa or releases it.
14. Chief's Quarters
Any character who listens at the door hears two voices in a heated discussion - a loud, growling voice demanding payment for something, and a silky smooth reply.
Kaleesh Chieftain
Medium humanoid, lawful balanced
- Armor Class 14 (fiber armor)
- Hit Points 22 (4d8 + 4)
- Speed 30 ft.
STR DEX CON INT WIS CHA 12 (+1) 14 (+2) 12 (+1) 11 (+0) 10 (+0) 14 (+2)
- Saving Throws Dex +4
- Skills Perception +2, Stealth +4
- Senses darkvision 60ft, passive Perception 12
- Languages Kaleesh, Galactic Basic
- Challenge 1 (200 XP)
Actions
Multiattack. The Kaleesh Chieftain makes two meelee attacks with its Shoni Spear or two ranged attack with its slugthrower.
Lig Sword. Melee Weapon Attack: +4 to hit, reach 5 ft, one target. Hit 5 (1d8 + 1) kinetic damage.
Shoni Spear. Melee or Ranged Weapon Attack: +3 to hit, reach 5 ft. or range 20/60, one target. Hit 4 (1d6 + 1) kinetic damage.
Sudden Rush. Until the end of the turn, the Kaleesh Chieftain's speed increases by 60 feet and it doesn't provoke opportunity attacks.
Changeling Infiltrator
Medium humanoid, lawful dark
- Armor Class 15 (fiber armor)
- Hit Points 36 (8d8)
- Speed 30 ft.
STR DEX CON INT WIS CHA 8 (-1) 16 (+3) 10 (+0) 16 (+3) 12 (+1) 14 (+2)
- Saving Throws Dex +5, Int +5
- Skills Acrobatics +5, Perception +3, Stealth +5
- Senses passive Perception 13
- Languages Galactic Basic, one other of your choice
- Challenge 3 (700 XP)
Shapechanger. The infiltrator can use its action to polymorph into a Small or Medium humanoid it has seen, or back into its natural form. Its statistics, other than its size, are the same in each form. Its equipment is not transformed. If slain, the infiltrator reverts to its natural form.
Evasion. If the infiltrator is subjected to an effect that allows it to make a Dex saving throw to take only half damage, the infiltrator instead takes no damage on a success, and half damage on a fail.
Techcasting. The infiltrator is a 3rd-level techcaster. Its techcasting ability is Intelligence (tech save DC 13, +5 to hit with tech powers). It has 15 tech points and knows the following tech powers:
- At will: electrical burst, encrypted message, on/off
- 1st-level: holographic disguise, smoke cloud, tranquilizer
- 2nd-level: infiltrate, scorching ray
Actions
Blaster Carbine. Ranged Weapon Attack: +5 to hit, range 60/240 ft., one target. Hit: 6 (1d6 + 3) energy damage. The attack deals an extra 14 (4d6) damage when the infiltrator has advantage on the attack roll, or when the target is within 5 feet of an ally of the infiltrator and the infiltrator doesn't have disadvantage on the attack roll.
Reactions
Uncanny Dodge. The infiltrator halves the damage that it takes from an attack that hits it.
Northwest Room. This partially collapsed chamber was once a comfortable bathroom. It still contains a large tile tub, unused by the castle's current occupants.
Unconscious Quarren. Near the southwest corner of the room is Gundark Roksek, a quarren commoner. He is unconscious but stable at 0 hit points.
Dovin Arthek is a fierce old kaleesh chieftain with 35 hit points. He rules the bandits through pure intimidation. Age has stooped his shoulders and hunched his back, but he remains surprisingly agile and strong. He is demanding and vindictive, and no bandit dares to cross him.
Dovin Arthek is attended by Snarl, a sybian hound with 18 hit points, and a female changeling infiltrator. The infiltrator, Vyerith, is a messenger from the Black Rancor, come to collect Gundark Roksek and the navigational charts of Wave Echo Mine from Dovin Arthek. Arthek wants to sell the charts instead of surrendering it, and he and the infiltrator are negotiating a price. Vyerith first wants to question Gundark to find out if anyone else knows the location of the mine. Then the infiltrator intends to kill the quarren and destroy the charts.
If the villains have been warned that an attack is imminent, Vyerith hides behind the door to the northeast, leaving it open a crack and hoping to attack an intruder from the rear. Arthek holds Gundark hostage, ready to kill the quarren if the characters don't back off.
Loopholes. The loopholes are 15 feet above the ground outside, and the creatures here aren't keeping watch. They are unlikely to notice intruders moving around the exterior of the castle.
Developments
If Dovin is killed, Vyerith tries to kill Gundark and flee with the charts, heading toward area 11 and escaping through the concealed canvas door. If cornered, the infiltrator fights to the death rather than allow herself to be captured.
Sybian Hound
Medium beast, unaligned
- Armor Class 13 (natural armor)
- Hit Points 11 (2d8+2)
- Speed 40 ft.
STR DEX CON INT WIS CHA 12 (+1) 15 (+2) 12 (+1) 3 (-4) 12 (+1) 6 (-2)
- Skills Perception +3, Stealth +4
- Senses passive Perception 13
- Languages -
- Challenge 1/4 (50 XP)
Keen Hearing and Smell. The hound has advantage on Wisdom (Perception) checks that rely on hearing or smell.
Pack Tactics. The hound has advantage on attack rolls against a creature if at least one of the hound's allies is within 5 feet of the creature and the ally isn't incapacitated.
Actions
Bite. Melee Weapon Attack: +4 to hit, reach 5 ft., one target. Hit: 7 (2d4+2) kinetic damage. If the target is Large or smaller, it must succeed on a DC 11 Strength saving throw or be knocked prone.
If Gundark is revived, he thanks the party for coming to his rescue but won't leave Arthek Castle without his map. Unfortunately, he doesn't know where Dovin Arthek has hidden it (see the "Treasure" section).
Treasure
Hidden under Dovin's bed mattress is a sack containing 540 credits, three medpacs, and Gundark's navigational charts to Wave Echo Mine.
Awarding Experience Points
Divide 950 XP equally among the characters if the party defeats Dovin Arthek, the wolf, and the infiltrator.
Award an additional 200 XP to the party if the characters rescue Gundark Roksek and escort him safely back to Formos.
What's Next?
If Gundark Roksek survives the ordeal at Arthek Castle, he offers the characters his thanks and asks that they escort him back to Formos and then venture to Wave Echo Mine to learn the fate of his brothers, Nundark and Terdark. He knows that someone called the Black Rancor orchestrated his capture and hopes that the characters stop the villain. Upon returning to Formos, Gundark offers the characters 250 credits each for their assistance and promises the party a 10 percent share of the mine's wealth once his operation there is up and running.
Whether the characters sought the information from Agatha or Reidoth, negotiated with Hamun Kost, or recovered Gundark and his map from Arthek Castle, they now know the location of Wave Echo Mine. The only thing left for them to do is seek out the old mine and discover for themselves who the Black Rancor is, and why he's so interested in the Lost Mine of Kessel.
Part 4: Wave Echo Mine
On the nearby planet of Kessel, lies Wave Echo Mine. The rich mine was lost hundreds of years ago during conflicts that devastated the region.
In the years since, countless prospectors have searched for the lost mine, but none succeeded until the Roksek brothers found the entrance a month ago. Unfortunately, the Rokseks did not realize they were being trailed by spies working for Nysnar, the Black Rancor, and they inadvertently led the cathar villain to their prize. Nysnar and his followers dealt with the two Rokseks who were guarding their find, then arranged for Gundark's ambush. Learning of the characters' involvement with Gundark or their exploits on and around Formos, the Black Rancor has given orders for the characters to be dealt with. Meanwhile, Nysnar has begun his exploration of Wave Echo Mine.
The cathar is searching for a legendarily enormous cache of stabilize coaxium. However, Nysnar's exploration has been hindered by the restless droids and dangerous monsters that lurk in Wave Echo mine, forcing him to proceed with great caution.
The characters now have the chance to aid Gundark, avenge his kin, and put a stop to the nefarious schemes of the Black Rancor. And of course, the hoard of coaxium rumored to be hidden in the mines is a rich prize.
Character Level
This part of the adventure is designed for characters of at least 4th level and assumes that each character has earned at least 2,700 XP. If the characters skipped too many of the optional investigations and encounters in part 3, they might not be 4th level, and many of the encounters in this section might be difficult for them.
Experience Point Awards
In this part of the adventure, XP is awarded for overcoming monsters, as in parts 2 and 3. However, XP awards for monsters is not given in the encounter description. Instead, the amount of XP that a monster is worth is noted in its stat block (see the appendix). You calculate the award by totaling the value for each monster the characters overcome. Additional XP awards, and the reasons for them, are described in the text, under the "Awarding Experience Points" heading.
Wandering Monsters
Monsters roam through all areas of the mine. Random encounters remind players that monsters aren't necessarily confined to specific areas, and that no part of the mine is safe. Encounters with wandering monsters are an effective way to keep the players and characters on their toes, alleviate player boredom, and tax party resources. However, having too many random encounters can become tedious, so use them sparingly.
If the characters spend a long time in a given area, you can check for wandering monsters by rolling a d20. On a roll of 17-20, an encounter takes place. Conversely, if the players seem restless, you can decide that an encounter occurs. Roll a d12 and consult the Wandering Monsters table to determine what the party meets.
Wandering Monsters
| d12 Roll | Result |
|---|---|
| 1-3 | Mynocks (2d4) |
| 4-5 | Anoobas (1d4) |
| 6 | Mucous Salamander (1d4) |
| 7-8 | Wookiee Berserkers (1d4) |
| 9-10 | Junk Droids (1d6) |
| 11-12 | Tusk Cat (1) |
General Features
The mine is cold, damp, and surprisingly drafty. A noticeable breeze blows through many of its passages, flowing from area 1 toward area 16.
Ceilings. Tunnels are 10 feet high unless noted otherwise. Rooms have 20-foot-high ceilings, while natural caverns have 30-foot-high ceilings dotted with stalactites.
Doors. Unless noted otherwise, all doors are 6 feet tall, 4 feet wide, and made of six-inch-thick cut slabs of stone fitted with metal handles and hinges. The doors are low and wide.
Wal1s. The walls are hewn stone. In a few areas (14, 15, 19, and 20), they are dressed with well-fitted stone blocks.
Floors. All floors are smooth, natural stone.
Light. None unless otherwise indicated. The boxed text assumes that the characters have light sources or darkvision.
Stalagmites. Found in many of the natural caverns, these spires of rock rise up from the floor and can be used for cover (see "Cover" in the rulebook).
Keyed Encounters
All the encounters in this part of the adventure are keyed to the map of Wave Echo Cave.
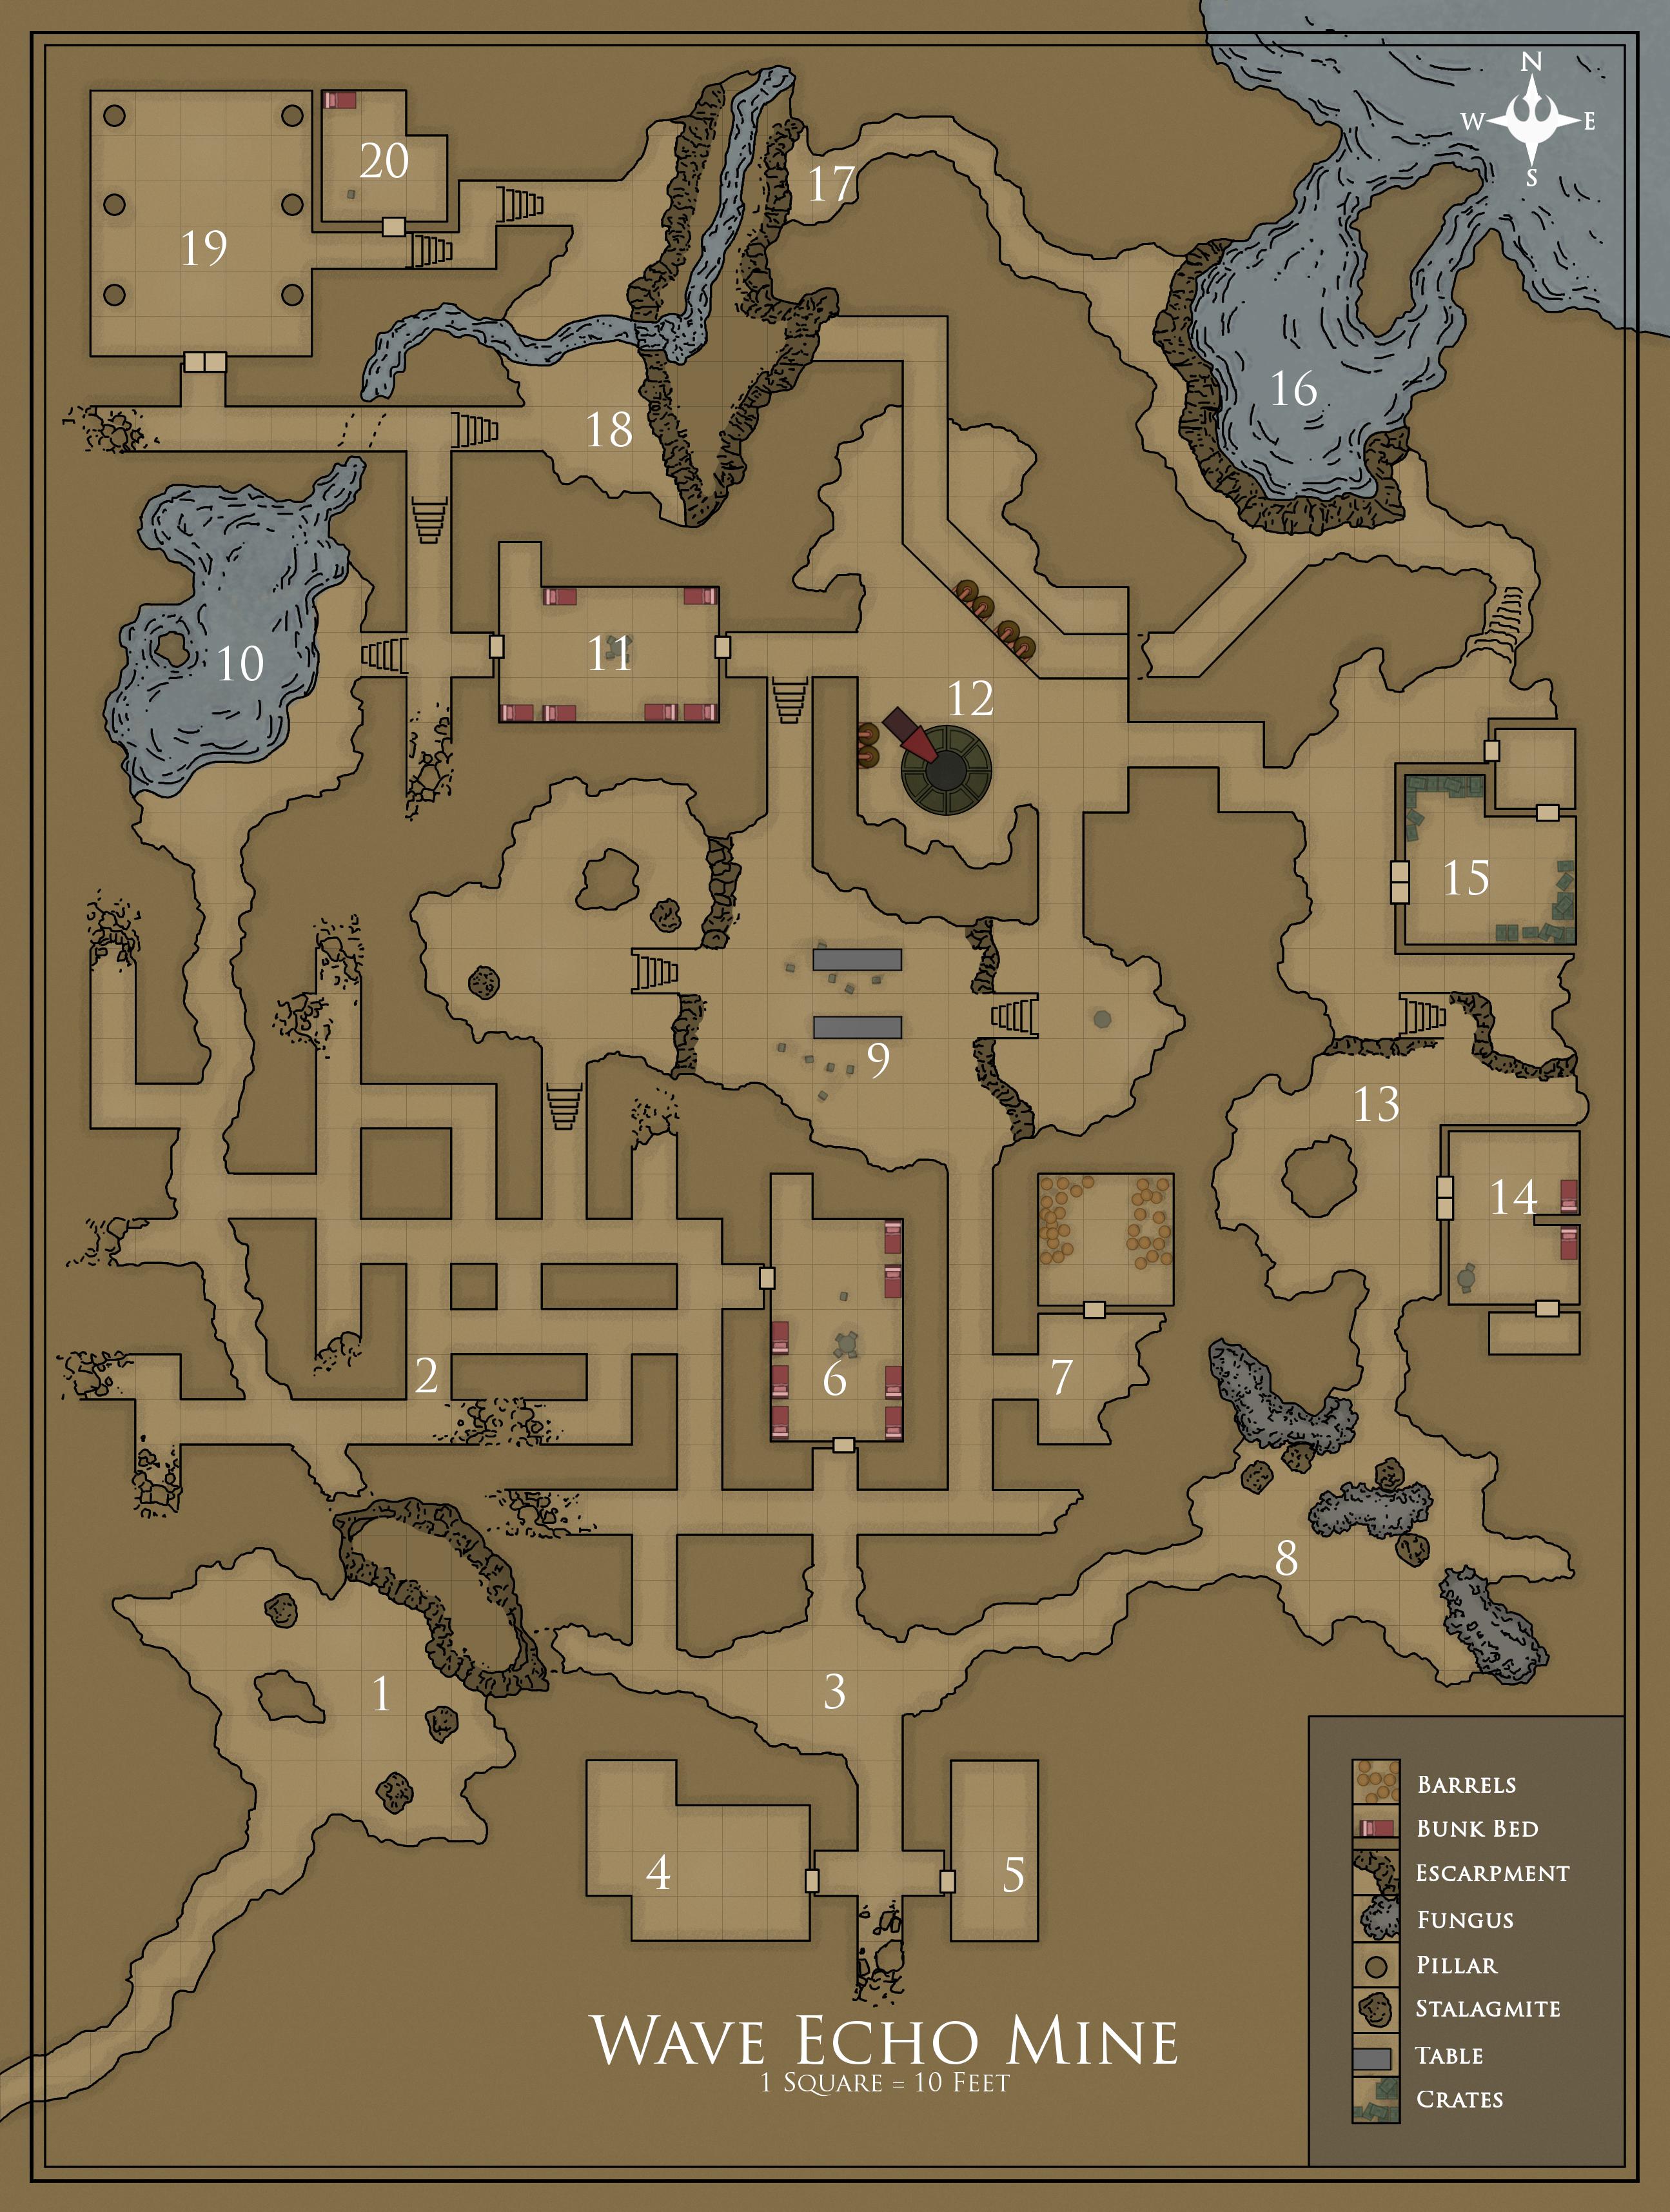
Booming Waves
All good dungeons have characteristics that make them unique, and Wave Echo Mine is no exception. The rhythmic thunder of pounding waves echoes throughout the mine, loud enough to make the stone underfoot shiver. Waves come about two minutes apart, growing louder toward the northeast.
Wave Echo Mine is nowhere near the ocean, but a water-filled cavern deep in the mine is connected to an underground hot spring. That spring boils over continuously to produce a surge that slams into a narrow funnel, making a sound like breaking surf. Describe this sound to players on occasion. It will pique their curiosity and lure them toward its source, drawing them deeper into the mine as a consequence.
1. Cave Entrance
Whether the characters follow Gundark's charts or receive directions to Wave Echo Mine from another source, their initial approach leads them to a narrow tunnel whose entrance in the deserted Kessel foothills.
This was the campsite of the Rokseks. The dead quarren is Terdark, Gundark's brother, who was killed by the Black Rancor. Gundark's other brother, Nundark, was here as well and is currently the Black Rancor's prisoner in area 20.
The quarren's supplies are potentially useful, but not particularly valuable.
Open Pit. Climbing up or down the wall of the pit without a rope requires a successful DC 15 Strength (Athletics) check. A character who fails the check by 5 or more falls and takes 1d6 kinetic damage per 10 feet fallen, landing prone at the bottom. The tunnel at the bottom of the pit leads northwest toward area 2 and east toward area 3.
Treasure
Terdark wears a pair of Mag-lock boots. In his haste to explore the rest of Wave Echo Mine, Nysnar overlooked them.
2. Mine Tunnels
This maze of passages is an old section of Wave Echo Mine's original mine site.
The dead-end passages are places where the miners gave up and decided to move on to other spots. Patiently lurking in one is an tusk cat. When the party enters this section of the mine, the cat begins to stalk the group, instinctively waiting for an opportunity to attack a lone target.
Tusk Cat
Large beast, unaligned
- Armor Class 13
- Hit Points 32 (5d10 + 5)
- Speed 60 ft.
STR DEX CON INT WIS CHA 15 (+4) 17 (+3) 12 (+1) 5 (-3) 14 (+2) 7 (-2)
- Skills Perception +4
- Senses darkvision 60 ft., passive Perception 14
- Languages -
- Challenge 2 (450 XP)
Traits
Keen Sight and Smell. The tusk cat has advantage on Wisdom (Perception) checks that rely on sight and smell.
Trampling Charge. If the tusk cat moves at least 20 feet straight toward a creature and then hits it with a tusk attack on the same turn, that target must succeed on a DC 15 Strength saving throw or be knocked prone. If the target is prone, the tusk cat can make one hooves attack against it as a bonus action.
Actions
Hooves. Melee Weapon Attack: +8 to hit, reach 5 ft., one target. Hit: 9 (1d10 + 4) kinetic damage.
Tusks. Melee Weapon Attack: +8 to hit, reach 5 ft., one target. Hit: 13 (2d8 + 4) kinetic damage.
3. Old Entrance
The tunnel that runs south was the original entrance to Wave Echo Mine, but it was buried by the destruction that wracked the mines centuries ago. A pitched battle was fought here and the dead still lie where they fell.
Clinging to the ceiling like bats are ten mynocks. The monsters find scant living prey in the mines, and they are ravenous. If the characters are looking down at the skeletons on the floor, the mynocks are likely get the drop on them. Any character who isn't watching the ceiling is surprised unless his or her passive Wisdom (Perception) score is higher than the mynocks' Dexterity (Stealth) check total (roll once for all of them). Characters who aren't surprised hear a flapping noise as the mynocks descend to attack.
The lamps and the carvings of miners at work were meant as a welcome to newcomers.
Mynock
Small beast, unaligned
- Armor Class 14 (natural armor)
- Hit Points 7 (2d6)
- Speed 5 ft., fly 40ft
STR DEX CON INT WIS CHA 4 (-3) 16 (+3) 11 (+0) 2 (-4) 8 (-1) 6 (-2)
- Senses darkvision 60 ft., passive Perception 9
- Languages -
- Challenge 1/8 (25 XP)
Traits
Atmosphere Agnostic. The mynock can survive in any type of atmosphere or vacuum.
Battery Drainer. If the mynock attaches itself to a piece of equipment that needs energy to function, that piece will stop working until the Mynock is removed.
Pack Tactics. The mynock has advantage on an attack roll against a creature if at least one ally of the mynock is within 5 feet of the creature and the ally isn't incapacitated.
Actions
Energy Drain. Melee Weapon Attack: +5 to hit, reach 5 ft., one creature. Hit: 5 (1d4 + 3) kinetic damage, and the mynock attaches to the target. If attached to a droid or construct, at the start of each of the mynock's turns, the target loses 5 (1d4 + 3) hit points due to energy being drained. The mynock can detach itself by spending 5 feet of its Movement. It does so after it drains 10 Hit Points of energy from the target or the target dies. A creature, including the target, can use its action to detach the Mynock
4. Old Guardroom
This guardroom once protected the nearby entrance to the mine.
In the round after any living creature enters this chamber, the rubble begins to stir and knit together, forming nine junk droids. They fight until destroyed.
Junk Droid
Medium droid, unaligned
- Armor Class 13 (armor scraps)
- Hit Points 13 (2d8+4)
- Speed 30 ft.
STR DEX CON INT WIS CHA 10 (+0) 14 (+2) 15 (+2) 6 (-2) 8 (-1) 5 (-3)
- Damage Vulnerabilities Ion
- Damage Resistances Necrotic, Poison, Psychic
- Condition Immunities poison, disease
- Languages Speaks binary, Galactic Basic
- Challenge 1/4 (50 XP)
- Circuitry. The droid has disadvantage on saving throws against effects that would deal ion or lightning damage.
Actions
Multiattack. The junkyard droid makes two blaster carbine attacks or two vibroblade attacks.
Blaster Carbine. Ranged Weapon Attack: +4 to hit, range 60/240 ft., one target. Hit: 5 (1d6+2) energy damage.
Vibroblade. Melee Weapon Attack: +4 to hit, reach 5ft., one target. Hit: 5 (1d6+2) kinetic damage.
5. Assayers' Office
The mine's assayers worked here, weighing and assessing coaxium samples and paying the minors for their labor.
The centuries-old data recording in the cubbyholes disintegrates if touched, but a character who inspects them can see that are recordings of weigh-ins and disbursements.
Treasure
Behind the counter sits a locked strongbox, requiring a slicer's kit and a successful DC 20 Dexterity check to open. This pay chest was overlooked in the fighting and contains 6420 credits.
6. South Barracks
This was a miners' barracks, where the delvers working in Wave Echo Mine rested between shifts. Any character who listens at the partially open door hears faint crunching and splintering sounds with a successful DC 10 Wisdom (Perception) check.
Three annobas from the pack in area 9 are here, cracking and gnawing on the ancient bones of the fallen in the vain hope that some tasty morsel of marrow remains. The anoobas, eager for a fresh meal, attack immediately.
Anooba
Medium beast, unaligned
- Armor Class 14 (natural armor)
- Hit Points 36 (5d10+9)
- Speed 50 ft.
STR DEX CON INT WIS CHA 16 (+3) 15 (+2) 15 (+2) 3 (-4) 12 (+1) 7 (-2)
- Senses passive perception 13
- Languages -
- Challenge 1 (100 XP)
Actions
Bite. Melee Weapon Attack: +5 to hit, reach 5 ft., one target. Hit: (2d6 + 3) kinetic damage. If the target is a creature, it must succeed on a DC 13 Strength saving throw or be knocked prone.
7. Ruined Storeroom
Despite the destruction all around, the northern part of this storage area has survived intact.
It's not comfortable, but the storeroom is a secure resting place. No monsters come this way. Moreover, the storeroom door is in good shape and can easily be blocked or barred from the inside.
The contents of the barrels have long since evaporated or rotted away.
8. Fungi Cavern
This cave has hindered Nysnar's explorations. The cathar suspects that the mine's refineries are close by, but he's reluctant to risk dealing with the creatures here.
Most of the fungi is harmless, and the green-glowing fungi allow creatures to see the entire cavern without the aid of darkvision or a light source.
Poison Gas. Whenever a creature attempts to cross the cavern, the carpets of fungi that cover most of the floor release poisonous gas into the air. Each creature in the cavern must succeed on a DC 11 Constitution saving throw or take 3d6 poison damage and be poisoned for 10 minutes (see the rulebook for more information on the poisoned condition). The gas disperses after 1 minute, but until then, any living creature that ends its turn in the cavern must repeat the saving throw.
9. Great Cavern
This cave once served as the dining hall room and meeting area for the miners.
Seven anoobas lurk in the shadows on the western ledge. They notice any light or noise elsewhere in the cave and quickly bound down to attack. The beasts are hungry and fight until killed.
The escarpments are 10 feet high and require a successful DC 12 Strength (Athletics) check to climb. A creature that falls or is knocked from the top of a ledge takes 1d6 kinetic damage and lands prone.
10. Dark Pool
Treasure is concealed in this water-filled cave.
The pool is 20 feet deep in the middle. The stream to the northeast is 3 feet deep, and the ceiling of the passage is 2 to 3 feet above the water. Characters can easily wade through the stream to area 18.
A character who explores the pool finds an old skeleton lying on the bottom, 10 feet from the shore and under 10 feet of water. These are the remains of a twi'lek explorer.
Treasure
The skeleton wears two platinum rings (750 credits each) and clutches a propulsion pack in its bony fingers.
11. North Barracks
The eastern door is barricaded from inside the room and requires a successful DC 20 Strength check to force open. A character who listens at either door and succeeds on a DC 10 Wisdom (Perception) check hears gruff voices speaking Shyriiwook and talking about how hungry they are.
If the party enters from the west, add:
Wookiee Berserker
Medium humanoid, unaligned
- Armor Class 14 (hide)
- Hit Points 30 (4d8+12)
- Speed 30 ft, climb 30 ft.
STR DEX CON INT WIS CHA 16 (+3) 12 (+1) 17 (+3) 7 (-2) 11 (+0) 10 (+0)
- Skills Athletics +5, Intimidation +5
- Senses darkvision 60 ft., passive Perception 10
- Languages Galactic Basic, Shyriiwook
- Challenge 1 (200 XP)
Aggressive. As a bonus action, the wookiee can move up to its speed toward a hostile creature that it can see.The Creature Name makes Number and type of attacks
Reckless. At the start of its turn, the wookiee can can gain advantage on all melee weapon attack rolls during that turn, but attack rolls against it have advantage until the start of its next turn.
Blood Rage. When a creature within 5 feet of the wookiee hits it with an attack, the wookiee may use its reaction to immediately make a melee weapon attack with advantage against that creature.
Five wookiee berserkers reside in this chamber. They are loyal minions of Nysnar. This room marks the front line in the Black Rancor's assault on Wave Echo Cave, and the wookiees are here to prevent creatures or droids from troubling their master in his lair (area 19).
Like area 6, this was formerly a barracks for miners. Nysnar's wookiees removed the corpses they found here and built the barricade.
Treasure
The largest wookiee carries a pouch containing 27 credits and a medpac.
Sentinel Guard Droid
Medium droid, unaligned
- Armor Class 16 (armor plating)
- Hit Points 58 (9d8 + 18)
- Speed 30 ft., climb 30 ft.
STR DEX CON INT WIS CHA 13 (+1) 19 (+4) 14 (+2) 15 (+2) 13 (+1) 9 (-1)
- Saving Throws Dex + 6
- Skills Perception +3, Stealth +6, Intimidate +1
- Damage Vulnerabilities Ion
- Damage Resistances Necrotic, Poison, psychic; energy from melee weapons
- Condition Immunities Poisoned, disease
- Senses darkvision 60 ft., passive Perception 13
- Languages Binary, Galactic Basic
- Challenge 4 (1,100 XP)
Circuitry. The droid has disadvantage on saving throws against effects that would deal ion or lightning damage
Droid Synergy. Once per turn, the droid can deal an extra 3 (1d6) damage to a creature it hits with a weapon attack if that creature is within 5 feet of a Sentinel Guard Droid ally that isn't incapacitated.
Leap. The droid can expend all its movement on its turn to jump up to its current movement speed in any direction.
Mag-lock Limbs. The droid can climb metal surfaces, including upside down on ceilings, without needing to make an ability check.
Actions
Multiattack. The droid makes two electrostaff attacks.
Electrostaff. Melee Weapon Attack: +6 to hit, reach 5 ft., one target. Hit: 9 (2d4+4) kinetic damage
Blaster Pistol. Ranged Weapon Attack: +6 to hit, range 40/160 ft., one target. Hit: 7 (1d6+4) energy damage.
Reactions
Parry. The droid adds 3 to its AC against one melee attack that would hit it. To do so, the droid must see the attacker and be wielding a melee weapon.
12. Smelter Cavern
Like the fungi cavern at area 8, this chamber poses a serious obstacle that prevents Nysnar from reaching his objective - the coaxium cache (area 15). The cathar is still formulating a plan to get past the guardians in this area.
There are eight junk droids in this room. They rise and pursue any living creatures that enter the room, but they do not pursue creatures outside this area for more than 1 round. In addition, a far more intelligent droid guards this area: a sentinel guard droid. This droid was a servant of the miners, and it continues to act on ancient instructions to prevent intruders from passing through.
This impressive chamber was the heart of the Wave Echo Mine operation. Here, coaxium was refined and ore processed. The dry channel is where the refiners diverted the stream from area 18 to aid in the process.
The channel's bottom is 5 feet below floor level, and no ability check is required to scramble in or out. Characters in the channel can follow it out of this room to the north or to the east, though the ceiling is only 5 feet high after the channel exits this room.
13. Starry Cavern
The structural damage and the skeletal remains in this area are evidence of the destructive here centuries ago.
The damaged buildings are described in areas 14 and 15. Minerals in the ceiling are pretty, but they are neither magical nor valuable.
14. Scribe's Quarters
The doors leading into this area are cracked, their hinges partially melted. Wrenching or smashing open the doors requires a successful DC 15 Strength check.
This room contains the restless spirit of the last person to die here: Mormesk the force ghost. He is not immediately visible but materializes when a living creature enters the room.
Mormesk the Ghost
Medium aberration, neutral dark
- Armor Class 13
- Hit Points 45 (6d8 + l8)
- Speed 30 ft.
STR DEX CON INT WIS CHA 6 (-2) 16 (+3) 16 (+3) 12 (+1) 14 (+2) 15 (+2)
- Damage Resistances acid, cold, fire, lightning, kinetic, ion, energy
- Damage Immunities necrotic, poison
- Condition Immunities charmed, grappled, paralyzed, petrified, poisoned, prone, restrained
- Senses darkvision 60 ft., passive Perception 12
- Languages Galactic Basic
- Challenge 3 (700 XP)
Incorporeal Movement. The wraith can move through an object or another creature, but can't stop there.
Actions
Life Drain. Melee Weapon Attack: +5 to hit, reach 5 ft., one creature. Hit: 16 (3d8 + 3) necrotic damage, and the target must succeed on a DC 13 Constitution saving throw or its hit point maximum is reduced by an amount equal to the damage taken. If this attack reduces the target's hit point maximum to 0, the target dies. This reduction to the target's hit point maximum lasts until the target finishes a long rest.
Mormesk was a powerful Jedi until he met his end in the disaster that destroyed the mines. Centuries of anger have poisoned his soul, transforming him into a hate-filled apparition.
The wraith spends his time here because the treasure he had amassed in life is in the scorched chest (see the "Treasure" section). No longer corporeal, he cannot touch or possess the wealth he enjoyed in life.
Roleplaying Mormesk
Mormesk speaks in grave whispers. When the wraith first rises up from the floor, it says, "Your presence is offensive to me, your life forfeit. My treasures are mine alone, not yours to plunder!" If the characters make no attempt to reason with the wraith, it attacks.
If the characters try to reason with the wraith, it listens to what they have to say, provided they have not harmed it in any way or seized any of its property. The wraith is irrevocably evil, so the only way the characters can stay its spectral hand is to offer it something a former Jedi would consider valuable in exchange for their lives. Mormesk values force infused items, holocrons, lightsabers, and force knowledge. Whatever the gift, a character must succeed on a DC 10 Charisma (Persuasion) check to convince the wraith of its value.
Regardless of what the characters offer it, the wraith won't relinquish the carved pipe in the scorched chest. It will, however, part with the coins and gems if the characters agree to kill the droid in the coaxium storeroom. (The wraith doesn't explain what a spectator is. It merely points toward area 15.) Once it receives its gift, the wraith allows characters to peruse its datapads and keep the secret map in one of them (see the "Treasure" section).
Treasure
The scorched chest is unlocked and contains 370 credits, three gemstones (1000 credits each), and a carved pipe adorned with platinum filigree (1500 credits).
A handful of preserved datapads remain on the shelves. Most are just histories, but one has a map hidden in it. The map's presence can be discerned with a successful DC 12 Intelligence (Investigation) check. The map shows the location of a dungeon of your own creation. When the characters finish their explorations here, this can lead them to their next adventure.
15. Coaxium Storeroom
Here is where the refineries stabilized massive amounts of raw coaxiaum. The northernmost door is scorched and cracked, its hinges partially melted; forcing it open requires a successful DC 15 Strength check. The western double doors are just as damaged but stand slightly ajar.
The droid that guards this room is an ancient assassin droid. The droid is tasked with guarding the coaxium stached here. The droid's grip on reality has become unhinged. It has become deranged and believes that the mine is still in use, ignoring all evidence to the contrary.
The wraith (area 14) wants to drive off or kill the droid, but so far, the creature has easily handled the assaults of Mormesk's creatures. If the party attempts to remove anything from this area, the droid attacks. If the droid is blinded somehow, it powers down, convinced that it can no longer perform the task for which it was summoned.
With a successful DC 15 Charisma (Deception) check, a character can trick the droid into thinking one or more party members are miners who work for the owners of Wave Echo Mine, sent to terminate the droid's employment. If the deception succeeds, the droid believes it is released from its obligations, and it powers down.
Coaxium Cache. A successful DC 15 Intelligence (Technology) check identifies the crates as the cache of coaxium.
Northern Room. This small room is a separate workspace, where spice was refined. Like the main workshop, it has been almost completely destroyed.
Ancient Assassin Droid
Medium droid, unaligned
- Armor Class 16 (armor plating)
- Hit Points 58 (9d8+18)
- Speed 30 ft.
STR DEX CON INT WIS CHA 14 (+2) 17 (+3) 15 (+2) 14 (+2) 13 (+1) 7 (-1)
- Skills Perception +3, Stealth +5, Survival +3
- Damage Vulnerabilities Ion
- Damage Immunities Damage_Immunities
- Condition Immunities poison, disease
- Senses darkvision 60 ft., passive Perception 13
- Languages Binary, Galactic Basic
- Challenge 3 (700 XP)
Circuitry. The droid has disadvantage on saving throws against effects that would deal ion or lightning damage.
Sneak Attack (1/Turn). The assassin droid deals an extra 7 (2d6) damage when it hits a target with a weapon attack and has advantage on the attack roll, or when the target is within 5 feet of an ally of the assassin droid that isn't incapacitated and the assassin doesn't have disadvantage on the roll.
Actions
Sniper Rifle. Ranged Weapon Attack: +5 to hit, range 150/600 ft., one target. Hit: 9 (1d12+3) energy damage.
Stock Strike. Melee Weapon Attack: +2 to hit, reach 5 ft., one target. Hit: 4 (1d4+2) kinetic damage.
Kyr'bes'aran. This premium beskar weave armor has a gold mythosaur motif worked into its design.
Treasure
On the worktable in the southeast corner of the room are the last items the droid was charged to protect: Lightbringer and Dragonguard.
Lightbringer. This +1 premium vibromace was made for a priest of some sort. The head of the mace is shaped like a sunburst. Named Lightbringer, this weapon can be made to glow as bright as a torch with the flick of a switch.
16. Booming Caverns
The sound of pounding surf that gives Wave Echo Mine its name can be traced to this water-filled cavern.
The ledge that hugs the south wall is 15 feet above water level. However, when water surges into the cave every 2 minutes, it raises the water level by 10 feet. After a minute, the water level returns to its normal depth of 20 feet.
17. Old Streambed
The stream flowing from area 10 to area 18 used to continue through this low passage, eventually emptying out into area 16.
The miners diverted the stream into the channel leading to area 12 to drive the waterwheel in the smelter. Then the earthquakes that rocked Wave Echo Mine during its destruction collapsed the floor in area 18, diverting the stream once again. The old streambed remains as a usable passage that circumvents area 12, although Nysnar has not yet discovered this.
18. Collapsed Cavern
Nysnar's servants occupy this cavern, guarding against incursions and carefully sifting through the rubble. The Black Rancor believes that some valuable treasure is hidden at the bottom of the rift that was created when this area was destroyed.
Three wookiee berserkers are stationed here. Two of them are clearing rock on the rift floor while one more stands guard in the western half of the cavern. A changeling infiltrator named Vhalak supervises the operation. If a fight breaks out in the main cavern, the two wookiees in the rift climb up the ropes to join the fray.
Rift. The rift is 20 feet deep. Climbing up or down without using a rope requires a successful DC 10 Strength (Athletics) check. A creature that fails the check by 5 or more falls and takes 1d6 kinetic damage per 10 feet fallen, landing prone at the bottom.
Changeling Infiltrator
Medium humanoid, lawful dark
- Armor Class 15 (fiber armor)
- Hit Points 36 (8d8)
- Speed 30 ft.
STR DEX CON INT WIS CHA 8 (-1) 16 (+3) 10 (+0) 16 (+3) 12 (+1) 14 (+2)
- Saving Throws Dex +5, Int +5
- Skills Acrobatics +5, Perception +3, Stealth +5
- Senses passive Perception 13
- Languages Galactic Basic, one other of your choice
- Challenge 3 (700 XP)
Shapechanger. The infiltrator can use its action to polymorph into a Small or Medium humanoid it has seen, or back into its natural form. Its statistics, other than its size, are the same in each form. Its equipment is not transformed. If slain, the infiltrator reverts to its natural form.
Evasion. If the infiltrator is subjected to an effect that allows it to make a Dex saving throw to take only half damage, the infiltrator instead takes no damage on a success, and half damage on a fail.
Techcasting. The infiltrator is a 3rd-level techcaster. Its techcasting ability is Intelligence (tech save DC 13, +5 to hit with tech powers). It has 15 tech points and knows the following tech powers:
- At will: electrical burst, encrypted message, on/off
- 1st-level: holographic disguise, smoke cloud, tranquilizer
- 2nd-level: infiltrate, scorching ray
Actions
Blaster Carbine. Ranged Weapon Attack: +5 to hit, range 60/240 ft., one target. Hit: 6 (1d6 + 3) energy damage. The attack deals an extra 14 (4d6) damage when the infiltrator has advantage on the attack roll, or when the target is within 5 feet of an ally of the infiltrator and the infiltrator doesn't have disadvantage on the attack roll.
Reactions
Uncanny Dodge. The infiltrator halves the damage that it takes from an attack that hits it.
Developments
If two or more wookiees are killed, the infiltrator tries to retreat to area 19 to warn Nysnar.
Treasure
Nysnar's beliefs are accurate. Buried under heavy rubble at the bottom of the rift is the crushed skeleton of a duros wearing plastoid composite armor with a fine powered armoring modification installed. The remains are hidden from view but can be found with a successful DC 20 Wisdom (Perception) check. Each character searching can attempt one check per hour.
19. Ruined Temple
Nysnar uses this room as his headquarters while he explores the mines and searches for the coaxium stache.
If the room's occupants are not aware of the characters as they enter, add the following:
Nysnar the Black Rancor is joined by two juvenile rancors that defend their master to the death. If they are expecting trouble, the rancors hide behind pillars, and Nysnar casts force camouflage on himself and stands near the table. Make a Dexterity (Stealth) check for the rancors. When intruders appear, the rancors try to quickly close to melee range. Nysnar joins the fray on the round after the rancors attack.
If the infiltrator from area 18 retreated to this area, it assumes the guise of Nundark Roksek so that Nysnar can use the "quarren" as leverage to force the party's surrender (although the cathar won't actually harm the disguised infiltrator). See the "Roleplaying Nysnar" section for more information on the cathar villain.
Force Presence any character skilled in the force feels a strong aura of in this room. Any damaging force powers cast near the pillars can cause them to collapse, triggering a ceiling collapse. Each creature in the room must make a DC 15 Dexterity saving throw, taking 4dl0 kinetic damage from falling rubble and falling prone on a failure, or taking only half the damage on a success.
Table. The table is strewn with datapads showing Nysnar's efforts at exploring the mine so far. A black leather sack of treasure is amid the papers (see the "Treasure" section).
Roleplaying Nysnar
Even though he intends to kill the characters, Nysnar is curious about them. Given the chance, he quizzes the characters at length regarding their identities, allegiances, interests, and goals. He files it all away in memory in the hope that someday he might find a use for what he learns.
Nysnar admits to being the Black Rancor, and to using the Arthek bandits and the Redbrands to ensure that Wave Echo Mine remains his secret. He will say or do anything to put the characters off their guard, including promising to surrender or proposing cooperation against the monsters impeding his progress toward reaching the coaxium cache. However, he betrays the characters as soon as they outlive their usefulness.
Developments
The creatures in area 18 can hear sounds of combat in this room. If they haven't already been dealt with, they arrive after 3 rounds and act immediately after Nysnar's rancors in the initiative count.
Nysnar the Black Rancor
Medium humanoid, lawful dark
- Armor Class 11 (14 with battle precognition)
- Hit Points 27 (6dS)
- Speed 30 ft.
STR DEX CON INT WIS CHA 9 (-1) 13 (+1) 10 (+0) 13 (+1) 14 (+2) 16 (+3)
- Saving Throws Cha +5, Wis +4
- Skills Lore +5, Perception +4, Stealth +3
- Condition Immunities Charmed
- Senses darkvision 120 ft., passive Perception 14
- Languages Galactic Basic, Catharese
- Challenge 2 (450 XP)
Special Equipment. Nysnar has a lightsaber with a regular ostrine crystal.
Spellcasting. Nysnar is a 4th-level force caster that uses charisma as his force casting ability (spell save DC 13; +5 to hit with spell attacks). Nysnar has the following spells prepared from the force powers list:
- At-will: denounce, enfeeble, shock
- 1st Level (4 slots): battle precognition, wound, dark side tendrils
- 2nd Level (3 slots): force camouflage, coerce mind
Actions
Lightsaber. Melee Weapon Attack: +1 to hit, reach 5 ft., one target. Hit: 2 (1d6-1) energy damage plus 3 (1d4) poison damage.
Rancor, Juvenile
Medium beast, unaligned
- Armor Class 13 (natural armor)
- Hit Points 95 (10d8+50)
- Speed 30 ft.
STR DEX CON INT WIS CHA 19 (+4) 11 (+0) 20 (+5) 4 (-3) 9 (-1) 6 (-2)
- Senses darkvision 120 ft., passive Perception 9
- Languages -
- Challenge 2 (450 XP)
Actions
Multiattack. The rancor makes two attacks: one with its claws, and one with its bite.
Claw. Melee Weapon Attack: +6 to hit, reach 5 ft., one target. Hit 7 (1d6+4) kinetic damage.
Bite. Melee Weapon Attack: +6 to hit, reach 5 ft., one target. Hit 9 (1d10+4) kinetic damage.
If the characters capture Nysnar and deliver him to the governor's hall on Formos, the cathar is locked up until Syl Ordo or another representative of the Bounty Hunter's Guild can escort him to Nar Shaddaa. However, unless the characters post guards outside Nysnar's cell, Halia Graven (see page 19) breaks him out of jail, smuggles him off Formos, and delivers him into the waiting arms of the Czerka Corporation. Czerka want to learn everything the Black Rancor knows about Wave Echo Mine. What happens to Nysnar at that point is up to you.
Treasure
Nysnar carries a medpac and a lightsaber with a poison regular ostrine crystal . In addition, the cathar carries an key with a head shaped like an anvil. This key unlocks the door to area 20.
Nysnar's exploration of Wave Echo Mine has yielded some treasure, which the cathar keeps in the sack on the table. The sack contains 3180 credits, nine small gemstones (100 credits each), and an ornate carved mug (1000 credits).
Awarding Experience Points
If Nysnar is captured alive and delivered to Syl Ordo or Governor Wester on Formos, award the party double his XP value.
20. Priest's Quarters
The door to this room is locked, requiring a slicer's kit and a successful DC 15 Dexterity check to open. Nysnar (area 19) carries the key.
Unless the characters are being stealthy, any activity at the door attracts the attention of Nysnar and his allies in area 19, prompting the cathar to send his rancors to investigate.
This room formerly belonged to the priest in charge of the temple (area 19), but Nysnar has appropriated it for use as a cell. The figure lying on the floor is Nundark, a quarren commoner and the youngest of the three Roksek brothers. Nysnar spared him because he thought the quarren might know more about the mine than he admitted. The cathar has interrogated Nundark harshly once or twice a day ever since capturing him.
Developments
Nundark is grateful if the characters rescue him, and he offers to tag along for the duration of their stay in Wave Echo Mine. Nundark doesn't know any more about the layout than the characters, so he hasn't much to offer in the way of useful information. See the "NPC Party Members" sidebar (page 14) for tips on running Nundark.
If the characters deal with Nysnar and his minions, this area serves as a safe and comfortable place to rest before continuing their explorations of the mine.
Commoner
Medium humanoid (any race), any alignment
- Armor Class 10
- Hit Points 4 (1d8)
- Speed 30 ft.
STR DEX CON INT WIS CHA 10 (+0) 10 (+0) 10 (+0) 10 (+0) 10 (+0) 10 (+0)
- Senses passive Perception 10
- Languages anyone (usually Galactic Basic)
- Challenge 0 (10 xp)
Actions
Club. Melee Weapon Attack: +2 to hit, reach 5 ft., one target. Hit: 2 (ld4) kinetic damage.
Awarding Experience Points
If Nundark is rescued and survives the adventure, divide 200 XP equally among the characters in the party.
Conclusion
With hard work and a little luck, the characters have defeated the Black Rancor and undone his destructive plots, cleared Formos of the ruffians who threatened its people, and reclaimed the lost Wave Echo Mine. Their deeds will be long remembered in this corner of the Outer Rim. In years to come, the restored mine will bring great riches to Formos and help establish peace and prosperity in the area.
Gundakr and Nundark Roksek take over administration of the new mine. For the characters' service to their family, they gladly award the party a 10 percent share of the mine's profits. If the characters want to remain on Formos and perhaps restore Tresendar Manor or establish homes of their own, the people of the area are glad to have them stay. Even if they choose to move on in search of new adventures, they'll always have a warm welcome on Formos.
By the end of the adventure, the characters should be 5th level. If your players wish to continue playing their characters, you can use the contents of this set to create your own adventures; the mysterious map found in area 14 of Wave Echo Mine provides one possible adventure hook, but feel free to explore other ideas using the monsters, items, and locations in this adventure. If you want to create adventures for characters higher than 5th level, you'll need the basic rules in the the Player's Handbook.
Appendix: Statblocks
Anooba
Medium beast, unaligned
- Armor Class 14 (natural armor)
- Hit Points 36 (5d10+9)
- Speed 50 ft.
STR DEX CON INT WIS CHA 16 (+3) 15 (+2) 15 (+2) 3 (-4) 12 (+1) 7 (-2)
- Senses passive perception 13
- Languages -
- Challenge 1 (100 XP)
Actions
Bite. Melee Weapon Attack: +5 to hit, reach 5 ft., one target. Hit: (2d6 + 3) kinetic damage. If the target is a creature, it must succeed on a DC 13 Strength saving throw or be knocked prone.
Ancient Assassin Droid
Medium droid, unaligned
- Armor Class 16 (armor plating)
- Hit Points 58 (9d8+18)
- Speed 30 ft.
STR DEX CON INT WIS CHA 14 (+2) 17 (+3) 15 (+2) 14 (+2) 13 (+1) 7 (-1)
- Skills Perception +3, Stealth +5, Survival +3
- Damage Vulnerabilities Ion
- Damage Immunities Damage_Immunities
- Condition Immunities poison, disease
- Senses darkvision 60 ft., passive Perception 13
- Languages Binary, Galactic Basic
- Challenge 3 (700 XP)
Circuitry. The droid has disadvantage on saving throws against effects that would deal ion or lightning damage.
Sneak Attack (1/Turn). The assassin droid deals an extra 7 (2d6) damage when it hits a target with a weapon attack and has advantage on the attack roll, or when the target is within 5 feet of an ally of the assassin droid that isn't incapacitated and the assassin doesn't have disadvantage on the roll.
Actions
Sniper Rifle. Ranged Weapon Attack: +5 to hit, range 150/600 ft., one target. Hit: 9 (1d12+3) energy damage.
Stock Strike. Melee Weapon Attack: +2 to hit, reach 5 ft., one target. Hit: 4 (1d4+2) kinetic damage.
Astromech Droid
Small droid, unaligned
- Armor Class 12 (armor plating)
- Hit Points 7 (2d6)
- Speed 25 ft.
STR DEX CON INT WIS CHA 6 (-2) 13 (+1) 11 (+0) 16 (+3) 12 (+2) 5 (-3)
- Skills Perception +3, Technology +5, Piloting +5
- Damage Vulnerabilities Ion
- Damage Resistances Necrotic, Poison, Psychic
- Condition Immunities poison, disease
- Senses Darkvision 60 Ft., passive Perception 13
- Languages Speaks binary, understands Basic
- Challenge 1/8 (25 XP)
Circuitry. The droid has disadvantage on saving throws against effects that would deal ion or lightning damage.
Keen Hearing and Sight. The astromech droid has advantage on Wisdom (Perception) checks that rely on hearing or sight.
Rocket Boost (1/day). The astromech droid leaps up to 40 feet in any direction.Actions
Shockprod. Melee Weapon Attack: +3 to hit, reach 5 ft., one target. Hit: 3 (1d4+1) lightning damage.
Bandit Leader
Medium humanoid, neutral dark
- Armor Class 16 (weave armor)
- Hit Points 26 (4d8 + 8)
- Speed 30 ft.
STR DEX CON INT WIS CHA 13 (+1) 16 (+3) 14 (+2) 11 (+0) 11 (+0) 12 (+1)
- Skills Athletics +3, Perception +2, Persuasion +3
- Senses darkvision 60 ft., passive Perception 11
- Languages Galactic Basic, aquilash, shyriiwook
- Challenge 1 (200 XP)
Actions
Multiattack. The Bandit Leader makes two blaster rifle or stock strike attacks.
Blaster Rifle. Ranged Weapon Attack: +5 to hit, range 60/240 ft., one target. Hit: 7 (1d6 + 3) energy damage.
Stock Strike. Melee Weapon Attack: +3 to hit, reach 5 ft., one target. Hit: 3 (1d4 + 1) kinetic damage.
Thermal Grenade (1/day). The bandit leader throws a grenade, choosing a point within 40 feet. Each creature within 10 feet must make a DC 14 Dexterity saving throw. A creature takes 2d6 fire and 2d6 kinetic damage on a failed save, or half as much as on a successful one. Additionally, on a failed save, the creature is knocked prone.
Battle Droid
Medium droid, unaligned
- Armor Class 15 (armor plating)
- Hit Points 16 (3d8+3)
- Speed 30 ft.
STR DEX CON INT WIS CHA 11 (+0) 16 (+3) 12 (+1) 14 (+2) 10 (+0) 9 (-1)
- Skills Perception +2
- Damage Vulnerabilities Ion
- Damage Immunities Necrotic, Poison, Psychic
- Condition Immunities poison, disease
- Senses darkvision 60 ft., passive Perception 12
- Languages Binary, Galactic Basic
- Challenge 1/2 (100 XP)
Battle Droid Swarm. When an ally of the battle droid hits a hostile creature that it can see with a weapon attack, the battle droid can use its reaction to make one weapon attack against that creature.
Circuitry. The droid has disadvantage on saving throws against effects that would deal ion or lightning damage.
Actions
Blaster Pistol. Ranged Weapon Attack: +5 to hit, range 40/160 ft., one target. Hit: 6 (1d6+3) energy damage.
Stock Strike. Melee Weapon Attack: +2 to hit, reach 5 ft., one target. Hit: 2 (1d4) kinetic damage.
Reactions
Redirect Attack. When a creature the battle droid can see targets it with an attack, the battle droid chooses another battle droid within 5 feet of it. The two battle droids swap places, and the chosen battle droid becomes the target instead.
Changeling Infiltrator
Medium humanoid, lawful dark
- Armor Class 15 (fiber armor)
- Hit Points 36 (8d8)
- Speed 30 ft.
STR DEX CON INT WIS CHA 8 (-1) 16 (+3) 10 (+0) 16 (+3) 12 (+1) 14 (+2)
- Saving Throws Dex +5, Int +5
- Skills Acrobatics +5, Perception +3, Stealth +5
- Senses passive Perception 13
- Languages Galactic Basic, one other of your choice
- Challenge 3 (700 XP)
Shapechanger. The infiltrator can use its action to polymorph into a Small or Medium humanoid it has seen, or back into its natural form. Its statistics, other than its size, are the same in each form. Its equipment is not transformed. If slain, the infiltrator reverts to its natural form.
Evasion. If the infiltrator is subjected to an effect that allows it to make a Dex saving throw to take only half damage, the infiltrator instead takes no damage on a success, and half damage on a fail.
Techcasting. The infiltrator is a 3rd-level techcaster. Its techcasting ability is Intelligence (tech save DC 13, +5 to hit with tech powers). It has 15 tech points and knows the following tech powers:
- At will: electrical burst, encrypted message, on/off
- 1st-level: holographic disguise, smoke cloud, tranquilizer
- 2nd-level: infiltrate, scorching ray
Actions
Blaster Carbine. Ranged Weapon Attack: +5 to hit, range 60/240 ft., one target. Hit: 6 (1d6 + 3) energy damage. The attack deals an extra 14 (4d6) damage when the infiltrator has advantage on the attack roll, or when the target is within 5 feet of an ally of the infiltrator and the infiltrator doesn't have disadvantage on the attack roll.
Reactions
Uncanny Dodge. The infiltrator halves the damage that it takes from an attack that hits it.
Combat Engineer, Junior
Medium humanoid, unaligned
- Armor Class 12
- Hit Points 16 (3d8+3)
- Speed 30 ft.
STR DEX CON INT WIS CHA 10 (+0) 12 (+1) 12 (+1) 14 (+2) 11 (+0) 10 (+0)
- Skills Technology +4
- Senses Passive Perception 10
- Languages Galactic Basic
- Challenge 1 (200 XP)
Techcasting. The junior engineer is a 3rd-level techcaster. Its techcasting ability is Intelligence (power save DC 12, +4 to hit with tech attacks) and it has 14 tech points. The junior engineer knows the following tech powers:
- At-will: electro shock, encrypted message, rime shot
- 1st-level: energy shield, homing rockets, repair droid, smoke cloud
- 2nd-level: acid dart, magnetic field
Actions
Blaster Carbine. Ranged Weapon Attack: +3 to hit, range 60/240 ft., one target. Hit: 4 (1d6 + 1) energy damage.
Electrostaff. Melee Weapon Attack: +0 to hit, Reach 5 ft., one target. Hit: 3 (1d6) kinetic damag eand make a DC 13 constitution saving throw or take 1d4 lightning damage and gain the shocked condition.
Commoner
Medium humanoid (any race), any alignment
- Armor Class 10
- Hit Points 4 (1d8)
- Speed 30 ft.
STR DEX CON INT WIS CHA 10 (+0) 10 (+0) 10 (+0) 10 (+0) 10 (+0) 10 (+0)
- Senses passive Perception 10
- Languages anyone (usually Galactic Basic)
- Challenge 0 (10 xp)
Actions
Club. Melee Weapon Attack: +2 to hit, reach 5 ft., one target. Hit: 2 (ld4) kinetic damage.
Cultist
Medium humanoid, any nonlight alignment
- Armor Class 12
- Hit Points 9 (2d8)
- Speed 30 ft.
STR DEX CON INT WIS CHA 11 (+0) 12 (+1) 10 (+0) 10 (+0) 11 (+0) 10 (+0)
- Skills Deception +2, Lore +2
- Senses passive Perception 10
- Languages Basic
- Challenge 1/8 (25 XP)
Devotion. The cultist has advantage on saving throws against being charmed or frightened.
Actions
Techblade. Melee Weapon Attack: +3 to hit, reach 5 ft., one target. Hit: 4 (ld6 + 1) kinetic damage.
Force Wanderer
Medium humanoid, lawful dark
- Armor Class 16 (fiber armor)
- Hit Points 110 (20d8 + 20)
- Speed 30 ft.
STR DEX CON INT WIS CHA 11 (+0) 18 (+4) 12 (+1) 13 (+1) 12 (+1) 17 (+3)
- Saving Throws Dex +7, Cha +6
- Skills Acrobatics +7, Intimidation +6, perception +4
- Senses darkvision 60 ft., passive Perception 14
- Languages Galactic Basic, two more of your choice
- Challenge 8 (3,900 XP)
Forcecasting. The wanderer is a 10th-level forcecaster. It's forcecasting ability is Charisma (force save DC 14, +6 to hit with power attacks). The wanderer has 33 force points and knows the following force powers:
- At-Will: denounce, force disarm, force push/pull, mind trick, saber throw, slow
- 1st level: dark side tendrils, force jump, sap vitality, sense force
- 2nd level: animate weapon, drain vitality, force sight, stun
- 3rd level: improved dark side tendrils, choke, force suppression, sever force
- 4th level: drain life
Force Resistance. The wanderer has advantage on saving throws against force powers.
War Casting. When the wanderer uses an action to cast a force power, they can use a bonus action to make a Double Saber attack.Actions
Spinning Double Saber. Melee Weapon Attack: +7 to hit, reach 5 ft., one target. Hit: 17 (3d8 + 4) energy damage.
Double Saber. Melee Weapon Attack: +7 to hit, reach 5 ft., one target. Hit: 8 (1d8 + 4) energy damage.
Dark Lightning. Ranged Power Attack: +6 to hit, range 120 ft., one or two targets. Hit: 14 (4d6) necrotic damage. The target must succeed on a DC 16 Strength saving throw or become restrained until the end of the wanderer's next turn.
Horned Kath Hound
Medium beast, unaligned
- Armor Class 13 (natutal armor)
- Hit Points 22 (4d8 + 4)
- Speed 40 ft.
STR DEX CON INT WIS CHA 14 (+2) 15 (+2) 12 (+1) 3 (-4) 12 (+1) 6 (-2)
- Skills Perception +3
- Senses darkvision 30 ft., passive Perception 13
- Languages -
- Challenge 2 (450 XP)
Keen Hearing and Smell. The hound has advantage on Wisdom (Perception) checks that rely on hearing or smell.
Charge. If the hound moves at least 20 feet straight toward a creature and then hits it with a bite attack on the same turn, that target must succeed on a DC 13 Strength saving throw or be knocked prone. If the target is prone, the hound can make another attack with its tusks against it as a bonus action.
Pack Tactics. The hound has advantage on an attack roll against a creature if at least one of the hound's allies is within 5 feet of the creature and the ally isn't incapacitated.
Actions
Multiattack. Melee Weapon Attack: +4 to hit, reach 5 ft., one target. Hit: 7 (2d4 + 2) kinetic damage.
Tusk. Melee Weapon Attack: +4 to hit, reach 5 ft., one target. Hit: 9 (2d6 + 2) kinetic damage.
Interrogation Droid
Tiny droid, unaligned
- Armor Class 11 ()
- Hit Points 6 (4d4-4)
- Speed 0 ft, fly 40 ft. (hover)
STR DEX CON INT WIS CHA 3 (-4) 10 (+0) 8 (-1) 6 (-2) 10 (+0) 12 (+1)
- Skills Intimidation +5, Insight +4
- Damage Vulnerabilities Ion, Lightning
- Damage Resistances Poisoned, diseased
- Condition Immunities poison, disease
- Senses Passive Perception 13, passive Insight 14
- Languages Speaks binary, understands Basic
- Challenge 1/4 (50 XP)
- Flyby. The droid doesn't provoke opportunity attacks when it flies out of an enemy's reach.
Actions
Dart Launcher. Ranged Weapon Attack: +3 to hit, range 15/60 ft., one target. Hit: 1 kinetic damage plus 7 (2d6) poison damage. On a hit, the target must succeed on a Con. saving throw (DC 12) or become stunned for one round.
Jawa Scrapper
Small humanoid, chaotic balanced
- Armor Class 12
- Hit Points 13 (3d6+3)
- Speed 30 ft.
STR DEX CON INT WIS CHA 8 (-1) 14 (+2) 12 (+1) 11 (+0) 10 (+0) 8 (-1)
- Skills Stealth +6
- Senses darkvision 60 ft., passive Perception 10
- Languages Jawaese, understands but doesn't speak Galactic Basic
- Challenge 1/2 (100 XP)
Nimble Escape. The jawa can take the Disengage or Hide action as a bonus action on each of its turns.
Actions
Ion Blaster. Ranged Weapon Attack: +4 to hit, range 40/160 ft., one creature. Hit 3 (1d4 + 2) ion damage.
Ion Grenade (3/day). The jawa throws a grenade at a point it can see within 20 feet Each creature within 10 feet must make a DC 12 Dexterity saving throw. A creature takes 2d4 ion damage on a failed save, or half as much as on a successful one. Any electronics within the blast radius are disabled until rebooted.
Junk Droid
Medium droid, unaligned
- Armor Class 13 (armor scraps)
- Hit Points 13 (2d8+4)
- Speed 30 ft.
STR DEX CON INT WIS CHA 10 (+0) 14 (+2) 15 (+2) 6 (-2) 8 (-1) 5 (-3)
- Damage Vulnerabilities Ion
- Damage Resistances Necrotic, Poison, Psychic
- Condition Immunities poison, disease
- Languages Speaks binary, Galactic Basic
- Challenge 1/4 (50 XP)
- Circuitry. The droid has disadvantage on saving throws against effects that would deal ion or lightning damage.
Actions
Multiattack. The junkyard droid makes two blaster carbine attacks or two vibroblade attacks.
Blaster Carbine. Ranged Weapon Attack: +4 to hit, range 60/240 ft., one target. Hit: 5 (1d6+2) energy damage.
Vibroblade. Melee Weapon Attack: +4 to hit, reach 5ft., one target. Hit: 5 (1d6+2) kinetic damage.
Kaleesh Chieftain
Medium humanoid, lawful balanced
- Armor Class 14 (fiber armor)
- Hit Points 22 (4d8 + 4)
- Speed 30 ft.
STR DEX CON INT WIS CHA 12 (+1) 14 (+2) 12 (+1) 11 (+0) 10 (+0) 14 (+2)
- Saving Throws Dex +4
- Skills Perception +2, Stealth +4
- Senses darkvision 60ft, passive Perception 12
- Languages Kaleesh, Galactic Basic
- Challenge 1 (200 XP)
Actions
Multiattack. The Kaleesh Chieftain makes two meelee attacks with its Shoni Spear or two ranged attack with its slugthrower.
Lig Sword. Melee Weapon Attack: +4 to hit, reach 5 ft, one target. Hit 5 (1d8 + 1) kinetic damage.
Shoni Spear. Melee or Ranged Weapon Attack: +3 to hit, reach 5 ft. or range 20/60, one target. Hit 4 (1d6 + 1) kinetic damage.
Sudden Rush. Until the end of the turn, the Kaleesh Chieftain's speed increases by 60 feet and it doesn't provoke opportunity attacks.
Knobby White Spiderling
Tiny plant, unaligned
- Armor Class 11
- Hit Points 10 (4d4)
- Speed 20 ft.
STR DEX CON INT WIS CHA 11 (+0) 12 (+1) 11 (+0) 2 (-4) 10 (+0) 5 (-3)
- Skills Stealth +3
- Damage Vulnerabilities Fire
- Senses darkvision 60 ft., passive Perception 10
- Languages -
- Challenge 1 (200 XP)
Distress Spores. When the spider takes damage, all other spiders within 240 feet of it can sense its pain.
Actions
Slam. Melee Weapon Attack: +2 to hit, reach 5 ft., one target. Hit: 2 (1d4) kinetic damage.
Stinger. Melee Weapon Attack: +4 to hit, reach 5 ft., one target. Hit: 3 (1d6) kinetic damage, and the target must make a DC 14 Constitution saving throw, taking 9 (2d8) poison damage on a failed save, or half as much damage on a successful one. If the poison damage reduces the target to 0 hit points, the target is stable but poisoned for 1 hour, even after regaining hit points, and is paralyzed while poisoned in this way.
Mandalorian Recruit
Medium Humanoid, lawful neutral
- Armor Class 16 (weave armor)
- Hit Points 33 (6d8+6)
- Speed 30 ft.
STR DEX CON INT WIS CHA 12 (+1) 14 (+2) 12 (+1) 12 (+1) 10 (+0) 10 (+0)
- Saving Throws Dexterity +5
- Skills Survival +3
- Senses darkvision 60 ft, passive Perception 11
- Languages Galactic Basic, Mando'a
- Challenge 1 (200 XP)
Actions
Multiattack. The Mandalorian Recruit makes two weapon attacks.
Blaster Carbine. Ranged Weapon Attack: +5 bonus to hit, range 100/400 ft., one target. Hit: 6 (1d6+3) energy damage.
Techblade. Melee Weapon Attack: +5 to hit, reach 5 ft., one target. Hit: 5 (1d6 + 2) kinetic damage.
Mormesk the Ghost
Medium aberration, neutral dark
- Armor Class 13
- Hit Points 45 (6d8 + l8)
- Speed 30 ft.
STR DEX CON INT WIS CHA 6 (-2) 16 (+3) 16 (+3) 12 (+1) 14 (+2) 15 (+2)
- Damage Resistances acid, cold, fire, lightning, kinetic, ion, energy
- Damage Immunities necrotic, poison
- Condition Immunities charmed, grappled, paralyzed, petrified, poisoned, prone, restrained
- Senses darkvision 60 ft., passive Perception 12
- Languages Galactic Basic
- Challenge 3 (700 XP)
Incorporeal Movement. The wraith can move through an object or another creature, but can't stop there.
Actions
Life Drain. Melee Weapon Attack: +5 to hit, reach 5 ft., one creature. Hit: 16 (3d8 + 3) necrotic damage, and the target must succeed on a DC 13 Constitution saving throw or its hit point maximum is reduced by an amount equal to the damage taken. If this attack reduces the target's hit point maximum to 0, the target dies. This reduction to the target's hit point maximum lasts until the target finishes a long rest.
Mucous Salamander
Medium beast, unaligned
- Armor Class 13 (15 natural armor in solid form)
- Hit Points 44 (8d8 + 8)
- Speed 30 ft., climb 30 ft. (solid form), swim 50 ft. (liquid form)
STR DEX CON INT WIS CHA 16 (+3) 17 (+3) 13 (+1) 3 (-4) 12 (+1) 5 (-3)
- Skills Athletics +5, Stealth +5
- Damage Vulnerabilities lightning in liquid form
- Damage Resistances Energy, Ion, and kinetic from unenhanced weapons in solid form
- Condition Immunities Prone, Grappled, restrained in liquid form
- Senses passive Perception 11
- Languages -
- Challenge 2 (450 XP)
Shifting Molecules. When the salamander enters or exits water, it changes the form of its molecular structure to mimic its surroundings. Other than its AC, its statistics are the same in each form. Any object it is wearing or carrying isn't transformed.
Amphibious. The salamander can breathe air and water.
Diffuse Body (Liquid Form Only). The salamander can move through other creatures and objects no more than 10 feet in diameter as if they were difficult terrain. It takes 5 (1d10) kinetic damage if it ends its turn inside an object.
Spider Climb (Solid Form Only). The salamander can climb difficult surfaces, including upside down on ceilings, without needing to make an ability check.
Spiked Hide (Solid Form Only). Any creature that grapples the salamander takes 3 (1d6) kinetic damage at the end of its turn.
Watery Stealth (Liquid Form Only). While underwater, the salamander has advantage on Dexterity (Stealth) checks made to hide, and it can take the Hide action as a bonus action.
Actions
Bite. Melee Weapon Attack: +5 to hit, reach 5 ft., one target. Hit: 7 (1d8 + 2) kinetic damage.
Claw (Solid Form Only). Melee Weapon Attack: +5 to hit, reach 5 ft., one target. Hit: 8 (1d10 + 3) kinetic damage.
Mynock
Small beast, unaligned
- Armor Class 14 (natural armor)
- Hit Points 7 (2d6)
- Speed 5 ft., fly 40ft
STR DEX CON INT WIS CHA 4 (-3) 16 (+3) 11 (+0) 2 (-4) 8 (-1) 6 (-2)
- Senses darkvision 60 ft., passive Perception 9
- Languages -
- Challenge 1/8 (25 XP)
Traits
Atmosphere Agnostic. The mynock can survive in any type of atmosphere or vacuum.
Battery Drainer. If the mynock attaches itself to a piece of equipment that needs energy to function, that piece will stop working until the Mynock is removed.
Pack Tactics. The mynock has advantage on an attack roll against a creature if at least one ally of the mynock is within 5 feet of the creature and the ally isn't incapacitated.
Actions
Energy Drain. Melee Weapon Attack: +5 to hit, reach 5 ft., one creature. Hit: 5 (1d4 + 3) kinetic damage, and the mynock attaches to the target. If attached to a droid or construct, at the start of each of the mynock's turns, the target loses 5 (1d4 + 3) hit points due to energy being drained. The mynock can detach itself by spending 5 feet of its Movement. It does so after it drains 10 Hit Points of energy from the target or the target dies. A creature, including the target, can use its action to detach the Mynock
Nysnar the Black Rancor
Medium humanoid, lawful dark
- Armor Class 11 (14 with battle precognition)
- Hit Points 27 (6dS)
- Speed 30 ft.
STR DEX CON INT WIS CHA 9 (-1) 13 (+1) 10 (+0) 13 (+1) 14 (+2) 16 (+3)
- Saving Throws Cha +5, Wis +4
- Skills Lore +5, Perception +4, Stealth +3
- Condition Immunities Charmed
- Senses darkvision 120 ft., passive Perception 14
- Languages Galactic Basic, Catharese
- Challenge 2 (450 XP)
Special Equipment. Nysnar has a lightsaber with a regular ostrine crystal.
Spellcasting. Nysnar is a 4th-level force caster that uses charisma as his force casting ability (spell save DC 13; +5 to hit with spell attacks). Nysnar has the following spells prepared from the force powers list:
- At-will: denounce, enfeeble, shock
- 1st Level (4 slots): battle precognition, wound, dark side tendrils
- 2nd Level (3 slots): force camouflage, coerce mind
Actions
Lightsaber. Melee Weapon Attack: +1 to hit, reach 5 ft., one target. Hit: 2 (1d6-1) energy damage plus 3 (1d4) poison damage.
Rancor, Juvenile
Medium beast, unaligned
- Armor Class 13 (natural armor)
- Hit Points 95 (10d8+50)
- Speed 30 ft.
STR DEX CON INT WIS CHA 19 (+4) 11 (+0) 20 (+5) 4 (-3) 9 (-1) 6 (-2)
- Senses darkvision 120 ft., passive Perception 9
- Languages -
- Challenge 2 (450 XP)
Actions
Multiattack. The rancor makes two attacks: one with its claws, and one with its bite.
Claw. Melee Weapon Attack: +6 to hit, reach 5 ft., one target. Hit 7 (1d6+4) kinetic damage.
Bite. Melee Weapon Attack: +6 to hit, reach 5 ft., one target. Hit 9 (1d10+4) kinetic damage.
Redbrand Ruffian (weave armor)
Medium humanoid (human), neutral dark
- Armor Class 14
- Hit Points 16 (3d8 + 3)
- Speed 30 ft.
STR DEX CON INT WIS CHA 11 (+0) 14 (+2) 12 (+1) 9 (-1) 9 (-1) 11 (+0)
- Skills Intimidation +2
- Senses passive Perception 9
- Languages Basic
- Challenge 1/2 (100 XP)
Actions
Multiattack. The ruffian makes either two melee attacks with their techblade or two ranged attacks with their blaster carbine.
Techblade. Melee Weapon Attack: +4 to hit, reach 5 ft., one target. Hit: 5 (1d6 + 2) kinetic damage.
Blaster Carbine. Ranged Weapon Attack: +4 bonus to hit, range 100/400 ft., one target. Hit: 5 (1d6+2) energy damage.
Rock Wart
Small beast, unaligned
- Armor Class 12 (natural armor)
- Hit Points 13 (3d8)
- Speed 30 ft., climb 30 ft.
STR DEX CON INT WIS CHA 13 (+1) 15 (+2) 11 (+0) 1 (-5) 9 (-1) 3 (-4)
- Skills Stealth +4
- Senses blindsight 30 ft., passive Perception 9
- Languages -
- Challenge 1/8 (25 XP)
Actions
Bite. Melee Weapon Attack: +3 to hit, Reach 5 ft., one target. Hit: 1 (1d3-1) kinetic damage, and the target must make a Constitution saving throw (DC 14). On a success, the creature is unaffected by the venom. On a failure, the creature loses 1d6 Strength, then must attempt another save 1 minute (10 rounds) later. If the second save fails, the creature loses an additional 1d6 Strength. If this reduces the creature's Strength to 0 or lower, it dies.
Ruffian
Medium Humanoid, neutral dark
- Armor Class 14 (weave armor)
- Hit Points 13 (2d8+4)
- Speed 30 ft.
STR DEX CON INT WIS CHA 12 (+1) 11 (+0) 13 (+1) 10 (+0) 9 (-1) 12 (+1)
- Skills Intimidation +3
- Senses passive Perception 9
- Languages Basic, Huttese
- Challenge 1/2 (100 XP)
Actions
Heavy Pistol Ranged Weapon Attack: +4, range 40/160 ft., one target. Hit: 6 (1d6+2) energy damage.
Vibrobaton Melee Weapon Attack: +4 to hit, reach 5 ft., one target. Hit: 6 (2d4 + 2) kinetic damage.
Sentinel Guard Droid
Medium droid, unaligned
- Armor Class 16 (armor plating)
- Hit Points 58 (9d8 + 18)
- Speed 30 ft., climb 30 ft.
STR DEX CON INT WIS CHA 13 (+1) 19 (+4) 14 (+2) 15 (+2) 13 (+1) 9 (-1)
- Saving Throws Dex + 6
- Skills Perception +3, Stealth +6, Intimidate +1
- Damage Vulnerabilities Ion
- Damage Resistances Necrotic, Poison, psychic; energy from melee weapons
- Condition Immunities Poisoned, disease
- Senses darkvision 60 ft., passive Perception 13
- Languages Binary, Galactic Basic
- Challenge 4 (1,100 XP)
Circuitry. The droid has disadvantage on saving throws against effects that would deal ion or lightning damage
Droid Synergy. Once per turn, the droid can deal an extra 3 (1d6) damage to a creature it hits with a weapon attack if that creature is within 5 feet of a Sentinel Guard Droid ally that isn't incapacitated.
Leap. The droid can expend all its movement on its turn to jump up to its current movement speed in any direction.
Mag-lock Limbs. The droid can climb metal surfaces, including upside down on ceilings, without needing to make an ability check.
Actions
Multiattack. The droid makes two electrostaff attacks.
Electrostaff. Melee Weapon Attack: +6 to hit, reach 5 ft., one target. Hit: 9 (2d4+4) kinetic damage
Blaster Pistol. Ranged Weapon Attack: +6 to hit, range 40/160 ft., one target. Hit: 7 (1d6+4) energy damage.
Reactions
Parry. The droid adds 3 to its AC against one melee attack that would hit it. To do so, the droid must see the attacker and be wielding a melee weapon.
Snow Wampa
Large beast, unaligned
- Armor Class 12 (natural armor)
- Hit Points 51 (6d10 + 18)
- Speed 40 ft.
STR DEX CON INT WIS CHA 19 (+4) 13 (+1) 16 (+3) 5 (-3) 12 (+1) 11 (+0)
- Skills Perception +3, Stealth +3
- Damage Immunities Cold
- Senses darkvision 60 ft., passive Perception 13
- Languages -
- Challenge 3 (700 XP)
Fear of Fire. If the wampa takes fire damage, it has disadvantage on attack rolls and ability checks until the end of its next turn.
Keen Smell. The wampa has advantage on Wisdom (Perception) checks that rely on smell.
Snow Camouflage. The wampa has advantage on Dexterity (Stealth) checks made to hide in snowy terrain.
Actions
Multiattack. The wampa makes two attacks, one with its claw and one with its bite.
Claw. Melee Weapon Attack: +6 to hit, reach 5 ft., one target. Hit: 12 (2d6+5) kinetic damage.
Bite. Melee Weapon Attack: +6 to hit, reach 5 ft., one creature. Hit: 7 (1d10+2) kinetic damage. The target is grappled (escape DC 14) Until this grapple ends, the target is restrained, and the Snow Wampa can't bite another target.
Spider Droid
Large Droid, unaligned
- Armor Class 16 (armor plating)
- Hit Points 35 (5d10+5)
- Speed 40 ft, climb 40 ft.
STR DEX CON INT WIS CHA 15 (+2) 16 (+3) 12 (+1) 10 (+0) 10 (+0) 9 (-1)
- Skills Perception +4
- Damage Vulnerabilities Ion
- Damage Resistances Necrotic, Poison, Psychic
- Condition Immunities Poison, Disease
- Senses truesight 120 ft, passive Perception 14
- Languages Binary, Galactic Basic
- Challenge 2 (450 XP)
Circuity The spider droid has disadvantage on saving throws against effects that would deal ion or lightning damage.
Spider Climb The spider droid can climb difficult surfaces, including upside down on ceilings, without needing to make an ability check.
Actions
Blaster Cannon. Ranged Weapon Attack: +5 to hit, range 100/400 ft., one target. Hit: 9 (1d12+3) energy damage.
Burst The spider droid sprays a 10-foot-cube area within normal range with shots. Each creature in the area must make a DC 13 Dexterity saving throw, taking 9 (1d12+3) energy damage on a failed save, or half as much on a successful one.
Claw Melee Weapon Attack. +4 to hit, reach 5 ft., one target. Hit: 5 (1d6+2) kinetic damage.
Self-Destruct. When the spider droid is reduced to half of its hit point maximum and is within 20 feet of a hostile creature, it attempts to self-destruct. Each creature within 20 feet of it must make a DC 13 Dexterity saving throw, taking 6d6 fire damage on a failed save, or half as much on a successful one.
Sybian Hound
Medium beast, unaligned
- Armor Class 13 (natural armor)
- Hit Points 11 (2d8+2)
- Speed 40 ft.
STR DEX CON INT WIS CHA 12 (+1) 15 (+2) 12 (+1) 3 (-4) 12 (+1) 6 (-2)
- Skills Perception +3, Stealth +4
- Senses passive Perception 13
- Languages -
- Challenge 1/4 (50 XP)
Keen Hearing and Smell. The hound has advantage on Wisdom (Perception) checks that rely on hearing or smell.
Pack Tactics. The hound has advantage on attack rolls against a creature if at least one of the hound's allies is within 5 feet of the creature and the ally isn't incapacitated.
Actions
Bite. Melee Weapon Attack: +4 to hit, reach 5 ft., one target. Hit: 7 (2d4+2) kinetic damage. If the target is Large or smaller, it must succeed on a DC 11 Strength saving throw or be knocked prone.
Syl Ordo
Medium humanoid (human), neutral light
- Armor Class 16
- Hit Points 27 (5d8+5)
- Speed 30 ft.
STR DEX CON INT WIS CHA 13 (+1) 10 (+0) 12 (+1) 10 (+0) 11 (+0) 10 (+0)
- Saving Throws Str +3, Con +3
- Skills Perception +2
- Senses passive Perception 12
- Languages Galactic Basic
- Challenge 1 (200 XP)
Actions
Multiattack. The Syl makes two and melee attacks.
Vibroblade. Melee Weapon Attack: +3 to hit, reach 5 ft., one target. Hit: 5 (ld8 + 1) kinetic damage.
Assault Cannon. Ranged Weapon Attack: +2 to hit, range 100 ft./400 ft., one target. Hit: 5 (ldl0) energy damage.
Trooper
Medium humanoid, any alignment
- Armor Class 15 (mesh armor)
- Hit Points 13 (2d8 + 4)
- Speed 30 ft.
STR DEX CON INT WIS CHA 13 (+1) 16 (+3) 15 (+2) 9 (-1) 11 (+0) 10 (+0)
- Senses darkvision 60 ft., passive Perception 10
- Languages Galactic Basic, one other
- Challenge 1/2 (100 XP)
Actions
Blaster Rifle. Ranged Weapon Attack: +5 to hit, range 100/400 ft., one target. Hit: 7 (1d8 + 3) energy damage.
Stock Strike. Melee Weapon Attack: +3 to hit, reach 5 ft., one target. Hit: 3 (1d4 + 1) kinetic damage.
Tusk Cat
Large beast, unaligned
- Armor Class 13
- Hit Points 32 (5d10 + 5)
- Speed 60 ft.
STR DEX CON INT WIS CHA 15 (+4) 17 (+3) 12 (+1) 5 (-3) 14 (+2) 7 (-2)
- Skills Perception +4
- Senses darkvision 60 ft., passive Perception 14
- Languages -
- Challenge 2 (450 XP)
Traits
Keen Sight and Smell. The tusk cat has advantage on Wisdom (Perception) checks that rely on sight and smell.
Trampling Charge. If the tusk cat moves at least 20 feet straight toward a creature and then hits it with a tusk attack on the same turn, that target must succeed on a DC 15 Strength saving throw or be knocked prone. If the target is prone, the tusk cat can make one hooves attack against it as a bonus action.
Actions
Hooves. Melee Weapon Attack: +8 to hit, reach 5 ft., one target. Hit: 9 (1d10 + 4) kinetic damage.
Tusks. Melee Weapon Attack: +8 to hit, reach 5 ft., one target. Hit: 13 (2d8 + 4) kinetic damage.
Wookiee Berserker
Medium humanoid, unaligned
- Armor Class 14 (hide)
- Hit Points 30 (4d8+12)
- Speed 30 ft, climb 30 ft.
STR DEX CON INT WIS CHA 16 (+3) 12 (+1) 17 (+3) 7 (-2) 11 (+0) 10 (+0)
- Skills Athletics +5, Intimidation +5
- Senses darkvision 60 ft., passive Perception 10
- Languages Galactic Basic, Shyriiwook
- Challenge 1 (200 XP)
Aggressive. As a bonus action, the wookiee can move up to its speed toward a hostile creature that it can see.The Creature Name makes Number and type of attacks
Reckless. At the start of its turn, the wookiee can can gain advantage on all melee weapon attack rolls during that turn, but attack rolls against it have advantage until the start of its next turn.
Blood Rage. When a creature within 5 feet of the wookiee hits it with an attack, the wookiee may use its reaction to immediately make a melee weapon attack with advantage against that creature.
Actions
Vibroaxe. Melee Weapon Attack: +5 to hit, one target. Hit: 9 (1d12 + 3) kinetic damage.