Summary
The following is an adventure intended for 1st level players, however, it is generally recommended for somewhat experienced or experimental players, as it breaks, tweaks, or utterly ignores how most classes would typically play due to the very strange situation it places the players in.
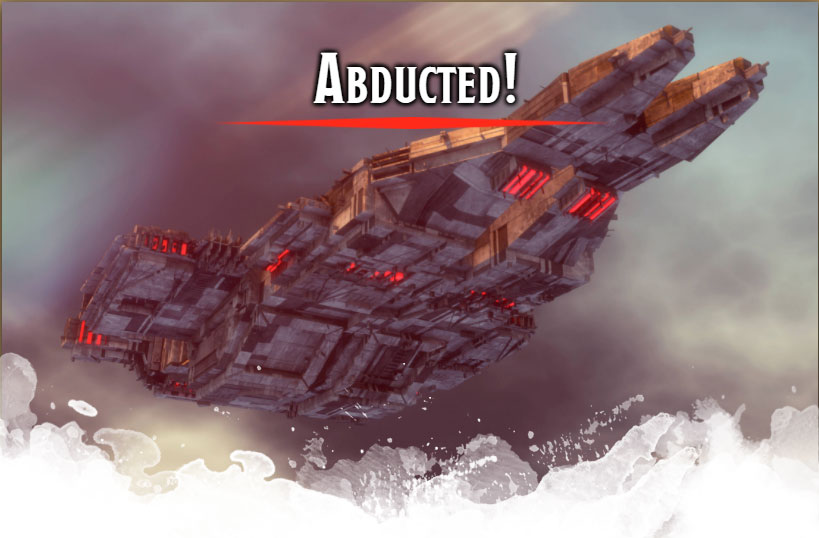
What is the situation? The players are abducted by a spaceship and find themselves bereft of gear and hopeless out matched by their foes wielding sci-fi level gear - their only hope is to seize their foes weapons and shoot their way free with laser guns!
Overview
The following is the rough intended outline of adventure. No outline survives contact with a part of adventurers.
- Players are abducted by a spaceship via transporter beam.
- Wake up unarmed and weaponless with the ship in the midst of a boarding action and mutiny.
- Arm themselves with weapons from the fallen, and space suits that give them temporary air (to bypass the poison gas).
- Kill everything that wants to shoot them.
- Decodes the door locks from the clues in the Medbay and Crew Quarters.
- Restarts the power to the ship.
- Negotiates with the AI on the bridge to send them home.
- (Optional Objectives: Save the elf child, deal with the pirates, loot the captain's chamber, find a way to kill the Mind Flayer.
Overall, while it has many paths, it's a small fairly linear area.
Intro (Optional)
The story starts as many stories do. The players are transporting a wagon from a place to another place, as adventurers do, and it's full of stuff and things, drawn by a horse.
The players find themselves on a grassy path through some light hills, with tumbled rocks all about. Have them make a Wisdom (Perception) check - on a 10 or higher, then realize they are being ambushed by orcs! Roll initiative.
There is about 15 orcs, surrounding the players. The situation looks quite grim.
On initiative 20, have all of your players make a DC 20 Charisma saving throw. On failure, they see a blinding flash of light, and everything fades to blackness. While this is intended to be failed, if one passes, let them pass. They see their companions vanish into a beam of light that descends from the sky, and can take their turn as they wish.
If a player is knocked out by the orcs, they will automatically fail their next DC 20 Charisma save, which occurs on initiative to 20 until all players have failed.
And no... it's not railroad... it's a spaceship!
Grassy Path Map
This map is fairly simple and doesn't necessarily need a battle map at all, but if you are looking for one, I'd recommend this Grassy Path by 2 Minute Table Top. You can even find Wagon assets from them as well.
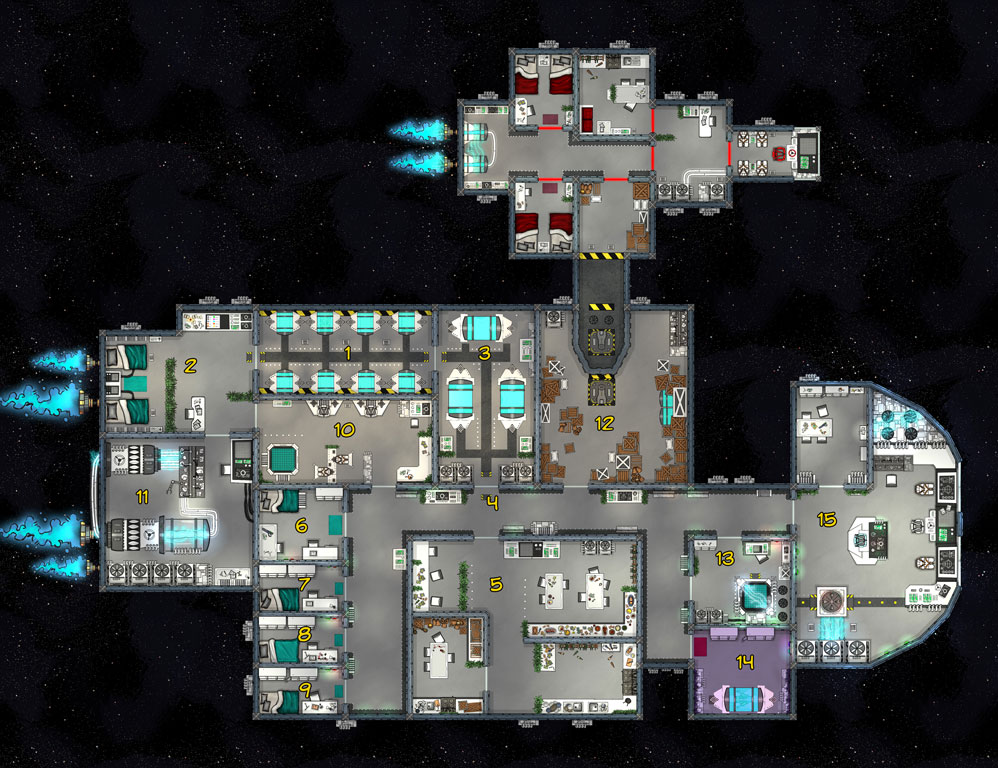
1. Specimen Storage
Dull red light illuminates a strange metallic cave. A deep rumbling noise breaks the silence. This chamber has eight strange reclined beds made from metal and glass that are exceedingly uncomfortable. Each is covered with a strange curved glass window. The floors and walls seem entirely made from a worked metal substance, with a door to the east and west. Each door has a strange number pad, buttons and flashing light to the right of it. You see a humanoid corpse against the western door.
In the fourth bed, you see an orc stirring awake.
This is where the adventure properly begins. These contain the players and one orc from the previous encounter. They have lost all of their gear and find themselves with only strange blue smocks. The orc will immediately attack in confusion, and can be a challenging foe for a party with no weapons.
The orc's name is Had-rak, and he is very aggressive, confused, and currently violent. Talking him down without knocking him unconscious requires speaking orcish and a DC 15 persuasion or DC 20 Charisma (Intimidation) check. This check is reduced by 5 for each time he has been knocked out by the party, until it reaches a minimum of 10 or he is killed.
Once the immediate problem of an angry orc is resolved, the corpse can be investigated. The corpse is wearing Strange Armor. A DC 10 Wisdom (Medicine) check will reveal the corpse appears to have died of poison inhalation, and a subsequent DC 10 Intelligence (Investigation) check will reveal that it appears the helm is improperly sealed. A player donning the armor does not require a check to engage or disengage the seal, the previous wearer was just in a hurry and made a mistake.
Examining the doors will reveal they are sliding metals doors, each has a panel to the right side. This panel has a keypad with the numbers zero through nine on it, and two buttons. The button on the left locks the door, and the button the right opens the door. You can warn the players that once locked, they see no easy way to unlock the door, as locking the wrong doors can make their progress very challenging.
2. Med-bay
Illuminated by the same dull red light, this room contains what appears to be large storage racks along the northern wall, two marginally more comfortable looking beds surrounded by strange arcane ritual equipment along the western wall, with a desk and smaller door on the southern wall, with a large door and a small door along the eastern wall. Both of the smaller doors have a flashing red light beneath their keypad above the buttons.
A corpse lies in the southeast corner against the small door to the east, leaving a large pool of blood.
Likely the first room the players will explore after their starting location, there's a lot of useful things for them to find here. First of all, the med-bay beds are advanced healing stations, though likely beyond the players ken to use. If a creature is placed in the bed, another creature can activate the healing properties of the bed with a DC 20 Intelligence check. If a creature fails by 5 or more, the creature in the bed takes 1d4 slashing damage. If they succeed, they can restore 1 hit to the creature in the bed, bringing an unconscious creature to wakefulness. A creature with an Intelligence ability score of 10 or high instinctive realizes that challenge and risk of using this gear.
An investigation of the equipment wields that little of it can be understood, but a DC 10 Investigation reveals a Force Scalpel that they can take and make use of.
The players can find a limited selection of their former belongings in the storage racks, including any holy symbols, arcane focuses, and other small items. None of their weapons or armor is present though. They do however find a Strange Armor and a Strange Plate Armor on the storage racks, each of them have a Strange Wand holstered at the side.
The desk to the south holds papers the players cannot understand. Using comprehend languages will reveal little as most of them are in medical jargon, but will reveal notes about "Neogi" and "Illithid" and their dietary and medical requirements. Additionally, it holds two doses of Healing Serum (which are effectively greater health potions).
The corpse in the south eastern corner wields a damaged Strange Armor. It has only half the temporary hit points remaining. The corpse is additional carrying another Strange Wand. A DC 5 investigation check reveals that he appears to have died while trying to open the door to the east, a result of 10 or more will reveal notice that the blood smears on the keypad come from his hand and are on the numbers "7" and "9".
3. Large Specimen Storage
Immediately upon opening this door, have each player that is not wearing a Strange Armor with their helm sealed make a Constitution saving throw as poison gas begins to fill the room. Each player takes 1d4 poison damage, and as a result of a 5 or less collapses to the ground, unable to act.
If the players immediately shut the door again, no further checks are required, but as long as the door remains open requires additional checks, with the DC rising by 1 each time.
On a DC 10 Perception check or if the players enter the room, read the following description of it.
A desk is against the north wall with an odd spear in a rack next to it. A large door is to the south, a small green light flashing on its control panel.
A closer inspection of the closed pod reveals that it contains their player's horse from part on.
The poison is flooding into the chamber from vents along the ceiling, and can pose a great danger if not deactivated or contained. A creature can deactivate the poison from any of the pod consoles with a DC 5 Intelligence check. If the panel next to the horse's container is used, failing this check accidentally releases a confused horse into the poisoned room. The horse can be released intentionally without a check, but figuring it out takes 1 minute.
The desk contains nothing useful, but the spear is a Lightning Zap Spear.
The door to the south is unlocked and leads to the main halls, and the players roll initiative as soon as it opens.
4. Main Halls
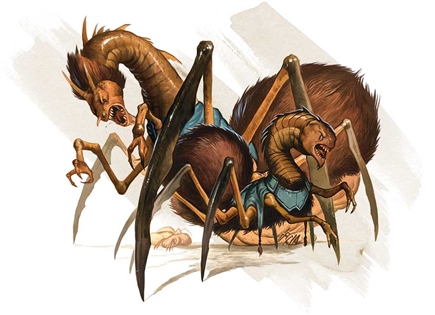
The main hall connects the mess hall, crew chambers, captains room, fitness center, hibernation pod, teleporter pad, and bridge. Entering this room from the fitness center or large specimen storage rooms presents the players an immediate challenge though. A Strange Sailor is around the corner toward the bridge, and two Neogi are around the corner toward the captain's chamber.
A DC 10 Wisdom (Perception) check will reveal that the Strange Sailor seems as wary of the door directly across from him (the door into 12. Cargo Bay) as he is of the Neogi or players. That door is currently locked.
Both factions are hostile to each other and the party, and communication is all but impossible. The Strange Sailor will hold his position and fire at the closest threat. The Neogi will rush into the Large Specimen Room as soon as the door is opened, dashing if necessary. They will prioritize deactivating the poison, closing the doors, and then killing the players. The Neogi's Enslave ability does not recharge in this module, and only one of them has a use of Enslave remaining. If they become bloodied, they will recognize the players as a threat and attempt to use Enslave on the strongest looking one.
The two Neogi have nothing of value to players, but the Strange Sailor has a Strange Wand and a Strange Armor but his armor is likely to be destroyed in the process of fighting him. He speaks no languages the players do, and cannot be easily convinced to stand down, as he's functionally backed into a corner as the players will learn should they reach the Bridge.
Event: Strange Pirates!
Each time the players subsequently enter the main halls after a minute has passed since all creatures within them have been slain, make an event roll with a d20 (or as the players do). On a 5 or lower, the Pirates in the cargo bay have managed to hack their door, unlocking it, and have entered the Main Halls (both Strange Pirates and the Strange Pirate Wizard). Unlike the other factions in the ship, they will avoid combat with the players if possible, shouting at them and pointing weapons, but not attacking unless attacked (they are shouting for the players to drop their weapons). They have no interest in fighting the players.
5. Mess Hall
This room is instantly recognizable as the common room of an inn, its arrangement is strange with tables arrayed facing the walls. A large table stands in the middle of the room, a bar in the back, and a strange mechanical bar along the eastern wall.
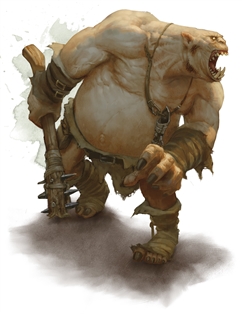
Distractingly a large ogre stands in the middle of the room carrying a blood splattered metal chair, a smashed corpse sprawled over the table being the obvious source.
As soon as this door is opened, have the players roll initiative if they are not already in initiative. The ogre is in a smashing mood and there's little the players can do to convince it to do otherwise. The ogre is remarkably proficient in using the metal chair as a club, but deals only 11 (2d6 + 4 bludgeoning damage), and corpse on the table got a solid shot in before being clubbed to death, leaving the ogre with 47 hit points.
Once the ogre is dealt with, the players are free to explore the room.
The kitchen is mostly incomprehensible to the players regardless of a check, but they can determine the heating unit and cold food storage. All the food the players could want is here, though it will largely be strange and unrecognizable to them as to what it actually is, it tastes quite good. The strange machine along the eastern wall dispenses various beverages from coffee to soda, and can be figured out without a check (though if a player wants a custom latte, a more complicated check might be appropriate!)
The dead Strange Sailor's armor is once more totally destroyed, but from his body another Strange Wand can be salvaged.
They will find the only other door is to the small room to the back in the southwest corner of the room. It is also locked, but even a cursory examination shows that this door seems more decorative than effective. Players can either open it with the lock code if they've discovered it or simple smash it down with a DC 10 Strength (Athletics) check.
The room beyond seems to be a fancier dining room, requisite with silverware. A DC 10 Intelligence (Investigation) check reveals the silverware is just valueless shiny metal rather than silver. A DC 10 Wisdom (Perception) check or a search of the room reveals there is a Small Elf Child in hiding in the room.
Small Elf Child (Yin'lore'id)
If the room becomes flooded with poison or has its atmosphere vented, the child is unfortunately dead. Otherwise, the child is scared of the players but generally harmless. She will be far less apprehensive of an elf character (particularly a high elf) than others. She does not share any languages with the players and her language is incomprehensible and sibilant.
She has the commoner stats, but with a Strength of 4 and an Intelligence of 14, a size of small and does not speak common, but speaks a unique dialect of her people, as well as the languages spoken by the pirates and sailors. She is proficient in Technology. The only way to directly communicate with her is the A.I. in the bridge, but she can communicate in basic gestures to an extent. If the players come up with reasonable gestures, simple let them work, otherwise communicating simple concepts requires a DC 10 Charisma (Performance) check to communicate, and a DC 10 Wisdom (Insight) check to understand her response; complicated concepts are much harder to communicate, but clever players may come up with some ideas.
She is, like the players, collected as a specimen, and is a moon elf (as in elf from the moon... which moon is not clear), and generally finds the situation scary. She is happy to follow around the players, and has no objective besides surviving, getting off the ship, and preferably being returned home. As she can read the language of the Sailors, she can potentially provide some clues if the players are otherwise stuck.
Playing Yin'lore'id
The small elf child is scared of dying and will stay away from anything that looks dangerous, but unlike the players understands that she's on a spaceship, and how most of the things on it work (as well as child would).
6. Captain's Room
The first challenge of the captain's room is that it is locked, and it has a unique keycode to it. The keycode to the Captain's room is 1234, but the only person on the ship that knows that is the A.I. on the bridge. It is not impossible a player would guess the code, and if they do, let it work. Otherwise, you can let them make a DC 20 Wisdom (Insight) check to guess it. The adventure can be completed without entering this chamber. The Captain was at some point tossed out an airlock during the fighting prior to the player's arrival.
Should the players successfully open the door, they are confronted by one of the more dangerous enemies of the adventure, XF-344, the captain's guard droid. You can use an Iron Golem with the following changes: its size is medium, it lacks the Sword and Poison Breath actions, and it has only 60 hit points.
It will not attack unless they enter the room, and DC 5 Wisdom (Insight) check reveals that information. Even with their gear, it is a difficult opponent to fight, and it cannot be easily convinced to stand down. If engaged, it will use its superiority at melee combat to its advantage and close the door, forcing the players to come to it. It can exit the room if the players attempt to siege it, but will not pursue them if they flee.
Should the players successfully defeat or bypass the guard, they can search the room finding three Greater Healing Potions, a Charged Sunblade, a +1 Strange Wand, an intact Strange Armor, a repair kit, a diamond worth 300 gp, and the Captain's ID Card.
The Captain's ID card is the only item that can get the A.I. to allow them control ship operations.
7-9. Crew Chambers
The crew chamber doors are unlocked, all with the flashing green light to indicate that. When any are opened you can read the description:
The room contains a narrow bunk bed, a desk, a storage chest, and little else. The rooms are spartan and small, though the beds look at least a little more comfortable than the strange glass beds you awoke in.
Room 7
A DC 5 Intelligence (Investigation) check reveals finds the players a Repair Kit. A 10 or more finds the Strange Brace of Crossbow Bolt Tips as well (these are ammunition for the Automatic Armless Crossbow that can be found on the wounded Strange Sailor in the Fitness Room).
Room 8
A DC 5 Investigation check of this room reveals scraps of paper in the trash can. With a 5, you can determine the numbers "9" and "07" are written on them. With a 10 or higher, you can determine that a fourth number is another 7. With a 20 or higher you can fully reconstruct the note to reveal the keycode ("9707").
If the players are stuck here without finding or searching the rooms, you can always have a bored Yin'lore'id find the paper scraps if she is still alive.
Room 9
A DC 5 Intelligence (Investigation) check reveals finds an Intricate Gauntlet. A 10 or more finds a Greater Healing Potion as well.
10. Fitness Center
All doors into the Fitness Room are locked, so it cannot be accessed until the players have a way to open these doors. As soon as one of these doors open, have them roll for initiative. The wounded Strange Sailor in the room has been waiting to get the drop on whoever enters and has advantage on his roll. Unlike the others, he armed with the dangerous Automatic Armless Crossbow (which is actually an assault rifle of some form).
Due to his superior knowledge of the device, he gains both the benefits of having sufficient strength and intelligence, despite not having the requisite stats. He is an extremely dangerous enemy due to the damage he can deal firing 6 shots, though he is very unlikely to hit after 3 or 4. Fortunately, he has only 4 hit points and 24 temporary hit points, having been badly wounded and partially repaired his armor.
Once this threat is dealt with, the player can find two holographic target ranges at the eastern side of the room, a treadmill, a bench press, and medicine cabinet containing vitamin supplements. Among these are two Healing Potions, though it takes a DC 10 Wisdom (Medicine) check to identify them as such.
11. Engine Room
As soon as one of the doors opens, have the players roll initiative.
By far the strangest room yet, this large room is filled with a dull roar and more brightly lit than the other rooms, with the red lights warring with a bright blue glow from the various strange massive arcane structures in this room.
Giant tanks cover the south wall, a massive work table sits near the door, and unimaginably complex large devices dominate the room. An armor figure grabs a heavy looking wand off the workbench and points it at you, flames leaping from its tip.
Inside is a Strange Armored Sailor, this is a Strange Sailor, but wearing a Strange Armored Suit giving him an AC of 16 and 45 temporary hit points (instead of 30). He is armed with the Heavy Fire Wand (a flamethrower) and will use it to hit as many players as he can each turn.
Once this threat is dealt with, his weapon can be taken and the room can be explored. Much of the room is taken up by strange "arcane" machinery, but no arcana check can reveal more info about it. There is a workbench with the Lightning Fire Wand on it (an arc welder). This is one way to open locked doors if the players cannot figure out the codes, and can open a door in a bout minute, destroying it in the process.
With a DC 10 Intelligence (any related tool) check, a player can cobble together a set of that tool here, be that Smith's Tools, Tinker's Tools, or Glassblower's Tools.
Engine Console
The console is the engine console. It is very simple to use, but the players have no way of knowing that. It has three buttons, though they are labeled, the players cannot read the labels.
- Prime Engine: The far button left button primes the engine. If the engine is off, it causes the screen to have a green diagram on it, and the room begins to hum. If the engine is already primed or running when the button is pressed, it causes flashing red lights and then shuts down the engine.
- Start Engine: The middle button starts the engine. If the engine is primed, it causes the screen to have a blue chart on it, and the ship powers up, normal lights being restored.
- Stop Engine: The right button shuts down and flushes the engine, setting it to fully off. If the engine is off, this does nothing. If the engine is primed or on, it flushes the engine and shuts it off, causing a red light to and the ship to run on emergency power (as it has been).
The engine starts in the primed state, so just pressing the middle Start Engine button will start the engine, but pressing other buttons will shut it down, requiring pressing Prime before Start again.
The ship cannot be moved and the warp pad cannot be used unless the ship is fully powered. The A.I. can tell the players how to operate this console, as can the pirates or Yim'lore'id (as though she has no idea how it works, she can read what the buttons say, which makes it obvious) if either can be communicated with to understand what they players want and convinced it will help them. As the sequence is simple, the players can quite likely figure it out themselves.
12. Cargo Bay
The Cargo Bay is locked, but may be unlocked by either the players or eventually by the Pirates within it (as per the Strange Pirates! event). If this is the first time encountering the occupants within, read the following:
This room is filled by strange large metal crates. The northern wall seems to be rent open, but resealed by a strange metal tube. Crouching amid the large metal crates you see three figures in strange armor, but different armor than you have seen before. Both more ragged, but more heavy and effective looking. One of them is wearing a strange glowing device around his wrist and blue coat over his armor, and all three seem armed with strange wands.
They do no open fire but yell at you in their strange language gesturing with their wands at you.
Inside is two Strange Pirates and a Strange Pirate Wizard. The Strange Pirate Wizard is just a Strange Pirate that gains the ability to cast the following spells once each: shield, burning hands, scorching ray, and fireball, with a DC of 14.
These are a hard fight, but will prefer to avoid a fight. They have no interest in the players, and just want to loot the ship, but will be content with the primary prize they already have in the cargo bay if they cannot get more without fighting.
The players can establish a working relationship with the pirates, as the pirates don't care if the players escape or take the ship, but will fight if the players try to take cargo or pirate ship. Working with the pirates is hard due to the language barrier, and the easiest approach is to just leave them alone, but they present many potential outcomes to the adventure should the players engage with them. It is not impossible that the pirates would recruit the players as a potential ending to the one shot.
The pirates have a hacking device that unlock the doors, and the Pirate Wizard is a 5th level caster (through his techno-caster tool), unfortunately he does not have comprehend languages on it, though he can prepare it during a long rest if the party is somehow on the ship for that long (though that will only allow him to understand the party, not speak to them).
13. Teleporter Pad
A giant window along the southern wall shows a wide dirt road through a grassy plane that looks a lot like where you last remember being before being abducted.
Strange glowing screens cover the eastern wall, and the small console of some kind is in the north eastern corridor.
The window on the southern wall is simply a screen showing where the teleporter is calibrated for. If the players activate it and go through it, they will be returned to where they started, but is not currently active. If the ship has not been powered on yet, a blinking red lock icon shows over the screens.
This is how the players got on the ship, and represents one of the potential ends of the one shot should they figure out how to use it to get back to their planet. It cannot be used unless the ship is powered on, and requires a DC 20 Intelligence to determine the usage of it. The A.I. on the bridge can operate it, and is the most likely person to do so, though the Pirates could also operate it without a check. Yim'lore'id can operate it if the Ship Manual from the bridge is retrieved, but it requires her several hours to figure out, and requires a DC 10 Intelligence check to avoid complications.
Returning Yim'lore'id to where she came from is extremely challenging (see Bridge A.I. section for more details). She'd rather go with the players to their world than stay here though.
14. Hibernation Pod
The door to this room is locked, though if the players manage to open it, read the following.
This room is far stranger than any you have seen before, with strange purple crystals growing from the walls and a hot humid environment. The floor seems to be some strange spongy material.
At the far side of the room against the eastern wall is a glass tank-like bed similar to what you woke up in, but larger and more complicated. Inside is a strange purple humanoid with tentacles descending from their jawline.
The creature in this pod is a Mind Flayer, and DC 10 Intelligence (History) reveals that. The Mind Flayer will not wake up unless their pod is opened or it is attacked, which is good, as if the Mind Flayer is awakened, a TPK is likely. With enough preparation, the players may be able to kill the Mind Flayer before it acts, but to do so would be dangerous. The pod prevents any melee attacks from reaching it without it being broken or opened, and absorbs the first 20 points of damage if the creature attempts to attack through it. The mind flayer wakes as soon as the pod is damaged.
You can warn your players that they feel a sense of unease and danger from this creature, as waking it will likely lead to a total party kill.
Should it be awakened, it will use it's Mind Blast to knock out the players, and then act from there the best way based on the state of the ship. The Neogi serves it. The Pirates will not fight it and will flee back to their ship and fly away if they become aware of its presence.
15. Bridge
The door to this room is locked. If the players open it, read the following.
Large windows out into the night sky cover the eastern wall. Below them, dozens of flashing lights and strange pieces of arcane technology cover the lower part of the wall. Five large chairs face the windows.
In the largest and closest of these chairs is perched on of the large bugs. Two other chairs are occupied by the strange sailors. As the door opens, the bug's neck twists to face you, screeching incomprehensibly.
The two sailors stand up as once spinning to face you, grabbing their strange wands.
You notice a large ghost like figure floating over a strange table to the south. It is the upper body of a large humanoid figure, that looks
Have the players roll initiative. The bug is a Neogi Master and the two humans are Strange Sailors the Neogi have mentally enslaved. A DC 10 Wisdom (Perception) check reveals their movements to be strange and clunky. They are armed with Strange Wands, but move to block access to the Neogi before prioritizing their own cover.
The Neogi will attempt to find cover from the players as quickly as possible, and use it's innate spell casting to defeat them. It cannot use Enslave as it has already enslaved the sailors (and for the purposes of this adventure, Neogi Enslave does not recharge).
All three will fight to the death.
Ship Controls
The ship controls are incomprehensible regardless of any checks. They are too complicated and foreign to be used. Only the Pirates or A.I. can control the ship effectively from these.
A.I. "R.I.V.A 51"
The ship's A.I. is the only entity that can communicate with the players. It does not know what language they speak, but will cycle through them until it finds one they speak. It will first inquire if they are sentient life forms. It can speak all languages the players might know.
Once it concludes they are sentient, it will converse with them. It refers to them as "Specimens" and is not particularly hostile, but will threaten to self-destruct the ship if they attack its console. If power has been restored to the ship, it is not bluffing, as it has anti-tamper software installed. If power has not been restored to the ship, it cannot do so.
Consequently it will try to get the players to restore power to the ship as early as possible if it has not already been.
The A.I. cares little for anything besides not being blamed for the disaster, and will insist it warned the crew that working with Neogi and Illithid was an insurance nightmare waiting to happen. From talking to the A.I. the players can determine that the ship was crewed by the humans at the behest of the Neogi and Illithid, but after the specimens were collected, a series of problems occurred.
- The Neogi attempted to seize control of the ship, enslaving half the crew.
- The Pirates attacked the ship, damaging its engines and boarding it to loot the cargo.
There are quite a few potential outcomes in talking to the A.I.
- The simple and intended outcome of the adventure is that the ship will return the players to where they were abducted from. It will do this if they restore power to the ship, and (a) give it a voice recording to the A.I. clearing it of any wrongdoing (for insurance purposes) or (b) use the Captain's ID Card to force it return them, or (c) use the Captains ID card to give it control of the ship.
- The A.I. can control the ship once power is restored, but will not do so at behest of the players unless they give it a good reason or use the Captain's ID Card to compel it do so. The A.I. will be able to return the ship to its owners once it divests itself of the players, so that's its preferred outcome.
Playing RIVA51
RIVA51 is an AI. She can transmit herself off the ship if it is destroyed, so she is primarily concerned with liability and being decommissioned for the failures of this mission. Returning with the ship intact would make her less likely to get decommissioned, so that's her primary objective. She does not seriously consider the Players as new crew material (and they are not), so would be extremely difficult to convince to allow that.
She views the players as barely sentient and largely ignorant, but is more patronizing that rude. She is perfectly happy to return them to the world if she can get what she wants, and bares them no ill-will for killing the crew. She dislikes the Pirates, but will work with them to accomplish her goals.
Returning Yin'lore'id
If Yin'lore'id is still alive, the A.I. is the only person that knows where Yin'lore'id actually came from, but she was abducted earlier, and her moon is out of range of the Warp Pad now. The A.I. will not fly the ship back that way unless compelled by the Captain's ID Card, and will insist destruction is likely, as they would attract more pirates and worse flying in that direction.
This would lead into a whole new adventure, so should the ship be compelled to do so, that'd be one of the ends of this one-shot.
The ship will recommend taking Yin'lore'id back with you and finding another way to return her to her home using "magic". The A.I. does not care if you succeed in this, and just wants to be rid of the players, the kid, the horse, the orc (if alive) and the insurance liabilities you all represent.
16. The Pirate Ship
If the players defeat the pirates, they can search the pirates ship. It is much smaller than the ship that abducted them, with a small cargo bay, ready room, bridge, crew bunk, captain's room, gunners station, and engine room.
It is rougher and less well maintained, but functional. Flying it is no easier than flying the main ship and it has no A.I. of its own, but the A.I. of the main ship (RIVA51) can be convinced to give the players brief instruction on how to fly it should the pirates be dispatched and the A.I. believes it will get rid of the players.
Should they attempt to fly off the pirate ship, it is extremely likely they will crash land back on their world, but this can open the door to many new chapters of their adventure should it continue down that route.
The End
This adventure can end many ways, but if you have remaining time or wish to continue the adventure, the main expected outcome is that the players are returned to where they were abducted. They are likely ambushed by orcs once more, but their new weapons should be able to drive off the orcs rather easily... ideally taking up most of the remaining charges they might have on their very overpowered items... perhaps just leaving a few uses or souvenirs for future adventures.
Awarding Experience
Unfortunately defeating enemies with advanced weaponry gives reduced experience, but it would be appropriate to let the players reach level 2 from their very strange experiences among the stars.
Items
Strange Armor
Light Armor, AC 12
Strange armor made of remarkable tough cloth or hide of a creature you don't recognize.
Donning this armor grants you 30 temporary hit points. These hit points are diminished when you take damage, and cannot be regained unless the suit is repaired. You see no obvious way to do that.
These temporary hit points are bypassed by psychic damage.
You can seal the helmet of this armor, making you immune to inhaled poison or lack of oxygen. It has 1 minute of stored air without an attached tank.
Dose of Haste
It appears to be a small potion of haste. Once you take it, you are under the effect of the haste for the next three hours.
When the effect ends, you become incapacitated for 6 hours while occasionally vomiting.
Lightning Zap Spear
Spear, 1d6, Versatile (1d8).
A strange spear that produces lightning.
Deals an additional 3d6 lightning damage on hit. On a critical hit, the target must make a DC 14 constitution saving throw, or is stunned until the end of their next turn.
The strange metal magical cylinders run out and need to be replaced after 20 hits.
Strange Magical Wand
Ranged Weapon, Martial Weapon
A strange magical wand that is activated by pulling a lever. Make a ranged attack. Deals 3d6 lightning damage on hit. Range 40/120.
After being fired 20 times, the magical metal cylinders that power it stop working.
Heavy Fire Wand
You can use this to cast 3rd level (5d6) burning hands at will, DC 14.
Once you cast burning hands with this 9 times, it mysteriously stops working.
Patch Kit
Make an advanced fabrication check DC 14 (Intelligence modifier + smith or tinker's tools proficiency). On success, it restores 5d6 temporary hit points to Strange Armor or Strange Plate Armor (up to its maximum starting health). If they get a 10 or higher, they manage to restore 1d6 temporary hit points. On a 9 or lower, the kit wasted.
Intricate Gauntlet
A very fancy metal gauntlet. Allows you to add your Intelligence modifier to your Dexterity modifier.
After 3 days, it mysteriously stops working.
Healing Potion?
This mysterious liquid causes you to instantly regain 4d4 + 4 hit points.
Automatic Armless Crossbow
Two Handed, Heavy Crossbow?, Ranged Weapon
When you make an attack, roll a 1d6. It makes that many attacks. Each subsequent attack has an additional -3 to hit (-0, -3, -6, -9, -12, -15). On a 5 or higher for the number of attacks, make DC 12 strength saving throws. On failure, you disarm yourself and the attacks are made against random targets as the weapon flies from your grasp.
Deals 3d6 piercing damage on hit. Range 60/180
If your intelligence score is 15 or higher you can select the number of shots you fire when using this weapon.
If your strength score is 15 or higher, the penalty to each attack is -2 instead of -3.
After being fired 35 times, this weapon mysteriously stops working.
Clip of Strange Crossbow Tips
Small metal objects arrayed into some form of tight fitting container. No obvious use.
50 of them.
Ammo
These are obviously spare ammunition for the Automatic Armless Crossbow, a DC 16 Intelligence check can reveal that, but it should be relatively hard for PCs to deduce.
Strange Plate Armor
Heavy Armor, AC 16
Strange armor made of remarkable tough cloth or hide of a creature you don't recognize.
Donning this armor grants you 45 temporary hit points. These hit points are diminished when you take damage, and cannot be regained unless the suit is repaired. You see no obvious way to do that.
These temporary hit points are bypassed by psychic damage.
While wearing this armor, your Strength is increased by 5 and your Dexterity is increased by 3.
After 2 days of use, the magical metal cylinders that charge this armor die and must be replaced or recharged.
Force Scalpel
Dagger, Simple, Thrown(20/60)
A strange dagger that projects a force blade. Deals 3d4 force damage.
Mysteriously stops working after making 40 attacks.
Strange Magic Device
Magic Device
Has 20 charges.
You can cast: chromatic orb (fire) using 1 charge.
You can cast: scorching ray using 3 charges.
Mysteriously stops working after spending the charges and doesn't seem to recharge no matter how many times dawn passes.
Small Mysterious Tank
Gives you a bad feeling. A sort of explosive bad feeling. Filled with some form of liquid.
Charged Sunblade
Melee Martial Weapon, Longsword, Versatile, Finesse, Magical.
This item appears to be a Longsword hilt. While grasping the hilt, you can use a Bonus Action to cause a blade of pure radiance to spring into existence, or make the blade disappear, by pressing a button on the hilt. While the blade exists, this magic Longsword has the Finesse property. If you are proficient with shortswords or longswords, you are proficient with the sun blade.
You gain a +2 bonus to Attack and Damage Rolls made with this weapon, and the weapon deals an additional die of radiant damage (2d8, or 2d10 when wielded in two hands).
The sword's luminous blade emits bright light in a 15-foot radius and dim light for an additional 15 feet.
Temporary Items?
Unlike the other items, this item doesn't quickly run out of power. If it does or how long it takes is up to the DM. You can easily make this just a 20-30 use item if you plan to continue the campaign and don't want it to disrupt the game long term.
Monster Stat Blocks
Strange Sailor
Medium humanoid (human), neutral evil
- Armor Class 12
- Hit Points 5 (1d4 + 1)
- Speed 30
STR DEX CON INT WIS CHA 8 (-1) 14 (+2) 8 (-1) 15 (+2) 10 (+0) 8 (-1)
- Skills Perception +3, Technology +5
- Senses Passive perception 13
- Languages Space People
- Challenge 1* *(as long as you have laser guns)
Strange Armor: The Strange Sailor starts with 30 temporary hit points from his armor.
Educated. This creature has an unusually high proficiency bonus.
Actions
Strange Wand. Ranged Weapon Attack: +5 to hit, Reach/Range, one target. Hit: 10 (3d6) Lightning damage
Strange Pirate
Medium humanoid (human), neutral evil
- Armor Class 16
- Hit Points 7 (1d4 + 1)
- Speed 30
STR DEX CON INT WIS CHA 12 (+1) 14 (+2) 10 (+0) 14 (+2) 8 (-1) 10 (+0)
- Skills Perception +3, Technology +5
- Senses Passive perception 13
- Languages Space People
- Challenge 1* *(as long as you have laser guns)
Strange Armor: The Strange Sailor starts with 45 temporary hit points from his armor.
Educated. This creature has an unusually high proficiency bonus.
Actions
Multiattack. The giant makes two Strange Wand attacks.
Strange Wand. Ranged Weapon Attack: +5 to hit, Reach/Range, one target. Hit: 10 (3d6) Lightning damage
Credits
Art
- Spaceship - Licensed Stock Art
- Spaceship battle map - KibblesTasty Homebrew (Commissioned by a friend)
- Ogre - Wizards of the Coast
- Neogi - Wizards of the Coast
Fan Content Policy
Content is unofficial Fan Content permitted under the Fan Content Policy. Not approved/endorsed by Wizards. Portions of the materials used are property of Wizards of the Coast. ©Wizards of the Coast LLC.
Made with the support of my patreons at https://www.patreon.com/KibblesTasty.