Introduction
This is an adventure for Dungeons and Dragon 5th edition, designed for a party of four 5th to 6th level characters. The adventure was inspired by Epic Isometric's free sample pack and was designed to use all the components within. The free sample pack is available at ttps://www.patreon.com/posts/free-epic-sample-48023715.
All art used in this document is by Epic Isometric. See their website at http://epicisometric.com/
Summary
This adventure sees the party venturing into a tomb dotted with eerie hovering crystals. Within the undead spirit of an evil wizard lies trapped. However the wards are fading. Will the adventurers end the threat of the undead wizard once and for all? Or will the wards be broken, unleashing the evil trapped within?
Adventure Hooks
These are some potential adventure hooks for getting the player characters to delve into the tomb.
Missing Heirloom - The new head of House Mistwalker is seeking to reclaim the Mistwalker Regalia, a set of magic items belonging to the house in ages past. The Mistwalker Cloak is one such item. You have been tasked with recovering it. It's last owner was Garuthan Mistwalker, whose last known location is in the Tomb of the Pale Crystals. No further mention of Garuthan can be found in the family record. This hook is best suited to characters with a mercenary mindset. It gives a strong and clear incentive to delve deep into the dungeon.
Waning Wards - While taking inventory to magical vaults, a local wizard's guild has found a crack on one of Twin Rings of Halad. The records are not particularly detailed, but what is clear is that the rings are linked to a set of mystical wards in the region of the Tomb of the Pale Crystal. You have been sent to investigate the area and find out what is happening. This hook is best suited for characters which are motivated to do good, so that when they find the wards weakened they actively try to stop Garuthan.
Strangers in the Hills - There are stories of all sorts about what lies sealed in the Tomb of the Pale Crystals. Recently some figures have been seen there. Did they escape the tomb? Or are they looking to free what lies within? This hook is best suited to characters motivated by their own curiosity, well suited for a rumour based sandbox campaign.
/
Finding the Tomb
The exact location of the tomb is not particularly important. It can be located in any sufficiently isolated area of wilderness. Any locals should be able point in the general direction of the tomb, more long live locals may even be able to recall a trail to the area back when construction was underway for the entrance hall (Area 1). The pale glow of the crystal which the tomb is named after also means that finding the tomb at night is actually surprisingly easy
There are two main entrances to the tomb, the entrance hall (Area 1) or the ruins (Area 4). Both are clearly visible from the other due to the glowing crystals so characters can choose which they begin to explore first.
The Tomb of the Pale Crystals
The pale crystals which the tomb is now named after are ethereal crystals. These were a creation of the nobleman and wizard Garuthan Mistwalker from the essence of the Ethereal Plane. Initially interested in planar travel, as Garuthan aged, he realised his end was near and became obsessed with finding a cure for his death. He repurposed his research into the ethereal crystals, and eventually, after experimenting on numerous unfortunate souls, came upon a method to bind his soul with the ethereal plane. This would allow him to become a wraith like being, but free to roam as he pleased, rather than be bound to a specific location like other spectral undead.
Although Garuthan was slain by a group of adventurers, he had succeeded. To prevent the undead spirit of Garuthan from escaping, seals were placed upon several doors of his laboratory to prevent any undead from leaving it.
Time eroded away the memories of laboratory and Garuthan's spirit which waits within. Now known simply as the Tomb of the Pale Crystal, after the strange ethereal crystals. Only one of the sealing wards remain active.
General Features
The following are general features of the tomb unless described otherwise
Lighting - Generally the interior region tomb is completely dark unless illuminated by the ethereal crystals or described otherwise.
Distance - Each 2 by 2 isometric grid is 5 ft.
Ethereal Crystal Growths - The Ethereal Crystals, indicated by the jagged crystals on the map, hover motionlessly about 1 foot off the ground, giving off a light mist and a pale blue glow, shedding dim light in a 30 ft radius. Touching one of the Ethereal Crystals causes the creature to exist in both the Ethereal Plane and the Material Plane simultaneously and allows the creature to see 60 ft. into the Ethereal Plane and the Material Plane. The larger crystals cannot be moved, as if anchored to specific locations. A small shard can be chipped from the larger crystals and confer the same benefits, except only shedding dim light in a 5 ft radius. The small chips fade into nothingness after 1 hour.
Ethereal Crystal Obelisks - These ethereal crystals were specifically grown into a obelisk like shape. The surfaces of the crystals are almost mirror like. These crystals have the same properties as the Ethereal Crystal Growths described in A1. In addition, a creature can see, but not hear, through these crystals through the ethereal mirror in the east of Area 12
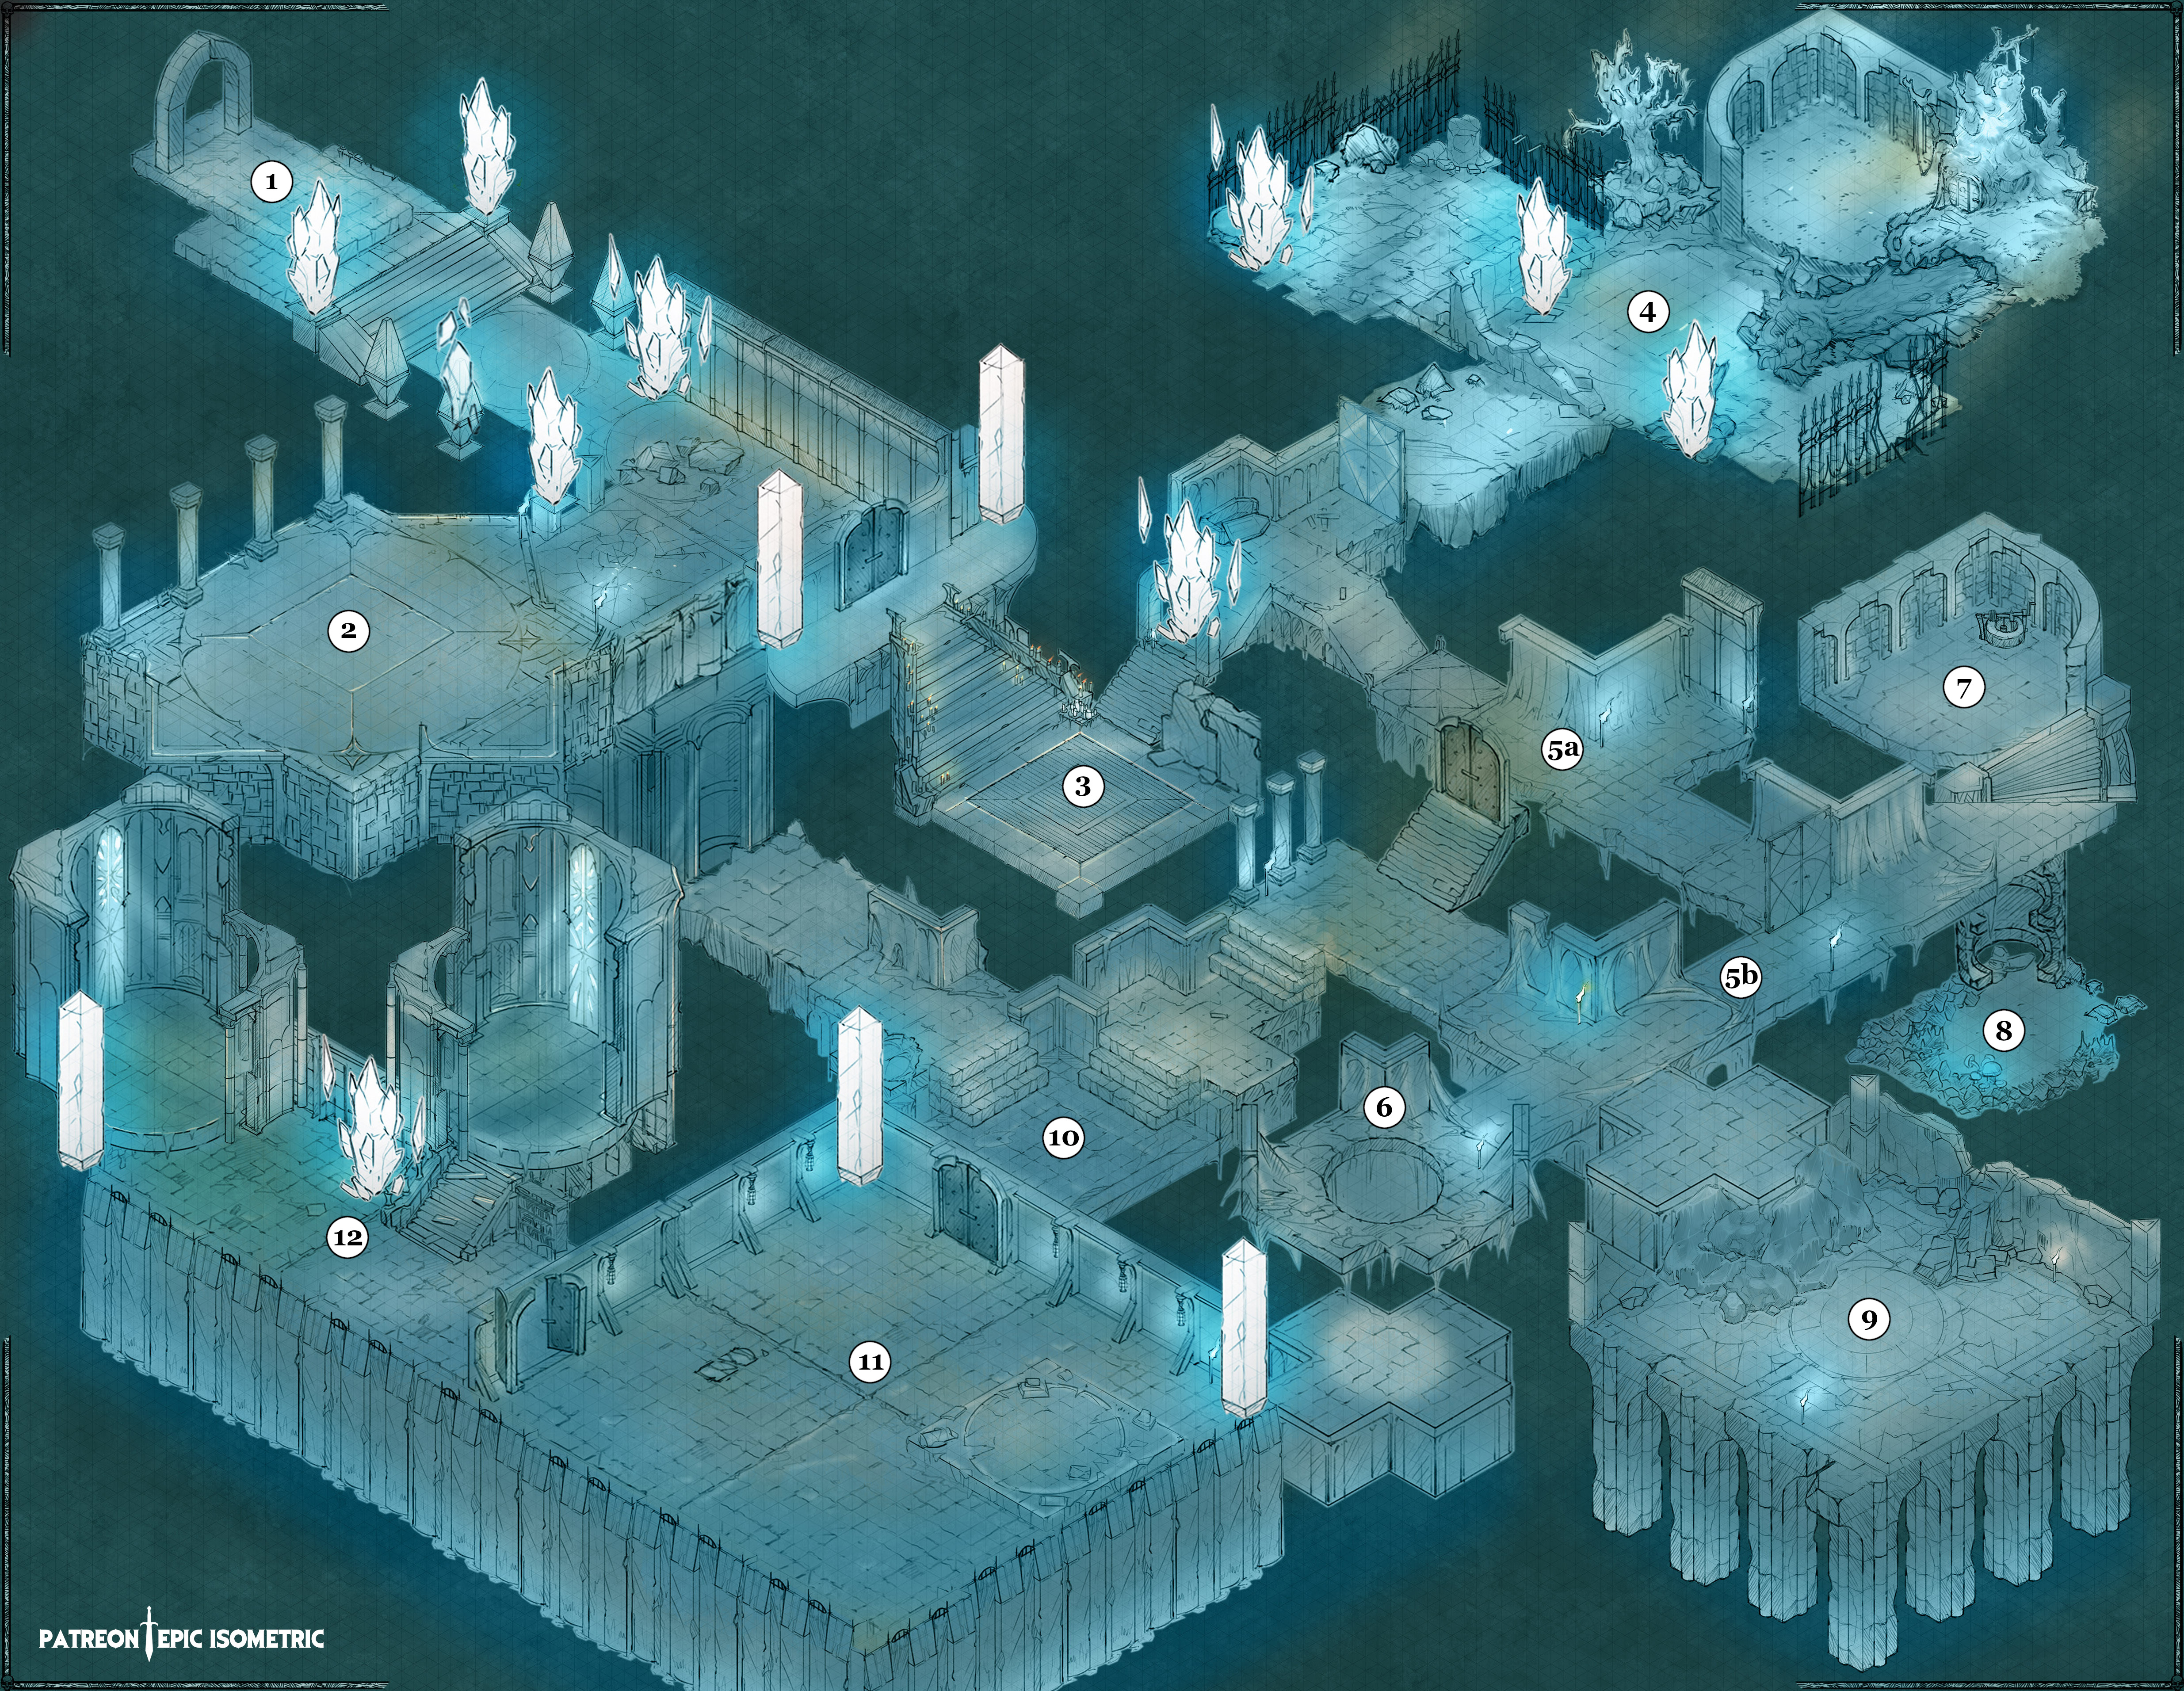
A1 - Entrance Hall
The entrance hall is half build and a later construction than the rest. Originally commissioned by a wealthy businessman seeking to refurbish the ruins and use the strange crystals here to peddle a new form of psuedo-magical spa. This plan ended after the workers were attacked by undead giant rats and an adventuring party hired to clear out the ruins below never returned.
Iron Doors - The large set of iron doors is locked. The lock can be picked with a DC15 Thieves' Tools (Dexterity) check or forced open with a DC18 Athletics (Strength) check . Alternatively the door is old and rusted enough that spending 1 hour attacking the door can force it open. Doing this alerts the undead giant rats in area 3 and causes them to hide.
A2 - Unfinished Teleportation Circle
An old unfinished teleportation circle is carved into the floor. The walls in the area are of the original construction, but newer tiles were laied here which the circle is carven in.
Secret Door - A DC15 Wisdom (Perception) check or a dedicated search of the area reveals a wall which can be pushed back, revealing a shaft which drops 20 ft vertically. If the descent the shaft, they reach area 10.
A3 - Foyer
The entryway is dimly illuminated by two ethereal crystals. A set of stairs descend into a dusty foyer A portrait hands on the south wall.
Undead Giant Rats - There are 6 undead giant rats in the area, raised by the lingering necrotic energy in the area. If they were alerted by loud noises they hide in the cracks in the wall. Otherwise they are gnawing on the edge of the rug in the center of the room. Regardless they attack anyone entering the room.
Old Floor Trap - The rug actually hides an old floor trap. The mechanism has rusted and is no longer as sensitive as it once was. As such the trap only triggers when more than one medium or two small creatures stand on the rug. When the trap is triggered, the floor gives way, and any creature standing on the trapped area must make a DC14 Dexterity Saving Throw. On a failure the creature falls 20ft down into Area 10.
Old Portrait - A large weathered portrait of a elderly, regal man dressed in a grey blue robe hangs in a finely crafted gilded frame on the south wall. The portrait itself is of little value, but the gilded frame is worth 250 gp.
A4 - Ruins
The ruins have been worn down by the ages. It was originally a tower of some sort, but now only the first and second floor remain. The ruins are outdoors and open to the elements
Outlanders - A group of outlanders travelling through the area thought to plunder the tomb, but were driven back by the phase spider in area 5 and 6, although the were not able to identify it. They are currently using the ruins nearby for shelter as they tend to their wounded.
Their leader is a towering man known as Einar the Walker (CN male human berserker). The rest of the band is made up of 4 tribal warriors, Tola, Dag, Thurid and Hildar. Tola is currently unconscious from the phase spider venom, while Dag broke his leg as they were escaping. Thurid tend to the wounded to the best of her ability while Hildar guards the warded door.
The outlanders are not hostile unless threatened, however they are not particularly friendly and cautious of strangers. Healing Tola with magical healing or a DC18 Wisdom (Medicine) check will allow Tola to regain consiousness but remain paralyzed for 1 hour. The outlanders are thankful for the assistance and become friendly. If the player characters have encountered or otherwise deduce that creature which attacked them was a phase spider, the DC of the Wisdom (Medicine) check is reduced to 13.
The outlanders generally let Einar speak to any strangers and know the following information. They will initially only divulge a limited amount of information, based on how well the PCs do on their Charisma (Persuasion) check. The outlanders do not take kindly to intimidation and will refuse to provide any information. If they are friendly with the PCs, they will openly share any information they have.
- DC8: The monster that attacked them was a spider as large as a horse, it was blue as death and appeared out of nowhere and disappear like mist.
- DC12: The ruins beyond were covered in cob webs. They didn't get very far before they were attacked
- DC16: There were two more members of their band, Floki and Regin who got separated in the escape. They are assumed to be dead.
- DC20: Regin had found a small chest, he and Floki took it as they ran through another set of warded doors during the attack.
- DC24: The outlanders are exiled from their tribe after Einar's brother Bjorn took control of the tribe. They are travelling south hoping to find a life for themselves. These ruins were a way to find valuable which they could trade.
Warded Door - The iron doors leading to Area 3 and Area 5 is marked by intricate glyphs and geometric patterns which glow faintly. The door is barred by the outlanders when they escaped the phase spider. A DC13 Intelligence (Arcana) check on the door indicates that the door is warded against undead and travel via the ethereal plane, however the magic seems weak and fading.
The door is unlocked if the bar is removed. The outlanders will notice anyone attempting to open the door. They can be convinced to unbar the door with a DC 10 Charisma (Persuasion or Deception) check, if the PCs claim to have killed the monster, this check is made with Advantage. The outlanders will quickly bar the doors again once the PCs have passed through. Trying to force the door open while barred requires a DC25 Strength (Athletics) check. If successful, the force will damaged the door, rendering the wards useless.
A5 - Webbed Corridors
The corridors are covered in thick webbing. There is a damaged warded door to the south and a set of iron doors to the west.
Damaged Warded Door - This warded door is damaged and no longer glowing.
Webs - The faintly shimmering webs cover the corridors. In area 5a the floor is clear, burnt away by the outlanders during their expedition into the tomb. The webs are difficult terrain. Each creature that starts its turn in the webs or that enters them during its turn must make a DC11 Dexterity saving throw. On a failed save, the creature is restrained as long as it remains in the webs or until it breaks free.
A creature restrained by the webs can use its action to make a DC11 Strength check. If it succeeds, it is no longer restrained.
The webs are flammable. Any 5-foot cube of webs exposed to fire burns away in 1 round, dealing 2d4 fire damage to any creature that starts its turn in the fire.
The webbing is considered difficult terrain. Area 5a has webbing on the walls and ceiling and has had the webbing on the floor burnt away by the outlanders. Area 5b is entirely covered in webbing.
The webs also extend into the ethereal plane. A DC13 Intelligence (Nature) check allows a character to discern the webs were made by a phase spider.
Phase Spider - A phase spider hunt in this area. It prefers to attack isolated creatures or creatures restrained by it's webs. It remains in the ethereal plane until it is ready to strike. Once a creature is paralyzed by it's venom, it will take it's body to Area 6 to be consumed. If reduced to half HP or lower, it shifts into the ethereal plane and retreats to Area 6 to recover.
A6 - Garbage Pit
This room is covered in thick layers of webbing and dominated by a 15 ft wide pit descending down into darkness.
Web - The webs here functions as per webs described in Area 5.
Pit - The pit is 20 ft deep and originally used as a garbage disposal. It now acts as the phase spider's lair. Due to the webbing, falling into the pit does not cause fall damage, instead, upon landing the creature must make a DC11 Dexterity saving throw or be restrained by the webs as they get tangled in the webs on their descent.
Regin - Regin, one of the outlanders, was caught in the spider's webs in Area 5b and paralyzed by the phase spider and is currently here, bound into a web cocoon. If the character's have taken less than 1 hour to reach here Regin is still alive, with the paralysis wearing off, Regin groans and struggles weakly against his bindings. If freed, Regin is eager to find Floki and return to his friends. Regin knowns Floki was last headed towards Area 7. Rescuing Regin makes the outlanders friendly towards the characters.
Remains- The bottom of the pit is littered with the skeletal remains of Garuthan and the phase spider's victims. Searching through these is a gruesome task but yields 1 small gold bracelet (25 gp) and a blood stone ring (50 gp) as well as a key to the laboratory (Area 11).
A7 - Well Room
A curved flight of stairs lead to a dusty room with a small well in the corner.
Tracks - in the dust are clear set of tracks. A DC13 Wisdom (Survival) check indicates that the tracks belonged to one humanoid individual and leads to behind the well. There is no tracks leading out of the room.
Well - The well descends 50 ft into an underground pool. There is a faint glow visible at the bottom, as well a something glimmering in the water. It still has a functional winch with a sturdy rope connected to a bucket.
A8 - Cavern
The small cavern holds a underground pool of fresh water and is lit by bioluminescent fungus. The pool is fairly shallow, being 5 ft deep at it's deepest point.
Broken Chest - The chest has fell as Floki attempted to lower it in the bucket, cracking open as the hit the bottom of the shallow pool causing it's contents to litter the bottom of the pool. Collecting the content will take some time, but it contains 102 gp worth of coins, a silver medallion with 250 gp and 2 shattered vials.
Floki's Corpse - Floki descended down the well in hopes of finding an exit without crossing the phase spider's territory. After descending, Floki tried to gather up as much of the valuables as possible before he was killed by a group of giant centipedes. His body now lies on the edge of the pool. He has 48 gp, 2 Garnets worth 100 gp each, a key to the laboratory (Area 11) and a Stone of Good Luck (Basic Rules , pg. 205) shaped like a cat with jade eyes.
Giant Centipedes - The 6 giant centipedes are currently eating what remains of Floki's corpse. If they are notice any other creatures, they rear up threateningly, but do not attack unless they are approached or threatened.
A9 - Crumbling Room
The room is crumbling under the weight of age, and covered in rubble. A magic circle is etched into the floor.
Magic Circle - The permanent 10 ft radius magic circle preventing any undead from leaving it. It was originally created by Garuthan to contain his necrotic experiments. The body of Alenthia was left in the circle by Garuthan and eventually raised as a undead. Casting dispel magic on the magic circle ends the effect.
Undead Guard - A skeletal undead warrior stands in the middle of the circle. She wielding a sword which looks like it was carved from one of the ethereal crystals. When any character approaches this room, she shouts a warning to leave this place and not to return.
The skeletal warrior is Alenthia Brynath. Formerly Garuthan's personal bodyguard, she turned on her master after realising Garuthan's plans, aiding the adventurers from ages past in killing him. She was slain the the battle with Garuthan and the energies of the tomb raised her as an undead.
Roleplaying Alenthia - Alenthia sees it as her duty to guard the tomb and to warn any outsiders from dying to Garuthan. If Alenthia is convinced the characters show the intention of stopping Garuthan she is willing to offer her aid, giving them her longsword Wraithhew and the key to the laboratory (Area 11) or going with them if she is the magic circle is dispeled. If she becomes convinced the characters are attempting to free Garuthan she tries to warn against it.
She is familiar with the history and layout of the tomb prior to her death and can give directions. As she is has not left the room, she is unaware of the failing wards, though she knows adventurers had entered these tombs and not returned.
Killing her and removing her bones from the tomb will free her, though she is hesitant to allow this until Garuthan is stopped.
Alenthia is a wight with the following changes
- Alenthia is lawful good
- Alenthia's longsword is replaced by an ethereal sword (see Appendix B)
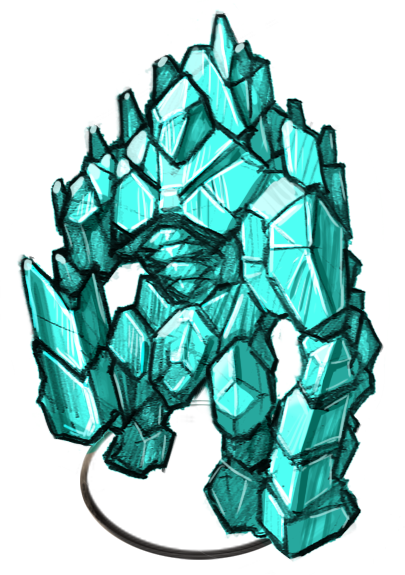
A10 - Golem's Post
A glowing golem made from the ethereal crystals stand guard in front of a set of locked iron doors.
Ethereal Crystal Golem - The ethereal crystal golems attacks any living creature which approaches within 30 ft of it. It normally does not chase any creatures beyond 60 ft from it's original post unless it continues to be attacked. Garuthan can use the ethereal mirror in the north of Area 12 to see through the golem and take direct control of it.
Locked Doors - The iron doors can be opened with a DC22 Dexterity (Thieves' Tools) check or a key.
A11 - Laboratory
A large room once dedicated to magical research. It is now fallen into disrepair. The room, dimly lit by two ethereal crystal obelisks. Against the south wall is a raised dais with a ritual circle inscribed on the floor. In the center is a withered corpse draped in a grey cloak.
Skeletal Guards - 8 Skeletons and one Skeleton Veteran wait in the room. 4 of the skeletons are towards the back of the wall using bows, while the other 4 and the skeletal veteran engage in melee. The skeletons ready actions to attack anyone within range as soon as the doors swing open.
Garuthan's Corpse - While dying, Garuthan crawled into the ritual circle and completed his undeath. The corpse wears a gold and silver medallion worth 250 gp as well as the Mistwalker Cloak . On his person is also a collection of his research notes, in which details the painstaking process of creating the Ethereal Crystals and shaping it. The notes are a mess of shorthand and overlapping annotations, deciphering these notes will take some time.
A12 - Sanctum
Garuthan's inner sanctum
Ethereal Mirrors - Garuthan monitors the tomb through the two ethereal mirrors. The northern mirror shows the area around the ethereal crystal golem if it is has not been destroyed. As an action, a creature can use the northern mirror to directly control the golem on it's next turn. The eastern mirror shows the area around one of the ethereal crystal obelisks. As an action, a creature can choose one other obelisk in the tomb and see through it instead. The ethereal mirrors show images only and does not produce sound.
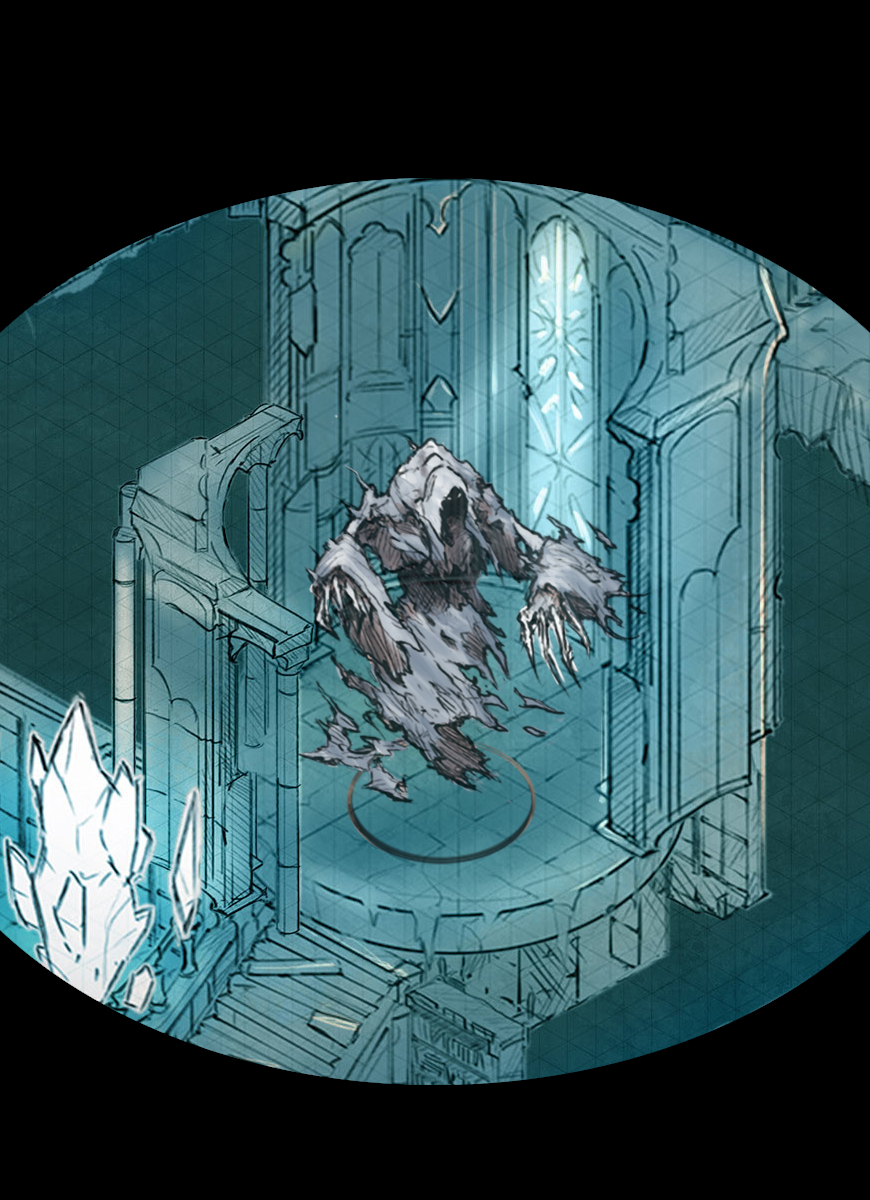
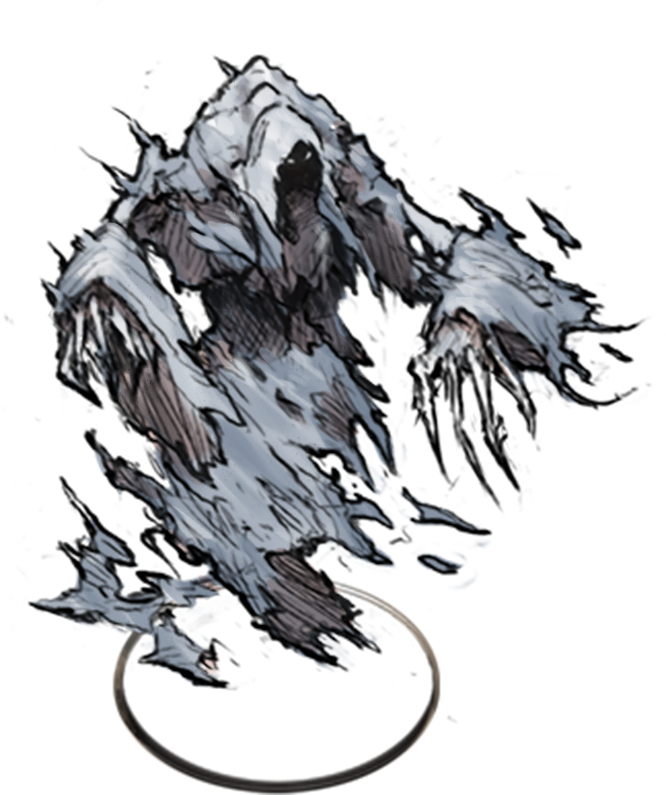
Garuthan the Returned - Garuthan is likely monitoring the laboratory room through the eastern ethereal mirror. Garuthan is ready to join the fray if an opening presents itself.
Roleplaying Garuthan - Although arrogant and boastful, Garuthan is a coward at heart and fears a final death. If he believes he has the upper hand he will taunt the characters, and revel in his power. His ultimate goal is removing the wards and leaving this place. If given the chance he will use a character as a hostage to force the others to destroy the wards.
If the tide turns against him, he will plead and bargain with the characters to spare him, willing to give them anything in return. Still, Garuthan isn't one to keep promises and will turn on the characters if given an opening.
Garuthan's Hoard - Garuthan has gathered an eclectic hoard of treasures from the adventurers. He displays much of these as trophies in his sanctum. The treasures include including 280 gp worth of coins, 350 gp worth of jewels, two greater healing potions and a Staff of the Adder (DMG 203), a full suit of plate armour as well as a collection of mundane weapons and spell foci.
Concluding the Adventure
If Garuthan is destroyed, congratulations, a dangerous evil has been stopped. The characters can return to their patron to complete their quest. Perhaps with Garuthan's notes they can use the ethereal crystals for good, even crafting ethereal weapons.
If Garuthan is not destroyed but the wards remain intact, he will bide his time as the wards weaken. If the characters attempt to find someone capable of strengthening the wards they may return just in time to strengthen the wards and keep Garuthan trapped. Or they may find the wards gone and the tomb empty.
If Garuthan is freed, a new evil is now loose in the world. Pursuing Garuthan may be another whole adventure.
Appendix A - Monsters
Ethereal Crystal Golem
Large Construct
- Armor Class 15 (Natural Armour)
- Hit Points 114 (12d10+48)
- Speed Speed
STR DEX CON INT WIS CHA 18 (+4) 8 (-1) 18 (+4) 3 (-4) 8 (-1) 1 (-5)
- Damage Vulnerabilities Thunder
- Damage Resistances Bludgeoning, Piercing, and Slashing from Nonmagical Attacks
- Damage Immunities Poison, Psychic
- Condition Immunities Charmed, Exhaustion, Frightened, Paralyzed, Petrified, Poisoned
- Senses Darkvision 60 Ft., passive Perception 9
- Languages Understands The Languages Of Its Creator But Can't Speak
- Challenge 5 (1,800 XP)
Ethereal Threshold. The golem exists in the Ethereal Plane and the Material Plane simultaneously. It is visible on the Material Plane and the Border Ethereal, and can affect or be affected by anything on either plane.
Immutable Form. The golem is immune to any spell or effect that would alter its form.
Magic Resistance. The golem has advantage on saving throws against spells and other magical effects.
Magic Weapons. The golem's weapon attacks are magical.
Actions
Multiattack. The golem makes two slam attacks.
Slam. Melee Weapon Attack: +7 to hit, reach 10 ft., one target. Hit: 13 (2d8 + 4) bludgeoning damage.
Skeletal Champion
Medium undead
- Armor Class 17 (Splint)
- Hit Points 58 (9d8+18)
- Speed 30 ft.
STR DEX CON INT WIS CHA 16 (+3) 13 (+1) 14 (+2) 6 (-2) 8 (-1) 8 (-1)
- Skills Athletics +5, Perception +1
- Damage Vulnerabilities Bludgeoning
- Damage Immunities Poison
- Condition Immunities Exhaustion, Poisoned
- Senses Darkvision 60 Ft., passive Perception 11
- Languages Understands All Languages It Spoke In Life But Can't Speak
- Challenge 3 (700 XP)
Actions
Multiattack. The veteran makes two greataxe attacks.
Greataxe. Melee Weapon Attack: +5 to hit, reach 5 ft., one target. Hit: 9 (1d12 + 3) slashing damage

Garuthan the Returned
Large undead, neutral evil
- Armor Class 12
- Hit Points 58 (9d8+18)
- Speed 0 ft., fly 60 ft. (hover)
STR DEX CON INT WIS CHA 6 (-2) 14 (+2) 14 (+2) 17 (+3) 12 (+1) 11 (+1)
- Skills Arcana +6
- Damage Resistances Acid, Cold, Fire, Lightning, Thunder; Bludgeoning, Piercing, and Slashing From Nonmagical Attacks That Aren't Silvered
- Damage Immunities Necrotic, Poison
- Condition Immunities Charmed, Exhaustion, Grappled, Paralyzed, Petrified, Poisoned, Prone, Restrained
- Senses Darkvision 60 Ft., passive Perception 12
- Languages Common, Draconic, Elvish
- Challenge 6 (2,300 XP)
Incorporeal Movement. The wraith can move through other creatures and objects as if they were difficult terrain. It takes 5 (1d10) force damage if it ends its turn inside an object.
Sunlight Sensitivity. While in sunlight, the wraith has disadvantage on attack rolls, as well as on Wisdom (Perception) checks that rely on sight.
Spellcasting. The mage is a 7th-level spellcaster. Its spellcasting ability is Intelligence (spell save DC 14, +6 to hit with spell attacks). The mage has the following wizard spells prepared:
Cantrips (at will): chill touch, mage hand, poison spray, ray of frost
1st level (4 slots): false life, cause fear, ray of sickness
2nd level (3 slots): blindness/deafness, ray of enfeeblement
3rd level (3 slots): animate dead, dispel magic, fear, vampiric touch
4th level (1 slots): blight
Actions
Life Drain. Melee Weapon Attack: +5 to hit, reach 5 ft., one creature. Hit: 15(3d8 + 2) necrotic damage. The target must succeed on a DC 14 Constitution saving throw or its hit point maximum is reduced by an amount equal to the damage taken. This reduction lasts until the target finishes a long rest. The target dies if this effect reduces its hit point maximum to 0
Appendix B - Magic Items
Ethereal Sword
Weapon (longsword), rare (requires attunement)
While you hold this sword you exists in the Ethereal Plane and the Material Plane simultaneously. You are visible on the Material Plane and the Border Ethereal, and can affect or be affected by anything on either plane.
When you hit an undead with incorporeal movement with this magic weapon, that creature takes an extra 2d6 force damage. If the target has 25 hit points or fewer after taking this damage, it must succeed on a DC 15 Wisdom saving throw or be destroyed. On a successful save, the creature's speed becomes 0 until the end of your next turn.
While you hold this weapon, it sheds dim light in a 20-foot radius.
Mistwalker Cloak
Wondrous Item, rare (requires attunement)
This grey cloak emanates a faint mist. While wearing it, you can use it to cast the dimension door spell as an action. This property of the cloak can't be used again until the next dawn.
When you disappear, you leave behind a cloud of smoke, and you appear in a similar cloud of smoke at your destination. The smoke lightly obscures the space you left and the space you appear in, and it dissipates at the end of your next turn. A light or stronger wind disperses the smoke.