Islemont
A Campaign Setting
by
Eric Jude Hatcher
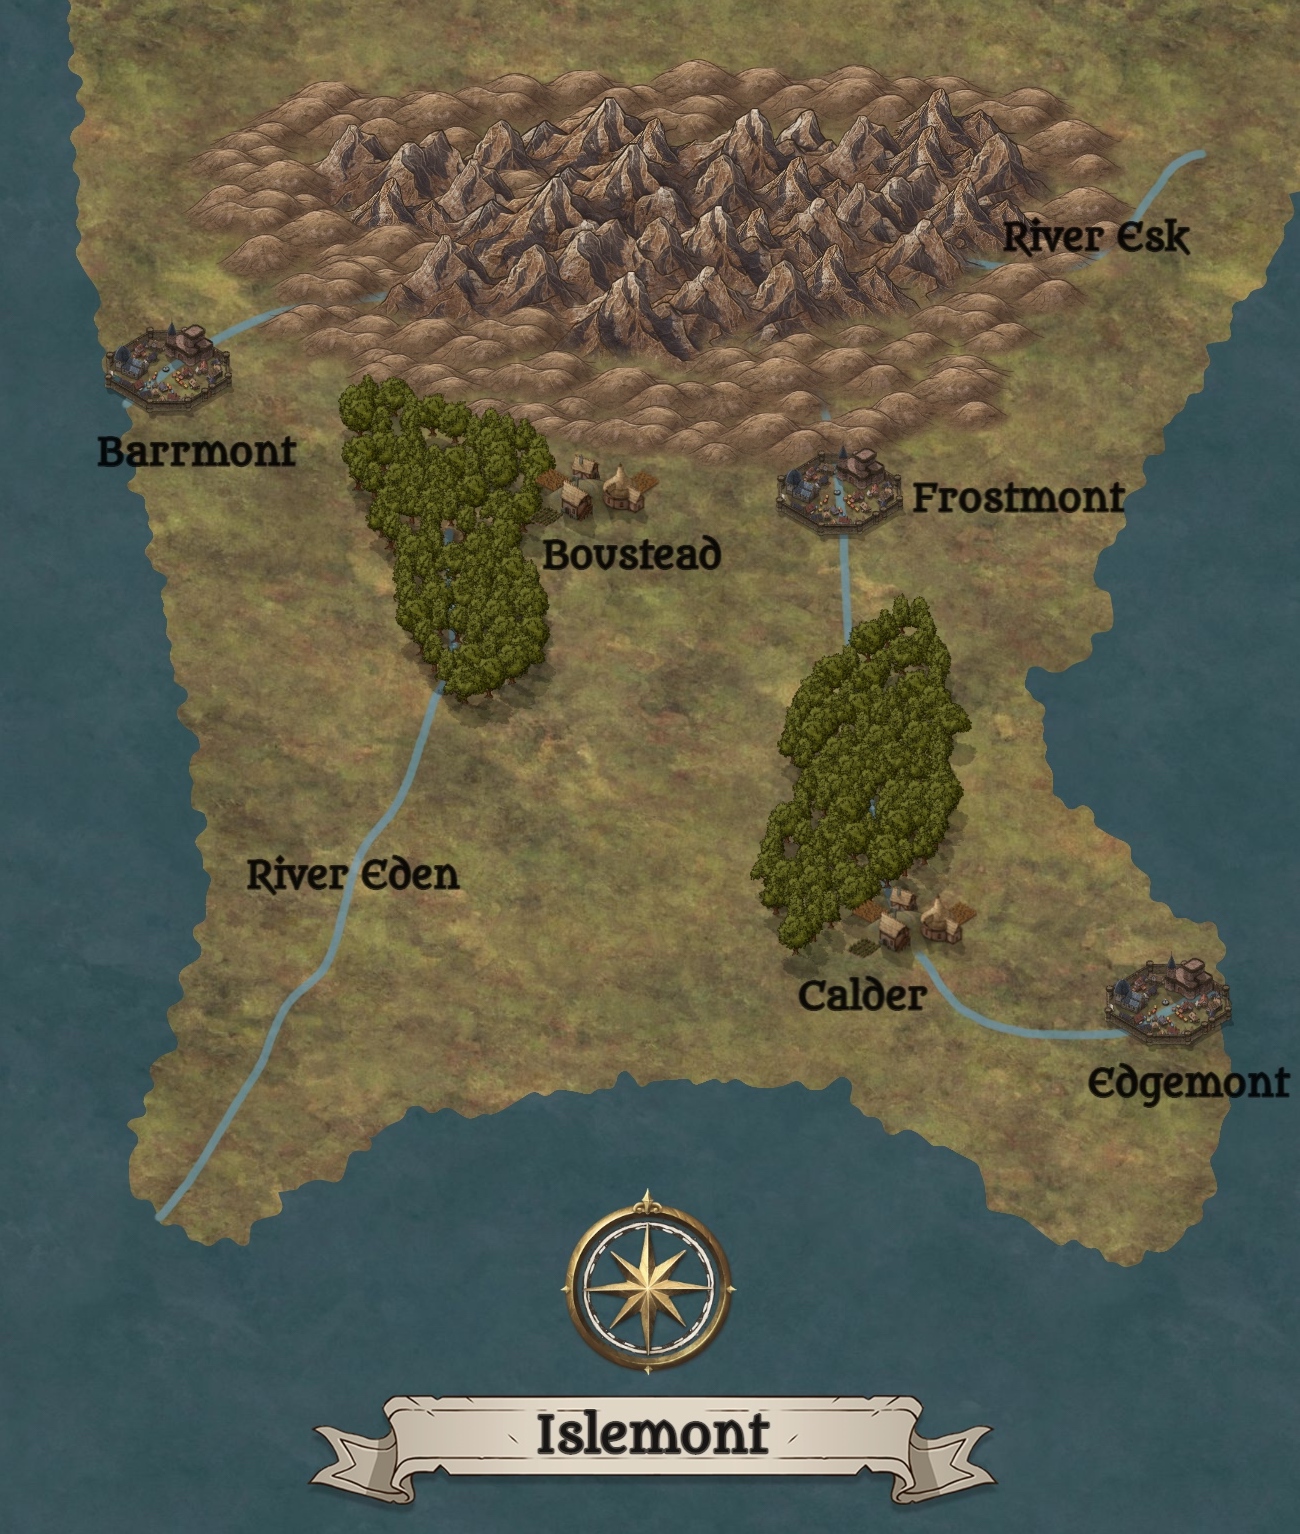
Table of Contents
-
2The World of Islemont
-
8Freeing Calder (L1)
-
12Where to Now? (L2-4)
-
21Let's Play Catchup (L3-4)
-
26A Servant of Shar (L4-6)
-
33The Northern Mountains (L6-7)
-
39Two Halves Don't Make a Whole (L7)
-
40The Whole Kit and Kaboodle (L7)
-
42Rescuing Frostmont (L8)
-
44The Known and Unknown (L9)
-
47The Windmill Farm (L9)
-
??Let's Go to Barrmont for a Drink
-
??Appendix A: Maps
-
??Appendix B: Ancient Islemont
-
??Appendix C: Islemont Pantheon
The World of Islemont
Islemont was formed when a small tectonic plate collided with the southern edge of the continent, forming a peninsula with mountains along its northern border. As the mountains grew, two major rivers formed. The River Ehan flows southwesterly through the city of Barrmont. The River Calder flows from north to south through Frostmont to Caldor Village, where it turns east and runs through Edgemont before entering the Eastern Sea. Two minor rivers can be found in Islemont. In the north, the River Esk runs west to east out of the mountains before it mysteriously disappears in the grasslands. In the southwest, the River Eden flows south out of the forest and into the Western Sea; its source has never been found. There are five major settlements on the peninsula, Barrmont, Boustead Village, Frostmont, Calder Village, and Edgemont. Barrmont, Frostmont, and Edgemont mint their own coinage. Numerous smaller settlements can be found within one- or two-days journey of each other. Either Boustead Village or Calder Village can serve as the party’s homebase due to their locations. A map of the peninsula is available in Appendix A: Maps.
Barrmont
Barrmont, with a population of about 10,000, is a bustling port city specializing in the exchange of natural resources. The River Ehan, with its source high in the mountains, provides a natural route of transport for natural resources. The warm western trade winds give Barrmont a pleasant climate throughout the year. Taking advantage of the course of the River Ehan, Barrmont’s founders had a single purpose in mind: making money. Whether it was from lumber in forest hills or minerals and precious metals mined from the mountains, the River Ehan has been exploited as a natural route for transport for over a century. The ruling council of the city keeps a tight hold on the daily business dealings of the port. They have gone so far as to place agents at all levels of the bureaucracy, from dock and market workers, to foremen and middlemen, to business owners. Nothing in the city happens without the ruling council knowing or finding out. Outside the port area, the city is divided into three districts according to class. Lower class inhabitants live closest to the port; upper class inhabitants live on the edges of the city, near the surrounding hills and forest; middle class inhabitants are found in between. The city derives its name from "bar" meaning "weight" and "mont" meaning "hill".
Boustead Village
The peninsula’s youngest settlement, Boustead Village was founded by people who left Barrmont fifty years ago searching for security and independence. Situated between the Western Forest and the foothills, the village welcomes anyone looking for a simpler and safer life. Its population is about 1,000. The village derives its name from "bow" meaning "bend" and "stead" meaning "place".
Frostmont
Although it is not the northernmost settlement, Frostmont is by far the coldest. Its location on the eastern side of the mountains prevents its climate from ever truly escaping winter. With 5,000 inhabitants, Frostmont has a population about half of Barrmont, but they are a hardy people. Unable to grow traditional crops, they hunt the surrounding hills and fish the River Calder for food. The city government has recently come under the control of a gang of thugs. They have not yet consolidated rule, but have their sights on controlling the city and villages in the surrounding area. The city derives its name from "frost" meaning "ice" and "mont" meaning "hill".
Calder Village
Situated on the southern edge of the Calder Forest, the original settlement on the peninsula, Calder Village, also known as Calder Bridge, grew around a natural crossing of the river that runs through it. The neighboring monastery was founded very soon after, and the two quickly became dependent on each other. Their founding was so long ago, no one remembers the true history, but tradition holds that the two were founded at the same time. The total population of the area is about 1,500. Twenty-five years ago, the dean of Calder Monastery died and was replaced by a Minotaur Cleric from Edgemont. Shortly thereafter, the monastery closed its doors to the world and the village has been struggling to survive ever since. The village and monastery were founded without names, but they and their inhabitants began to be referred to as Calder, meaning "ancients who are together." The village derives its name from "co-" meaning "together," "ald" meaning "old," and "-er" meaning "belonging to a specific place or group".
Edgemont
The second port city of Islemont, Edgemont has the largest population of any settlement on the island at 20,000. It also hosts the corrupt regional government of the peninsula. Taken over by organized crime years ago, the city’s four districts control all trade coming into and going out of Islemont. They report to no one save the religious temples and magic schools in the city. Each district controls a different market. The north controls crops; the east controls seafood and shipping; the south controls fabrics; the west controls metallurgy. An uneasy alliance keeps goods and services supplied to the many markets and shops around the city. The city derives its name from "edge" meaning "edge" and "mont" meaning "hill".
The Rivers Esk and Eden
There are two rivers with no major settlements, the River Esk is found in the north. It runs west to east out of the mountains before it mysteriously disappears in the grasslands. In the southeast, the River Eden flows south out of the forest and into the Western Sea; its source has never been found. Time has forgotten that the two rivers are actually one, called the Neverending River by the Fey. It forms a loop that flows through the Feywild and the Material Plane, crossing over at four portals. The first is the Grove of Eden in the Western Forest. As time passed, geologic processes on the Material Plane changed the landscape. The coastline in the southwest eroded, leaving the second portal of the River Eden underwater. As the island collided with the continent, the land rose, eventually placing the first of Esk's groves high in the Northern Mountains and causing the second to simply disappear into the grasslands.
Money in Islemont
From the time when Islemont was an island, coinage was referred to as pu, meaning hills. Initially pronounced /pu/, over time the pronunciation changed to /phu/ before settling on fu (pronounced /φu/) in modern Islemont Common. Coins themselves are typically referred to be their relationship to the fu, rather than their composite material, but with increasing contact with the continent, the composite material names are gaining a foothold in the settlements:
| Coin | hony-fu /copper | sib-fu /silver | song-pu /electrum† | fu /gold | siib-fu /platinum |
| hony-fu | 1 | 1/10 | 1/50 | 1/100 | 1/1,000 |
| sib-fu | 10 | 1 | 1/5 | 1/10 | 1/100 |
| song-fu | 50 | 5 | 1 | 1/2 | 1/20 |
| fu | 100 | 10 | 2 | 1 | 1/10 |
| siib-fu | 1,000 | 100 | 20 | 10 | 1 |
† Early in Islemont's history song-pu coins existed, but millennia before the island collided with the continent, methods to refine the electrum alloy were found and virtually all old coins were reminted into sib-pu and pu. Any song-pu coins found in Islemont are extremely valuable for their historic nature, worth much more than their simple material value. Continental electrum coins are accepted in the port cities of Barrmont and Edgemont, but other settlements will not deal in them.
Human Variants
By far, the greatest percentage of the native population of Islemont is human, unless they have Fey ancestry. It is possible to find other races on the peninsula, but they are not native. Players choosing human characters with origins from one of the peninsula’s five settlements gain a Skill bonus if they have Proficiency in the related Skill. The bonus can be granted if Proficiency in the Skill is gained later in their adventuring career.
| Settlement | Skill | Bonus |
| Barrmont | CHA/Deception or CHA/Intimidation | +1 |
| Boustead Village | WIS/Medicine or DEX/Stealth | +1 |
| Frostmont | INT/Nature or WIS/Survival | +1 |
| Calder Village | INT/History or INT/Religion | +1 |
| Edgemont | INT/Investigation or CHA/Persuasion | +1 |

Exploring Islemont
As your players progress, they will be introduced to the five settlement areas and be drawn back to delve deeper into the intricacies of the major cities. They will also investigate the mysteries of the Rivers Eden and Esk. Freeing Calder is designed for first level characters, introducing them to the mechanics of melee and skills, by traveling from Calder Village to Frostmont. Where to Now? moves the party to Boustead Village and into the Western Forest in search of the source of the River Eden. Let's Play Catchup is an optional adventure and a way to get the campaign back on track if the party makes bad decisions during Where to Now? A Servant of Shar is an adventure in three parts, introducing the party to the city of Edgemont. The Northern Mountains finds the party exploring caves, meeting Goblns, and facing the return of Gnirk and Gnark. Two Halves Don't Make a Whole takes place in the city of Frostmont and requires the party to practice diplomacy. The Whole Kit and Kaboodle shows the party what happens if diplomacy fails. (It is an optional adventure depending on the events of Two Halves Don't Make a Whole.) In Rescuing Frostmont the party must try to stop the assassination of the Council of Fifteen, Frostmont's ruling body. The Known and Unknown brings the party back to the Feywild to assist the Conclave of Dryads in moving the portals along the Neverending River (The Rivers Esk and Eden) to restore the bond between the Feywild and the Material Plane. The Windmill Farm has the party investigate the ancient history of Islemont. Let's Go to Barrmont for a Drink brings the party face to face with the innerworkings of politics.
Magic Items in Islemont
Players can craft magic items as soon as they begin their adventure, as long as they have the materials and resources. Players must have proficiency in the appropriate tools or Arcana skill. Materials and tools costs are listed below:
| Item Rarity | Time† | Creation Cost† |
| Common | 1 workweek | 50 gp |
| Uncommon | 2 workweeks | 200 gp |
| Rare | 10 workweeks | 2,000 gp |
| Very Rare | 25 workweeks | 20,000 gp |
| Legendary | 50 workweeks | 100,000 gp |
| Item Rarity | Base Price† |
| Common | 100 gp |
| Uncommon | 400 gp |
| Rare | 4,000 gp |
| Very Rare | 40,000 gp |
| Legendary | 200,000gp |
| Item Rarity | CR Range |
| Common | 1-3 |
| Uncommon | 4-8 |
| Rare | 9-12 |
| Very Rare | 13-18 |
| Legendary | 19+ |
Scribing a spell scroll can be done by any spellcaster with the time, patience, and resources. The character must have proficiency in the Arcana skill and must provide any material components required for the casting of the spell. Moreover, the character must have the spell prepared, or it must be among the character’s known spells, in order to scribe a scroll of that spell. If the scribed spell is a cantrip, the version on the scroll works as if the caster were 1st level.
| Spell Level | Time | Cost |
| Cantrip | 1 day | 15 gp |
| 1 | 1 day | 25 gp |
| 2 | 3 days | 250 gp |
| 3 | 1 workweek | 500 gp |
| 4 | 2 workweeks | 2,500 gp |
| 5 | 4 workweeks | 5,000 gp |
| 6 | 8 workweeks | 15,000 gp |
| 7 | 16 workweeks | 25,000 gp |
| 8 | 32 workweeks | 50,000 gp |
| 9 | 48 workweeks | 250,000 gp |
| Type | HP Healed | Time | Cost |
| Healing | 2d4+2 | 1 day | 25 gp |
| Greater Healing | 4d4+4 | 1 workweek | 100 gp |
| Superior Healing | 8d4+8 | 3 workweeks | 1,000 gp |
| Supreme Healing | 10d4+20 | 4 workweeks | 10,000 gp |
All information taken from "Downtime Revisited" in Xanthar's Guide to Everything.
Skills Challenges
Greatly inspired by Lord Faeryl’s Rules for 5e Skill Challenges by Mike Harvey, which are built from Lord Kensington’s Rules for Skill Challenges in 4e by Rodrigo D. Lopez A narrative encounter focusing on the use of Skills to progress the adventure. The timeline of a Skills Challenge can be minutes to days, so long as the players are given a specific conflict to overcome or goal to reach. The key feature of a Skills Challenge is that it is player driven; they work together to resolve the situation, with the GM there only to rule on the appropriateness of a players proposed action. There is no right or wrong action, only successes and failures. The party must achieve the target number of successful Skill checks (typically the number of party members plus three) before getting three (3) unsuccessful Skill checks. The DC of the checks is set by the GM based on the party’s level and the CR of the encounter. Difficulty Class; Typical DCs (DMG, p238)
| Task | DC |
| Very Easy | 5 |
| Easy | 10 |
| Moderate | 15 |
| Hard | 20 |
| Very Hard | 25 |
| Nearly impossible | 30 |
Restrictions: A player cannot select a skill or tool proficiency if that skill/tool proficiency was used during the previous player’s turn, of if the current player used that skill/proficiency on their turn during the last round. This requires players to think outside of their main strengths. A player cannot cast a spell in place of making a Skill check. Players may describe a spell-like ability when making a relevant Skill check (e.g., Arcana for arcane spellcasters, Nature for primal, Religion for divine, etc.); this will not expend a spell slot. Aid Another: Once per challenge, a party member can choose to use their turn to benefit the next person in the initiative order. The benefit must utilize an action or feature that takes no more than one regular Action or Bonus Action (e.g., Bless, Guidance, Bardic Inspiration, etc.). Lean on Another: Once per Skills Challenge, each player may choose to reroll one failure on their turn, describing how they involve the next player in initiative order for support. When this happens, the DC increases somewhat for that next player. As with combat, a player can choose to hold their action until further in the initiative order, but their turn is permanently moved to that position. A natural 20 should be treated as an automatic success; a natural 1 should be treated as an automatic failure. Since all checks are preapproved by the GM, nothing challenge-breaking should occur. If the attempted check was exceptional, the GM can award (or penalize) at their discretion. The GM can decide that because of a situation advantage or aspect, the party might have an expendable resource available to them (e.g., the book they found contains information that grants advantage on a INT/Religion check, etc.). When the party reaches the target number of successes, they succeed in the Skills Challenge. If the party reaches the target number of failures first, they fail. The outcomes of each scenario will be determined by the GM, with a combination of narrative and mechanical consequences.
.

Experience Progression and Character Advancement
The author uses milestones for advancement. Milestone Progression is based on the requirement of one Major Milestone less than a character's current Proficiency Bonus, with three Minor Milestones equaling one Major Milestone. A Minor Milestone is awarded for successful party encounters with planned or random minor enemies, not including exceptional major enemies. If a major enemy is the only encounter of the adventuring day, the encounter might qualify as a Major Milestone depending on the Challenge Rating. Skill Challenges are made use of as often as possible as they encourage roleplay and always qualify as a Major Milestone. Every attempt has been made to indicate when characters should advance. Milestone details are given at the end each adventure to ensure the GM is clear where the players should be upon completion of each. If level progression occurs in the middle of an adventure or session, this is mentioned. A full table of Milestone Progression through Level 20 is presented for the GM.
| Level | Proficiency Bonus | Level Milestones (Minor/Major) | Total Milestones (Minor/Major) |
| 1 | 2 | -- | -- |
| 2 | 2 | 3/1 | 3/1 |
| 3 | 2 | 3/1 | 6/2 |
| 4 | 2 | 3/1 | 9/3 |
| 5 | 3 | 6/2 | 15/5 |
| 6 | 3 | 6/2 | 21/7 |
| 7 | 3 | 6/2 | 27/9 |
| 8 | 3 | 6/2 | 33/11 |
| 9 | 4 | 9/3 | 42/14 |
| 10 | 4 | 9/3 | 51/17 |
| 11 | 4 | 9/3 | 60/20 |
| 12 | 4 | 9/3 | 69/23 |
| 13 | 5 | 12/4 | 81/27 |
| 14 | 5 | 12/4 | 93/31 |
| 15 | 5 | 12/4 | 105/35 |
| 16 | 5 | 12/4 | 117/39 |
| 17 | 6 | 15/5 | 132/44 |
| 18 | 6 | 15/5 | 147/49 |
| 19 | 6 | 15/5 | 162/54 |
| 20 | 6 | 15/5 | 177/59 |
Freeing Calder
The centuries old relationship between Calder Bridge and Calder Monastery was disrupted twenty-five years ago, and now the future of the village is at stake. Freeing Calder is an adventure that takes characters from 1st to 2nd level and introduces them to Calder Village and the City of Frostmont.
Story Overview
Ever since the monks of Calder Monastery disappeared, the village of Calder Bridge has come under the threat of bandits and thieves demanding protection payments. No one in the village knows they are commanded by Gnirk and Gnark, half-orc thugs living in Frostmont looking to expand their territory. A group of six comes every month to collect the payments.
Adventure Summary
Regardless of how the party came to Calder Village, they are approached by its leader, Daria Fieldmont (Noble, Human Female). She explains the village's plight, asking them to defend the village from the thugs and bandits, who are expected the next day.
| Daria Fieldmont Medium humanoid (human), Neutral Good AC: 11 (15 with breastplate) Hit Points: 9 (2d8) Speed: 30 ft STR 11 (+0) DEX 12 (+1) CON 11 (+0) INT 12 (+1) WIS 14 (+2) CHA 16 (+3) Skills: Insight +4, Deception +5, Persuasion +5 Senses: Passive Perception 12 Languages: Common CR: 1/8 (25 XP) Proficiency Bonus: +2 Actions Rapier. Melee Attack: +3 to hit, reach 5ft, one target. Hit: 5 (1d8+1) piercing. Reactions. Parry. The noble adds 2 to its AC against one melee attack that would hit it. To do so, the noble must see the attacker and be wielding a melee weapon. |
Setup and Starting Points
Work with the players to establish why their characters are in Calder. You can provide information regarding the small village and its surroundings, but do not mention any major details about Calder Monastery beyond what is mentioned in the story overview. Before the adventure begins is also the time to figure out if the characters already know each other of if this is the first time they’ve met.
Part One: The Payment Comes Due
Daria Fieldmont, a village Noble, explains to you that since the monks of Calder Monastery disappeared, the Calder Village has come under the threat of bandits demanding protection payments. No one in the village knows who is commanding them, but they come every month to collect the payments. As she begins to ask for your help, a boy runs up, saying, "Six people are coming. I think it's the same ones as last time!" Daria calms the boy and says, "It's okay, son. Tell us what you have seen." "Sorry, ma'am. I just get so excited when they show up! Six people, two in chainmail with spears, four in leather. They're all carrying daggers. They're about five minutes away." Word of their arrival quickly spreads, and the villagers quickly begin returning to their homes to avoid any confrontation.
Val and Elle intend to seek out Daria Fieldmont immediately. If the players attempt to hide and follow the visitors (DEX/Stealth vs Val and Elle's Passive Perception 12), have all players following them roll, regardless of Proficiency; any critical failures alert the visitors, who gain the upper hand. If the party is successful in their DEX/Stealth check, they choose where and how to engage the bandits. The party gains a surprise round. If the bandits gain the upper hand, they will lead the players into the village center so each has an escape path.
| Val (m) and Elle (f) Medium humanoid (human), Lawful Neutral AC: 16 (Chain Shirt, Shield) Hit Points: 11 (2d8+2) Speed: 30 ft STR 13 (+1) DEX 12 (+1) CON 12 (+1) INT 10 (+0) WIS 11 (+0) CHA 10 (+0) Skills: Perception +2 Senses: Passive Perception 12 Languages: Common CR: 1/8 (25 XP) Proficiency Bonus: +2 Actions Spear. Melee Attack: +3 to hit, reach 5ft or range 20/60 ft, one target. Hit: 4 (1d6+1) piercing, or 5 (1d8+1) piercing if used with two hands to make a melee attack. Dagger. Melee Attack: +3 to hit, reach 5ft or range 20/60 ft, one target. Hit: 4 (1d4+1) piercing. These NPCs are based on the Guard in the Basic Rules. |
| Mylo (m), Arlo (f), Pola (m), and Isa (f) Medium humanoid (human), Lawful Neutral AC: 12 (Leather armor) Hit Points: 11 (2d8+2) Speed: 30 ft STR 11 (+0) DEX 12 (+1) CON 12 (+1) INT 10 (+0) WIS 10 (+0) CHA 10 (+0) Senses: Passive Perception 10 Languages: Common CR: 1/8 (25 XP) Proficiency Bonus: +2 Actions Dagger. Melee Attack: +3 to hit, reach 5ft or range 20/60 ft, one target. Hit: 4 (1d4+1) piercing. These NPCs are based on the Bandit in the Basic Rules. |
Any enemy reduced to one quarter hit points (3 or less) will Disengage and attempt to flee. Any bandit who is killed or knocked unconscious can be searched. The Chain Shirts (AC 13, sized for a human or similar) can be sold for 25gp each. The spears are normal and can be sold for a total of 1gp. The Leather Armor (AC 11, sized for a human or similar) can be sold for 5gp each. All daggers are normal and can be sold for 1gp each. Val or Elle has a coin purse with 127SP and 78CP. They each carry 5SP and 12CP.
If the party searches or interrogates any survivors, they can fnid or learn:
| Skill | DC | Information |
| WIS/Perception or INT/History or INT/Investigation | 10 | Val or Elle carries a scroll on which is kept a tally of "Rents Collected." All locations are north of Calder Village. |
| 12 | Some coins are from the city of Frostmont to the north of Calder Village | |
| WIS/Medicine or INT/Nature | 10 | One of the Bandits carries tea leaves known to treat cold and flu symtoms. |
| CHA/Intimidation or INT/Investigation | 12 | Identity of Gnirk and Gnark |
| 15 | Location of Gnirk and Gnark |
Calder has a Village Watch, but does not have a prison. The party can choose to escort any prisoners to Frostmont to be turned over to the City Watch. They will not slow their travel time. There is nowhere to sell any of the equipment taken from the bandits. The villagers tell them that Frostmont has many places to buy and sell adventuring equipment. If any of the bandits escaped the encounter in Calder Village, they will make their way to Frostmont at half speed. Each day of the week-long trip, check if the party catches up to them (50% chance). The bandit(s) will have recovered 1 hit point per day, but will not attack regardless of their strength. The party must decide if they will take them into custody or leave them on the road.
Character Advancement
At the conclusion of Part One, the players have completed one Minor Milestone. They can safely take a long rest in Calder Village if needed.
Part Two: Heading North
Calder Village is the farthest south on the collection route of Val and Elle’s scroll; they are not expected back in Frostmont for at least two weeks. A direct route only takes one. Salellan and Malellan are paternal twin half-elves who patrol the southern road into Frostmont on behalf of Gnirk and Gnark. They follow travelers, listening in on campsite conversations, trying to find out if they pose a threat to business. Unfortunately for our party, they are seen as a threat. Salellan and Malellan will lie in wait for the party to arrive, attacking once each on a surprise round with their longbows. They will target the members of the party who look to be the strongest or most well-protected. If possible, they will attempt a second round of range attacks. They will then move into melee multiattacking with their shortswords.
| Salellan (m) and Malellan (f) Medium humanoid (half-elf), Lawful Neutral AC: 13 (Leather Armor) Hit Points: 16 (3d8+3) Speed: 30 ft STR 11 (+0) DEX 14 (+2) CON 12 (+1) INT 11 (+0) WIS 13 (+1) CHA 11 (+0) Skills: Stealth +6, Nature +4, Perception +5, Survival +5 Languages: Common CR: 1/2 (100 XP) Proficiency Bonus: +2 Keen Hearing and Sight. The scout has advantage on WIS/Perception checks that rely on hearing or sight. Actions Multiattack. The scout makes two melee attack or two ranged attacks per turn. Shortsword. Melee Attack: +4 to hit, reach 5ft, one target. Hit: 5 (1d6+2) piercing. Longbow. Ranged Attack: +4 to hit, range 150/600 ft, one target. Hit: 6 (1d8+2) piercing. These NPCs are based on the Scout in the Basic Rules. |
If either is reduced to one quarter hit points (4), they will Disengage and attempt to flee. If they get at least 100 ft away from the party, they can make a DEX/Stealth check to hide. If either (or both) is killed or knocked unconscious, they can be searched. The leather armor (AC 11, sized for a half-elf or similar) can be sold for 5gp each. Their shortswords and longbows are normal and can be sold for 5gp and 25gp each respectively. They carry 24 arrows, 5GP and 12SP each. Neither Salellan nor Malellan have any loyalty to Gnirk and Gnark; they are simply hired help. If the party interrogates any survivors, they can learn:
| Skill | DC | Information |
| CHA/Intimidation or INT/Investigation | 12 | Identity of Gnirk and Gnark |
| 15 | Location of Gnirk and Gnark |
If the party chooses to escort them, along with any bandit(s), to Frostmont, the half-elves will try to escape during the encounter with the Swarm of Insects. If they get at least 100 ft away from the party, they can make a DEX/Stealth check to hide. Unknown to the party, neither will attempt to contact Gnirk and Gnark, so their escape is no danger to the party.
Part Two (Continued): On the Road
The week-long trip north is the opportunity to have a random encounter. It can occur before or after the encounter with Salellan nor Malellan, but the party should have the benefits of a long rest before each. For the sake of simpleness and time, this additional encounter should be short and take the party no more than two rounds.
| Swarm of Insects Medium Beast, Unaligned AC: 12 (natural armor) Hit Points: 22 (5d8) Speed: 20 ft, climb 20 ft STR 3 (-4) DEX 13 (+1) CON 10 (+0) INT 1 (-5) WIS 7 (-2) CHA 1 (+5) Damage Resistances: Bludgeoning, Piercing, Slashing Condition Immunities: Charmed, Frightened, Grappled, Paralyzed, Petrified, Prone, Restrained, Stunned Senses: Blindsight 10 ft Languages: - CR: 1/2 (100 XP) Proficiency Bonus: +2 Swarm. The swarm can occupy another creature’s space and vice versa, and the swarm can move through any opening large enough for a Tiny insect. The swarm can’t regain hit points or gain temporary hit points. Actions Bite. Melee Attack: +3 to hit, reach 0ft, one target in the swarm’s space. Hit: 10 (4d4) piercing, or 5 (2d4) piercing if the swarm has half of its hit points of fewer. |
Part Three: The Bronze Mace
Gnirk and Gnark are half-orcs who took advantage of the disappearance of the monks at Calder Abbey and expanded their protection ring to include Calder Village. If the party learn their identities and location from the half-elven twins, they will have no idea the party is coming.
As you enter the Southern District of Frostmont you see a guard post with what appears to be cells. Just beyond the entrance is a large market with shops, smiths, and stalls that appears to be bustling with activity.
| Player's Skill | Gnirk and Gnark's Skill | |
| CHA/Deception | vs | N/A |
| CHA/Intimidation | vs | CHA/Intimidation |
| INT/Investigation | vs | CHA/Intimidation |
| WIS/Perception | vs | N/A |
| CHA/Persuasion | vs | CHA/Intimidation |
| DEX/Stealth | vs | N/A |
Gnirk and Gnark roll together with advantage (e.g., roll four d20+2, keeping the highest result) when rolling against the players. If a player critically fails a Skill attempt in something Gnirk and Gnark have no opposing skill in (e.g., WIS/Perception), Gnirk and Gnark can roll simple CHA/Intimidation (DC 10) checks to see if word reaches them. Gnirk and Gnark are known thugs around Frostmont, but they keep business private. They can be found at The Bronze Mace, a tavern only a few blocks away. Anyone the party asks points Gnirk and Gnark out. If they are not expecting the party, they will be seated at their usual table talking to the patrons and sharing drinks. Unless the party takes their time approaching, they will not have an opportunity to load and fire their crossbows and will address the party: "Who are you?" If they are expecting the party, they will be seated at their usual table alone, their loaded crossbows on the table. As soon as the party approaches their table, the half-orcs fire at two random members and then enter melee.
|
Gnirk and Gnark
Medium humanoid (half-orc), Lawful Neutral
AC: 11 (Leather Armor)
Hit Points: 32 (5d8+10)
Speed: 30 ft
STR 15 (+2) DEX 11 (+0) CON 14 (+2) INT 10 (+0) WIS 10 (+0) CHA 11 (+0) Skills: Intimidation +2 Languages: Common, Orcish CR: 1/2 (100 XP) Proficiency Bonus: +2 Pack Tactics. The thug has advantage on an attack roll against a creature if at least one of the thug’s allies is within 5 feet of the creature and the ally isn’t incapacitated. Actions Multiattack. The thug makes two melee attacks. Mace. Melee Attack: +4 to hit, reach 5ft, one creature. Hit: 5 (1d6+2) bludgeoning. Heavy crossbow. Ranged Attack: +2 to hit, range 100/400 ft, one target. Hit: 5 (1d10) piercing. These NPCs are based on the Thug in the Basic Rules. |
All patrons of The Bronze Mace will run out of the tavern, or take cover, as soon as melee begins. Gnirk and Gnark will make every attempt to stay within five feet of each other to take advantage of Pack Tactics, even if this means delaying their turn/action. If Gnirk and/or Gnark is killed or subdued, they can be searched. Their maces are normal and can be sold for 5gp total; their heavy crossbows are normal and can be sold for 25gp each. They have one Bag of Holding (with 114GP, 286SP, and 76CP) and carry 5 (or 4) crossbow bolts each. Word can be sent to the City Watch and Gnirk and Gnark will be arrested. Unknown to the party, their arrest, as well as that of the bandits left at the guard house, is all for show and eventually the half-orcs will come back to seek revenge.
Character Advancement
The author uses milestones for advancement and requires one major (or three minor) milestone each for advancement to level 2 through level 4. At this point, the characters are ready to advance to level 2. The party can safely rest in the Western District of Frostmont, finding training and equipment.
Where to Now?
Word of the party’s exploits has reached Boustead Village. While training in the Western District of Frostmont, they are approached by representatives with a mission: Find an expedition that has disappeared looking for the source of the River Eden.
Story Overview
The inhabitants of the Western Lands have always enjoyed the benefits of the River Eden. A few have tried to find its source, but the dense Western Forest has prevented them from succeeding. With the recent settlement of Boustead Village, more have gone in search of the source. All have eventually returned until now.
Adventure Summary
While training in Frostmont, the party is approached by representatives of Boustead Village. Word of the party’s victory over Gnirk and Gnark is becoming known. The party is approached to locate a missing expidition, which leads them into the Feywild.
Setup and Starting Points
There should be nothing special required to establish why the characters are in Frostmont; they are completing their training after the encounter with Gnirth and Gnarth.
Read the Story Overview to the players and then explain that a group of ten, led by Terth Nightore and Loti Hama, left Boustead about a month ago to search for the source of the River Eden. Every few days, a message would arrive by animal updating the village of the group’s progress. A week ago, the messages stopped. The final message read: “Found a grove that doesn’t belong. Animals strange, too. Hope to find reason for being here. Tomorrow might be the day. Will update tomorrow.” The representatives offer to pay the party’s daily expenses if they accept, as well as a reward for the safe return of Terth Nightore and Loti Hama.
Although not the reason for being hired, if the party is able to locate the source of the River Eden, it would settle a long-standing mystery of the peninsula.
A Word on Treasure and Rewards
The GM will find no mention of specific treasure or rewards in any of the following encounters; there is no logical reason for there to be any to be found. However, the time spent in the Feywild should be used to equip the characters with whatever their needs might be for the next two or three levels. Material components should be easily found; wonderous items and magical weapons or armor should be provided to them through Feywild NPCs. The only rewards the characters should not receive are monetary, excluding occasional gems.
Prologue
Travel from Frostmont to Boustead takes five days by foot, or three days by horse. The trip is along friendly roads and should be uneventful. This can, however, be a good time for the players to discuss and familiarize themselves with the new skills they learned while training in Frostmont. A minor random encounter on one night of the journey would be appropriate.
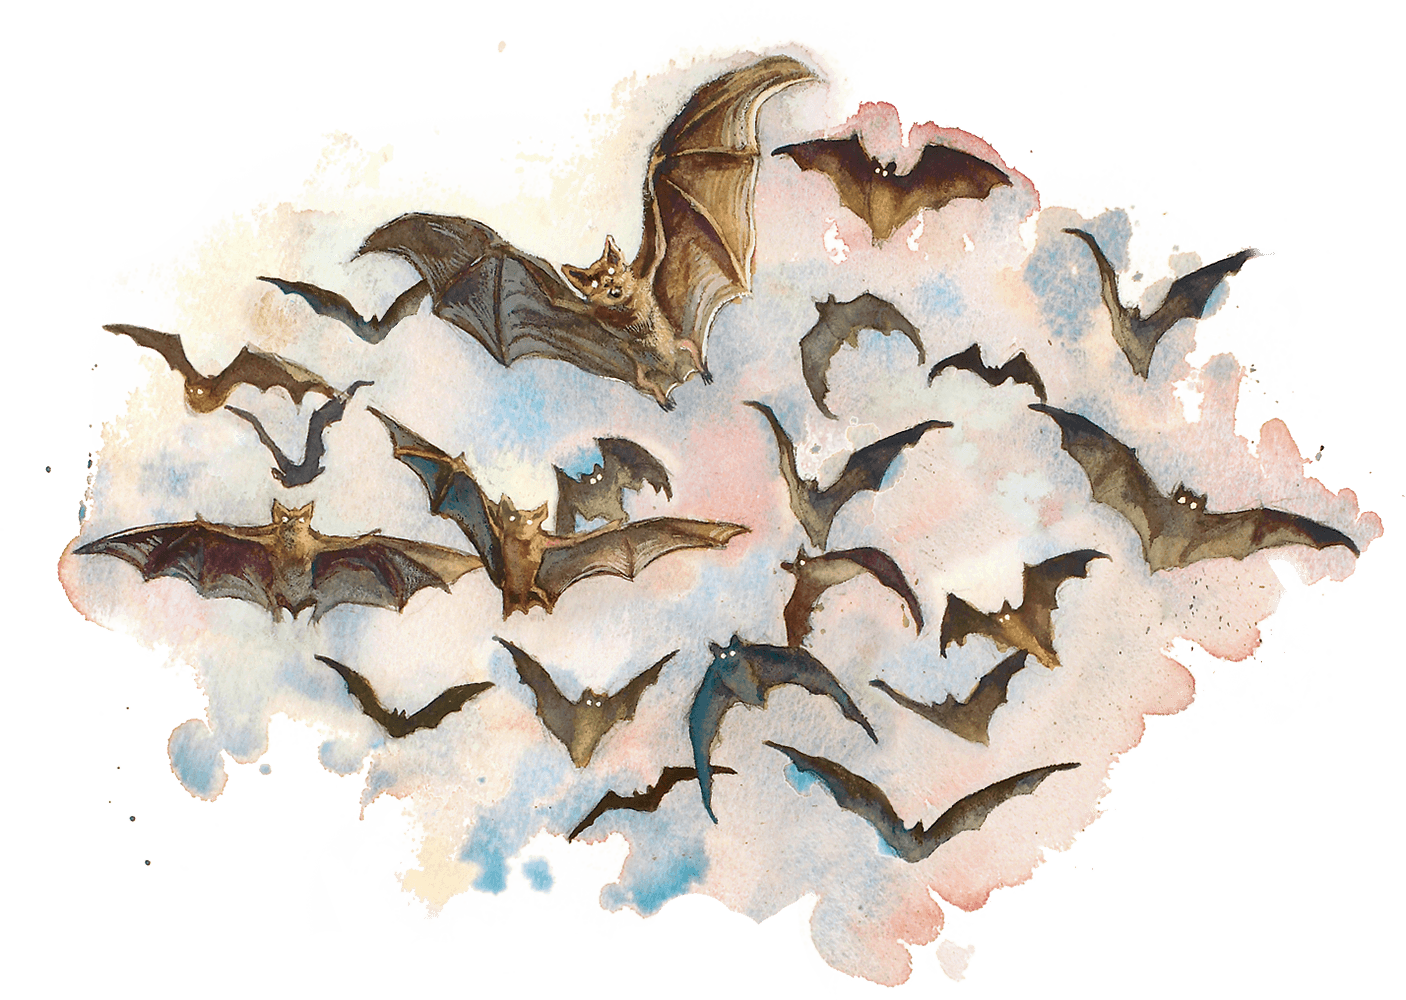
| Swarm of Bats (x2) Medium Beast, Unaligned AC: 12 (natural armor) Hit Points: 22 (5d8) Speed: 0 ft, fly 30 ft STR 5 (-3) DEX 15 (+2) CON 10 (+0) INT 2 (-4) WIS 12 (+1) CHA 4 (-3) Damage Resistances: Bludgeoning, Piercing, Slashing Condition Immunities: Charmed, Frightened, Grappled, Paralyzed, Petrified, Prone, Restrained, Stunned Senses: Blindsight 60 ft Languages: - CR: 1/4 (50 XP) Proficiency Bonus: +2 Echolocation. The swarm can’t use its blindsight while deafened. Keen Hearing. The swarm has advantage on Wisdom (Perception) checks that rely on hearing. Swarm. The swarm can occupy another creature’s space and vice versa, and the swarm can move through any opening large enough for a Tiny insect. The swarm can’t regain hit points or gain temporary hit points. Actions Bite. Melee Attack: +4 to hit, reach 0ft, one target in the swarm’s space. Hit: 5 (2d4) piercing, or 2 (1d4) piercing if the swarm has half of its hit points or fewer. |
Part One: How Do We Get There?
Once the party reaches Boustead Village, they are able to learn details about the expedition. All of the previous messages were written down, providing a rough log of the three weeks of exploration. The details of the messages are unimportant, but if players ask, there are a dozen messages (four per week). The first speaks directly about entering the forest, the rest mention random information about trees and animals. The final message reads: “Found grove that doesn’t belong. Animals strange, too. Hope to find the reason it’s here. Tomorrow might be the day. Will update tomorrow night.” Any character with Proficiency in INT/History (maps) or INT/Nature or WIS/Perception or WIS/Survival can make a check (DC 10) to notice immediately that the party appears to have spent much of their time traveling in circles. Thinking about their own recent travels, the trip from Calder to Frostmont took a week; the trip from Frostmont to Boustead took five days. The trip from Boustead to the presumed source of the River Eden should have taken two days, three at most. What was the expedition doing for three weeks? When the party finally decides to set out into the Western Forest, the journey should be played as a Skills Challenge (The rules for Skills Challenges can be found in the Introduction to Islemont). The party must declare if they are searching for the missing expedition or the source of the River Eden. In terms of the adventure, their decision makes little difference. The missing expedition is charmed by minor fey in the grove they referred to in their last message. The grove is also the source of the River Eden. The declaration should influence their actions during the Skills Challenge. Let each player suggest a specific Skill and how it progresses the party towards their goal. There is no right or wrong action, only successes and failures. The party must achieve the target number (party members plus three) of successful Skill checks (DC 12) before getting three (3) unsuccessful Skill checks.
Part Two: Are We Sure This Is the Place?
Win or lose the Skills Challege, the party will come upon a grove of trees that is obviously out of place. The species are wrong; their ages are wrong. Nothing about them is right. If the party fails at the Skills Challenge, each member suffers one level of exhaustion (Disadvantage on ability checks until the party finishes a long rest). Additionally, their final action alerts the minor fey inside the grove to their presence. As they reach the outskirts of the grove, the party sees and hears what appears to be a group of ten people in a makeshift campsite. If the party calls out to the group, they get no response. An INT/Nature check (DC20) will reveal the grove’s origin: fey.
If the party chooses to enter the campsite, read them the following:
As you enter the grove, you pass through a shimmering veil you didn't seem to notice before, a clearing reveals itself. At the center is a spring feeding a pool about twenty-five feet across; a stream flows from the pool. The flora seems to have an otherworldly nature. The missing expedition becomes clearly visible: Terth Nightore and Loti Hama are sitting on the ground around an unlit campfire, while the other members are going about pantomiming normal campsite duties.
Terth, Loti, and the rest of the expedition are charmed. The Dryads will break their Charm on the expedition and attempt to Fey Charm Terth, Loti, and the party. The other members of the expedition immediately flee the grove. The Dryads do not wish to fight. If they are able to charm any members of the party, they speak to the party, using anyone who is charmed to encourage everyone to leave the grove. If the party chooses to leave voluntarily, the Dryads break their Charm on everyone. A Spring Eladrin will emerge from the spring, introduce himself as Ælfspring, and tell the history of the grove (presented on page 12). He will then invite them into the Feywild. If the party chooses to attack the Dryads, Terth and Loti (if they succeed in resisting the Fey Charm) will join the party in fighting the Dryads and Sprites.
| Terth Nightore (m) and Loti Hama (f) Medium humanoid (human), Neutral Good AC: 11 (15 with breastplate) Hit Points: 9 (2d8) Speed: 30 ft STR 11 (+0) DEX 12 (+1) CON 11 (+0) INT 12 (+1) WIS 14 (+2) CHA 16 (+3) Skills: Insight +4, Investigation +5, Persuasion +5 Senses: Passive Perception 12 Languages: Common CR: 1/8 (25 XP) Proficiency Bonus: +2 Actions Rapier. Melee Attack: +3 to hit, reach 5ft, one target. Hit: 5 (1d8+1) piercing. Reactions. Parry. The noble adds 2 to its AC against one melee attack that would hit it. To do so, the noble must see the attacker and be wielding a melee weapon. These NPCs are based on the Noble in the Basic Rules. |
| Commoner (8) Medium humanoid (human), Lawful Neutral AC: 10 Hit Points: 4 (1d8) Speed: 30 ft STR 10 (+0) DEX 10 (+0) CON 10 (+0) INT 10 (+0) WIS 10 (+0) CHA 10 (+0) Senses: Passive Perception 10 Languages: Common CR: 0 (10 XP) Proficiency Bonus: +2 Actions Knife. Melee Attack: +2 to hit, reach 5ft, one target. Hit: 1 (1d2) piercing. |
The four Sprites emerge from the spring on their individual turns in the initiative order. They attack with their Shortbows, attempting to put the party to sleep. The number of Sprites and presence of the Satyrs is dependent on the strength of the party. If the party remains uncharmed and overcomes the initial four Sprites early in the encounter, the GM can bring a second wave of Sprites into melee. The same with the individual Satyrs, introducing one or both if necessary.

| Dryad (2) Medium fey, Neutral AC: 11 (16 with Barkskin) Hit Points: 22 (5d8) Speed: 30 ft STR 10 (+0) DEX 12 (+1) CON 11 (+0) INT 14 (+2) WIS 15 (+2) CHA 18 (+4) Skills: Perception 14, Stealth +5 Senses: Darkvision 60ft, Passive Perception 14 Languages: Elvish, Sylvan CR: 1 (200 XP) Proficiency Bonus: +2 Innate Spellcasting. The dryad's innate spellcasting ability is Charisma (spell save DC 14). The dryad can innately cast the following spells, requiring no material components: At will: druidcraft 3/day each: entangle, goodberry 1/day each: barkskin, pass without trace, shillelagh Magic Resistance. The dryad has advantage on saving throws against spells and other magical effects. Speak with Beasts and Plants. The dryad can communicate with beasts and plants as if they shared a language. Tree Stride. Once on her turn, the dryad can use 10 feet of her movement to step magically into one living tree within her reach and emerge from a second living tree within 60 feet of the first tree, appearing in an unoccupied space within 5 feet of the second tree. Both trees must be Large or bigger. Actions Club. Melee Weapon Attack: +2 to hit (+6 to hit with shillelagh), reach 5 ft., one target. Hit: 2 (1d4) bludgeoning damage, or 8 (1d8 + 4) bludgeoning damage with shillelagh. Fey Charm. The dryad targets one humanoid or beast that she can see within 30 feet of her. If the target can see the dryad, it must succeed on a DC 14 Wisdom saving throw or be magically charmed. The charmed creature regards the dryad as a trusted friend to be heeded and protected. Although the target isn't under the dryad's control, it takes the dryad's requests or actions in the most favorable way it can. Each time the dryad or its allies do anything harmful to the target, it can repeat the saving throw, ending the effect on itself on a success. Otherwise, the effect lasts 24 hours or until the dryad dies, is on a different plane of existence from the target, or ends the effect as a bonus action. If a target's saving throw is successful, the target is immune to the dryad's Fey Charm for the next 24 hours. The dryad can have no more than one humanoid and up to three beasts charmed at a time. |
| Sprite (4-8) Tiny fey, Neutral Good AC: 15 (Leather Armor) Hit Points: 2 (1d4) Speed: 10 ft, fly 40ft STR 3 (-4) DEX 18 (+4) CON 10 (+0) INT 14 (+2) WIS 13 (+1) CHA 11 (+2) Skills: Perception +3, Stealth +8 Senses: Passive Perception 13 Languages: Common, Elvish, Sylvan CR: 1/4 (50 XP) Proficiency Bonus: +2 Actions Longsword. Melee Attack: +2 to hit, reach 5ft, one target. Hit: 1 slashing. Shortbow. Ranged Attack: +5 to hit, range 80/320ft, one target. Hit: 6 (1d6+3) piercing, and the target must succeed on a DC 10 Constitution saving throw or become poisoned for 1 minute. If its saving throw result is 5 or lower, the poisoned target falls unconscious for the same duration, or until it takes damage or another creature takes an action to shake it awake. Heart Sight. The sprite touches a creature and magically knows the creature's current emotional state. If the target fails a DC 10 Charisma saving throw, the sprite also knows the creature's alignment. Celestials, fiends, and undead automatically fail the saving throw. Invisibility. The sprite magically turns invisible until it attacks or casts a spell, or until its concentration ends (as if concentrating on a spell). Any equipment the sprite wears or carries is invisible with it. |

| Satyr (0-2) Medium fey, Chaotic Neutral AC: 14 (Leather Armor) Hit Points: 31 (7d8) Speed: 40 ft STR 12 (+1) DEX 16 (+3) CON 11 (+0) INT 12 (+1) WIS 10 (+0) CHA 14 (+2) Skills: Perception +2, Performance +6, Stealth +5 Senses: Passive Perception 12 Languages: Common, Elvish, Sylvan CR: 1/2 (100 XP) Proficiency Bonus: +2 Magic Resistance. The satyr has advantage on saving throws against spells and other magical effects. Actions Ram. Melee Attack: +3 to hit, reach 5ft, one target. Hit: 6 (2d4+1) bludgeoning. Shortsword. Melee Attack: +5 to hit, reach 5ft, one target. Hit: 6 (1d6+3) piercing. Shortbow. Ranged Attack: +5 to hit, range 80/320ft, one target. Hit: 6 (1d6+3) piercing. |


The Dryads will not fight to the death. They are bound to the trees of the grove and will move to a place of safety until they can return. When the first Dryad becomes bloodied (reduced to 11 HP or fewer), they will both immediately Tree Stride as a Bonus Action, ending their Charm on all affected characters. Any Sprites and Satyrs involved in the encounter will immediately disengage from combat. As soon as the Dryads Tree Stride, a Spring Eladrin (details presented in Part Three: Can’t We Just Stay Here?) will emerge from the spring. Each member of the party must make a DC16 Wisdom saving throw against Joyful Presence. Terth and Loti will fail their saving throws. Those who fail are Charmed for one minute. Those who succeed are immune for 24 hours. The Eladrin introduces himself as Ælfspring and explains that he is not here to fight. If the party agrees, he will break his Charm and tells the history of the grove, and answers honestly any questions they ask. It is up to the party to decide if they believe him.
The Grove of Eden Created by Eladrin who wished to nourish Islemont when it was still an island, the Grove of Eden is as ancient as the land itself. At the center of the grove is a spring that is the source of the River Eden. The spring is also a gateway to the Feywild, allowing passage between realms. When intelligent creatures began to settle the land, two dryads volunteered to protect the grove. As time passed and centuries became eons, the grove came under threat and needed to be hidden. Greater Fey came through the spring and caused the great Western Forest to grow, imbuing it with the ability to renew itself as needed. If any intelligent creatures managed to locate the grove, the dryads charmed them, eventually sending them back into the forest and to their homes. With the establishment of Boustead, the number and frequency of visitors increased. The Eladrin who created the grove have decided Dryad protection is no longer enough and a permanent solution is needed.
Ælfspring then offers the party the opportunity to redeem themselves by entering the Feywild and retrieving a Feywild Shard to ensure the safety of the Grove. If they agree, he asks them to follow him into the pool and through the spring, explaining it is a portal into the Feywild. If the party attacks, he will defend himself and attempt to subdue the party. The Sprites and Satyrs can return to melee if necessary to subdue the party. Once subdued, Ælfspring explains the history of the grove, but does not offer them entry into the portal. He disappears through the portal and it closes behind him.
If the party attacked Ælfspring, Part Three and Part Four should be skipped. The party will need to make its way back to Boustead with Terth and Loti.
| Ælfspring (Spring Eladrin) Medium fey (elf), Chaotic Neutral AC: 19 (natural armor) Hit Points: 127 (17d8+51) Speed: 30 ft STR 14 (+2) DEX 16 (+3) CON 16 (+3) INT 18 (+4) WIS 11 (+0) CHA 18 (+4) Skills: Deception +8, Persuasion +8 Damage Resistances: bludgeoning, piercing, and slashing from nonmagical attacks Senses: Darkvision 60ft, Passive Perception 10 Languages: Common, Elvish, Sylvan CR: 10 (5,900 XP) Proficiency Bonus: +4 Joyful Presence. Any non-eladrin creature that starts its turn within 60 feet of the eladrin must make a DC 16 Wisdom saving throw. On a failed save, the creature is charmed for 1 minute. On a successful save, the creature becomes immune to any eladrin’s Joyful Presence for 24 hours. Actions Multiattack. The eladrin makes two weapon attacks. The eladrin can cast one spell in place of one of these attacks. Longsword. Melee Attack: +6 to hit, reach 5ft, one target. Hit: 6 (1d8+2) slashing plus 4 (1d8) psychic, or 7 (1d10+2) slashing plus 4 (1d8) psychic is used with two hands. Longbow. Ranged Attack: +7 to hit, range 150/600 ft, one target. Hit: 7 (1d8+3) piercing plus 4 (1d8) psychic. |

Part Three: Can’t We Just Stay Here?
The party emerges from the portal into what appears to be the same grove they were in. Immediately, everyone notices the differences: the colors are more vibrant, the sounds are more melodic, the smells are more pleasing. They are in the Feywild, a realm where the senses can easily become overwhelmed.
"You are here at my invitation; none will tempt or harm you. You are free to collect any flora you see. You are welcome to keep any enchanted items you find. Any offers to enchant your belongings can be accepted in good faith." "If during your explorations, you find yourself wishing to stay here, your are welcome. We can speak again when you return with the shard." He gives two words of warning, "Those who are not strong of mind can become entrapped by the wonders of the Feywild, losing themselves. Do not harm any fauna you encounter or you forfeit your right to return to your natural realm."

While the party explores the Feywild, they can collect material components, find wondrous items, be given magical armor and weapons, etc. for their future needs. Although the characters are level 2, they will reach level 3 at the end of their exploration and need to be properly equipped to battle the Green Hag. As the GM, you set the rules for your world, but two rare items or one rare and two uncommon items per character would be appropriate. Any character of non-evil alignment is welcome to stay in the Feywild, however it should be made clear that the adventure is over for their character, with no possibility of returning. Some players might see this as an opportunity to start over with a new character concept. Once a decision is made on who is returning, Ælfspring will escort the party through the passage back to their native plane. Upon returning to the Grove of Eden, they see Terth and Loti sitting around the unlit campfire. The party retains all memories of their experiences. If asked, Ælfspring will explain that reality and time are different in the Feywild. He then performs the required ritual with the Feywild Shard, explaining that the passage is now closed to all but Fey, with the party being an exception. They are welcome to return anytime they wish.
Character Advancement
The author uses milestones for advancement and requires one major (or three minor) milestone each for advancement to level 2 through level 4. At this point, the characters have completed three minor milestones and should be ready to advance to level 3. This is the logical time to level up all characters, creating new characters if required. The party should all be level 3 before beginning Part Four. Any characters left in the Feywild can return as NPCs if the party ever returns to the Feywild.
Part Four: Trapped on the Material Plan (or Revenge is a Dish Best Served Green)
Remind the players that Terth and Loti are traveling with the party. If new characters are joining to the party, they should be introduced before or during the encounter with the Green Hag. Lala, a Green Hag, was trapped in the Material Plane when Ælfspring closed the grove passage. Although she is Fey, the Feywild Shard used prevents all beings of evil alignment from passing through. Before seeking another passage, she is going to take her revenge.
Throughout the first day of the return journey to Boustead, you hear whispers in the forest. They seem to be the random voices of campers or hunters. As you set out on the second day, the sounds become more distinct. Eventually one of you notices Ælfspring calling to the party from the direction of the grove, but you cannot make out what he is saying over the sounds of the woods.
Ælfspring is a minor illusion about 100 feet away, cast by Lala. Party members with a Passive Insight of 12 or higher see through the illusion. The sounds of his voice are mimicry (DC 14 WIS/Insight). A successful check on either causes both to end for the player. Lala is somewhere within 30 feet of the illusion; she will be invisible. The ravens will be within 50 feet of the party, perched in the trees. Lala’s sole desire is revenge. She has no desire to disguise herself or her intentions. She cannot be bargained with; she will not surrender. She will, however, Disengage and try to escape when bloodied. Lala will avoid the party for as long as possible, inflicting as much damage with Vicious Mockery from a distance as possible until forced to enter melee. Each round, she sends a wave of ravens to attack the party. As soon as the illusion of Ælfspring disappears for the first player, Lala will cast Vicious Mockery (DC12 WIS saving throw, Hit: 3d4 psychic) on a random character. She then sends the first wave of Ravens to attack the party. Terth and Loti will make no attempts to engage Lala; they will simply defend themselves from the ravens attacking them.

| Lala (Green Hag) Medium fey, Neutral Evil AC: 17 (natural armor) Hit Points: 82 (11d8+33) Speed: 30 ft STR 18 (+4) DEX 12 (+1) CON 16 (+3) INT 13 (+1) WIS 14 (+2) CHA 14 (+2) Skills: Arcana +3, Deception +4, Perception +4, Stealth +3 Senses: Darkvision 60ft, Passive Perception 14 Languages: Common, Draconic, Sylvan CR: 3 (700 XP) Proficiency Bonus: +2 Amphibious. The hag can breathe air and water. Innate Spellcasting. The hag’s innate spellcasting ability is Charisma (spell save DC 12). She can innately cast the following spells, requiring no material components: At will: dancing lights, minor illusion, vicious mockery (3d4 psychic) Mimicry. The hag can mimic animal sounds and humanoid voices. A creature that hears the sounds can tell they are imitations with a successful DC 14 Wisdom (Insight) check. Actions Claws. Melee Attack: +6 to hit, reach 5 ft., one target. Hit: 13 (2d8 + 4) slashing. Illusory Appearance. The hag covers herself and anything she is wearing or carrying with a magical illusion that makes her look like another creature of her general size and humanoid shape. The illusion ends if the hag takes a bonus action to end it or if she dies. The changes wrought by this effect fail to hold up to physical inspection. For example, the hag could appear to have smooth skin, but someone touching her would feel her rough flesh. Otherwise, a creature must take an action to visually inspect the illusion and succeed on a DC 20 Intelligence (Investigation) check to discern that the hag is disguised. Invisible Passage. The hag magically turns invisible until she attacks or casts a spell, or until her concentration ends (as if concentrating on a spell). While invisible, she leaves no physical evidence of her passage, so she can be tracked only by magic. Any equipment she wears or carries is invisible with her. |
| Raven (1 per player per round) Tiny Beast, Unaligned AC: 12 Hit Points: 1 (1d4-1) Speed: 10 ft, fly 50 ft STR 2 (-4) DEX 14 (+2) CON 8 (-1) INT 2 (-4) WIS 12 (+1) CHA 6 (-2) Skills: Perception +3 Languages: -- CR: 0 (10 XP) Proficiency Bonus: +2 Mimicry. The raven can mimic simple sounds it has heard, such as a person whispering, a baby crying, or an animal chittering. A creature that hears the sounds can tell they are imitations with a successful DC 10 Wisdom (Insight) check. Actions Beak. Melee Attack: +4 to hit, reach 5ft, one target. Hit: 1 piercing. |
The third day of the trip back to Boustead is uneventful.

Epilogue
As the party enters the outskirts of Boustead, they are greeted by the villagers in ones and twos. Quickly word spreads of the return of Terth and Loti and soon the entire village surrounds them. Terth and Loti, who only experienced the battle with the Dryads and Lala, know nothing of the exploration of the Feywild. They relate disjointed stories of a spring, a battle with fairies, and a magic ritual. When pressed, they are unable to account for the month they have been gone. The village leaders turn to the party, thanking them for the safe return of the expedition. They then ask if the party can shed any light on the mystery. Nothing the party tells the leaders will endanger the grove, the spring, or the passage, so the decision is up to the characters. As promised, the village leaders give the party their reward: 50gp each and the offer to stay in the village for two weeks.
Character Advancement
The author uses milestones for advancement and requires one major (or three minor) milestone each for advancement to level 2 through level 4. If the party traveled to the Feywild and defeated Lala, the characters have completed one major milestones and should be ready to advance to level 4. From here, the GM should run A Servant of Shar. If the players attacked Ælfspring, they have completed two Minor Milestones and can advance to Level 3. From here, the GM should run Let's Play Catchup. Although Boustead is a small village, its inhabitants can assist the characters in their training. The party can stay in the village for free for up to two weeks. If the party chooses to stay longer than that, staying will cost according to their chosen Lifestyle.
Let's Play Catchup
They attacked the Spring Eladrin? After fighting two Dryads? And four Sprites? And maybe a Satyr or two? At level two? What were they thinking? And you may ask yourself, "Well... how did I get here?" And you may ask yourself, "How do I work this?" And you may ask yourself, "Am I right? Am I wrong?" And you may say to yourself, "My God! What have I done?" Okay, what's done is done. Now you have to run a catchup encounter to try and get the party's advancement and equipment back on track. Otherwise, the next adventure is going to kill them all.
Story Overview
The party decided to attack when they should have yielded, completely blowing the campaign off the rails. Now the GM has to figure out how to get things back on track for both Character Advancement and equipment rewards, without it looking like deus ex machina. Luckily, we can buff Lala up to an Auntie and put her into a lair. The players will fight a tougher challenge and we can justify them finding rewards.
Adventure Summary
The party screwed up last time, so getting their equipment isn't going to be easy. A near TPK isn't the right idea, but just giving them the stuff won't work either. They're going to have to work for it.
Setup and Starting Points
The party was in Boustead recovering from the encounter with Ælfspring and training for level 3, so that's where things should pick up. Since the party was not able to be outfitted in the Feywild, they should be encouraged to spend some of their time during training trying to create items to prepare for upcoming encounters. The inhabitants of Boustead can provide enough materials to cut the cost of potions in half. Any character with proficiency with the Herbalism Kit can craft a Potion of Healing (2d4+2). Materials will cost 12GP, 5SP each and take one day per potion; the party can craft a maximum of five total.
Any character with proficiency with Carpenter's or Smith's Tools can craft a shield for free. Enchanting a common or uncommon item will require 1d4 days and a spellcaster with knowledge of the applicable spell (e.g., Protection or Shield for +1, etc.). Any character with proficiency with Weaver's Tools can craft a cloak or robe for free. Enchanting a common or uncommon item will require 1d4 days and a spellcaster with knowledge of the applicable spell (e.g., Enhance Ability for Elvenkind; Shield for Protection; etc.). No more than one item can be enchanted for each character.
Getting Things Started
You have spent the last few weeks in Boustead Village recovering from your encounter with the Dryads and Ælfspring. You have also taken advantage of the time to train and prepare for the future. During your time here, Boustead has begun to be visited by ravens each night. At first, they came in ones or twos, but now they are in groups of six to eight. The residents try to hide it, but they are getting worried.
Any player making a WIS/Nature (DC 10) check recognizes the ravens have something special to them. A DC15 check identifies it as a greenish hue in their feathers. Everyone notices that the ravens always come from the same direction, the Western Forest. The DC15 also reveals that the ravens arrive at sunset each night, roost on the roof of a different building or house, and depart at sunrise. On their last departure, their calls changed from typical caws to the mimicked sounds of a baby crying. If the party investigates, they will find that the house where the ravens spent the previous night belongs to Häs and Kisi Samosk, and their one-week old daughter Talsi. She is the first child born in Boustead in the past six months.
Häs is an extremely proud father. Kisi's pregnancy is what prompted them to leave Barrmont: "It just didn't feel safe anymore. But that's a conversation for another time. Right now I'm worried about the noise the ravens were making all night. When they first landed on my roof, they were making the normal caws that all ravens made, but as the night went on, their calls started to change. By the time the sun came up, I couldn't tell the difference between the cries coming from Talsi and the cries coming from the birds. I can't express the relief I felt when they finally left."
You have allowed your players to create Healing Potions for half price. You have also allowed them to create a cloak, shield, or other item of protection for free. You have told them there is a newborn baby in the village; there are ravens very interested in it; and that they were last seen leaving the village mimicking its cry. Hopefully, you have piqued their interest enough and don't have to talk the players into investigating. If the players express no interest in investigating the ravens, have an NPC run into the village mumbling something about seeing an ugly old woman (an Illusory Duplicate of Auntie Lala) about two days' journey from the village.
Off to Auntie Lala's
Green Hag Lair Regional Effects
Each hag's lair is the source of three to five regional effects; the home of a grandmother, an auntie, or a coven has more effects than the lair of a single hag, including some that can directly harm intruders. Any regional effect that requires a creature to make a saving throw uses the save DC of the hag's most powerful ability. These effects either end immediately if the hag dies or abandons the lair, or take up to 2d10 days to fade away.
A powerful green hag creates one or more of the following additional regional effects within 1 mile of her lair:
|
| Awakened Tree (1-2) Huge plant, unaligned AC: 13 (natural armor) Hit Points: 59 (7d12 + 14) Speed: 20 ft. STR 19 (+4) DEX 6 (-2) CON 15 (+2) INT 10 (+0) WIS 10 (+0) CHA 7 (-2) Damage Vulnerabilities: fire Damage Resistances: bludgeoning, piercing Senses: passive Perception 10 Languages: one language known by its creator CR: 2 (450 XP) Proficiency Bonus: +2 False Appearance. While the tree remains motionless, it is indistinguishable from a normal tree. Actions Slam. Melee Attack: +6 to hit, reach 10 ft., one target. Hit: 14 (3d6+4) bludgeoning. |
The third day of the trip is when the party begins to encounter a growing number of ravens and the Illusory Duplicates of Auntie Lala. She will appear to them as various friendly-looking humanoids of medium size, interacting with them trying to find out why they are in the Western Forest. If they make any mention of the ravens, she says she knows of a possible source and offer to take them, but will actually mislead them around the forest. After walking for about thirty minutes, players with a Passive Insight above 12 automatically notice they are being led in circles. Players with a Passive Insight below 12 can make a WIS/Insight, INT/Nature, WIS/Perception, or WIS/Survival (DC12) check. Any player making a DC15 check on any of the above skills can find their bearings in the forest.
You stop walking and look around. You study the surrounding plants and trees. The branches of some trees fail to move with the wind, as if they are intentionally resisting. You notice the behavior of the animals. Ravens are perched in every tree. Twig fetishes scatter the forest floor. The influence of everything seems stronger to the northwest.
Once the party gets their bearings, they are able to find the entrance to Auntie Lala's lair. An INT/Nature or WIS/Perception check (DC10) will tell the player that the pile is made of the same species as the surrounding forest. A DC15 check will find an opening covered with branches.
You come upon a pile of trees and branches about fifty feet across and twenty feet high. Those on top are newer than those on the bottom, as if the pile gets added to every so often. On one side, there looks to be an opening covered with branches.
Auntie Lala's Lair
An artificial light source will be required unless all characters have darkvision, blindsight, or magical access to something similar. Auntie Lala has darkvision, so uses no artificial light.
As you open the door, you see a tunnel sloping into the darkness. It's hard to tell how far it goes; the daylight fails to penetrate more than about one hundred feet. As you look down the tunnel, you notice no footprints of any kind. The dirt and moss have not been disturbed in years.
The tunnel is ten feet wide and slopes underground for two hundred feet before leveling off and continuing another one hundred. It ends in a wooden door. The door is not locked, but it is trapped with poison darts. The holes in the walls are obscured by dust and moss. With a successful INT/Investigation (DC15) check, a character finds the pressure plate on the ground in front of the door. Wedging something under the plate prevents the trap from activating. Stuffing the holes with cloth or wax prevents the darts from launching. The trap activates when 20 or more pounds of weight is placed onto the pressure plate, releasing four darts. Each dart makes a ranged attack with a +8 bonus against a random target within 10 feet of the pressure plate. A target that is hit takes 2 (1d4) piercing damage and must succeed on a CON (DC15) saving throw, taking 6 (2d6) poison damage on a failed save, or half on a successful one. There is no continuing poison damage. Auntie Lala will be disguised as a female human. Somewhere in the common area will be a raven. Any character with a Passive Perception 15 or greater will notice the raven automatically once the party is inside the lair.
A female human opens the door shortly after you are hit with the darts and in a stilted voice says, "Try remember word." She pauses for what seems almost a minute and finally says "Hello." She moves a paw to her temple as if she is thinking and continues, "Never get visitor. Must take care. Did they hurt?"
If the players avoid the trap and knock on the wooden door, Auntie Lala will answer it:
A female human opens the door and in a stilted voice says, "Try remember word." She pauses for what seems almost a minute and finally says "Hello. Never get visitor. What bring here?"
Auntie Lala will begin to engage in conversation for about two sentences, then realize they are standing in the doorway. She will apologize and invite everyone inside. As soon as the entire party is inside, she will close and magically close and lock the door behind them (STR DC20 to force open). If anyone in the party asks about the door closing or tries to open the door she will blame it on the wind or the age of the building.
| Auntie Lala (Green Hag) Medium fey, Neutral Evil AC: 17 (natural armor) Hit Points: 82 (11d8+33) Speed: 30 ft STR 18 (+4) DEX 12 (+1) CON 16 (+3) INT 13 (+1) WIS 14 (+2) CHA 14 (+2) Skills: Arcana +3, Deception +4, Perception +4, Stealth +3 Senses: Darkvision 60ft, Passive Perception 14 Languages: Common, Draconic, Sylvan CR: 3 (700 XP) Proficiency Bonus: +2 Amphibious. The hag can breathe air and water. Innate Spellcasting. The hag’s innate spellcasting ability is Charisma (spell save DC 12). She can innately cast the following spells, requiring no material components: At will: dancing lights, minor illusion, vicious mockery (3d4 psychic) Mimicry. The hag can mimic animal sounds and humanoid voices. A creature that hears the sounds can tell they are imitations with a successful DC 14 Wisdom (Insight) check. Actions Claws. Melee Attack: +6 to hit, reach 5 ft., one target. Hit: 13 (2d8 + 4) slashing. Illusory Appearance. The hag covers herself and anything she is wearing or carrying with a magical illusion that makes her look like another creature of her general size and humanoid shape. The illusion ends if the hag takes a bonus action to end it or if she dies. The changes wrought by this effect fail to hold up to physical inspection. For example, the hag could appear to have smooth skin, but someone touching her would feel her rough flesh. Otherwise, a creature must take an action to visually inspect the illusion and succeed on a DC 20 Intelligence (Investigation) check to discern that the hag is disguised. Invisible Passage. The hag magically turns invisible until she attacks or casts a spell, or until her concentration ends (as if concentrating on a spell). While invisible, she leaves no physical evidence of her passage, so she can be tracked only by magic. Any equipment she wears or carries is invisible with her. |
Auntie Lala was perfectly happy living in her lair alone, making the occasional trip into the Feywild. When Ælfspring closed the portal, she felt compelled to increase her control over her region of the forest by establishing a coven. After building rooms for the forthcoming children, she began sending ravens into Boustead in search of babies that she could raise into sisters. Talsi is the first she has found. Auntie Lala's Lair is comprised of three chambers: 1) a common room that has had six rooms newly built to house children, 2) her bedroom, and 3) a storage room workshop. The tunnel door enters the common room (a 150ft x 100ft rectangle) twenty-five feet down the southern wall in the southwestern corner. The common area has three large (10ft by 15ft) tables with four chairs each in the center. There are six rooms (25ft x 20ft) in the northeastern corner, accessed through a common hallway ten feet wide and sixty feet long. There is a locked door to the hallway. A locked door in the southeastern corner leads to the storage room (50ft x 50ft). The bedroom (80ft x 125ft) is accessed through an archway (30ft wide) on the northern wall up stone steps. It has two levels: the lower is 60ft x 50ft, the upper is 80ft x 50ft on the north end; there are stone steps (60ft x 25ft) leading from the lower level to the upper. The remainder is a balcony on the upper level along the west and east walls. There are no sources of artificial illumination. A map of the lair is available in Appendix A: Maps. Auntie Lala stays in the human disguise, slowly becoming more comfortable with her speech. If no character has a Passive Perception 15 and no one asks about the raven, ask for a WIS/Perception (DC15) check. At this point, the players have received five hints to Auntie Lala's nature:
- the Awakended Tree(s)
- seemingly friendly humanoids leading them in circles
- twig fetishes
- ravens everywhere in the forest
- there are no sources of light; humans can't see in the dark
If none of the players start to question what is going on, start asking for Skill checks. Checks can prompt questions such as:
| WIS/Perception | DC10 | "I didn't catch your name." |
| INT/Investigation | DC10 | Are you a Druid? |
| INT/Religion | DC10 | "What Circle do you follow?" |
| WIS/Survival | DC10 | "Got any good X around here?" |
| WIS/Insight | DC20 | putting all the pieces together |
| INT/Investigation |
If the players just don't get the hints, have Auntie Lala offer the party some refreshements. She goes to the kitchen (in reality the hallway between the children's rooms), and then returns as an Illusory Duplicate. She will begin to attack each party member in turn with Vicious Mockery, eventually moving into melee.
Auntie Lala Lair Actions
Auntie Lala will use the following lair actions. Unless otherwise noted, any lair action that requires a creature to make a saving throw uses the save DC of the hag's most powerful ability.
On initiative count 20 (losing initiative ties), the hag can take a lair action to cause one of the following effects, but can't use the same effect two rounds in a row:
|
If they break down the door on attempt three, they emerge into the forest facing an Awakened Tree and no sign of Auntie Lala. Roll new initiative and enter melee. If they fail to break down the door by the third attempt, Auntie Lala escapes. Tell the party that nothing they try seems to move the door. They are trapped in the lair. About halfway through searching, Auntie Lala moves beyond her influence on the lair and all doors will open freely. Auntie Lala's escape means that she will continue to be a threat to Boustead. In six to nine months, the party can hear of more children being stolen, but this time Auntie Lala will be encountered with two sisters and much more powerful.
Epilogue
If Auntie Lala escapes, she will become a greater threat to Boustead. In about two years, the party can hear of children being stolen. Auntie Lala will be encountered in a new lair north of the village with two sisters and much more powerful.
Rewards and Treasure
Whether the party defeats Auntie Lala or she escapes, they can search her lair. Her bedroom has a bed and two large standing dressers with assorted tattered clothes. The children's rooms each have a small bed and empty dresser. There is nothing of value in any of these rooms. The storage room contains the belongings of Auntie Lala's previous victims. These should include two rare or one rare and two uncommmon items per player. Work with the individual players to determine what the characters need. The party also finds 79GP, 878SP, 2,297CP, and three gems (10GP-25GP) appropriate to spellcaster needs.
Character Advancement
Hopefully the party survived their encounter with Auntie Lala and have earned any Milestones needed to reach Level 4. They can return to Boustead (and eventually Calder Village) with all the equipment and skills required for A Servant of Shar.
A Servant of Shar
Stories have always been told of the monastery near the village of Calder Bridge. Some claim it is haunted; some claim it is the lair of bandits. All anyone knows for certain is that no one has been brave enough to go there for decades. “A Servant of Shar” is an adventure that takes a party of four or five players from Level 4 to Level 6. It can be placed into any existing world. Part One: Entering the Grounds can be run as a one-shot.
Story Overview
Whether the Calder Monastery was built near the village of Calder Bridge, or the village grew after the monastery’s founding, no one remembers. What everyone knows is that the two share a name and a relationship that has been essential to the survival of both for centuries. After the death of Dean Othmar, it seemed a bit strange that a Minotaur cleric took over a monastery filled with human monks, but the relationship with village was not affected. Over the next five years, the monks became more reclusive, until one day they closed the doors to the great hall. That was twenty years ago. Appropriate details can be revealed to the party during the Skills Challenge (Part Two: In Search of a Warlock) on the road between Calder Village and Edgemont.
Adventure Summary
The Party was last seen in Boustead Village training for level 4. The GM can develop whatever story they desire to bring them to Calder and get them interested in investigating the monastery and continue in search of Arsys. Part One: Entering the Grounds is intended for players of level 4, with at least one character able to deal elemental damage (i.e., acid, cold, fire, lightning, or thunder). It can be run as a one-shot to discover what happened to the monastery and its residents. Treasures should be changed as appropriate. Part Two: In Search of a Warlock is intended for players of level 4 or 5. It is a Skills Challenge where the players gather information about Calder Monastery, the Temple of Shar in Edgemont, and the Warlock Arsys. Part Three: A Warlock of Shar is intended for players of level 5. It is the confrontation with Arsys, the Warlock behind the mystery at Calder Monastery.
Setup and Starting Points
If this is being run as a one-shot, before the adventure begins is the time to figure out if the characters already know each other or if this is the first time they have met. If this is a continuation of the Islemont campaign, a reason will need to be found to get the party from Boustead to Calder. The god or gods the original monks of Calder Monastery served is at the discretion of the GM, although they should be of neutral or good alignment.
Prologue
The mystery begins in the village of Calder, where the party hears of the mystery surrounding the monastery.
Stories have always been told about the monastery near the small village. Some claim it is haunted; some claim it is the lair of bandits. All anyone knows is that no one has been brave enough to go there for decades.
Speaking with various members of the village, the party can learn:
- the village and monastery have had a relationship for centuries
- about twenty-five years ago, the Dean of the monastery died and was replaced by a Minotaur cleric from Edgemont
- after about five years, the monastery closed its doors and no one has emerged since
Part One: Entering the Grounds
The monastery is one day by horse or two days by foot. The party reaches the ruins about one hour before sunset, regardless of how they travel.
On the Road
If the party decide to travel by foot, they have an encounter with three brown bears. You can choose to have the encounter on the afternoon of day one, during the night, or the morning of day two.
| Brown Bear (3) Large beast, unaligned AC: 11 (natural armor) Hit Points: 34 (4d10+12) Speed: 40 ft, climb 30 ft STR 19 (+4) DEX 10 (+0) CON 16 (+3) INT 2 (-4) WIS 13 (+1) CHA 7 (-2) Skills: Perception +3 Senses: passive Perception 13 Languages: - CR: 1 (200 XP) Proficiency Bonus: +2 Keen Smell. The bear has advantage on WIS/Perception checks that rely on smell. Actions Multiattack. The bear makes two attacks: one with its bite and one with its claws. Bite. Melee Attack: +6 to hit, reach 5ft, one target. Hit: 8 (1d8+4) piercing. Claws. Melee Attack: +6 to hit, reach 5ft, one target. Hit: 11 (2d6+4) slashing. |
If one of the bears is killed, the others will attempt to run away on their next turn (they cannot Disengage). Any bears killed may be field dressed (INT/Nature or WIS/Survival DC 10) for food (1 week of rations each) and hides (3gp each; 10gp for all three). With a week’s work, the three hides can be turned into Hide Armor (AC 12) worth 15gp.
Outside the Ruins
Approaching the monastery, you come upon a clearing. In the center you find a long hall made of stone. Surrounding it are twelve sunken divots, six on either side.
A map of the monastery grounds is available in Appendix A: Maps. If the players search the divots, they find that they are the remains of the simple wooden apartments that housed the resident monks. There are eight that appear capable of housing two people in each and four of housing one each. They were dug down into the ground, with only about one fourth of the structure above ground. Over the past twenty-five years, the rooves have collapsed into the structures making it impossible to enter any of them. An INT/Investigate (DC 12) check will find: one religious relic (10gp) in each of the four single occupancy buildings. An INT/History or INT/Religion (DC 10) check will identify the god or gods the monks served (GM's choice).
There is only one entry into the hall, large double doors that have begun to fall from their hinges. Two STR/Athletics (DC 12) checks are required to move the doors safely to allow entry. Anyone failing the check or trying to enter without first securing the doors must make a DEX/Acrobatics (DC 15) check to avoid 1d4 damage and being trapped by the falling door. A STR (DC 12) check is required to free anyone trapped by a door.
The Dining Hall and Kitchen
The Dining Hall is 40 feet wide by 55 feet long; any furniture that once stood in the room has long collapsed. Along the left wall is a 10-foot by 20-foot alcove that once served as a Kitchen. There are a pair of double doors on the far wall. If the outside doors are not safely moved, the falling doors alert the Initiate Skeletons to the party’s presence. They will move towards the party, blocking the doorway so that only two party members can engage in combat through the doorway. If the doors are moved out of the way, the party can enter freely, and the Initiate Skeletons are encountered in the middle of the Dining Hall.
| Initiate Skeleton (8) Medium undead, lawful evil AC: 13 Hit Points: 13 (2d8+4) Speed: 30 ft STR 10 (+0) DEX 14 (+2) CON 15 (+2) INT 6 (-2) WIS 8 (-1) CHA 5 (-3) Damage Vulnerabilities: bludgeoning Damage Immunities: poison Condition Immunities: exhaustion, poisoned Senses: darkvision 60 ft, passive Perception 9 Languages: Common, but can’t speak CR: 1/4 (50 XP) Proficiency Bonus: +2 Actions Unarmed strike. Melee Attack: +4 to hit, reach 5ft, one target. Hit: 5 (1d6+2) bludgeoning. |
These are the animated skeletons of the human initiates (level 5 monks) of the monastery. They are dressed in the rags of robes with a rope tied around their waists. Rather than using melee weapons, they fight as monks. They have no treasure. Searching the Kitchen, the party can find enough pieces of fine cookware and cutlery to put together a set of Silver Cook’s Utensils (100gp, allows user to add proficiency bonus x2 to ability checks).
The Library
The Library is 40 foot square, but the walls are taken up by bookshelves, making the usable space within the room only 30 foot by 30 foot, plus the two 10 foot doorways. There is a set of double doors directly across from the ones the party enters. The double doors to the Library are closed, but unlocked, and open into the Dining Hall. Have the party declare their positions in the Dining Hall before stating who opens the door(s) to the Library, as they will be the target of the Minotaur Skeleton’s surprise round Charge/Gore attack. The target can attempt a DEX/Acrobatics or STR/Athletics vs the Minotaur’s Attack roll to withstand the Charge. If they fail to avoid the Charge/Gore, resolve it normally, determining if they are knocked into any player behind them causing them to be knocked prone (DEX/Acrobatics DC15) as well. The Brother Skeletons and Minotaur Skeleton are alerted to the party’s presence as soon as melee begins in the Dining Hall. The four brothers position themselves in the middle of the room. During combat, the Minotaur Skeleton will make use of its Charge/Gore attack whenever possible; if a Brother Skeleton is blocking his path, he will knock the skeleton out of the way (doing half damage to the skeleton, even if this destroys the skeleton) to reach its target. These are the animated skeletons of the human brothers (level 11 monks) and head of the monastery. Like the initiates, they are dressed in the rags of their original robes. The skeletons fight as monks. The Minotaur Skeleton fights with a greatmace. They have no treasure.
| Brother Skeleton (4) Medium undead, lawful evil AC: 13 Hit Points: 13 (2d8+4) Speed: 30 ft STR 10 (+0) DEX 14 (+2) CON 15 (+2) INT 6 (-2) WIS 8 (-1) CHA 5 (-3) Damage Vulnerabilities: bludgeoning Damage Immunities: poison Condition Immunities: exhaustion, poisoned Senses: darkvision 60 ft, passive Perception 9 Languages: Common, but can’t speak CR: 1/4 (50 XP) Proficiency Bonus: +2 Actions Unarmed strike. Melee Attack: +4 to hit, reach 5ft, one target. Hit: 6 (1d8+2) bludgeoning. |
| Minotaur Skeleton Large undead, lawful evil AC: 12 Hit Points: 67 (9d10+18) Speed: 40 ft STR 18 (+4) DEX 11 (+0) CON 15 (+2) INT 6 (-2) WIS 8 (-1) CHA 5 (-3) Damage Vulnerabilities: bludgeoning Damage Immunities: poison Condition Immunities: exhaustion, poisoned Senses: darkvision 60 ft, passive Perception 9 Languages: Abyssal, Common, but can’t speak CR: 2 (450 XP) Proficiency Bonus: +2 Charge. If the skeleton moves at least 10 feet straight toward a target and then hits it with a gore attack on the same turn, the target takes an extra 9 (2d8) piercing damage. If the target is a creature, it must succeed on a DC 14 STR saving throw or be pushed up to 10 feet away and knocked prone. Actions Greatmace. Melee Attack: +6 to hit, reach 5ft, one target. Hit: 14 (3d6+4) bludgeoning. Gore. Melee Attack: +6 to hit, reach 5 ft, one target. Hit 13 (2d8+4) piercing. |
The Chapel
The Chapel is 40 feet wide by 65 feet long, with three rows of benches and an altar at the far end. The benches can bear no weight. Entering the Chapel, the party finds it empty, except for furniture and two gargoyle statues on either side of the altar. Using the initiative order from the previous encounter, have the players describe their actions in detail, moving their figures around the map. As soon as there are players next to each gargoyle, the gargoyles will attack in a surprise round. Everyone then rolls new initiative and combat begins. It is important to keep track of how much total damage is elemental. If the gargoyle reaches 0 or fewer HP with less than half of the total damage (26) being elemental, the torso will not crack open, making it necessary to move the Sending Stones to the altar. At the service of an unknown master, the gargoyles watch over the ruined monastery’s inhabitants and contents.
| Gargoyle (2) Medium elemental, chaotic evil AC: 15 (natural armor) Hit Points: 52 (7d8+21) Speed: 30 ft, fly 60 ft STR 15 (+2) DEX 11 (+0) CON 16 (+3) INT 6 (-2) WIS 11 (-0) CHA 7 (-2) Damage Resistances: bludgeoning, piercing, and slashing from nonmagical attacks that aren’t adamantine Damage Immunities: poison Condition Immunities: exhaustion, petrified, poisoned Senses: darkvision 60 ft, passive Perception 10 Languages: Terran CR: 2 (450 XP) Proficiency Bonus: +2 Actions Mutiattack. The gargoyle makes two attacks: one with its bite and one with its claws. Bite. Melee Attack: +4 to hit, reach 5ft, one target. Hit: 5 (1d6+2) piercing Claws. Melee Attack: +4 to hit, reach 5ft, one target. Hit: 5 (1d6+2) slashing |
If a player does elemental damage of any kind to either of the gargoyles, mention that a noticeable crack appears on its torso. Each time elemental damage is done, the crack grows larger. If a minimum of half a gargoyle’s HP (26) is elemental damage, the torso cracks open when it reaches 0 or fewer HP. Inside each gargoyle is one Sending Stone (500gp for the pair) inscribed with a black disk encircled with a border. A successful INT/History or INT/Religion (DC 10) check will identify the sign of Shar. If less than half the total damage (26) is elemental, the Sending Stones can be moved to the altar. If the party searches the altar, they will find a yellow diamond (500gp, Elemental Gem - Earth Elemental) and a Dark Shard Amulet (1,000gp, warlock). Regardless of how many rounds each encounter takes, the party emerges from the ruined hall into the darkness of night and must rest before returning to the village. If they are travelling by horse, they encounter the bears (On the Road) on the trip back. If they are travelling by foot, the return to Calder is uneventful.
Character Advancement
At the conclusion of Part One, the players have completed four Minor Milestones and are Level 5. They can train in Calder Village.
Part Two: In Search of a Warlock

| Skill | Situation | DC | Information |
| INT/Investigation or INT/History | Calder Bridge | 10 | History of the Calder Monastery |
| INT/Investigation or INT/Religion | Sending Stones | 10 | Sending Stones are the Symbol of Shar |
| INT/Arcana or INT/Religion | Scrolls | 10 | Warlock spells |
| 15 | Created by a Warlock of Shar | ||
| INT/Nature or DEX/Stealth | On the road | 10 | Avoids combat with beasts/creatures |
| INT/Nature or DEX/Stealth | On the road | 10 | Avoids combat with bandits |
| WIS/Perception | On the road | 15 | Removes one day’s travel from the journey |
| INT/Investigation or CHA/Deception | On the road/ Edgemont | 15 | Rumors of a Minotaur traveling on the road between Edgemont and Calder Bridge |
| INT/Investigation or CHA/Deception | On the road/ Edgemont | 15 | Rumors of a Half-elf traveling on the road between Edgemont and Calder Bridge |
| INT/Investigation or WIS/Perception or CHA/Deception | Food House/ Ale House | 15 | Stories of a missing Minotaur Cleric |
| INT/Investigation or INT/Religion | Temple | 15 | The identity of Arsys (Arsys is made aware of the players’ presence in the city with anything other than CHA/Deception) |
| INT/Investigation or CHA/Deception | Food House/ Ale House | ||
| INT/Investigation or INT/Religion | Temple | 20 | The location of Arsys (Arsys is made aware of the players’ presence in the city with anything other than CHA/Deception) |
| INT/Investigation or CHA/Deception | Food House/ Ale House |
Have players roll initiative and go through the order twice, so each player makes two skill checks. Players are not allowed to use the same skill as the player before them or the skill they used on their first check. Before making the check, have the player declare the physical location the check is being made (e.g., the village of Calder, on the road to Edgemont, in the city of Edgemont, etc.). You can prompt the players with mention of travelers or sights on the road or in the city of Edgemont. If a player moves the party forward in the journey, they may not move backwards. Players must be proficient in a skill to attempt a check. They or another player can gain a bonus (up to three total) by using magic items or spells specific to the skill check (e.g., Invisibility can add Proficiency Bonus to a DEX/Stealth check to hide from a group of bandits).
Every three successful checks, mention that a new day has begun. The journey from Calder to Edgemont should take three to five days (six to ten successful checks), regardless of travel method. Once the initiative order has been completed twice, the journey is over. Once the party successfully learns the location of Arsys, they can go directly there, possibly catching her unprepared. If they choose to delay overnight, word reaches Arsys and she is prepared for them. Any unsuccessful check at the Temple or a Food/Ale House will alert Arsys of the party's presence in Edgemont. She will have a note delivered to the party, inviting them to her apartment.
Part Three: A Warlock of Shar
Arsys is in the two-room apartment that she also uses as a laboratory. The layout is very simple: a large common room (30 feet by 30 feet) with a desk near the far wall and tables along each of the side walls; it has a door at the far end. Through the door the party will find a small makeshift bedroom (15 feet by 30 feet). A map of Arsys' apartment is available in Appendix A: Maps. When the party arrives outside her apartment, regardless of what they say in greeting, ask for a CHA/Deception or CHA/Intimidation check. If the party beats her Passive Insight (17), the door will open on its own and she will allow them to enter.
You see a female half-elf walking toward the far end of the room. As she reaches for a dagger and a mace, she turns and asks, “How may I be assistance?”
If the party fails to beat Arsys’ Passive Insight (17) check or she knows the party is coming, the door will open as they knock and she will be found by one of the side tables, but within reach of the desk. She will be casting Armor of Agathys (25 temporary HP) as the party enters.
You see a female half-elf at the far end of the room, drinking from a cup. As she places the cup onto the table, a cloud of shimmering frost surrounds -- and then slowly settles on -- her. She picks up a dagger and a mace, turns and asks, “How may I be of assistance?”
| Arsys 11th level Warlock Medium humanoid (female half-elf), neutral evil AC: 16 (Leather armor +3) Hit Points: 132 (11d8+4) Speed: 30 ft. STR 10 (+0) DEX 14 (+2) CON 18 (+4) INT 17 (+3) WIS 15 (+2) CHA 19 (+4) Skills: Arcana (+4), History (+4), Insight (+7), Investigation (+4), Perception (+7), Religion (+4) Damage Resistances: see below Senses: Perception (13), Investigation (10), Insight (17), darkvision 120 ft. magical and nonmagical Languages: Common, Deep Speech, Elvish, Minotaur, Primordial, Telepathic (60 ft) Challenge Rating: 8 (3,900 XP) with surprise or 9 (5,000 XP) without surprise Actions Initiative: +2 Two Weapon Fighting. Dagger. Melee Attack +5 to hit, 5 ft reach, one target. Hit: 4 (1d4+1) Mace +3. Melee Attack +3, +7 to hit, 5 ft reach, one target. Hit: 7 (1d6+3) Rod of Absorption (begins combat with 7 levels of spell energy) Spellcasting. Arsys is an 11th-level spellcaster. Her spellcasting ability is Charisma (Spell DC 16, Spell Attack +8). She can cast two spells per turn and has the following warlock spells prepared: Cantrips: Blade Ward (resistance (half damage) against bludgeoning, piercing, and slashing damage); Chill Touch (3d8 necrotic), Eldritch Blast (3d10 force), Lightning Lure (pull 10 ft and 3d8 lightning) 1st level: Mage Armor (at will) 2nd level: Detect Thoughts 3rd level: Speak with Dead 5th level: Armor of Agathys (25 temporary HP; 25 cold damage); Arms of Hadar (6d6 necrotic, half on save); Darkness (c); Enemies Abound (c); Negative Energy Flood (5d12 necrotic, half on save); Vampiric Touch (c) (5d6 necrotic; regain half HP) 6th level: Create Undead Devil’s Sight. You can see normally in darkness, both magical and nonmagical, to a distance of 120 ft. Dark One’s Blessing. When you reduce a hostile creature to 0 HP, you gain 15 temporary HP. Dark One’s Own Luck. Once per short rest, when you make an ability check or a saving throw, you can add a d10 to your roll. You can do so after seeing the roll, but before the effect occurs. Fiendish Resilience. You can choose one damage type to gain resistance (1/2 damage) to when you finish a short or long rest. Damage from magical weapons or silver weapons ignore this resistance. |
Arsys' first round actions will be to a) cast Eldritch Blast (Spell Attack +8, three beams, 1d10 force) and b) cast Darkness, centered on an obvious spellcaster or fighter, to engulf as many of the players as possible. Her Devil’s Sight allows her to see through the magical darkness and track the players’ movements and actions. She will then duck behind her desk for half cover. Second round actions will be to a) activate Fiendish Resilience based on the damage type dealt by the party during the first round and b) cast Enemies Abound (DC16 INT save) on the next non-spellcaster in initiative order. This will cause the Darkness to fall, allowing the affected player to see their new enemies. If Enemies Abound fails (or her concentration is broken), Arsys’ third round actions will be to a) cast Eldritch Blast (Spell Attack +8, three beams, 1d10 force) and b1) Vampiric Touch (5d6) if she has taken significant damage and is adjacent to a player or b2) Negative Energy Flood (5d12 necrotic, half on CON save) on any adjacent player. If her concentration for Enemies Abound is maintained, she will cast Arms of Hadar (6d6 necrotic, half on STR save). Actions during all subsequent rounds are left up to the GM. Arsys will not surrender or try to escape. She swore her life to Shar and will give it willingly. If the players try to subdue her, she will continue attacking. Remember to use the Rod of Absorption (once per round) as a defensive weapon to negate the effects of any spells cast at her. Note on Arsys' strength: If the GM finds that Arsys is overpowered for the players, reducing her spellcasting to one spell per round after round two might be appropriate. Reducing her HP based on the amount of damage being dealt by the players would also be appropriate. If her strength is lowered, the rewards should be reduced as well. If the party defeats Arsys, a search of the body finds: Leather Armor +3, a Mace +3, a Rod of Absorption, and a Dark Shard Amulet. A search of the apartment finds 72PP, 172GP, 452SP, and 32CP in the desk and a simple bedroll in the bedroom.
Concluding the Adventure
The players can visit the temple of the god or gods of the clerics that founded Calder Monastery to relate the story of what has happened. If the party returns the four religious relics found in the Brother Monks apartments from the monastery, they will be given one Potion of Greater Healing (4d4+4 hit points) per player. If A Servant of Shar is being run as a one-shot, where you take the players from here is up to you. Calder Village and Edgemont can be placed anywhere in your world, allowing the players to visit (and maybe revisit). If it is being run as part of the Islemont Campaign, the party can stay in Edgemont or return to Calder Village.
Character Advancement
The author uses milestones for advancement and requires one major (or three minor) milestone for advancement to level 4, two major (or six minor) for advancement to level 5, and two major (or six minor) for advancement to level 6. Part One: Entering the Grounds is intended to advance a party from level 4 to level 5, with downtime in Calder Bridge before departing for Edgemont. This also allows any level 3 characters to catch up to level 4 and gain the significant rewards of that level. Parts Two and Three are intended to be combined to advance the entire party to level 6, with downtime after defeating Arsys.
The Northern Mountains
The Northern Mountains have always been a place of great allure. The innumerable caves and caverns throughout the range mean adventurers never fail to find something new to explore.
Story Overview
The party has been approached to explore a newly discovered network of caves in the Northern Mountains. In the meantime, Gnirk and Gnark have heard the party have returned to Frostmont. Little do the thugs know how powerful the party has become. After a very brief and unsuccessful attempt at revenge, Gnirk and Gnark decide to gather a small band and try to ambush the party outside that same network of caves.
Adventure Summary
Gnirk and Gnark play a game of hide and seek with the party, as the party explores caves in The Northern Mountains.
Setup and Starting Points
During their time in Edgemont or Calder, the party has heard of an opportunity to explore newly discovered caves in the Northern Mountains. They are to travel to Frostmont and meet their contact, Darser Woldstone (a dwarven merchant), at The Compass, an outfitter for mountain treks. It is on the same street as The Bronze Mace, the same tavern where the party found Gnirk and Gnark months before. If Gnirk and/or Gnark were killed during the party's first encounter with them at The Bronze Mace, the GM will need to make appropriate changes to the storyline. Or the GM can simply state that they were found and healed after the party left The Bronze Mace.
Prologue: Return to Frostmont
As soon as the party enters the street with The Compass and The Bronze Mace, Gnirk and Gnark attack. They swore revenge on the party but had no idea how powerful they had become. No matter the initiative, Gnirk and Gnark will act first in the round. Gnirk and Gnark should miss their attacks. No matter their rolls (except a natural 1), the party should hit on their attacks; damage is irrelevant. At the beginning of the second round of combat, Gnirk and Gnark will run away. If the party tries to follow them, they quickly lose them in the crowds. The party can then continue to The Compass to meet Darser Woldstone.
| Darser Woldstone Medium humanoid (dwarf), Lawful Neutral AC: 16 (Breastplate) Hit Points: 19 (3d8+6) Speed: 25 ft STR 11 (+0) DEX 14 (+2) CON 14 (+2) INT 11 (+0) WIS 13 (+1) CHA 11 (+0) Skills: Nature +4, Perception +5, Stealth +6, Survival +5 Damage Resistance: poison Senses: Darkvision 60ft, Passive Perception 15 Languages: Common, Dwarvish CR: 1/2 (100 XP) Proficiency Bonus: +2 Dwarven Resilience. The scout has advantage on saving throws against poison. Keen Hearing and Sight. The scout has advantage on WIS/Perception checks that rely on hearing or sight. Actions Multiattack. The scout makes two melee attacks. War Pick. Melee Attack: +4 to hit, reach 5ft, one target. Hit: 7 (1d8+3) piercing. Heavy crossbow. Ranged Attack: +3 to hit, range 100/400 ft, one target. Hit: 5 (1d10) piercing. |
Darser Woldstone is a former Scout who now owns The Compass, a shop for anyone putting together excursions into the Northern Mountains. He provides them all the supplies they will need for their journey. The party does not need a list, but if they have special requests, use your own judgement based on rarity. He has no magical items. If the party asks about the newly discovered caves, he knows little more than a general direction of travel.
“I have heard that they are four days travel north, where the foothills turn into mountains. They said they followed the river for three days. The last group to return claimed the entrance was hidden behind a pillar in the shape of an axe.”
Any player with proficiency can make an INT/Religion (DC10) or INT/History (DC15) check to know that the axe is the symbol of the Mighty One, Maglubiyet, the goblinoid (i.e., goblins, norkers, and hobgoblins) deity of war, but they aren't sure if that's relevant If the party asks about previous groups to go exploring, Darser tells them that they were all from out of town and left after failing.
Part One: Travels North
Gnirk and Gnark have also heard of the cave discovery, but they know that it is a semi-abandoned temple to Maglubiyet. Being half-orcs, they are enemies of goblinoids in general, but are not above using them as allies against the party. Gnirk and Gnark have gathered a dozen orcs to menace the party as it travels north to the caves, hoping to ambush them along the way or soon after they emerge weary from their fight with the goblins.
| Gnirk and Gnark (Thugs) Medium humanoid (half-orc), Lawful Neutral AC: 11 (Leather Armor) Hit Points: 32 (5d8+10) Speed: 30 ft STR 15 (+2) DEX 11 (+0) CON 14 (+2) INT 10 (+0) WIS 10 (+0) CHA 11 (+0) Skills: Intimidation +2 Languages: Common CR: 1/2 (100 XP) Proficiency Bonus: +2 Pack Tactics. The thug has advantage on an attack roll against a creature if at least one of the thug’s allies is within 5 feet of the creature and the ally isn’t incapacitated. Actions Multiattack. The thug makes two melee attacks. Mace. Melee Attack: +4 to hit, reach 5ft, one creature. Hit: 5 (1d6+2) bludgeoning. Heavy crossbow. Ranged Attack: +2 to hit, range 100/400 ft, one target. Hit: 5 (1d10) piercing. |
| Orc (12) Medium humanoid (orc), Choatic Evil AC: 13 (Hide Armor) Hit Points: 1 (minion) Speed: 30 ft STR 16 (+3) DEX 12 (+1) CON 16 (+3) INT 7 (-2) WIS 11 (+0) CHA 10 (+0) Skills: Intimidation +2 Senses: Darkvision 60ft, Passive Perception 10 Languages: Common, Orc CR: 1/2 (100 XP) Proficiency Bonus: +2 Aggressive. As a bonus action, the orc can move up to its speed toward a hostile creature that it can see. Actions Greataxe. Melee Attack: +5 to hit, reach 5ft, one target. Hit: 9 (1d12+3) slashing. Javelin. Melee or Ranged Attack: +5 to hit, reach 5ft or range 30/120 ft, one target. Hit: 6 (1d6+3) piercing. |
The first day of the journey is through rolling hills and uneventful. The party can encounter various random travelers or inhabitants, but none know anything about the cave systems. As long as the party continues northerly along the River Calder, they are going in the right direction. On the second day of the four-day journey north, Gnirk and Gnark will attempt the first of two attacks on the party. Roll DEX/Stealth for Gnirk and Gnark. Any member of the party with Passive Perception higher than the lowest roll will notice them. Gnirk, Gnark and the group of orcs are within 30 ft of the party and will attack with range weapons during the first round if possible. The orcs only carry one javelin, so once an orc has used their javelin attack, it is no longer available. Orc minions will die from any attack doing one HP damage or more, regardless of saving throw options. If the party defeats the entire ambush in their first encounter, they will no longer be a threat. Gnirk and Gnark carry 5 (or 4) crossbow bolts, 27GP, 43SP, and 8CP each. The orc minions carry nothing. If half of the orc minions are lost before Gnirk and Gnark become bloodied, they will all Disengage and run away. Regardless of the number of orcs lost, Gnirk and Gnark will Disengage when they become bloodied. They will attempt a second ambush when the party leaves the caves. Be sure to record the health of Gnirk and Gnark, as they will regain 4 HP each before their next encounter at the cave. The third day of the journey brings the party within sight of where the foothills begin to turn into mountains. They find tracks of previous expeditions who have entered and exited the mountains. By nightfall they have reached the first network of caves.
Character Advancement
Whether the encounter with Gnirk and Gnark takes place in one or two parts, it should be considered a single Major Milestone.
Part Two: The Caves of Maglubiyet
For centuries, goblins have used the natural caves around the Northern Mountains as temples to Maglubiyet. Because of the sacrificial nature of their devotion, every fifty years or so, they move to a new cave system, taking the altar stone and greataxe as a symbol of the continuity of their worship.
While exploring the mountains, the party should find a number of abandoned cave systems before coming upon the one the goblins now occupy. Other than humanoid remains, the abandoned cave systems contain nothing but discarded and useless old belongings. The GM can have players roll Skill checks, but only critical fails should have an effect. A map of the Caves of Maglubiyet is available in Appendix A: Maps. While exploring the cave system, the party will encounter the Hobgoblins in chamber two, Goblin Boss and four Goblins in chamber five, and the Norker War Leader and two Norkers in chamber nine. All other chambers/rooms will have 1d4 Goblins armed with only a scimitar.
Chamber Two: Hobgoblins (2)
| Hobgoblin (2) Medium humanoid (goblinoid), Lawful Evil AC: 18 (Chain Mail, Shield) Hit Points: 11 (2d8+2) Speed: 30 ft STR 13 (+1) DEX 12 (+1) CON 12 (+1) INT 10 (+0) WIS 10 (+0) CHA 9 (-1) Senses: Darkvision 60ft, Passive Perception 10 Languages: Common, Goblin CR: 1/2 (100 XP) Proficiency Bonus: +2 Martial Advantage. Once per turn, the hobgoblin can deal an extra 7 (2d6) damage to a creature it hits with a weapon attack if that creature is within 5 feet of an ally of the hobgoblin that isn't incapacitated. Actions Longsword. Melee Attack: +3 to hit, reach 5ft, one target. Hit: 5 (1d8+1) slashing or 6 (1d10+1) slashing if used with two hands. Shortbow. Ranged Attack: +3 to hit, range 150/600 ft., one target. Hit: 5 (1d8+1) piercing. |
Chamber Five: Goblin Boss and Goblins (4)
| Goblin Boss Small humanoid (goblinoid), Neutral Evil AC: 17 (Chain Shirt, Shield) Hit Points: 21 (6d6) Speed: 30 ft STR 10 (+0) DEX 14 (+2) CON 10 (+0) INT 10 (+0) WIS 8 (-1) CHA 10 (+0) Skills: Stealth +6 Senses: Darkvision 60ft, Passive Perception 9 Languages: Common, Goblin CR: 1 (200 XP) Proficiency Bonus: +2 Nimble Escape. The goblin can take the Disengage or Hide action as a bonus action on each of its turns. Actions Multiattack. The goblin makes two attacks with its scimitar. The second attack has disadvantage. Scimitar. Melee Attack: +4 to hit, reach 5ft, one target. Hit: 5 (1d6+2) slashing. Javelin. Melee or Ranged Attack: +5 to hit, reach 5ft or range 30/120 ft, one target. Hit: 3 (1d6) piercing. Reactions Redirect Attack. When a creature the goblin can see targets it with an attack, the goblin chooses another goblin within 5 feet of it. The two goblins swap places, and the chosen goblin becomes the target instead. |
| Goblin (4) Small humanoid (goblinoid), Neutral Evil AC: 15 (Leather Armor, Shield) Hit Points: 7 (2d6) Speed: 30 ft STR 8 (-1) DEX 14 (+2) CON 10 (+0) INT 10 (+0) WIS 8 (-1) CHA 8 (-1) Skills: Stealth +6 Senses: Darkvision 60ft, Passive Perception 9 Languages: Common, Goblin CR: 1/4 (50 XP) Proficiency Bonus: +2 Nimble Escape. The goblin can take the Disengage or Hide action as a bonus action on each of its turns. Actions Scimitar. Melee Attack: +4 to hit, reach 5ft, one target. Hit: 5 (1d6+2) slashing. Shortbow. Ranged Attack: +4 to hit, range 80/320 ft, one target. Hit: 5 (1d6+2) piercing. |
Chamber Nine: Norker War Leader and Norkers (2)
|
Norker War Leader
Small humanoid (goblinoid), Chaotic Evil
AC: 17 (Natural Armor)
Hit Points: 39 (6d8+12)
Speed: 30 ft
STR 16 (+3) DEX 10 (+0) CON 15 (+2) INT 12 (+1) WIS 11 (+0) CHA 13 (+1) Skills: Athletics +5, Intimidation +3, Perception +2 Senses: Darkvision 60ft, Passive Perception 12 Languages: Common, Goblin CR: 3 (700 XP) Proficiency Bonus: +2 Actions Multiattack. The norker war leader makes one greataxe and one bite attack, and also uses Fight On, You Slugs. Bite. Melee Attack: +5 to hit, reach 5ft, one target. Hit: 6 (1d6+3) piercing. Greataxe. Melee Attack: +5 to hit, reach 5ft, one target. Hit: 9 (1d12+3) slashing. Fight On, You Slugs. The norker war leader picks up to three allied goblinoids within 60 feet that can see it. The chosen creatures can each use their reactions to make a single melee attack. Reactions Defensive Rebuke. If a creature within 5 feet of the norker makes a melee attack against it, the norker can use its reaction to cause 6 piercing damage to it. |
| Norker (2) Small humanoid (goblinoid), Chaotic Evil AC: 17 (Natural Armor) Hit Points: 16 (3d8+3) Speed: 30 ft STR 13 (+1) DEX 10 (+0) CON 13 (+1) INT 8 (-1) WIS 8 (-1) CHA 7 (-2) Skills: Athletics +3 Senses: Darkvision 60ft, Passive Perception 9 Languages: Common, Goblin CR: 1/2 (100 XP) Proficiency Bonus: +2 Actions Multiattack. The norker makes one mace attack and one bite attack. Bite. Melee Attack: +3 to hit, reach 5ft, one target. Hit: 4 (1d6+1) piercing. Mace. Melee Attack: +3 to hit, reach 5ft, one target. Hit: 4 (1d6+1) bludgeoning. Reactions Defensive Rebuke. If a creature within 5 feet of the norker makes a melee attack against it, the norker can use its reaction to cause 4 piercing damage to it. |
The Norkers' weapons and armor are non-magical. They each carry 20SP. Chamber Nine appears to be the end of the cave system. An INT/Investigation (DC20) check will discover the secret door that leads to the Temple. If they stop to heal, they will be able to cast spells or drink potions. If the party chooses to stop for a short rest, they are interrupted after ten minutes by the Goblins from Chamber 10.
Chambers 1, 3-4, 6-8, 10-12
| Goblin (1-4) Small humanoid (goblinoid), Neutral Evil AC: 15 (Leather Armor, Shield) Hit Points: 7 (2d6) Speed: 30 ft STR 8 (-1) DEX 14 (+2) CON 10 (+0) INT 10 (+0) WIS 8 (-1) CHA 8 (-1) Skills: Stealth +6 Senses: Darkvision 60ft, Passive Perception 9 Languages: Common, Goblin CR: 1/4 (50 XP) Proficiency Bonus: +2 Nimble Escape. The goblin can take the Disengage or Hide action as a bonus action on each of its turns. Actions Scimitar. Melee Attack: +4 to hit, reach 5ft, one target. Hit: 5 (1d6+2) slashing. Shortbow. Ranged Attack: +4 to hit, range 80/320 ft, one target. Hit: 5 (1d6+2) piercing. |
The goblins' weapons and armor are non-magical. They each carry 20SP.
The Temple
The Temple and Antechamber (13) have been outfitted for worship, but the altar stone and greataxe have not yet been installed. When the party enters The Antechamber, they will see the altar stone and greataxe there. They will find four Goblin Priests and eight Goblins in the Temple area making final preparations for the consecration ceremony. The Goblin Priests will fight to the death, but the other Goblins will disengage and try to escape if given the opportunity.

| Goblin Priest (4) Small humanoid (goblinoid), Neutral Evil AC: 14 (Leather Armor) Hit Points: 9 (2d6+2) Speed: 30 ft STR 8 (-1) DEX 12 (+1) CON 10 (+0) INT 10 (+0) WIS 14 (+2) CHA 12 (+1) Skills: Stealth +5, Medicine +2 Senses: Darkvision 60ft, Passive Perception 10 Languages: Common, Goblin CR: 1/4 (50 XP) Proficiency Bonus: +2 Nimble Escape. The Goblin Priest can take the Disengage or Hide action as a bonus action on each of its turns. Spellcasting. The Goblin Priest is a 1st level spellcaster. Its spellcasting ability is Wisdom (spell save DC 12, +4 to hit with spell attacks). The goblin priest has the following cleric spells prepared. Cantrips (at will): light, sacred flame, thaumaturgy 1st level (3 slots): bane, bless, cure wounds Actions Club. Melee Attack: +4 to hit, reach 5ft, one target. Hit: 4 (1d6+1) bludgeoning. |
| Goblin (8) Small humanoid (goblinoid), Neutral Evil AC: 15 (Leather Armor, Shield) Hit Points: 7 (2d6) Speed: 30 ft STR 8 (-1) DEX 14 (+2) CON 10 (+0) INT 10 (+0) WIS 8 (-1) CHA 8 (-1) Skills: Stealth +6 Senses: Darkvision 60ft, Passive Perception 9 Languages: Common, Goblin CR: 1/4 (50 XP) Proficiency Bonus: +2 Nimble Escape. The goblin can take the Disengage or Hide action as a bonus action on each of its turns. Actions Scimitar. Melee Attack: +4 to hit, reach 5ft, one target. Hit: 5 (1d6+2) slashing. Shortbow. Ranged Attack: +4 to hit, range 80/320 ft, one target. Hit: 5 (1d6+2) piercing. |
The goblins’ and goblin priests’ weapons and armor are non-magical. They each carry 20SP. The goblin priests each carry a holy symbol of Maglubiyet.
Epilogue
If the party has not yet defeated Gnirk and Gnark, they and any remaining orcs will be waiting in ambush on either side of the entrance to the cave. Remember that Gnirk and Gnark have regained 4 HP each since the last encounter. They carry 5 (or 4) crossbow bolts, 27GP, 43SP, and 8CP each. The bodies of any goblins escaping from the Temple will be on the ground at the cave's entrance. They carry 20SP each.
Character Advancement
The author uses milestones for advancement and requires two major (or six minor) for advancement to level 7. Defeating Gnirk and Gnark gives the party one Major Milestone. Clearing The Caves of Maglubiyet gives the party a second Major Milestone. They should now be Level 7.

Two Halves Don't Make a Whole
We're just here to talk.
Story Overview
The many explorers in the mountain caves have disturbed Nicandran, a White Dragon living in the Northern Mountains. She sends her two half-dragon frost giant sons, Koras and Kunir, to Frostmont to find out why humans keep coming into the mountains.
Adventure Summary
About two weeks after the party returns to Frostmont, two half-white dragon frost giants enter the city. They have been sent to find out why the residents have been exploring the Northern Mountains. They are imposing, but do not make threats or attack the city. The encounter can (and should) be resolved through diplomacy.
Setup and Startup Points
The party is in Frostmont completing training for level 7. Koras and Kunir enter the city on the afternoon of their last day of training. After a very short meeting with the nominal city leaders, the party members are approached to hold discussions with the half-dragons.
Can We Talk?
Koras and Kunir are in Frostmont to gather information. They will defend themselves if attacked and will not intentionally kill anyone.
"We are Koras and Kunir, proud sons of Nicandran the great white wyrm of the Northern Mountains. We have come to speak with the leaders of Frostmont about its intrusion into her lands. We do not want battle, but will we defend ourselves if attacked."
Because Thugs control most of the city, the Council wants to appear neutral and is reluctant to enter into public discussions. A few members privately approach the party to speak with Koras and Kunir. Successful resolution can be reached by talking, including:
- an agreed area of the Northern Mountains where no one will explore
- a tribute paid by the City of Freemont to Nicandran for the right to explore the Northern Mountains during the spring and summer months
If an agreement is reached, Koras and Kunir will leave Frostmont. The repercussions for the city leaders play out in Rescuing Freemont. If the discussions break down into melee, Koras and Kunir will fight defensively, subduing the party. They should use their breath weapons only as a last resort. Once the party is subdued, Koras and Kunir will return to Nicandran’s lair. It will take the party up to two weeks (7+1d6 days) to fully recover from the battle; just in time for Nicandran and her sons to return to Frostmont intent on wiping out the city (The Whole Kit and Kaboodle).
| Koras and Kunir (Half-White Dragon Frost Giant) (2) Huge giant, Neutral Evil AC: 15 (Patchwork Armor) Hit Points: 138 (12d12+60) Speed: 40 ft STR 23 (+6) DEX 9 (-1) CON 21 (+5) INT 9 (-1) WIS 10 (+0) CHA 12 (+1) Saving Throws: CON +8, WIS +3, CHA +4 Skills: Athletics +9, Perception +3 Damage Immunities: Cold Senses: Blindsight 10ft, Darkvision 60ft, Passive Perception 13 Languages: Common, Draconic CR: 8 (3,900 XP) Proficiency Bonus: +3 Actions Multiattack. The giant makes two greataxe attacks. Greataxe. Melee Attack: +9 to hit, reach 10ft, one target. Hit: 25 (3d12+6) slashing. Rock. Ranged Attack: +9 to hit, 60/240 ft, one target. Hit: 28 (4d10+6) bludgeoning. Cold Breath (Recharge 5-6). The half-dragon Frost Giant exhales an icy blast in a 30ft cone. Each creature in that area must make a DC 15 Constitution saving throw, taking 45 (10d8) cold damage on a failed save, or half as much damage on a successful one. |
Character Advancement
The author uses milestones for advancement and requires two major (or six minor) for advancement to level 8. Successful discussions with Koras and Kunir will give the party their first Major Milestone. If the discussions became melee, defeating them will give the party their first Major Milestone. If the party is defeated, they earn one Minor Milestone. They will have the opportunity to earn two Minor Milestones in The Whole Kit and Kaboodle.
The Whole Kit and Kaboodle
We tried talking, but you didn’t want to. They did it again!? Against Half-Dragon Frost Giants? The fact that they were over ten feet tall wasn't a big enough hint? Okay, we can fix things, but this time it isn't going to be pretty. Hold onto your butts.
Story Overview
The attack on her sons, Koras and Kunir, has forced Nicandran, the Adult White Dragon living in the Northern Mountains, to seek revenge. She attacks the city of Frostmont, laying waste to it.
Adventure Summary
Two weeks after the fight with Koras and Kunir, Nicandran attacks Frostmont, laying waste to everything she can. The party finds themselves helpless in defending the city and must try to save as many residents as possible.
Setup and Startup Points
This adventure should only be run if the party made the stupid decision to attack Koras and Kunir in Two Halves Don’t Make a Whole. The party has physically recovered from their encounter and are in the Western District of Freemont.
Nicandran, The Great White Wyrm
You have spent the last two weeks recovering from your wounds after the fight with Koras and Kunir. Just as you feel well enough to leave your lodgings and begin light training, the city erupts with screams and prayers. "Great Eldath, protect us!" "Helm, we need you!" You look into the sky to see a great White Wyrm flying over the Northern District of Frostmont, breathing ice and tearing at buildings with its great claws. You quickly realize it is Nicandran, Koras and Kunir's mother, come to seek revenge for your attack on her sons. You are too far away to engage them directly, but you know there are other ways you can help.
We’re Here to Help
Although the stats for Koras, Kunir, and Nicandran are given, the party should not directly encounter them. The party’s mission is to help as many inhabitants of Frostmont as possible and should be played out as a Skills Challenge.
As with all Skills Challenges, there are no right or wrong actions, only successes and failures. The party must achieve the target number of successful Skill checks (typically the number of party members plus three) before getting three (3) unsuccessful Skill checks. The DC of the checks is set by the GM based on the party’s level and the CR of the encounter. When the party reaches the target number of successes, they succeed in the Skills Challenge. If the party reaches the target number of failures first, they fail. The outcomes of each scenario will be determined by the GM, with a combination of narrative and mechanical consequences. If the party attempts to engage Nincandran, Koras, or Kunir directly through the Skills Challenge, any successes should result in minor injuries to the foes at most. Failures can result in minor or major injuries to the character or party, depending on the Skill attempt. No character should die unless they place themselves directly into harm's way. The success or failure of the party at the Skills Challenge has no bearing on the fate of Frostmont: it is devastated by Nicandran and her sons. The party will have an opportunity to help the city in its recovery later.
| Koras and Kunir (Half-White Dragon Frost Giant) (2) Huge giant, Neutral Evil AC: 15 (Patchwork Armor) Hit Points: 138 (12d12+60) Speed: 40 ft STR 23 (+6) DEX 9 (-1) CON 21 (+5) INT 9 (-1) WIS 10 (+0) CHA 12 (+1) Saving Throws: CON +8, WIS +3, CHA +4 Skills: Athletics +9, Perception +3 Damage Immunities: Cold Senses: Blindsight 10ft, Darkvision 60ft, Passive Perception 13 Languages: Common, Draconic CR: 8 (3,900 XP) Proficiency Bonus: +3 Actions Multiattack. The giant makes two greataxe attacks. Greataxe. Melee Attack: +9 to hit, reach 10ft, one target. Hit: 25 (3d12+6) slashing. Rock. Ranged Attack: +9 to hit, 60/240 ft, one target. Hit: 28 (4d10+6) bludgeoning. Cold Breath (Recharge 5-6). The half-dragon Frost Giant exhales an icy blast in a 30ft cone. Each creature in that area must make a DC 15 Constitution saving throw, taking 45 (10d8) cold damage on a failed save, or half as much damage on a successful one. |
| Nicandran (Adult White Dragon) Huge dragon, Chaotic Evil AC: 18 (Natural Armor) Hit Points: 200 (16d12+96) Speed: 40 ft, burrow 30ft, fly 80ft, swim 40ft STR 22 (+6) DEX 10 (+0) CON 22 (+6) INT 8 (-1) WIS 12 (+1) CHA 12 (+1) Saving Throws: DEX +5, CON +11, WIS +6, CHA +6 Skills: Perception +11, Stealth +5 Damage Immunities: Cold Senses: Blindsight 10ft, Darkvision 60ft, Passive Perception 21 Languages: Common, Draconic CR: 13 (10,000 XP) Proficiency Bonus: +5 Legendary Resistance (3/day). If the dragon fails a saving throw, it can choose to succeed instead. Actions Multiattack. The dragon can use its Frightful Presence. It then makes three attacks: one with its bite and two with its claws. Bite. Melee Attack: +11 to hit, reach 10ft, one target. Hit: 17 (2d10+6) piercing plus 4 (1d8) cold damage. Claw. Melee Attack: +11 to hit, reach 5ft, one target. Hit: 13 (2d6+6) slashing. Tail. Melee Attack: +11 to hit, reach 15ft, one target. Hit: 15 (2d8+6) bludgeoning. Frightful Presence. Each creature of the dragon’s choice that is within 120ft of the dragon and aware of it must succeed on a DC 14 Wisdom saving throw or become frightened for 1 minute. Cold Breath (Recharge 5-6). The half-dragon Frost Giant exhales an icy blast in a 60ft cone. Each creature in that area must make a DC 19 Constitution saving throw, taking 54 (12d8) cold damage on a failed save, or half as much damage on a successful one. Legendary Actions The dragon can take 3 legendary actions, choosing from the options below. Wing Attack (Costs 2 Actions). The dragon beats its wings. Each creature within 10ft of the dragon must succeed on a DC19 Dexterity saving throw or take 13 (2d6+6) bludgeoning damage and be knocked prone. The dragon can then fly up to half its flying speed. |
Character Advancement
The author uses milestones for advancement and requires two major (or six minor) for advancement to level 8. If the party succeeds in the Skills Challenge, they have earned two Minor Milestones. Combined with the one they earned from failed discussions and melee in Two Halves Don’t Make a Whole, they now have one Major Milestone for level 8. If the party fails at the Skills Challenge, they earn one Minor Milestone and will be one Minor Milestone short of their first Major Milestone for level 8. The success or failure of the party at the Skills Challenge has no bearing on the fate of Frostmont: it is devastated by Nicandran and her sons.
Rescuing Frostmont
Brothers, our time is now!
Story Overview
The thugs have decided it is time to settle their individual differences and take direct control of Frostmont.
Adventure Summary
| A: Two Halves | B: Whole Kit |
| In the wake of the weakness shown by the city leaders facing Nicandran’s sons, | In the wake of the devastation caused by Nicandran and her sons, |
| the Thugs have organized themselves. It is time to eliminate Frostmont's rulers and take direct control. The party hears of the plot and must stop it at all costs. | |
Setup and Startup Points
If this adventure is being run after a settlement was reached with Koras and Kunir, Frostmont has not been devastated and the party has earned one Major Milestone towards level 8. If this adventure is being run after the attack of Nicandran on the city, Frostmont is in ruins and the party has earned two Minor Milestones towards level 8. Other than occasional mentions of the devastation, the adventure will play out the same and the party will have the opportunity to advance to level 8.
Part One: The Politics of Frostmont
Begin by having the party make CHA/Deception, INT/Investigation, or WIS/Perception checks. Based on their rolls, the party learns of these plans with successful (DC12) checks. Details of the plans are learned with a DC15. Any player with Passive Perception or Passive Ingestigation of 12 or 15 learns of these plans automatically.
The City of Frostmont is organized into four districts: Northern, Western, Southern, and Central. Each has a District Council of four members (three in the Central District) that make the day-to-day decisions within their district. Once a month, the Council of Fifteen (comprised of all District members) meet to discuss matters affecting all Frostmont.
A map of Frostmont is available in Appendix A: Maps.
Based on the party member's rolls, the are able to learn the following:
| Roll | Plot Information |
| DC12 | The Thugs around the city have decided it is time to take action and eliminate the Council of Fifteen, taking direct control of the city themselves. "It's time we come out from the shadows and take control." |
| DC15 | Two thugs from each district, with a hired assassin, will attack the District Council members as they travel into the Central District. They will then all gather and attack the Frostmont Authority Building in the Central District together. |
Part Two: Stopping the Plot
Although the three assassination attempts occur simultaneously, they should be played out individually to avoid confusion. Each of the three encounters include two Thugs and one Assassin. The party may divide itself however it chooses and can find hired help in the form of one to four NPC Guards for 2GP each.
| Guard (1-4) Medium humanoid (any race), Any Alignment AC: 16 (Chain Shirt, Shield) Hit Points: 11 (2d8+2) Speed: 30 ft STR 13 (+1) DEX 12 (+1) CON 12 (+1) INT 10 (+0) WIS 11 (+0) CHA 10 (+0) Skills: Perception +2 Senses: Passive Perception 12 Languages: Common CR: 1/8 (25 XP) Proficiency Bonus: +2 Actions Spear. Melee Attack: +3 to hit, reach 5ft or range 20/60 ft, one target. Hit: 4 (1d6+1) piercing, or 5 (1d8+1) piercing if used with two hands to make a melee attack. Dagger. Melee Attack: +3 to hit, reach 5ft or range 20/60 ft, one target. Hit: 3 (1d4+1) piercing. |
Each of the three District encounters should take place in the streets of Frostmont, where cover is available (whether from carts and wagons or rubble after Nicandran’s attack). The thugs will not surrender, but the assassins will Disengage and flee if reduced to one quarter (20) hit points; they will not appear in the final confrontation. Attacks on the District Council members will not be attempted until after melee is resolved, but make it appear as if the Thugs and/or Assassins are maneuvering towards them.
| Assassin Medium humanoid (any race), Any Non-Good AC: 15 (Studded Leather) Hit Points: 78 (12d8+24) Speed: 30 ft STR 11 (+0) DEX 16 (+3) CON 14 (+2) INT 13 (+1) WIS 11 (+0) CHA 10 (+0) Saving Throws: DEX +6, INT +4 Skills: Acrobatics +6, Stealth +9, Perception +3, Deception +3 Damage Resistance: poison Languages: Common, Thieves’ Cant CR: 8 (3,900 XP) Proficiency Bonus: +3 Assassinate. During its first turn, the assassin has advantage on attack rolls against any creature that hasn’t taken a turn. Any hit the assassin scores against a surprised creature is a critical hit. Evasion. If the assassin is subjected to an effect that allows it to make a Dexterity saving throw to take only half damage, the assassin instead takes no damage if it succeeds on the saving throw, and only half damage if it fails. Sneak Attack. Once per turn, the assassin deals an extra 14 (4d6) damage when it hits a target with a weapon attack and has advantage on the attack roll, or when the target is within 5ft of an ally of the assassin that isn’t incapacitated and the assassin doesn’t have disadvantage on the attack roll. Actions Multiattack. The assassin makes two shortsword attacks. Shortsword. Melee Attack: +6 to hit, reach 5ft, one target. Hit: 6 (1d6+3) piercing, and the target must make a DC15 Constitution saving throw, taking 24 (7d6) poison damage on a failed save, or half as much on a successful one. Light crossbow. Ranged Attack: +6 to hit, range 80/320 ft, one target. Hit: 7 (1d8+3) piercing, and the target must make a DC15 Constitution saving throw, taking 24 (7d6) poison damage on a failed save, or half as much on a successful one. |
| Northern District | Southern District | Western District | Central District | |
| Thug One | A | D | A | D | A | D | A | D |
| Thug Two | A | D | A | D | A | D | A | D |
| Assassin | A | D | F | A | D | F | A | D | F | A | D | F |
| DCM One | A | D | A | D | A | D | A | D |
| DCM Two | A | D | A | D | A | D | A | D |
| DCM Three | A | D | A | D | A | D | A | D |
| DCM Four | A | D | A | D | A | D | A | D |
| Thugs (2) Medium humanoid (any race), Any Non-Good AC: 11 (Leather Armor) Hit Points: 32 (5d8+10) Speed: 30 ft STR 15 (+2) DEX 11 (+0) CON 14 (+2) INT 10 (+0) WIS 10 (+0) CHA 11 (+0) Skills: Intimidation +2 Languages: Common CR: 1/2 (100 XP) Proficiency Bonus: +2 Pack Tactics. The thug has advantage on an attack roll against a creature if at least one of the thug’s allies is within 5 feet of the creature and the ally isn’t incapacitated. Actions Multiattack. The thug makes two melee attacks. Mace. Melee Attack: +4 to hit, reach 5ft, one creature. Hit: 5 (1d6+2) bludgeoning. Heavy crossbow. Ranged Attack: +2 to hit, range 100/400 ft, one target. Hit: 5 (1d10) piercing. |
After the three assassination attempts are resolved, surviving players and NPC Guards should make their way to the Frostmont Authority Building in the Central District for the final confrontation. Surviving Thugs and Assassins from any party failures will also be at the Frostmont Authority Building, so their statuses should be recorded at the end of melee (a chart is provided to the left). If all party members survived, the final confrontation should be resolved quickly. If the party is successful in stopping the overall assassination attempt (i.e., killing all eight of the Thugs), Freemont is safe. The Thug network has lost its leaders and will not be able to recover quickly enough to threaten the city. If the party fails (i.e., all party members are killed or knocked unconscious), the Thugs take control of Frostmont and the players get to create new characters.
Character Advancement
The author uses milestones for advancement and requires two major (or six minor) for advancement to level 8. Coming into this adventure, the party had either one Major Milestone or two Minor Milestones. Successful defeat of the Thugs earns the party a second Major Milestone (and one Minor Milestone if required) and advances them to level 8. Regardless of the status of the city, the party can find safe lodging and training.
The Known and Unknown (L9)
There are things we know; there are things we don't know. There are things we know we don't know. But what about the things we don't know we don't know?
Story Overview
The party has reached a milestone in their adventuring and have been summoned to the Conclave of Dryads to make a personal sacrifice to preserve the relationship between the Feywild and the Material Plane.
Adventure Summary
Last we saw the party, they were in Frostmont, having reached level 8: new skills, new feats, new abilities. But they haven't been able to replace their weapons and armor since they were in the Feywild. They have been summoned back to the Feywild and must make a choice.
Setup and Startup Points
The party is in Frostmont completing their training for Level 8 when they receive a message from Ælfspring summoning them to the Feywild. They must venture northeast to the Grove of Esk.
Part One: Summoned to the Feywild
While completing their training in Frostmont, the party receives a message from Ælfspring. The GM can choose to have the party together or separate when the message arrives, but they all receive it at the same time:
You are summoned to the Conclave of Dryads. You have two weeks to arrive. Seek the Grove of Esk.
Part Two: The Grove of Esk
The journey to the Grove of Esk is a seven to ten day journey. Traveling through the grasslands and foothills, the party should have two or three random encounters. The grasslands are unsettled, so a small pack or herd of beasts (i.e., dire wolves, lions, giant elk, etc.) would be appropriate. Eventually, the party reaches the river and begins to follow it.
As you follow the river, you find that it begins to narrow and the water flows a bit slower. A bit farther, you are following a slow-moving stream, and finally a babbling brook, before it ends in a clear pool of water less than five feet in diameter and no more than a few inches deep. The ground surrounding the pool is dry, with no sign of mud. You cannot explain where all the water goes. Ælfspring emerges from the water and greets you, "Welcome to the end and the beginning. Allow me to tell you what time has forgotten. The Rivers Esk and Eden are actually a single river forming a loop that flows through the Feywild and the Material Plane. The Grove of Eden and the Grove of Esk are only two of four portals into the Feywild. As you know, the Grove of Eden has recently been closed. As time passed, geology on the Material Plane changed the landscape. The coastline in the southwest eroded, leaving the second portal of the River Eden underwater. As the island collided with the continent, the land rose, eventually placing the first of Esk's groves high in the Northern Mountains and causing the second to simply disappear into the grasslands. I can tell you nothing more, as I know nothing more. Please come with me to the Conclave of Dryads."
Part Three: The Conclave of Dryads
The Conclave of Dryads is comprised of a number of members equal to that of the party. They are named after, and take their colors from, flowers of the Material Plane:
| Name (Order) | Flower | Color |
| Pinales | Juniper | purple |
| Myrtales | Clove | crimson |
| Asterales | Zinnia | orange |
| Lilales | Lily | white |
| Rosales | Rose | yellow |
The Conclave can be inside or outside, but should not be within sight of the portal. They greet the characters, introducing themselves in turn. The GM should describe the members in relation to their flower and color. The players can take this opportunity to introduce themselves. Any character who speaks to the Conclave without making an introduction is directly asked who they are. After introductions, the characters are told they have been summoned to assist in restoring the bond between the Feywild and the Material Plane. The Conclave will allude to the the history of the Rivers Esk and Eden and the closure of the two Groves of Eden. Juniper speaks to the party:
The Everflowing River is a conduit between our two worlds, strengthening and regenerating each as it flows. As time has passed in your world, the land has moved, restricting what was once a cascade to a trickle. When the Grove of Eden was closed, that trickle became a drip. We have asked you here because we require your assistance and a willing sacrifice. The Everflowing River cannot be moved, but the Groves can. By moving the Groves to new locations, we can remove the flow's obstruction and restore the bond. This will require a permanent sacrifice of strength or health. We are willing to make this sacrifice and hope you are too.
What the Conclave is proposing is a point of Strength or Constitution or a Hit Dice from each character to correspond to the sacrifice made by each Conclave member. The players can ask any questions and/or make any counter proposals they wish. Simple magic will not be accepted. Only personal sacrifice of some kind. Discussions should be guided by the fact that the Conclave of Dryads are Lawful Good and will always follow reasoning for benefit of the greatest good. The GM should make it clear to the players that table discussions are allowed, but their characters should make the decision individually and it should be communicated to the GM privately.
| Conclave Dryad (5) Medium fey, lawful good AC: 16 (natural armor) Hit Points: 143 (22d8 + 44) Speed: 30 ft. STR 12 (+1) DEX 19 (+4) CON 14 (+2) INT 19 (+4) WIS 20 (+5) CHA 21 (+5) Saving Throws: Intelligence +8, Wisdm +9, Charisma +9 Skills: Arcana +8, Nature +8, Perception +9 Senses: darkvision 60 ft., Passive Perception 19 Languages: Common, Elvish, Sylvan CR: 9 (5,000 XP) Proficiency Bonus: +4 Innate Spellcasting. The dryad's innate spellcasting ability is Charisma (spell save DC 17). The dryad can innately cast the following spells, requiring no material components: At will: Druidcraft 3/day: Dispel Magic, Entangle, Plant Growth, Spike Growth 1/day: Moonbeam, Grasping Vine, Wall of Thorns Magic Resistance. The dryad has advantage on saving throws against spells and other magical effects. Speak with Beasts and Plants. The dryad can communicate with beasts and plants as if they and the dryad shared a language. Actions Multiattack. The dryad makes three attacks, using its vine staff, its longbow, or both. Vine Staff. Melee Attack: +9 to hit, reach 5 ft., one target. Hit: 12 (2d6+5) bludgeoning. If the target is a creature, it must succeed on a DC 17 Dexterity saving throw or become restrained by twisting vines for 1 minute. A target restrained in this way can use an action to make a DC 17 Strength (Athletics) or Dexterity (Acrobatics) check, ending the effect on itself on a success. Longbow. Ranged Attack: +8 to hit, range 150/600 ft., one target. Hit: 8 (1d8+4) piercing. Summon Mount (1/Day). The dryad magically summons a mount, which appears in an unoccupied space within 60 feet of the dryad. The mount remains for 8 hours, until it or the dryad dies, or until the dryad dismisses it as an action. The mount uses the stat block of an elk (see the Monster Manual) with these changes: it is a plant instead of a beast, it has an Intelligence of 6, and it understands Sylvan but can't speak. While within 1 mile of the mount, the dryad can communicate with it telepathically. Suppress Magic (Recharge 5–6). The dryad targets one magic item it can see within 120 feet of it. If the magic item isn't an artifact, its magical properties are suppressed for 10 minutes, until the dryad is incapacitated or dies, or until the dryad uses a bonus action to end the effect. |
The GM should then describe the process of moving the portals. The descriptions can be as simple or as detailed as desired. This is a joyous celebration for the Fey; when it is complete the Feywild will experience a rebirth. No direct actions are required on the players parts, but those who chose to make the sacrifice feel their strength or health drain and then return.
Before the ritual begins, the Conclave of Dryads gather into a circle. As they begin singing, they are joined by others of the Feywild: Eladrin of each season, Dryads and Satyrs, Sprites and Pixies. You come to realize, this is not a sacrifice; it is a celebration. When the ritual is complete, you notice in the midst of the Conclave a spring begin to form. Slow at first, but growing with each passing moment, until it bursts forth and showers everything gathered. Those who made the sacrifice feel their skin become saturated and feel their strength and health return and increase. Everyone appears dry on the outside and it is impossible to tell who has been affected.
Once the ritual is complete, the GM should secretly tell those players who chose to make the sacrifice the result of the ritual on their character:
| Sacrifice | Reward |
| STR point | STR point returned and STR +1 |
| CON point | CON point returned and CON +1 |
| Hit Die | Hit Die returned and +1 to Any Ability Score |
Epilogue: Return to the Material Plane
When the party is ready to return to Islemont, Ælfspring will escort them through the portal. They emerge to find themselves about half a day's journey from where they entered the Feywild. They recognize the landscape, as they passed it on their journey to the Grove of Esk, but they are no longer in the grasslands. They are in the foothills.
Ælfspring speaks, "The ritual could not move the river, but it could move the portals. By moving the portals, the flow of the river could be strengthened. In less than ten years, the restored flow will cause the river to shift and carve a cave system into the hills and hide The Grove of Esk in the landscape." "If you were to follow the River Eden to the coast, you would find a changing landscape there too. Soon there will be a delta with rich farm land to feed the growing population of your world."
The party can return to Frostmont (seven days) to relay the information they have learned. If the city was destroyed by Nicandran, they might need to travel to Edgemont (ten days) instead. If they wish, they can follow the River Esk into the mountains in search of the other Grove of Esk (seven days) but risk a deadly encounter with Nicandran outside her lair.
Character Advancement
The author uses milestones for advancement and requires three major (or nine minor) for advancement to level 9. The party should earn one Minor Milestone for each random encounter during the journey to the Grove of Esk. Any member of the party agreeing to assist the Conclave of Dryads, earns their first Major Milestone towards level 9. Any member of the party not agreeing to assist the party earns a Minor Milestone. This is the first time characters within the party can be mismatched in their advancement. It is important to keep track of what characters have earned what Milestones.
| Character/Player | Minor Milestone(s) | Major Milestone |
| 1. | ||
| 2. | ||
| 3. | ||
| 4. | ||
| 5. | ||
| 6. |
The Windmill Farm (L9)
A song-pu? Where did you find it?
Story Overview
After returning from the Feywild, the party is contacted by an historian from Edgemont who wishes to hire them to find out if rumors of a collection of long-lost coins from Islemont’s past are true.
Adventure Summary
A small number of ancient song-pu pieces have been sold in Edgemont and appear to be real. The local historian wishes to hire the party to locate where they were found and if there are more.
Setup and Startup Points
While traveling from the Grove of Esk towards Frostmont or Edgemont, the party is contacted (in person or by Sending) with a job offer.
Prologue
In Islemont's ancient past, most pure silver and gold was reserved for jewelry and precious objects. Some coins were minted in silver (sib-pu) and gold (pu) for use by the nobility or in religious ceremonies, but the vast majority were minted using the naturally occurring electrum alloy for coins called song-pu. When they learned to separate the electrum into its composite metals, the old song-pu coins were melted down for use in new sib-pu (silver) and pu (gold) coins, as well as jewelry and other objects. The few song-pu coins that still exist in Islemont are extremely valuable for their historic nature, worth much more than their simple material value. Tishan Rouse, a mage studying the prehistory of Islemont, recently learned of the sale of three song-pu coins to a merchant in Edgemont. Although she was not able to acquire them, she was able to examine them long enough to cast Identify and determine they were real. She was also able to learn where they were found. She is too old to travel herself, and would like to hire the party to investigate.
| Tishan Rouse (Mage) Medium Humanoid (female human), Neutral AC: 12 (15 with mage armor) Hit Points: 40 (9d8) Speed: 30 ft. STR 8 (-2) DEX 10 (0) CON 10 (0) INT 19 (+4) WIS 12 (+1) CHA 11 (0) Saving Throws: INT +6, WIS +4 Skills: Arcana +6, History +6 Languages: Common, Any three additional languages CR: 6 (2300 XP) Proficiency Bonus: +3 Spellcasting. Tishan is a 9th-level spellcaster. Her spellcasting ability is Intelligence (spell save DC 14, +7 to hit with spell attacks). She has the following wizard spells prepared: Cantrips (at will): Fire Bolt, Light, Mage Hand, Prestidigitation 1st level (4 slots): Detect Magic, Mage Armor, Magic Missile, Shield 2nd level (3 slots): Misty Step, Suggestion 3rd level (3 slots): Counterspell, Fireball, Fly 4th level (3 slots): Greater Invisibility, Ice Storm 5th level (1 slot): Cone of Cold Actions Dagger. Melee or Ranged Attack: +3 to hit, reach 5 ft. or range 20/60 ft., one target. Hit: 2 (1d4) piercing. |
"Thank you for seeing me. My name is Tishan Rouse and I have dedicated my life to studying the ancient history of Islemont. Recently I have been able to examine three song-pu reportedly minted before the island became a peninsula." "My research tells me that they are real and that there might be more. I would go myself, but I have become too old to travel. I would like to hire you to investigate and return any artifacts you might find."
Because of her use of the Identify spell, Tishan is able to tell the party exactly where the three song-pu were found. They are in newly excavated tunnels under a windmill on a farm one and a half days southwest of Edgemont. She has no interest in disturbing the farmer or his family; she only wishes to protect any artifacts he might discover. She provides you with ten scrolls of Mold Earth and five scrolls of Stone Shape to offer in exchange. (If there are no spellcasters with Identify, she also provides six scrolls of Identify to the party; she doesn't want to waste her time examining fakes.)
Part One: Travel to the Windmill
Travel to the Windmill is easy, but a random encounter with two trolls should occur on the afternoon or evening of the first day. It can be while the party is traveling or after they have made camp.
| Troll (2) Large giant, Chaotic Evil AC: 15 (Natural Armor) Hit Points: 84 (8d10+40) Speed: 30 ft. STR 18 (+4) DEX 13 (+1) CON 20 (+5) INT 7 (-2) WIS 9 (-1) CHA 7 (-2) Skills: Perception +2 Senses: Darkvision 60 ft., Passive Perception 12 Languages: Giant CR: 5 (1,800 XP) Proficiency Bonus: +3 Keen Smell. The troll has advantage on Wisdom (Perception) checks that rely on smell. Regeneration. The troll regains 10 hit points at the start of its turn. If the troll takes acid or fire damage, this trait doesn't function at the start of the troll's next turn. The troll dies only if it starts its turn with 0 hit points and doesn't regenerate. Actions Multiattack. The troll makes three attacks: one with its bite and two with its claws. Bite. Melee Attack: +7 to hit, reach 5 ft., one target. Hit: 7 (1d6+4) piercing damage. Claw. Melee Attack: +7 to hit, reach 5 ft., one target. Hit: 11 (2d6+4) slashing damage. |
| Troll Regeneration. Smashing a troll’s bones and slashing through its rubbery hide only makes it angry. A troll’s wounds close quickly. If the monster loses an arm, a leg, or even its head, those dismembered parts can sometimes act with a life of their own. A troll can even reattach severed body parts, untroubled by its momentary disability. Only acid and fire can arrest the regenerative properties of a troll’s flesh. The trolls, enraged, will attack individuals making acid and fire attacks against them above all other prey. Troll Freaks. Their regenerative capabilities make trolls especially susceptible to mutation. Although uncommon, such transformations can result from what the troll has done or what has been done to it. A decapitated troll might grow two heads from the stump of its neck, while a troll that eats a fey creature might gain one or more of that creature’s traits. |
Character Advancement
They have no treasure, but parts of their bodies (e.g., teeth, hair, claws, etc.) can be taken for potions and/or components. Defeat of the two Trolls will earn the party one minor Milestone.
Part Two: The Windmill
The party will reach the windmill by midday, approaching from the northeast. GM Note: The GM needs to decide if Warford and his family will be friendly or hostile towards the party. Both scenarios are presented.
As you approach the windmill, you emerge from the trees and come to the edge of a natural outcrop of stone. The farm is about twenty feet below you. It is relatively small with less than two dozen cows eating from bales of hay. There do not appear to be any crops planted in the surrounding land. Beyond the windmill there is a structure, but you can't make out what it is. To the southeast of the windmill there are two buildings with red tile roofs appearing to be more residential in design; a well is situated between them. There are rock paths leading between all of the buildings. You seem to have approached from the back side of the farm.
See Windmill Farm in Appendix A: Maps for an overhead view of the area.
The Windmill (Friendly)
| Warford (m) and Audery (f) Londwyrc Sibbford (m) and Brea (f) Londwyrc Medium Humanoid (human), Neutral Good AC: 11 (16 with chain shirt, shield) Hit Points: 11 (2d8 + 2) Speed: 30 ft. STR 13 (+1) DEX 12 (+1) CON 12 (+1) INT 10 (+0) WIS 11 (+0) CHA 10 (+0) Skills: Perception +2 Senses: Passive Perception 12 Languages: Common CR: 1/8 (25 XP) Proficiency Bonus: +2 Actions Shortsword. Melee Attack: +3 to hit, reach 5 ft., one target. Hit: 4 (1d6+1) piercing damage. The NPCs are based on Guards, but possess shortswords instead of spears. |
| Ayden (m) and Ethel (f) Forstand Medium Humanoid (human), Neutral Good AC: 11 (16 with chain shirt, shield) Hit Points: 11 (2d8 + 2) Speed: 30 ft. STR 11 (+0) DEX 14 (+2) CON 12 (+1) INT 10 (+0) WIS 13 (+1) CHA 14 (+2) Skills: Religion +2, Deception +4, Persuasion +4 Senses: Passive Perception 10 Languages: Common CR: 2 (450 XP) Proficiency Bonus: +2 Actions Shortsword. Melee Attack: +3 to hit, reach 5 ft., one target. Hit: 4 (1d6+1) piercing damage. The NPCs are based on Cult Fanatics, but possess shortswords instead of daggers. They are trying to hide the discovery of the coins because they know of Guzzik and the Ring of Mind Shielding. |
| Hired Hands (6) Medium Humanoid (human), Neutral AC: 10 Hit Points: 4 (1d8) Speed: 30 ft. STR 10 (+0) DEX 10 (+0) CON 10 (+0) INT 10 (+0) WIS 10 (+0) CHA 10 (+0) Senses: Passive Perception 10 Languages: Common CR: 0 (10 XP) Actions Dagger. Melee or Range Attack: +2 to hit, reach 5 ft. or range 20/60 ft., one target. Hit: 2 (1d4) piercing damage. These NPCs are based on Commoners, but possess daggers instead of clubs. |
The party will need to decide if they will climb down the rock face, if they will walk around to the southern side of the farm, or if they will call out to the farm. Any character trying to climb down the rock face must succeed on a DC25 DEX/Acrobatics or STR/Athletics check or take 2d6 bludgeoning damage. If the character makes use of a rope, they gain a +5 on the check. Any character choosing to walk around to the southern side of the farm will take five minutes if they head northwest or fifteen minutes to find a safe path if they head east. If they call out to the farm, Warford and Sibbford will emerge from the main quarters and walk towards the double gate into the livestock yard.
Two men emerge from the eastern building's northern door and walk towards the double gate into the livestock yard. The older waves your way and calls out, "Welcome to Windmill Farm. What can we do for you?"
As you emerge from the trees, you see the fence surrounding the livestock. Just as you notice a few farm workers around, one of them looks up and greets you. "Good day and welcome to Windmill Farm."
Warford asks, "It's not often we get visitors. What brings you out this way?"
"We always knew there was something under the windmill 'cause of the stairs, but we couldn't get down there from all the rubble. Once we mended the fences and whatnot, we started clearing the steps a little each day 'til we found a room that's almost as big as the house!" "From the dust and dirt, it looked like it had been sealed off for over a century. There were a few crates, a wheelbarrow, and some small rooms with straw mats, but nothing that looked valuable. We saw a few coins here and there, so we picked those up." He walks over to a sideboard, opens a drawer and takes out a small coffer. When he opens it, a look of puzzlement comes across his face. "Audery, did you move them? Nothing's in here. Audery gives him a look of confusion, walks over and looks in the drawer. "Maybe they fell out."
GM Note: The party already knows where the missing coins are. They might have revealed this prior to the above dialogue. If so, it should be modified so that Warford is confirming that the coins are missing from the coffer. What nobody knows is that Ayden and Ethel are the ones that stole them trying to protect the family from Guzzik. After confirming that the coins are not in the drawer, Audery will return to telling the story of exploring under the windmill.
"Anyway, we've tried to get the big room clean, but haven't really done much else. We know there are some other small rooms with straw mats, and four other rooms: a big one that looks like it was an office, one with a big table, and two small bedrooms. Our torches put off too much smoke to make working down there easy. And we're afraid to set the whole place on fire!"
Character Advancement
Peacefully gaining access to beneath the windmill earns the party their second minor milestone.

The Windmill (Hostile)
| Warford (m) and Audery (f) Londwyrc Sibbford (m) and Brea (f) Londwyrc Ayden (m) and Ethel (f) Forstand Medium Humanoid (human), Lawful Neutral AC: 12 (13 with leather armor; 15 with Shield of Faith) Hit Points: 33 (6d8+6) Speed: 30 ft. STR 11 (0) DEX 14 (+2) CON 12 (+1) INT 10 (0) WIS 13 (+1) CHA 14 (+2) Skills: Religion +2, Deception +4, Persuasion +4 Languages: Common CR: 2 (450 XP) Proficiency Bonus: +2 Dark Devotion. The fanatic has advantage on saving throws against being charmed or frightened. Spellcasting. The fanatic is a 4th-level spellcaster. Its spellcasting ability is Wisdom (spell save DC 11, +3 to hit with spell attacks). The fanatic has the following cleric spells prepared: Cantrips (at will): Light, Sacred Flame, Thaumaturgy 1st level (4 slots): Command, Inflict Wounds, Shield of Faith 2nd level (3 slots): Hold Person, Spiritual Weapon Actions: Multiattack.: The fanatic makes two melee attacks. Shortsword. Melee Attack: +4 to hit, reach 5 ft., one target. Hit: 5 (1d6+2) piercing damage. Dagger.: Melee or Ranged Weapon Attack: +4 to hit, reach 5 ft. or range 20/60 ft., one creature. Hit: 4 (1d4+2) piercing damage. The NPCs are based on Cult Fanatics, but possess shortswords in addition to daggers. |
| Hired Hands (6) Medium Humanoid (human), Lawful Neutral AC: 11 (12 with leather armor) Hit Points: 9 (2d8) Speed: 30 ft. STR 11 (+0) DEX 12 (+1) CON 10 (+0) INT 10 (+0) WIS 11 (+0) CHA 10 (+0) Skills: Religion +2, Deception +2 Senses: Passive Perception 10 Languages: Common CR: 1/8 (25 XP) Proficiency Bonus: +2 Actions Shortsword. Melee Attack: +3 to hit, reach 5 ft., one target. Hit: 4 (1d6+1) piercing damage. Dagger. Melee or Range Attack: +3 to hit, reach 5 ft. or range 20/60 ft., one target. Hit: 3 (1d4+1) piercing damage. These NPCs are based on Cultists, but possess shortswords and daggers instead of scimitars. |
The party will need to decide if they will climb down the rock face, if they will walk around to the southern side of the farm, or if they will call out to the farm. Any character trying to climb down the rock face must succeed on a DC25 DEX/Acrobatics or STR/Athletics check or take 2d6 bludgeoning damage. If the character makes use of a rope, they gain a +5 on the check. Any character choosing to walk around to the southern side of the farm will take five minutes if they head northwest or fifteen minutes to find a safe path if they head east. If they call out to the farm, Warford and Sibbford will emerge from the main quarters and walk towards the double gate into the livestock yard.
Two men emerge from the eastern building's northern door and walk towards the double gate into the livestock yard. The older waves your way and calls out, "Welcome to Windmill Farm. What can we do for you?"
Any character with a Passive Perception of 10 or higher notice both men are carrying daggers on their belts. After a short conversation, Warford and Sibbford will raise a ladder to the party so they can safely climb down the rock face. Warford will then invite the party into the main residence for something to drink. Roll CHA/Deception (+4) for Warford and Sibbford. Any character with a Passive Perception above their roll notices something is amiss. The party can make WIS/Perception (vs the previous Deception rolls) checks for specific information. If any member(s) of the party chose to go around and enter from the south, they will be greeted by a hired hand as they walk along the western fence or enter the southern path.
As you emerge from the trees, you see the fence surrounding the livestock. Just as you notice a few farm workers around, one of them looks up and greets you. "Good day and welcome to Windmill Farm."
| Deception | Information |
| +5 | Hired Hands are hiding daggers in their boots. |
| +10 | Accents, which come and go, are not local to rural Edgemont. |
| +10 | The women are wearing a rune stone on a bracelet. |
| +15 | The men are wearing a rune stone around their necks. |
Eventually, everyone is gathered in the dining area of the main residence.
Warford asks, "It's not often we get visitors. What brings you out this way?"
Warford and his family should act friendly, but the story they tell about the farm is not entirely true. They claim to have taken up residence about two years ago when they came upon the ruins of the windmill. They spent most of their time rebuilding the structures and have only been able to make their way underground in the last couple of months. In reality they took over the farm after the death of the previous owner about a month ago. They were originally hired to work on the farm, but forbidden to enter the windmill. One day Warford snuck in and discovered the blocked stairs.
"We always knew there was something under the windmill because of the stairs, but we couldn't get down there from all the rubble. Once we repaired the fences and whatnot, we started clearing the steps a little each day until we found a room that was almost as big as the main house." "From the dust and dirt, it looked like it had been sealed off for over a century. There were a few crates, a wheelbarrow, and some small rooms with straw mats, but nothing that looked valuable. We saw a few coins here and there, so we picked those up." He walks over to a sideboard, opens a drawer and takes out a small coffer. When he opens it, a look of puzzlement comes across his face. "Audery, did you move them? Nothing's in here. Audery gives him a look of confusion, walks over and looks in the drawer. "Maybe they fell out."
"Anyway, we concentrated on trying to get the big room clean, but haven't really done much else. We know there are some other small rooms with straw mats, and four other rooms: a big one that looks like it was an office, one with a big table, and two small bedrooms. Our lanterns put off too much smoke to make working down there easy. And we're afraid to set the place on fire!"
If the party asks to go under the windmill, Warford says it is getting late and that it would be best to go in the morning when there is more natural light. He apologizes for having no guest quarters and offers the party to sleep in the common room of the servants residence. If the party accepts the offer to stay in the common room, the GM should ask if anyone is sleeping in the adjacent bedroom and note if the party has set a watch. Sibbford, Brea, Ayden, Ethel, and the six Hired Hands will attack after the party has gone to sleep. If the party chooses to sleep elsewhere, the GM should note if the party has set a watch. Sibbford, Brea, Ayden, Ethel, and four Hired Hands will attack after the party has gone to sleep. GM Note: All buildings are constructed of wood and filled with flammable materials. Area of effect spells run the risk of causing severe damage to the structures and/or igniting the buildings. Interior walls have 10hp; exterior walls have 15hp. Any area of effect (AOE) doing bludgeoning or force damage risks hitting a wall. Any AOE doing fire or lightning damage risks setting the building on fire.
Encounter: The Servants' Residence
| 5 | Win | 5 | Door | 5 | Win | 5 | O |
| Door | 5 | 5 | 5 | 5 | 5 | 5 | Win |
| Wall | 5 | 5 | 5 | 5 | 5 | 5 | Wall |
| * | Door | 5 | 5 | 5 | 5 | 5 | Wall |
| 5 | 5 | Wall | 5 | 5 | 5 | 5 | Win |
| 5 | 5 | 5 | 5 | 5 | 5 | Door | 5 |
| Bed | Bed | 5 |
Encounter: The Party's Campsite
Encounter: The Main Residence
Encounter: The Windmill
Character Advancement
Defeat of the Cultists and Cult Fanatics earns the party a second Minor Milestone.
Part Three: Under the Windmill
Whether Warford and Audery were friendly or hostile, the party is now able to explore under the windmill. They will need to bring an artificial light source with them, but torches and/or lanterns run the risk of setting fire to the decaying materials. If friendly, remember that Sibbford will be accompanying the party.
Once underground, you see that they were telling (mostly) the truth. Only the stairs and large room have been cleared. The stairs enter the large room (35ft x 30ft) in the southeast corner. The rooms with straw mats line the northern wall, but they look more like cells than rooms. There is a single door on the western wall and a double door on the eastern wall. [Sibbford speaks up, "As you can see, this is all we were able to clear. The doors lead to a hallway that goes around this room." He points at the western and eastern walls, then motions along the southern wall "There are more little rooms over there. And that's where the room with the big table is. The office and bedrooms are that way." "Most of the coins were in the office, but a couple were just on the floor here and there."]
Slave Master's Office (and Closet): There are two items of interest in the office: a map of the planet showing Islemont as an island and a journal written in Deep Speech. The closet (10ft x 10ft) contains nine crates (3ft per side) with about 15 pounds of song-pu coins (500 coins) in each (4,500 total). Bath and Dressing Room: These adjoining rooms have nothing of value in them. Bedrooms: The southern bedroom has the remains of twin bunk beds and a dressing cabinet. The northern bedroom has the remains of a single bed, a dressing cabinet, and a chest. On the table is a Ring of Mind Shielding housing the soul of Guzzik, a Mind Flayer that was master of the recovery operation here. See the Epilogue for full details on the Ring of Mind Shielding The Eastern Privy: Long dried up, this is the remains of the masters' latrine. The Sorting Room: As items and debris were brought out of the tunnels, they were sorted here before being crated for shipment or brought to the surface for scattering. The Tunnel: Long and dark, it leads from the reinforced structures beneath the windmill to the mining areas under the surface rockface. Storage Areas: Six branches of cleared tunnels reaching reinforced stone walls. They appear to have been magically carved from the bedrock to serve as storage places for the recovered song-pu coins. Searching through the six branches will recover 100 coins per hour, to a total of 500 coins (15 pounds). If any characters tries to magically identify the ring or any of the mine's contents, read the following:
Eons ago, while Islemont still drifted on the sea, a shunned Mind Flayer Arcanist named Guzzik took up residence in the windmill. Finding the Gith inhabitants easily manipulated, he enslaved about a dozen of them to collect the electrum coins buried beneath the old windmill. Guzzik had no need of the coins; he just took joy in controlling the actions of his slaves. Years into his exile, Guzzik was visited by members of his old colony. They had come to invite him back. He had no desire to return and had prepared for them by creating the Ring of Mind Shielding to protect himself. Unable to communicate with him telepathically, the Mind Flayers thought him lost and chose to destroy him and his Gith slaves.
The party has recovered 5,000 song-pu coins weighing a total of 150 pounds; each of the ten crate is 27 cubic feet. A Bag of Holding can hold up to 500 pounds in a size no larger than 64 cubic feet. The party can fit two crates (or the loose contents of three) into a single Bag of Holding, requiring four or five Bags of Holding to transport the coins. A Handy Haversack, can hold up to 120 pounds in a size no larger than 12 cubic feet. The party would need one Handy Haversack per loose crate of coins, or ten total. Everything would fit easily into a Portable Hole.
Aftermath (Friendly)
After fully exploring the tunnels, Sibbford invites the party to return to the main residence to speak with Warford and the family. Warford is surprised and delighted to hear of what the party has found, but is still curious to know how the three coins made their way to Edgemont. He will let you take one crate now, but the other nine will remain until the party is able to find out who took the missing three from the coffer. The party must decide what they will do. If they return to Tishan's residence (or contact her via Sending, all she is able to tell them the coins were brought to Edgemont by a young couple trying to prevent a dangerous discovery.
Tishan is very interested in the coins, but does not have the resources (between 50,000gp and 100,000gp depending on condition) to purchase all 5,000 from (or reimburse) Warford. She offers 2,500gp for the crate he allowed to be brought to Edgemont and asks that he keep the rest secret while she researches the coins. He agrees only if the party returns/stays to find the young couple.
Aftermath (Hostile)
If the party is in need of a way to transport the coins, they can search the barn to find four horses and a wagon to carry the crates back to Edgemont. The return trip will take two full days, with the party arriving in Edgemont late on the night of the second or on the morning of the third.
When the party presents the crates to Tishan, she is overwhelmed by the number of coins you have brought. Tishan quickly becomes lost in thought, forgetting the party is there. She mumbles occasional sentences: "One, maybe two, dozen coins, I thought. But five thousand? In one place? The entire early history of Islemont will have to be rewritten. How many coins were minted? Are these just the coins that survived? Or were none destroyed? I wish I could live long enough to answer these questions." If she's interrupted, Tishan apologizes, "I'm sorry. It's just that even if only one percent survived, they would have had to mint over half a million coins for a population we think was fewer than 5,000! What were they doing with all those coins?"
Epilogue
Tishan will invite the party to join her in studying the coins if they are interested. She is especially interested in any spellcasters with the ability to cast Identify or Legend Lore to learn the specific history of individual coins.
Identify will reveal fundamental facts about the coin: alloy percentages; date minted; mint mark meaning; date buried; etc.
Legend Lore will reveal more of a narrative tale about the coin's use: Pressed ten years before its burial, the coin passed through hundreds of hands: nobles, soldiers, farmers, merchants.
Players can create their own stories for each coin, but they should be given the following parameters as a guide:
|
If the party asks Tishan about the Ring of Mind Shielding, she will cast Legend Lore and relate all information to them. She will offer to cast Banishment to rid the ring of Guzzik's soul.
| Guzzik and the Ring of Mind Shielding No spell, with the exception of Legend Lore, will reveal that the ring is anything besides a normal Ring of Mind Shielding. The response to Legend Lore will not directly reveal Guzzik's soul is inside the ring, instead it will tell the caster: "Created to protect him from his enemies, the resolve of this ring's creator endures within it." When a character places the ring on a finger, Guzzik will wait until attunement is complete (24 hours) before beginning to communicate with them. Once attuned, a DC15 WIS spell save (Dominate Person) is required to be able to remove the ring. At first, Guzzik will communicate simple thoughts through telepathy trying to convince the wearer the ring is a sentient item and not possessed. Over time he will try (Deception +6; Persuasion +6) to convince them to "continue his work." Only if the character is able to resist the CHA/Deception or CHA/Persuasion attempt (once per day with Disadvantage), can a Remove Curse spell be used to remove the ring. Guzzik's soul remains in the ring. Banishment (as well as Divine Word or similar spell) can expel Guzzik's soul from the ring (whether worn or not) and back to his colony. Although the spell's duration is not permanent, the colony will imprison or destroy Guzzik and he will not return. |
Character Advancement
The author uses milestones for advancement and requires three major (or nine minor) for advancement to level 9. Defeat of the two Trolls has earned the party one minor Milestone. Successful discussions with (or defeat of) Warford and his family has earned the party a second minor Milestone. Recovery and return of the song-pu to Tishan Rouse has earned the party a third minor Milestone. If the party as a whole assists Tishan Rouse with research into the coins, they earn a fourth minor Milestone. If individual characters assist, only those characters will earn one. Because characters within the party can be mismatched in their advancement, it is important to keep track of what characters have earned what Milestones.
| Character/Player | Minor Milestone(s) | Major Milestone(s) |
| 1. | ||
| 2. | ||
| 3. | ||
| 4. | ||
| 5. | ||
| 6. |
Appendix A: Maps
 Islemont. Each hex represents one (green), two (tan), or three (brown) day's journey by foot. Travel time is halved if on a mount, except in a brown hex where mounts cannot travel. Original artwork.
 Calder Village (Day). Image from patreon.com/rustymaps
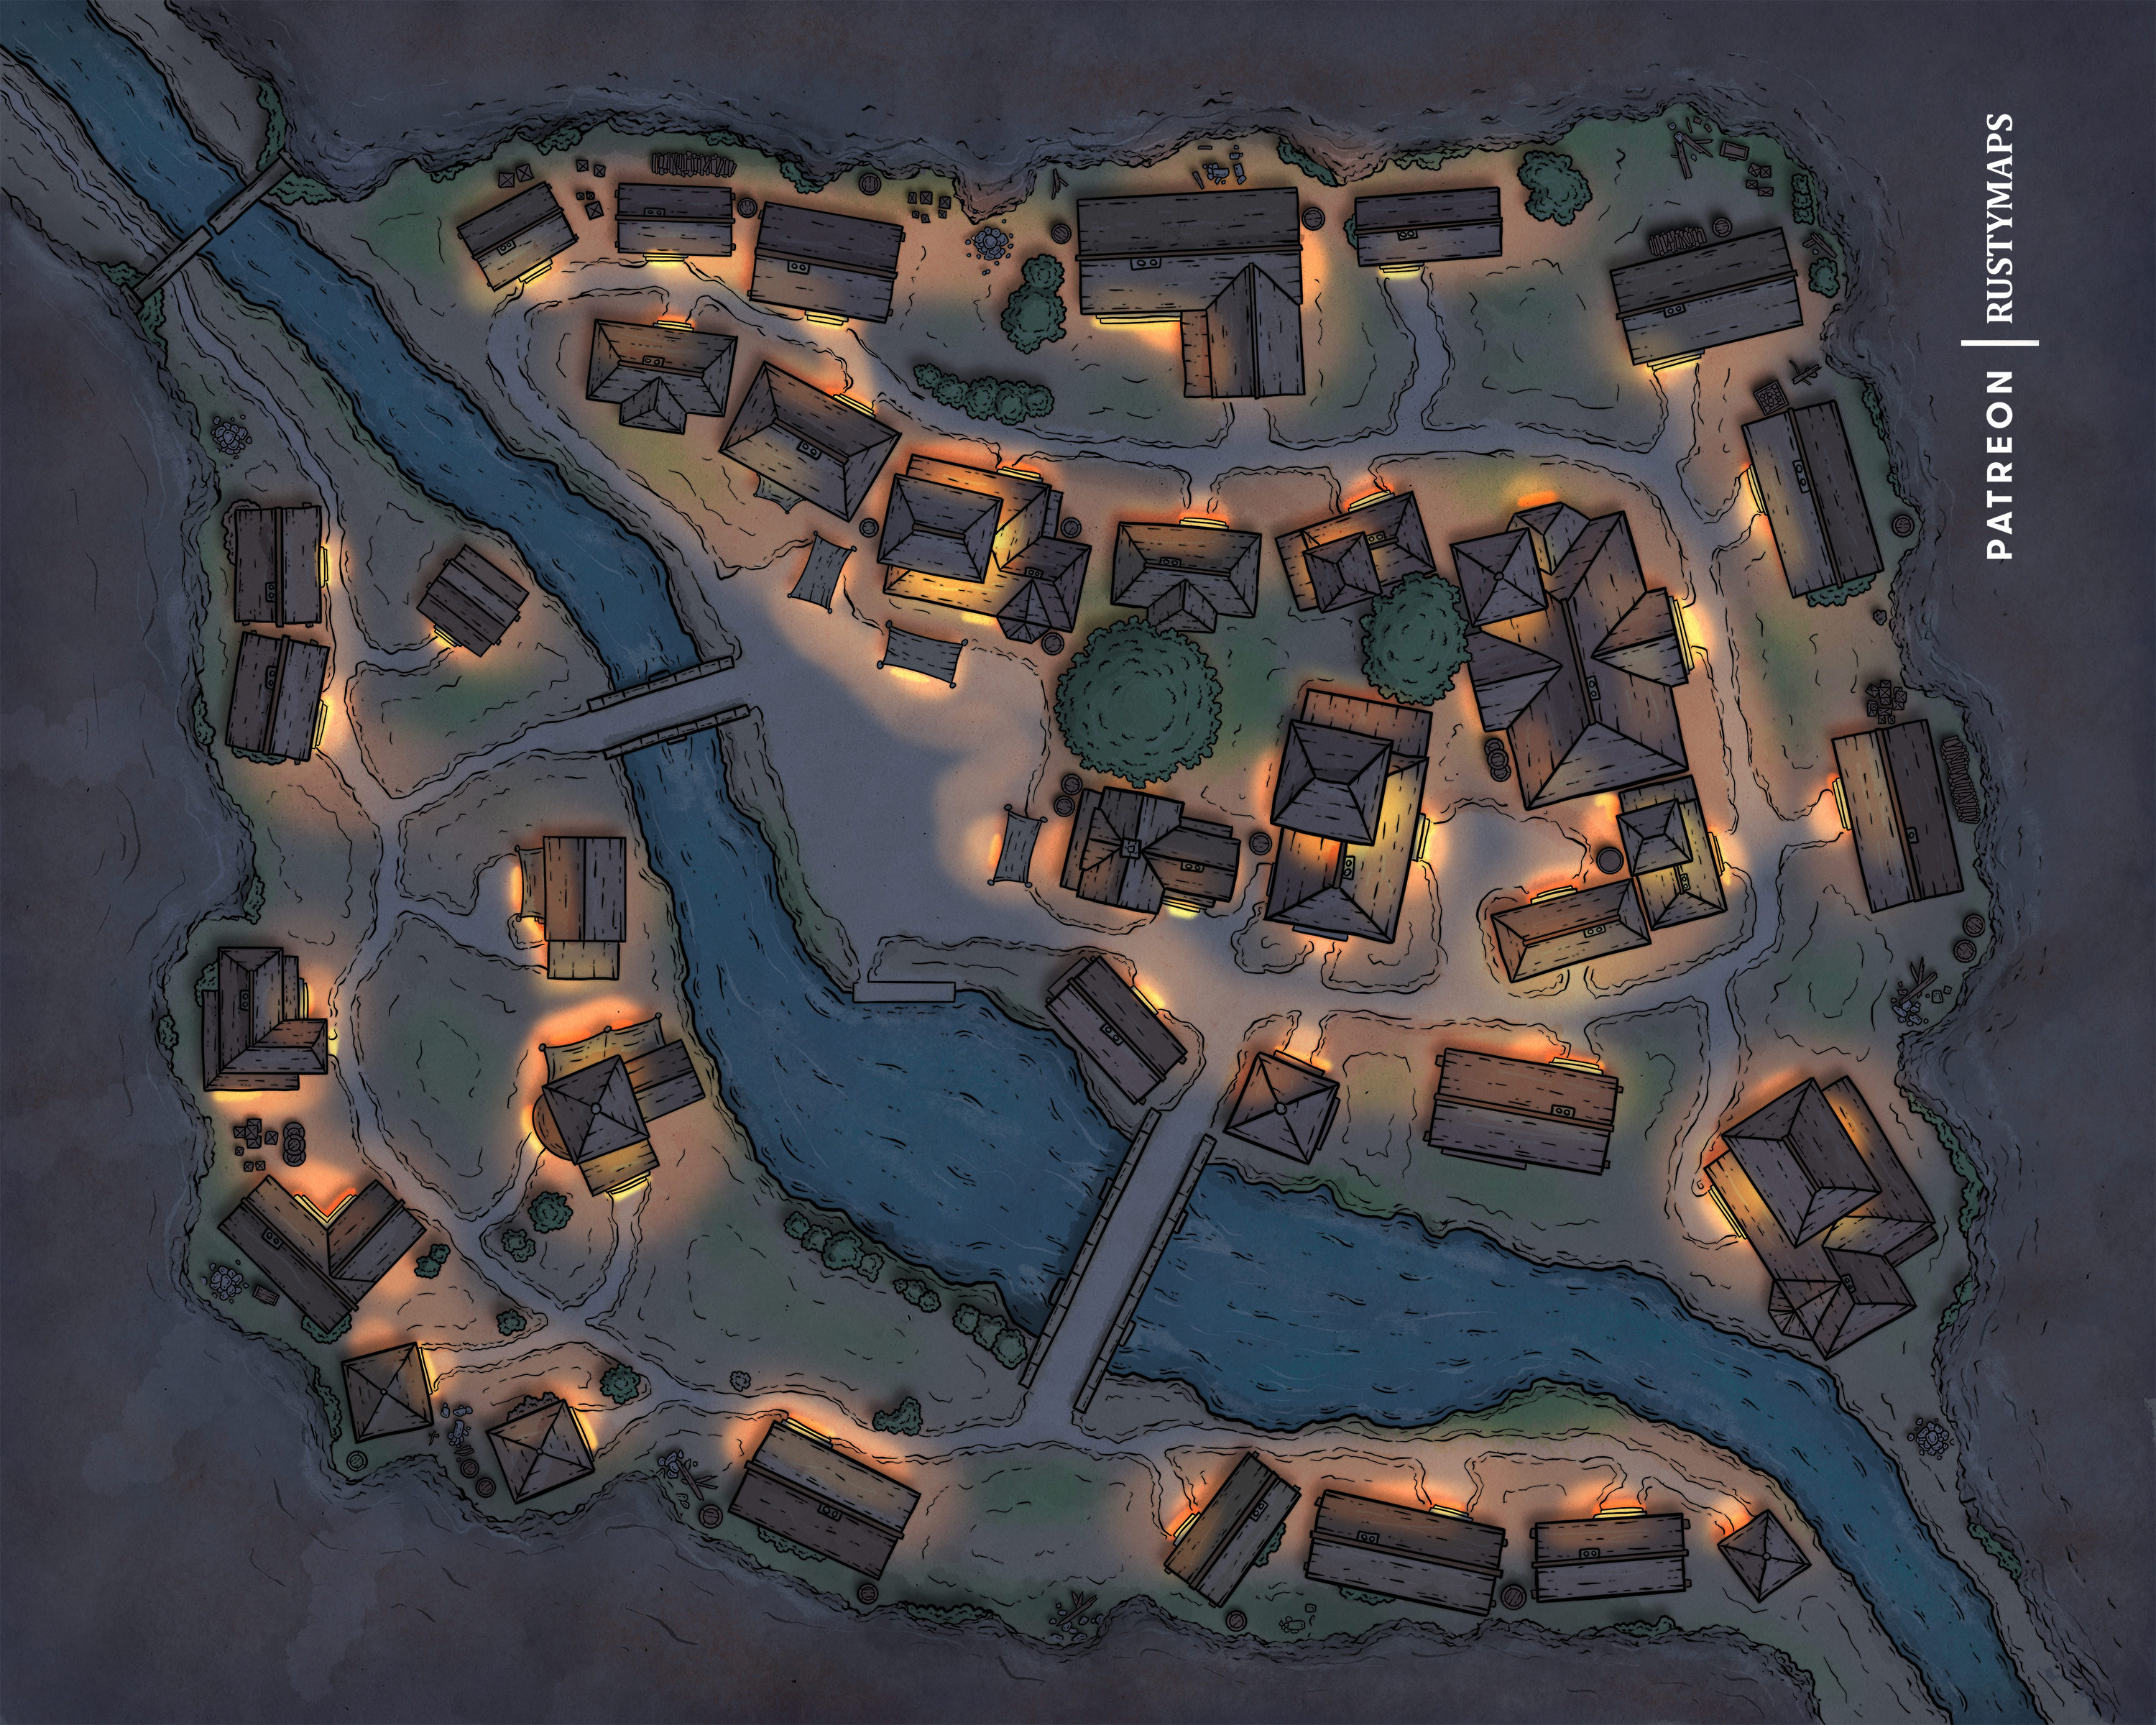 Calder Village (Night). Image from patreon.com/rustymaps
 Auntie Lala's Lair. Each square represents five feet. (The tunnels on the left and bottom right should be ignored). Image found online.
 Calder Monastery. Each square represents five feet. Original artwork.
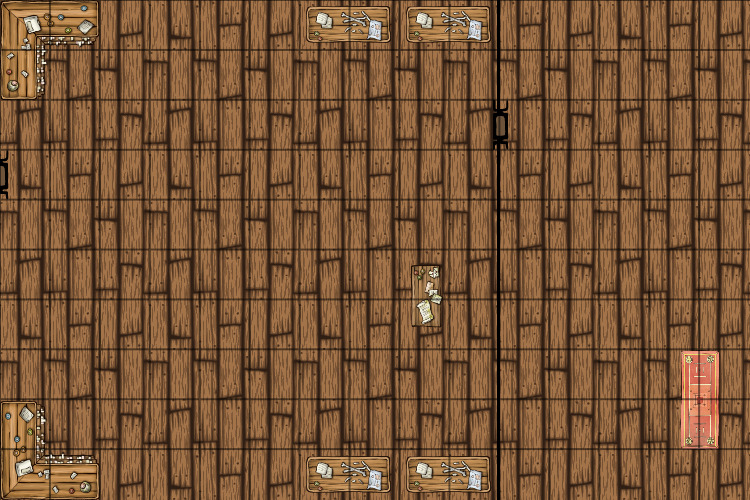 Arsys' Apartment. Each square represents five feet. Original artwork.
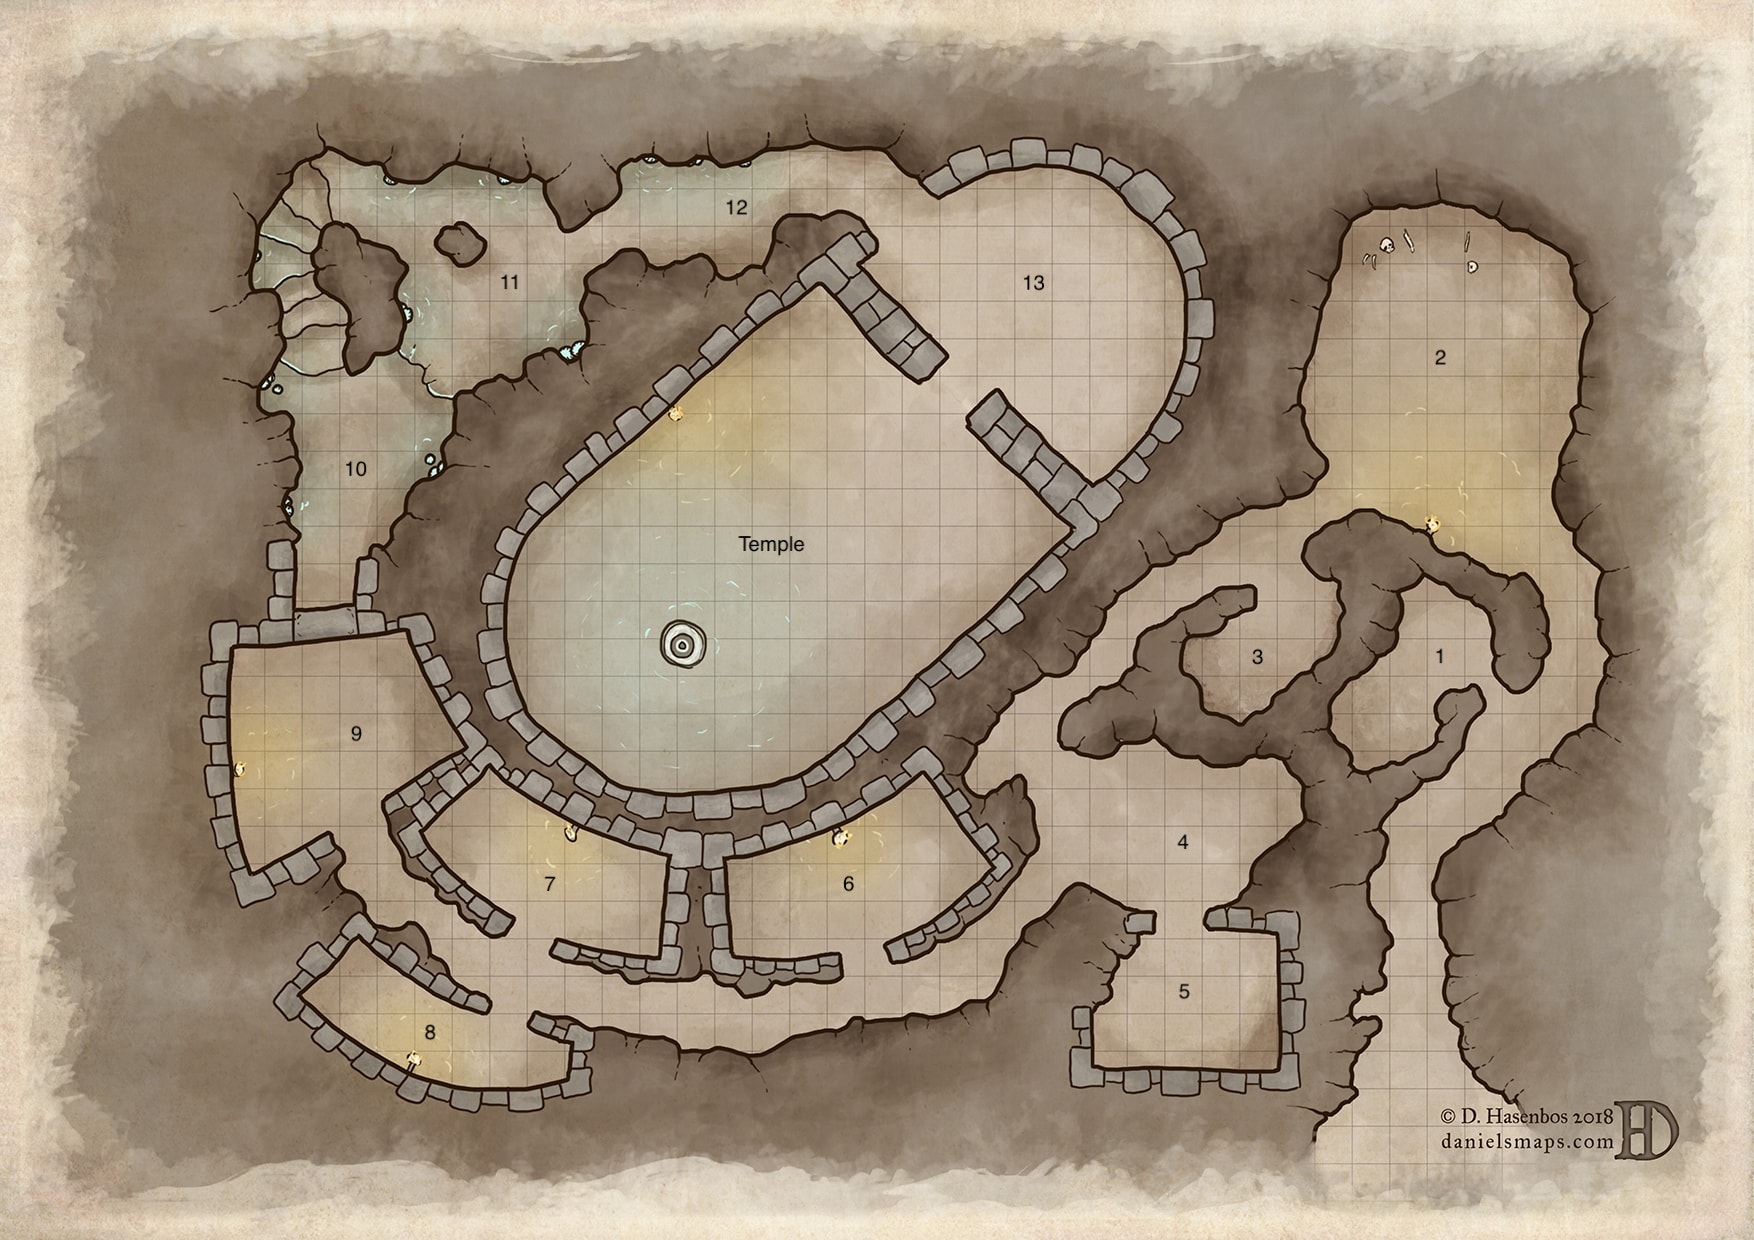 The Caves of Maglubiyet. Each square represents five feet. Image © D. Hasenbos 2018 (danielsmaps.com).
 Frostmont. Each hex represents one hour's journey. Original artwork.
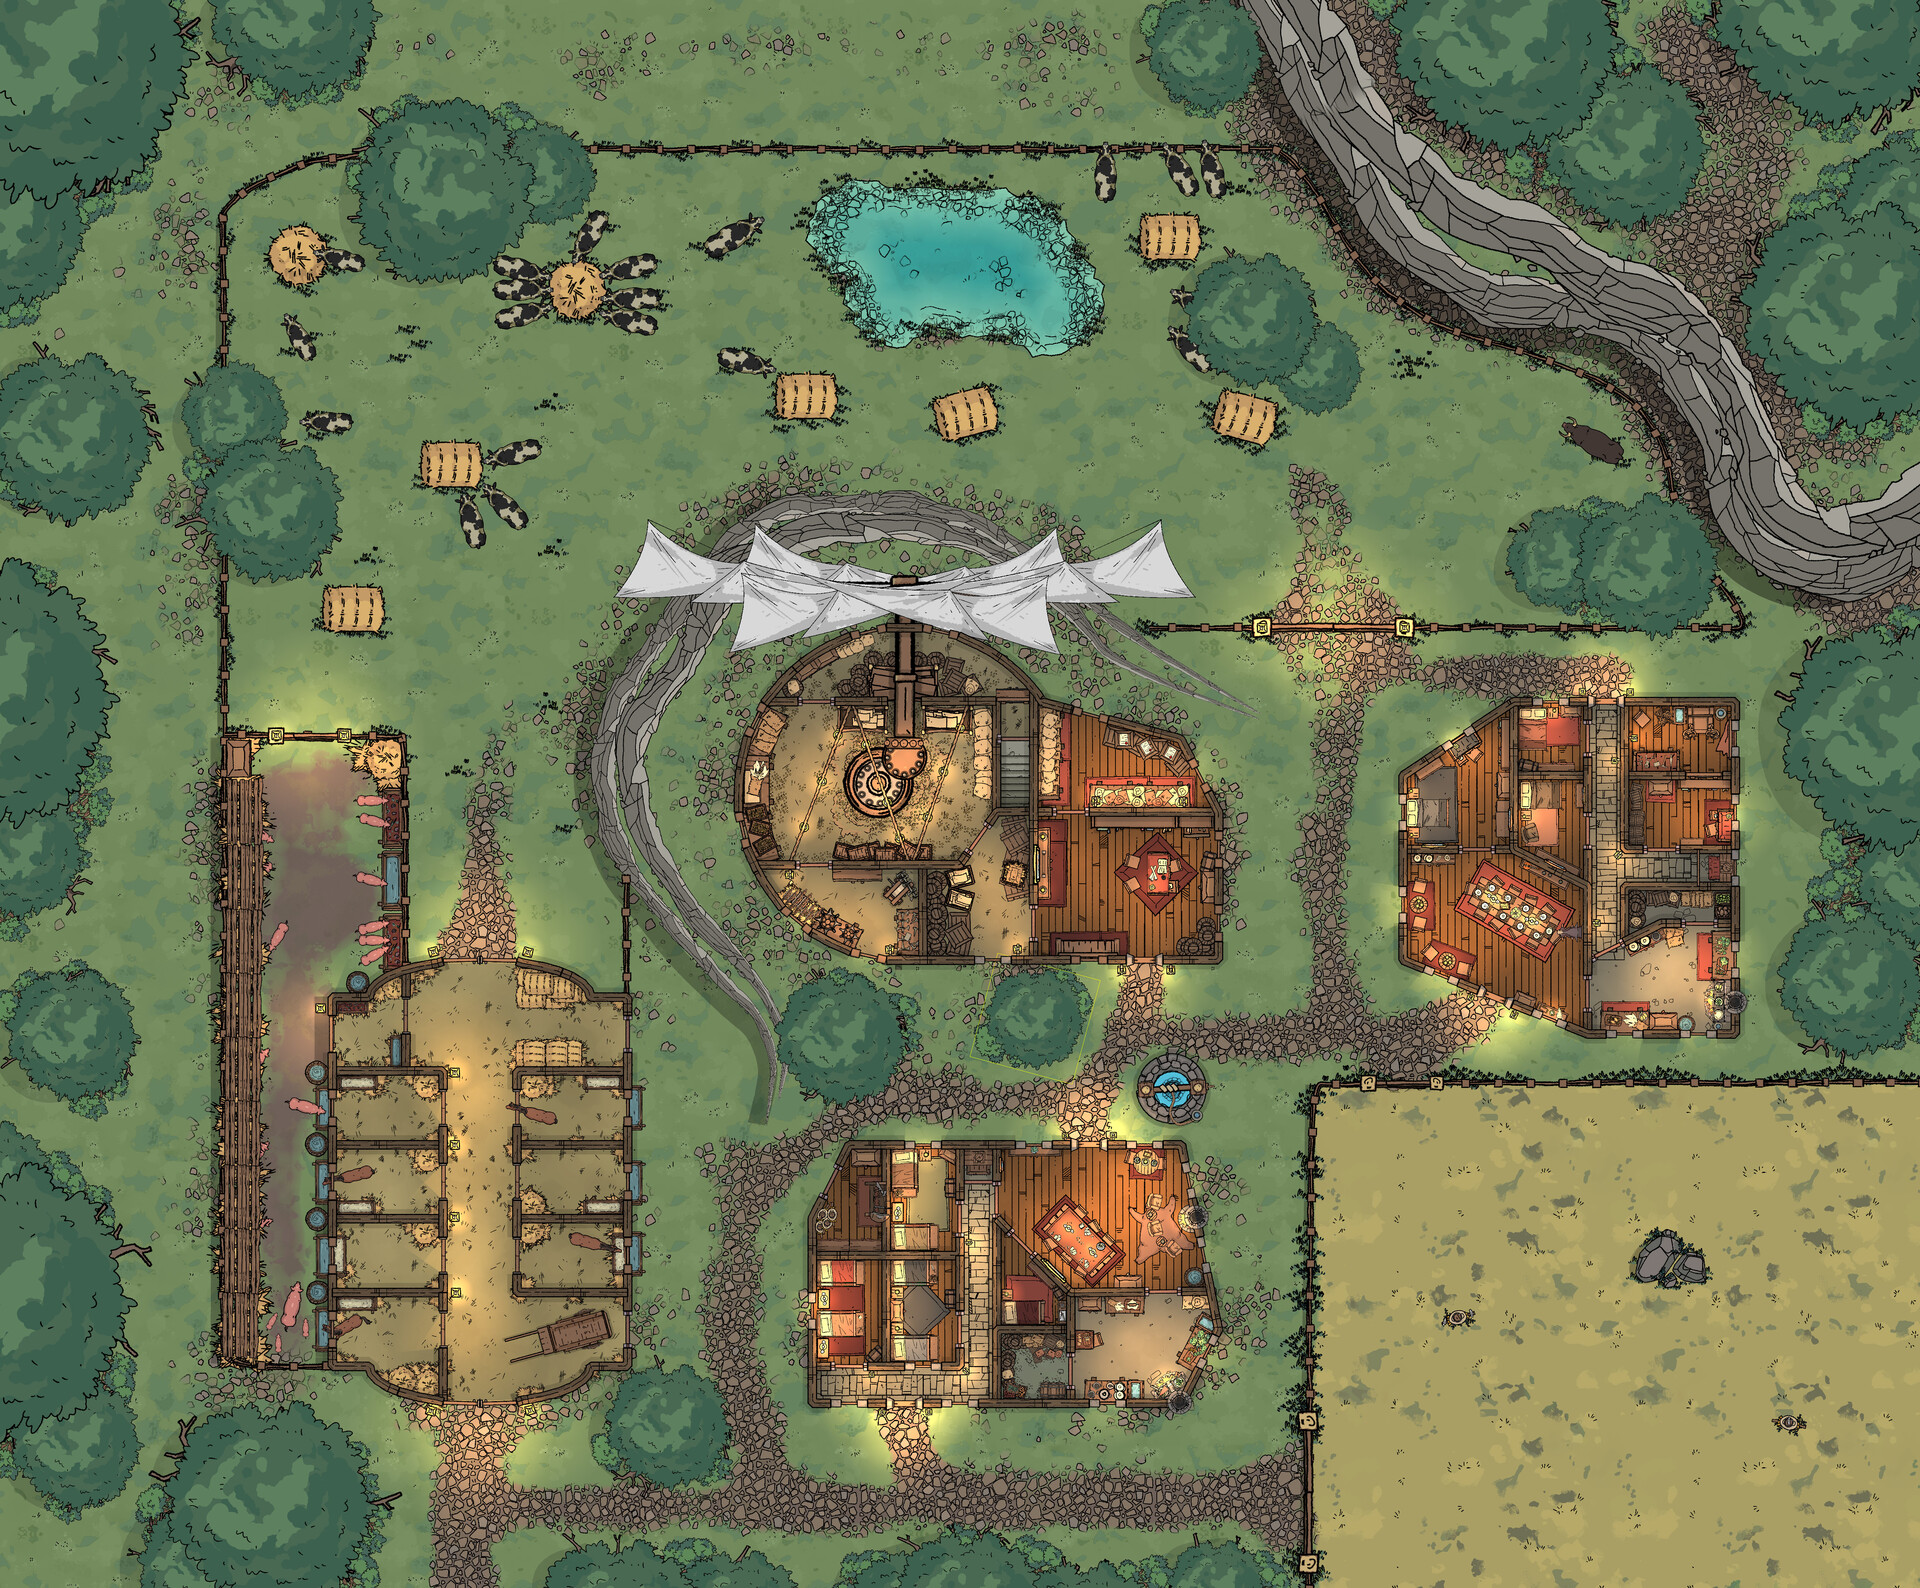 The Windmill Farm (The Farm). Jeff Todd, Morvold Press.
 The Windmill Farm (Under the Windmill). Jeff Todd, Morvold Press.
Appendix B: Ancient Islemont
During the First Flowering of elves on Faerûn, while the early tribal barbarian clans of humans, known as the Talfir, roamed Keltormir, were hiding and hunting in the great forests and avoiding the greater races of elves, giants, and dragons, the humans on Islemont found safety on the isolated island. This safety allowed the inhabitants to live peacefully, establish circles, and make advancements in agriculture and husbandry, cosmology and metaphysics, as well as natural and arcane magic.
Agriculture and Husbandry
Being isolated for so long, the people of Islemont had to find ways to ensure their survival from the flora and fauna present on the island. They developed varieties and breeds that could be exploited for specific resources.
Cosmology and Metaphysics
The island's location near the equator allowed its inhabitants to study nearly the entire night sky as the seasons passed. Through this work, they developed theories and proofs about the nature of the universe. This study of the cosmos influenced their spiritual beliefs, leading most to a polytheistic view. The truly devout found themselves imbued with the ability to channel the desires of certain deities as divine magic. Once contact with Faerûn was made, the gods of Islemont found complementary deities in the pantheon of the Realms. Some natives of Islemont still insist on using the ancient names of the gods.
Natural Magic
The presence of the Neverending River and its portals into the Material Plane allowed the magic of the Feyworld to seep into the natural world. Over time, those living nearest the springs learned to channel and control the energy until they became masters of manipulating this natural magic.
Arcane Magic
While some sought power through faith or nature, others studied the secrets behind magic. Slowly they untangled the mysteries that allowed them to bend reality to fit their desires. In time, they formed schools to focus their research and secure the survival of their knowledge.
-14,472 DR to -14,371 DR
-14,372 DR to -14,271 DR
-14,272 DR to -14,171 DR
Clans merged
-14,172 DR to -14,071 DR
-14,072 DR to -13,971 DR
-13,972 DR to -13,871 DR
-13,872 DR to -13,771 DR
-13,772 DR to -13,671 DR
-13,672 DR to -13,571 DR
-13,572 to -13,471 DR
Appendix C: Islemont Pantheon
Each day brings the occasion for discovery, life, and renewal. But it also brings loss, death, and destruction. We must celebrate our time together. - Ancient proverb Although evil was known on the island, the ancient Islemont pantheon did not recognize any deities holding power over evil. From contemporary points of view, they align along the Neutral axis, with some tending towards Lawful, Good, or Chaotic.
| Good | Neutral | Evil | |
| Lawful | CwealmSunnaWyrd | ||
| Neutral | BearnaBlomma | CēpanEōrtheGehyddeSkilaWīsa | |
| Chaotic | Happa | Mōne |
| Name | Alignment | Domain | Symbol | Realms Deity |
| Bearna, goddess of birth | NG | Life, Light | inverted Y | Lathander (m) NG |
| Blomma, goddess of agriculture | NG | Life | sheaf of grain | Chauntea (f) NG |
| Cēpan, god of protection | N | Life, Light | a tower | Helm (m) LN |
| Cwealm, god of the dead | LN | Death | branch of a yew tree | Kelemvor (m) LN |
| Eōrthe, nature (n) | N | Nature | an ash tree | Silvanus (m) N |
| Gehydde, god of wizards | N | Knowledge | eight-pointed star | Azuth (m) LN |
| Happa, goddess of joy | CG | Life | parallelogram whose height is greater than its width | Lliira (f) CG |
| Mōne, god of the moon | CN | Knowledge, Life | crescent moon | Selûne (f) CG |
| Skila, goddess of crafts and trades | NG | Knowledge | Gond (m) N | |
| Sunna, goddess of the sun | LN | Knowledge, Life | N/A | |
| Wīsa, goddess of magic | N | Knowledge | Mystra (f) NG | |
| Wyrd, fate (f) | LN | Life | pointing finger | Savras (m) LN |
Islemont Template
A snappy description, comment, or social reference.
Story Overview
Adventure Summary
Setup and Startup Points
Prologue
Part One:
Part Two:
Part Three:
Epilogue
Character Advancement
The author uses milestones for advancement and requires X major (or X minor) for advancement to level X. Because characters within the party can be mismatched in their advancement, it is important to keep track of what characters have earned what Milestones.
| Character/Player | Minor Milestone(s) | Major Milestone(s) |
| 1. | ||
| 2. | ||
| 3. | ||
| 4. | ||
| 5. | ||
| 6. |