Chapter 2: The Search of the Eternal Flame
Recap
With the necromancer dead, the haunting screams that once emanated from the temple’s depths became whispers of gratitude, and soon enough, the spirits of the Warriors of the Flame came forward as smoky shadows.
They appear to the players and thank them for their efforts but also warn them that Erebus is not truly defeated. They explain that they met the necromancer long ago at the beginning of the Dark Honeymoon while they were still alive and killed him. They seem worried once they learn that he was still alive and that he may returned yet again...
They warn the players that there are other locations where pieces of Prometheus’ Flame reside and ask them to go there before Erebus. They mention three other locations:
- The Great Forge Temple of Hephaestus
- Poseidon’s Everbright Lighthouse
- Artemis Hidden Moonflame Temple
Before disappearing, they give 1 broken piece of an Oil Lamp, that can be used to carry the flame if completed. The other locations might help rebuild the lamp.
Key NPCs:
- Erebus (Necromancer): The main and recurring villain of the campaign. Is part of The Ever Night Cult consisting of multiple copies of himself.
- Greybeard Shortfuse (Leader of the Forge Temple): Old, angry and experienced dwarf that takes care of the forge temple. Is very meticulous and hard to deal with.
- Anva Shortfuse (Eutheria Villager): Proud Dwarf and the smith of Eutheria. Also Greybeard's Daughter that left to explore the world.
- The Tide Master (Leader of the Lighthouse): A Triton in charge of taking care of the Lighthouse and its region. He charges a toll for the ships that pass by, but also protects them from dangers of the deep sea.
- Petra (Eutheria Villager): Townmaster of Eutheria and Demetrius daughter. She knows about the Tide Master from the merchants ships from the region.
- Osias, the Old Owl (Eutheria Villager): Blind veteran hunter. He was part of the Moonflame order before retiring.
Locations:
-
Village Eutheria: The party’ starting point, a peaceful village near the temple.
-
The Great Forge Temple of Hephaestus: Is located at the heart of a volcano at south of Kartelles. It is run by dwarfs that worship Hephaestus, and are completely devoted to the smith arts.
-
Poseidon’s Everbright Lighthouse: Is located at Kartelles coast, and is one of the main points of reference for sailors in the region of Thalassa’s Infinite Islands.
-
Artemis Hidden Moonflame Temple: Outside the Kartelles borders, lies a myth of a great lake that perfectly reflects the Moon. For some reason, many beasts, monstrosities and adventurers are drawn to the this hunting ground, where this hidden temple might reside...
Summary
After receiving the warning of the Warriors of the Flame, the party must choose where to go first and stop Erebus plans.
The 3 Key NPCs from Eutheria (Anva Shortfuse; Petra; Osias, the Old Owl) have contacts with some locations where the other flames reside and will accompany the party in their journey and help them.
After the party Saves two of these three locations, they will learn about a secret Temple of Prometheus, where the last Chapter will take place.
Act I - The Village of Eutheria
The party is welcomed back to the village and a party is made to celebrate their victory. The party will be rewarded and they will have more time to meet the rest of the NPCs and also discuss their next steps ahead of them.
Act II - The Search
They party and the NPCs will embark on a journey to the other locations where the flame resides.
They will have to deal with the challenges of the location they went to and try to save the Flame from Erebus.
Act III - The Corruption of the Flame
The party might try go to the third location where the Eternal Flame is. However, upon reaching there, Erebus will already have corrupted the flame, and destroyed the place.
It will be up to the party to go to Mount Haimos and stop him from corrupting the Original Flame.
Act I: The Celebration of Eutheria
List of Names:
- Demetrius: Priest that was in danger and warn the party about the necromancer
- Petra: Townmaster, tavern owner and Demetrius daughter
- Rhea: Old woman, mother of the Bandit Captain Iros
- Osias, the old Owl: Blind veteran soldier
- Anva Shortfuse: Proud Dwarf and the smith of the village.
The Heroes Return
Description: A Celebration!
As the party returns to Eutheria, the villagers welcome the heroes with open arms. The tension and worry dissipates and joy and relief takes their place.
The village is filled with laughter and music. Children run up to the heroes, eyes wide with admiration, and the villagers offer gifts of thanks.
A grand Feast is made for the heroes and songs about their triumph against the necromancer are played.
The party is free to explore and talk with the villagers.
Give them some opportunities to roleplay and enjoy their victory over Erebus! Here are a couple of things and plot hooks examples of what to do in a celebration:
Drinking Contest
The villagers love to drink, but no one can keep up with Anva Shortfuse! If they decide to have drinking contest (or just keep up with her drinking), they must succeed on an Endurance Save (DC 20). On a fail, they become completely drunk. On a success, they earn Anva's respect and gain 1 RP!
A Friendly Duel
Villagers love to watch a friendly duel! Although no one in the village is able to compete with the party, the party might want to duel between themselves. You can make a small combat between the party if they want so.
Remember, friendly duels end when Posture is broken!
What Happens to the Bandits?
-
Iros Lives: If the party was able to Influence Iros during the final fight, the Bandit Leader will reunite with his mother Rhea. Both of them will have a moment to grief the death of Timos and Iros will apologize for his mistakes. If the party went trough the main Entrance and killed the bandits, Iros will be furious not only at the party, but also himself for putting them into that situation. If the bandits are still alive, he will promise to protect the village and will also send 1 Bandit Archer (Tier 1/ name is Torus) from his team to follow and serve the party!
-
Iros is Dead: If the party ended killing Iros, Rhea will be sad by the news, but not surprised. If the Bandits are still alive, they will flee away.
A Show of Display!
The party may want to show off their skills or talents for the villagers. The villagers are in a very good mood and have respect for the party, so in order to make a good impression, they need to make a Check (DC 10).
The skill will depend on what the party want to do. A show would use Performance, while a display of Strength would use Athletics, and an Acrobatic feat would be Agility for example. On a success, the mood of the party becomes even better and they gain 1 extra RP!
An Unexpected Visitor!
If the party succeeds on the Check above (or if you feel the party is on a really good mood), you may want to ask them for a Luck Check (DC 20). If they fail, they may roll a Religion Check (DC 25) later on the party.
If they succeed, Dionysus, the god of parties and wine, blesses the party! He will offer 10 bottles of Dionysus’s Wine (Rare Potion) and give insight about Erebus and his Cult.
Erebus is a Primordial Deity representing Darkness. He was one of the first creatures to emerge from the Infinite Maelstrom of Chaos.
He also explains that his Cult, the Ever Night, is made up of people he has found completely lost and broken. The God invites them to "embrace the darkness", which means completely abandon their individuality and reason.
Although the followers become "Erebus" with this process, they are still limited by their flesh and minds. Only a few followers, become more powerful after the embrace, as most of them only perceives themselves as stronger due to Erebus ego.
Feel Free to add more Things!
The beauty of being a GM is to improvise and adapt things your way! If you have more ideas, like adding some event that connects with a character's background, feel free to do so!
Rewards
- The Party gains 4 RP and 200 Silver
- The villagers will always welcome them no matter what
- They will gain Fresh Ingredients for 20 meals (if they have Cooking Tools)
- They will also gain 4 Common Med Kits
Act II - The Search
Demetrius will ask on what the party plans to do next. The party will need to decide where to go. Anva Shortfuse, Petra and Osias, the old Owl will follow them in their adventures, but will mostly stay in the background, only shining on certain parts of the adventure.
The Great Forge Temple of Hephaestus
The Great Forge Temple is located at the heart of a volcano at south of Kartelles. It is run by dwarfs that worship Hephaestus, and are completely devoted to the smith arts.
Anva Shortfuse: Will comment that she knows the Great Forge Temple, and that she was raised there. She will comment that the party will need her help to deal with the other dwarves in the Forge, since they are even more stubborn then she is...
Poseidon’s Everbright Lighthouse
The Everbright Lighthouse is located at Kartelles coast, and is one of the main points of reference for sailors in the region of Thalassa’s Infinite Islands.
Petra: does a lot of commerce with the lighthouse and is where she gets all the fish in the village. She will offer to go with the party to the lighthouse.
The Travel
The party has safe passage to the Forge Temple since it lies within the borders of Kartelles. However, if they venture into the Silver Woods, they will encounter the Ravagorn Tribe, known for being the most aggressive of the main Tribes.
They may also pass through Magistrae territory, a tribe of mages. They typically engage in commerce and allow passage for a small fee. The Magistrae can sell a couple of Potion of Magical Healing (Rare Potion) and other Rare Potions of your choice for 10 to 20 gold coins.
Ask a Group Luck Check for the party (DC 10). If they succeed, the encounter the Magistrae, but if they fail, they encounter the Ravagorns instead.
Dealing with Ravagorns
If the party passes trough Ravagorn territory, you can run a small Combat encounter, as they immediately Attack.
Combat: Use 3 Orc Fighters (Tier 2) for the combat. If the combined Challenge Points are not enough to match party’ combined levels, you can add more Orc Fighters (Tier 2).
Orc Fighter
Medium, Humanoid/ Monstrosity
Tier 2, Challenge Point 4, XP: 8
Attributes
AC 16 AP 2 HP 39 Posture 20
- Passive Insight/ Perception 14
- Language Orcish
Movement
Base 25 Climb/Swim 20 Dash 40 Stats + Skills
STR +7 DEX +1 INT +0 WIS +4 CHA +0
- LU +2: Luck Points: 2; Critical Fail: 1
Abilities
- Orc Ferocity: Once per round, you can give yourself advantage to 1 Attack. If it hits, you can also add a +2 bonus to its damage roll.
- Tough Posture You don't trigger Attacks of Opportunity when your Posture is reduced to 0.
Action (2)
- Battle Axe Hit +7, Dmg 1d10 slash
- Throw Weapon (20/30)
- Versatile: If you Attack with both hands, the damage roll of this weapon becomes 1d12.
- Favorite Weapon: You score a Critical Hit on any Attack rolls of 18, 19 or 20 with this weapon. These Critical Hits also deal extra 1d6 damage
Bonus Action
- Forced Posture You can gain 4 Posture.
The Great Forge Temple of Hephaestus
Background
The dwarfs in charge of the Great Forge Temple are considered on of the best smiths of Kartelles. They make the best quality weapons, armors and all sorts of items that normal smiths could only dream of.
However, those that spend too much time near the volcano are cursed (or according to some, blessed) by Hephaestus himself. They are known as the Moltenkin, their skin become like ash or obsidian and veins with glowing, molten cracks that pulse out with the fiery energy of the volcano.
Their eyes burn like smoldering coals, reflecting the eternal flames that surround them. They become immune to fire, but they must always be near a heat source, or else be turned to into stone.
Description: Arrival
As the days pass, the volcano on the horizon looms ever larger, its jagged peak piercing the sky. The ground beneath the adventurers' feet feels warm, radiating the intense heat from deep within the earth. The path becomes more treacherous, the rocky terrain challenging their every step.
The rhythmic sound of hammers and the faint glow of molten metal in the distance signal their approach to this sacred domain.
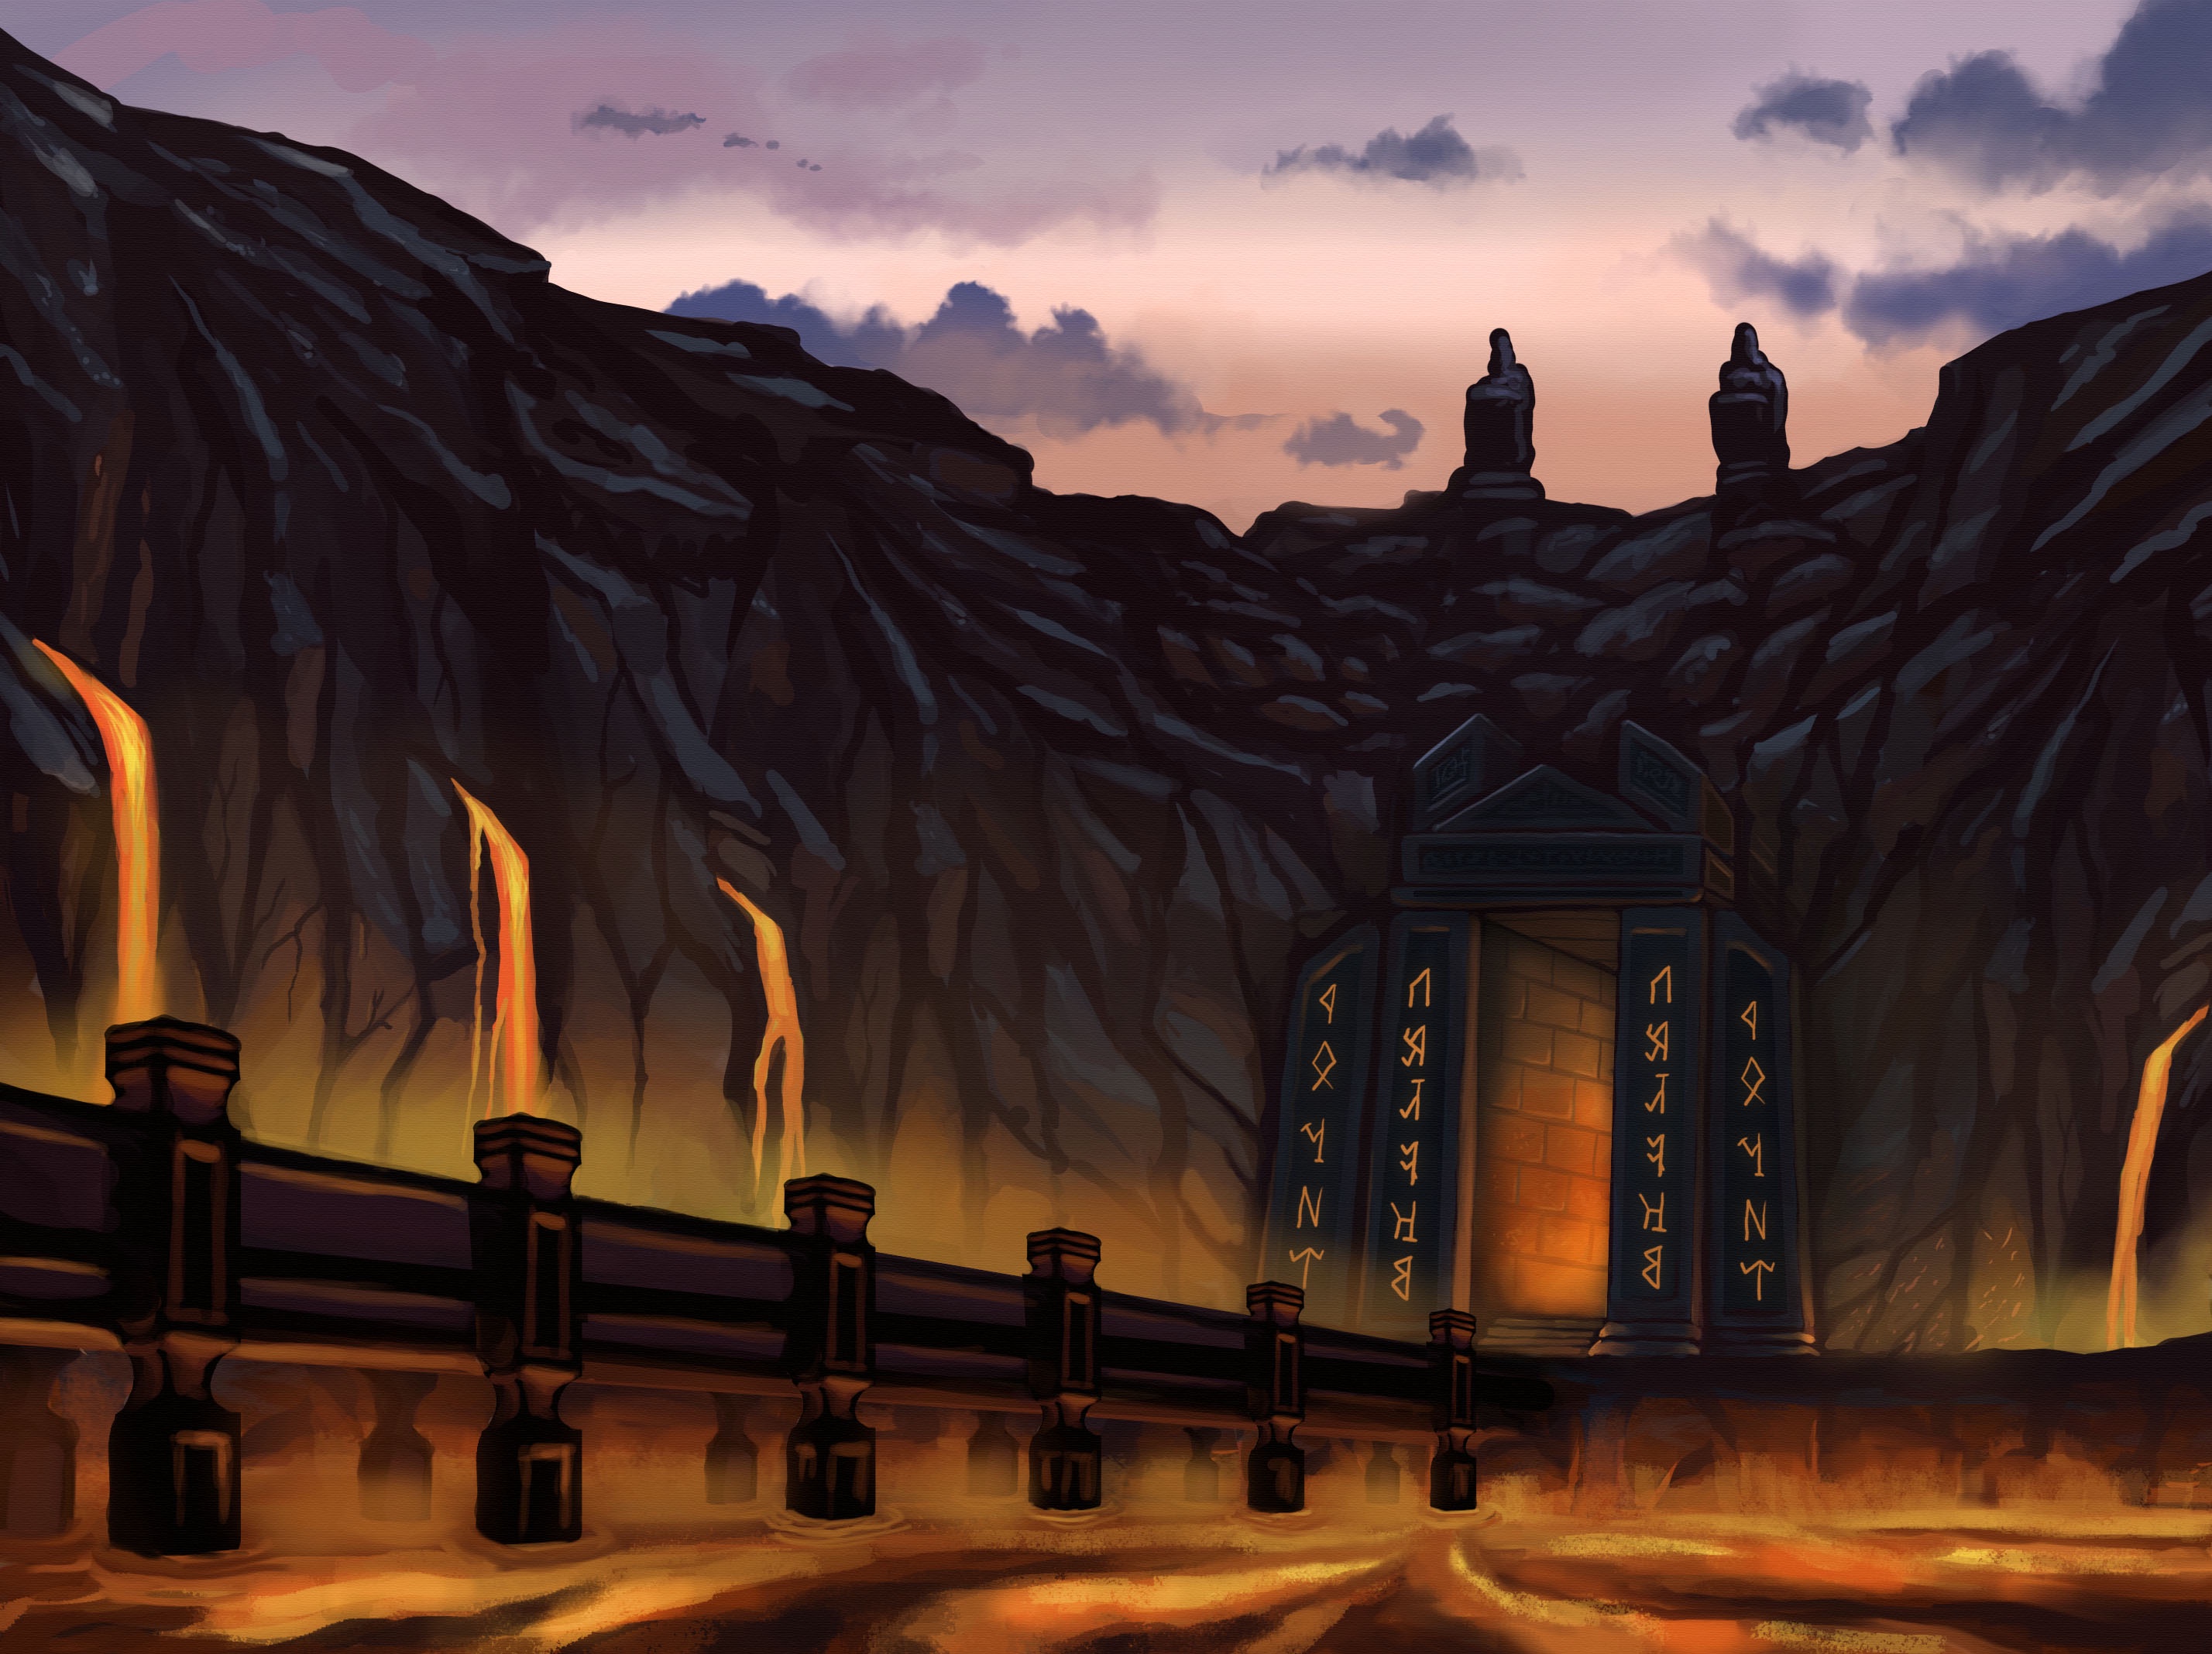
Description: A Magnificent Monument
The Forge Temple of Hephaestus, nestled within the fiery heart of an active volcano, is a testament to the god's dominion over fire and metalwork. Its colossal, blackened stone walls, etched with glowing runes, rise from the molten depths, exuding an aura of ancient power and relentless industry.
The interior is a labyrinth of smoldering forges, blazing furnaces, and intricate machinery, all powered by the volcano's intense heat. As one steps inside, the air is thick with the scent of molten metal and the rhythmic clang of hammers against anvils, a testament to the relentless industry within.
Summary
Erebus has managed to corrupt a couple of dwarfs and they are now seeking to capture the flame. They are building a Construct, if they succeed they will put the flame inside it, and make 1 Corpse Incinerator (Tier 3) under their complete control.
The party must help Anva Shortfuse compete against her dad in a Forged in Fire Trial. If she wins, she becomes a Forge Lord and will stop Erebus before it is too late.
Scene 1: A Fiery Welcome
Upon arriving at the temple, the party and Anva Shortfuse are greeted be the local dwarfs.
They seem surprised to see Anva back, and offer a hot drink and a place to sleep due to her history with the Forge.
She then confesses to the party that she is the daughter of one of the Forge Lords, Greybeard Shortfuse. However, she didn't wanted to become a Moltenkin and have to spend the rest of her life trapped in the Forge. So she ran away to explore the world and never came back, until now.
The party is taken to a modest, but well cared room where they can eat, sleep and talk about their current situation.
In the morning, they are scheduled to have a meeting with the leaders of the Forge, also known as the Forge Lords.
Scene 2: The Forge Lords' Council
In the next day, they are taken to a council to meet the Forge Lords and warn them about Erebus.
There are 3 Forge Lords, all of them are Moltenkin dwarfs:
-
Greybeard Shortfuse: As the name suggests, is an old bald dwarf, with a incredibly majestic gray beard. He is extremely grumpy, stubborn and difficult to deal with, but he is fair and follows the laws with extreme dedication.
-
Torak Emberheart: Is a very strong bald dwarf with fiery red beard and a face full of tattoos. Talks really loud and is extremely confident and bold. A character with 10 Passive Insight immediately notices that those are the same tattoos Erebus had.
-
Tilda Hillforge: An armor clad dwarf with the blonde braid hair and beard. Is more quiet compared to the others, but when she speaks, her authority shows.
The Council Meeting
The Lords will listen what the party has to say, but they will initially dismiss any warnings about Erebus. With a successful Group Persuasion Check (DC 15), they can convince Tilda to send some Guards to investigate the Forge. After a couple of days, these Guards will find a dwarf that claims to be Erebus, but he died before giving more information.
However, if they accused Torak Emberheart, they roll this Persuasion Group Check with disadvantage.
Plot Hook for the Forged in Fire
At the end of the meeting, Greybeard Shortfuse will antagonize his daughter Anva. He points at the armor and gear of the entire party, and says:
"Is this best work you can do? I thought you were going to explore the world to learn new techniques, but it seems you only forgot everything I taught you."
(Regardless of the party's and Anva's equipment, Greybeard will say this.)
Anva will say: "Is that what you think? Then I challenge you to a Forged in Fire Trial!"
Scene 3: Forged in Fire
As the party leaves the council meeting, Anva will explain what the Forged in Fire Trial is.
It is a competition between 2 Smiths in order to see who's craft is better. The one that wins, can have any favor from the other smith. If she wins, she is going to ask to become a Forge Lord and help them deal with Erebus.
Anva will ask the party's help, since she will need people to gather the necessary materials, and to demonstrate her work.
She also promises the party better equipment if they succeed in the Trial.
The Competition Begins!
After a couple of days, the entire clan of dwarfs prepare for the major Event. The 2 Shortfuse and their teams go to an arena, where the forging will take place.
Description: A Family Feud
The work in the Great Temple Forge always continues, but there are many dwarfs idle and just observing the 2 Shortfuse dispute in one of the main Forges.
The forge is a colossal chamber, illuminated by the intense glow of molten lava that flows through meticulously crafted channels in the blackened stone floor. The heat is palpable, and the air shimmers with the energy of creation. The anvil is said to be blessed by Hephaestus himself.
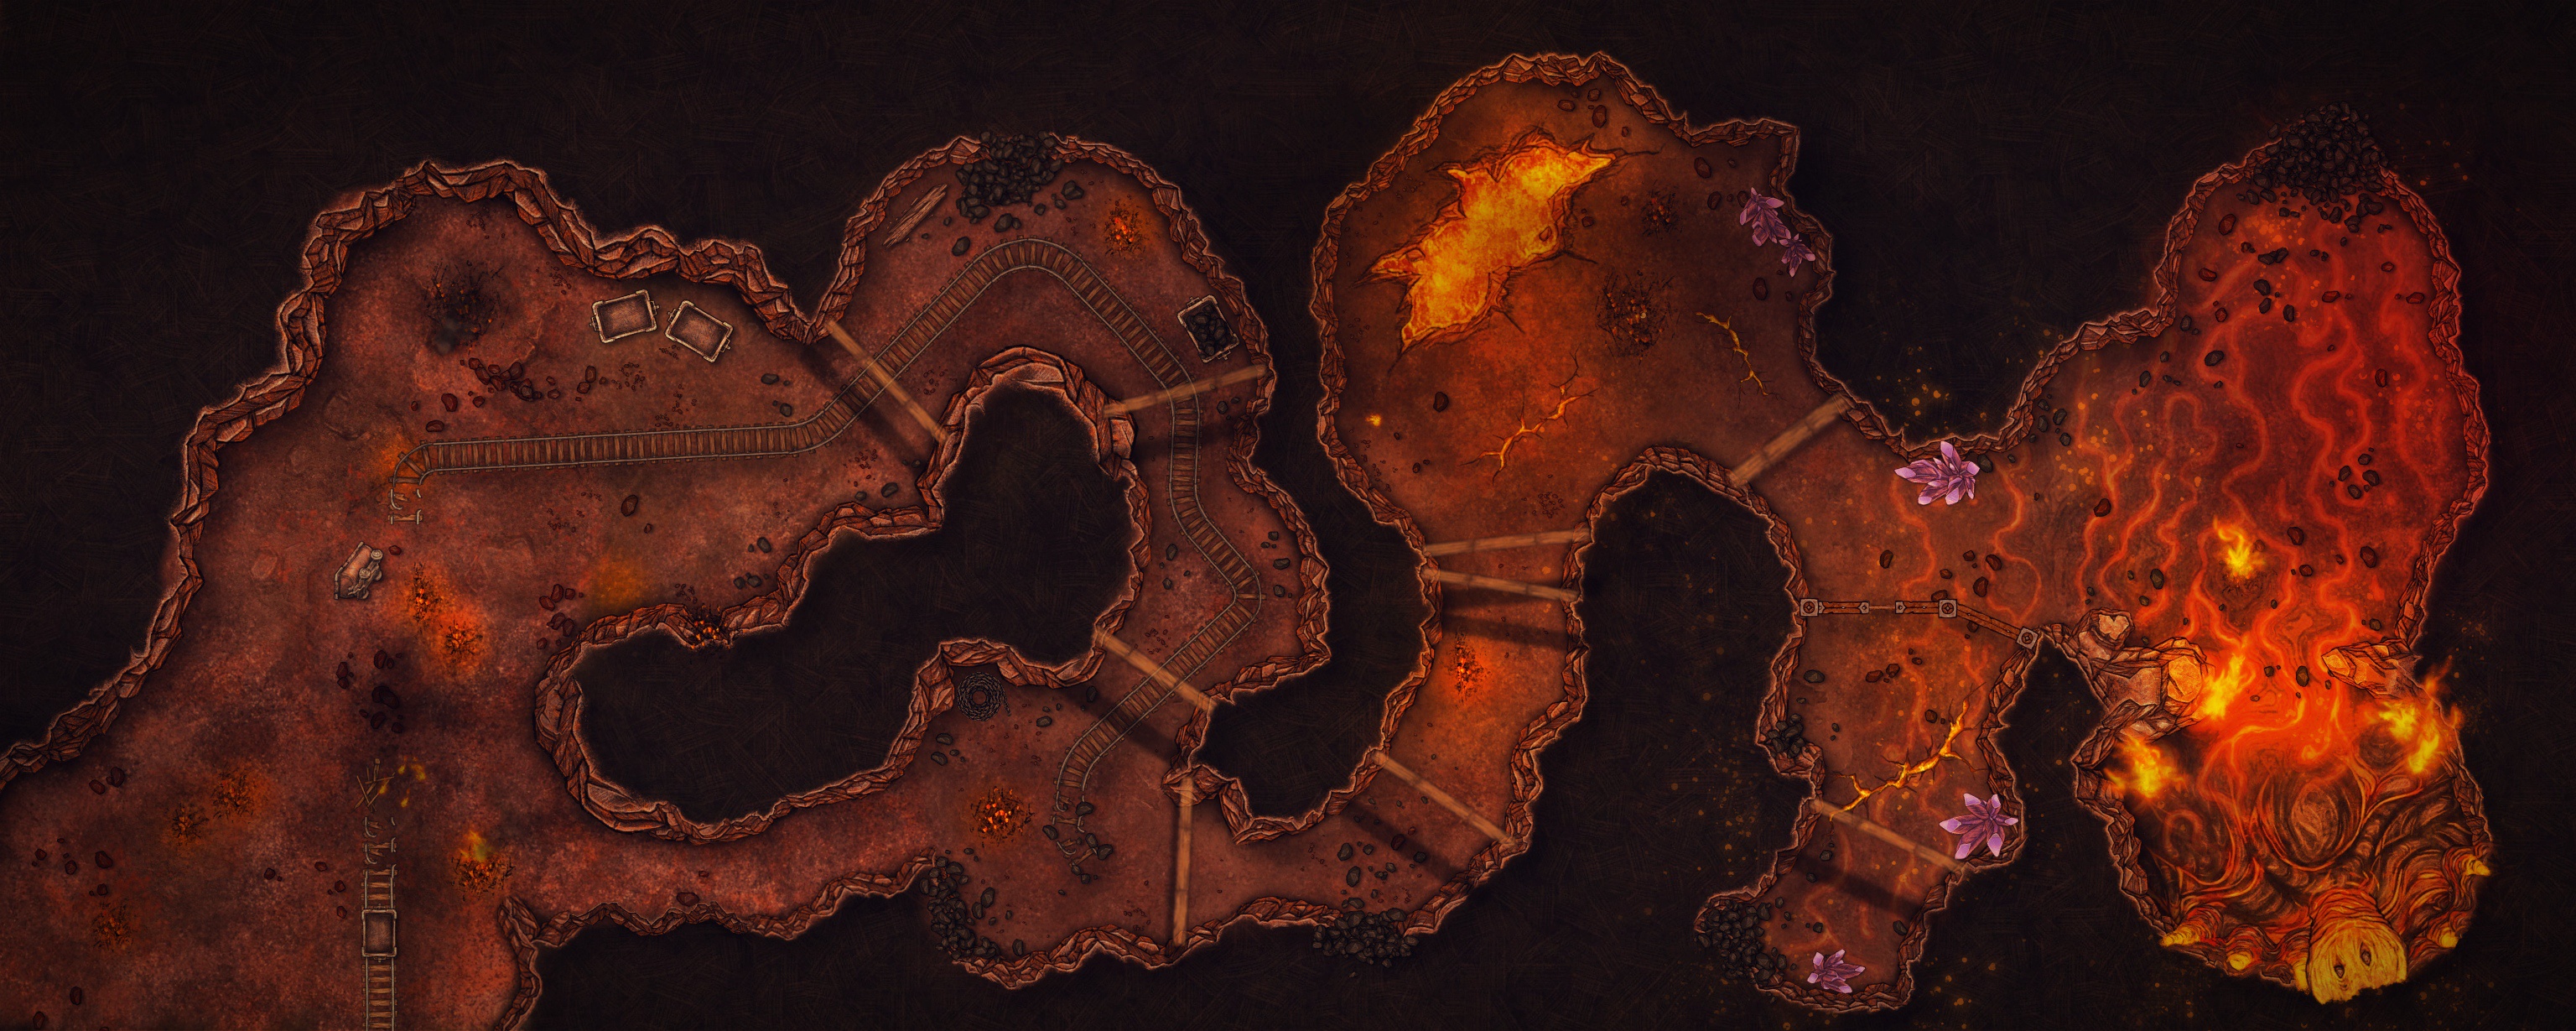
The quest for Materials
As part of the Event, the teams must gather materials in the nearby caves, while Anva and Greybeard stay at the Forge, preparing their anvils and tools for the forging. There are rumors of a lost Basilisk rooming the caves nearby.
The party dwells deep inside the cave in search of the metal. They will need a Skill Challenge (4 Successes, before 3 failures) to find and extract the Metal with the gear provided by Anva.
The sound of the metal being extracted will attract a Young Basilisk (Tier 2) and combat will start.
If they manage to succeed in the Skill Challenge, they are able to extract the metal fast enough and have time to prepare for an Ambush (they gain 1 Surprised round against the Basilisk), or even attempt an escape (which will require another Skill Challenge of 3 successes before 3 failures). If they fail the Skill Challenge, combat starts and they won't have any benefits.
This Skill Challenge represents the party navigating the twisting caverns, employing stealth and speed to avoid any dangers while efficiently mining the precious metals with the tools provided by Anva.
If they manage to kill the Young Basilisk, they can roll 1 Investigation or Nature Check (DC 14), and find tracks where it came from. Upon reaching they find the Basilisk Nest, with the mother dead, beheaded and apparently killed by necromantic magic, with the head nowhere to be seen.
Anyone turned into stone, will be retrieved and turned back to normal by the dwarfs later on.
The Forging
If the party succeeds, they can bring the metal to Anva so she can start working. However, it seems there are mystical forces conspiring against her success. The metal doesn't seem to get hot enough, something keeps messing with her tools, and etc...
Anva will ask the party for help deal with these problems. The party will need to make another Skill Challenge (4 successes, before 3 failures). If they succeed, Anva will be able to make either 1 Masterwork Armor, Masterwork Weapon or Masterwork Shield (the party's choice).
It seemed that there are people from the crowd watching the competition using magic to interfere with Anva's work. The Skill Challenge represents the party stopping those magic users (All of them are similar to Erebus).
If they fail, Anva still makes 1 Gauntlets of Protection for the party, but is clearly disappointed with her own work.
If the party succeeded in the Group Persuasion Check from the Council Meeting, and the Guards captured the dwarf that claimed to be Erebus, they automatically gain 1 successes in this Skill Challenge.
The Demonstration
Regardless of what happens, one of the party members using Anva's equipment will need to duel 1 dwarf champion from Greybeard's Team.
Combat: Use 1 Dwarf Shield Bearer (Tier 2) from this duel. The party members can use buff spells before the combat starts. This is a non-lethal duel, and it ends when Posture is broken!
The Final Verdict
-
If the party wins, Anva becomes a Forge Lord.
-
If the party loses, but Anva was able to create the Masterwork equipment, she will not become a Forge Lord, but will earn the respect of the Forge Lords and will be granted a chance to see the Eternal Flame.
-
If the party lose and Anva was not able to make the Masterwork equipment, she will need to work for 10 years for her father, and will not see the Eternal Flame. In this case, Erebus will win and go to Epilogue.
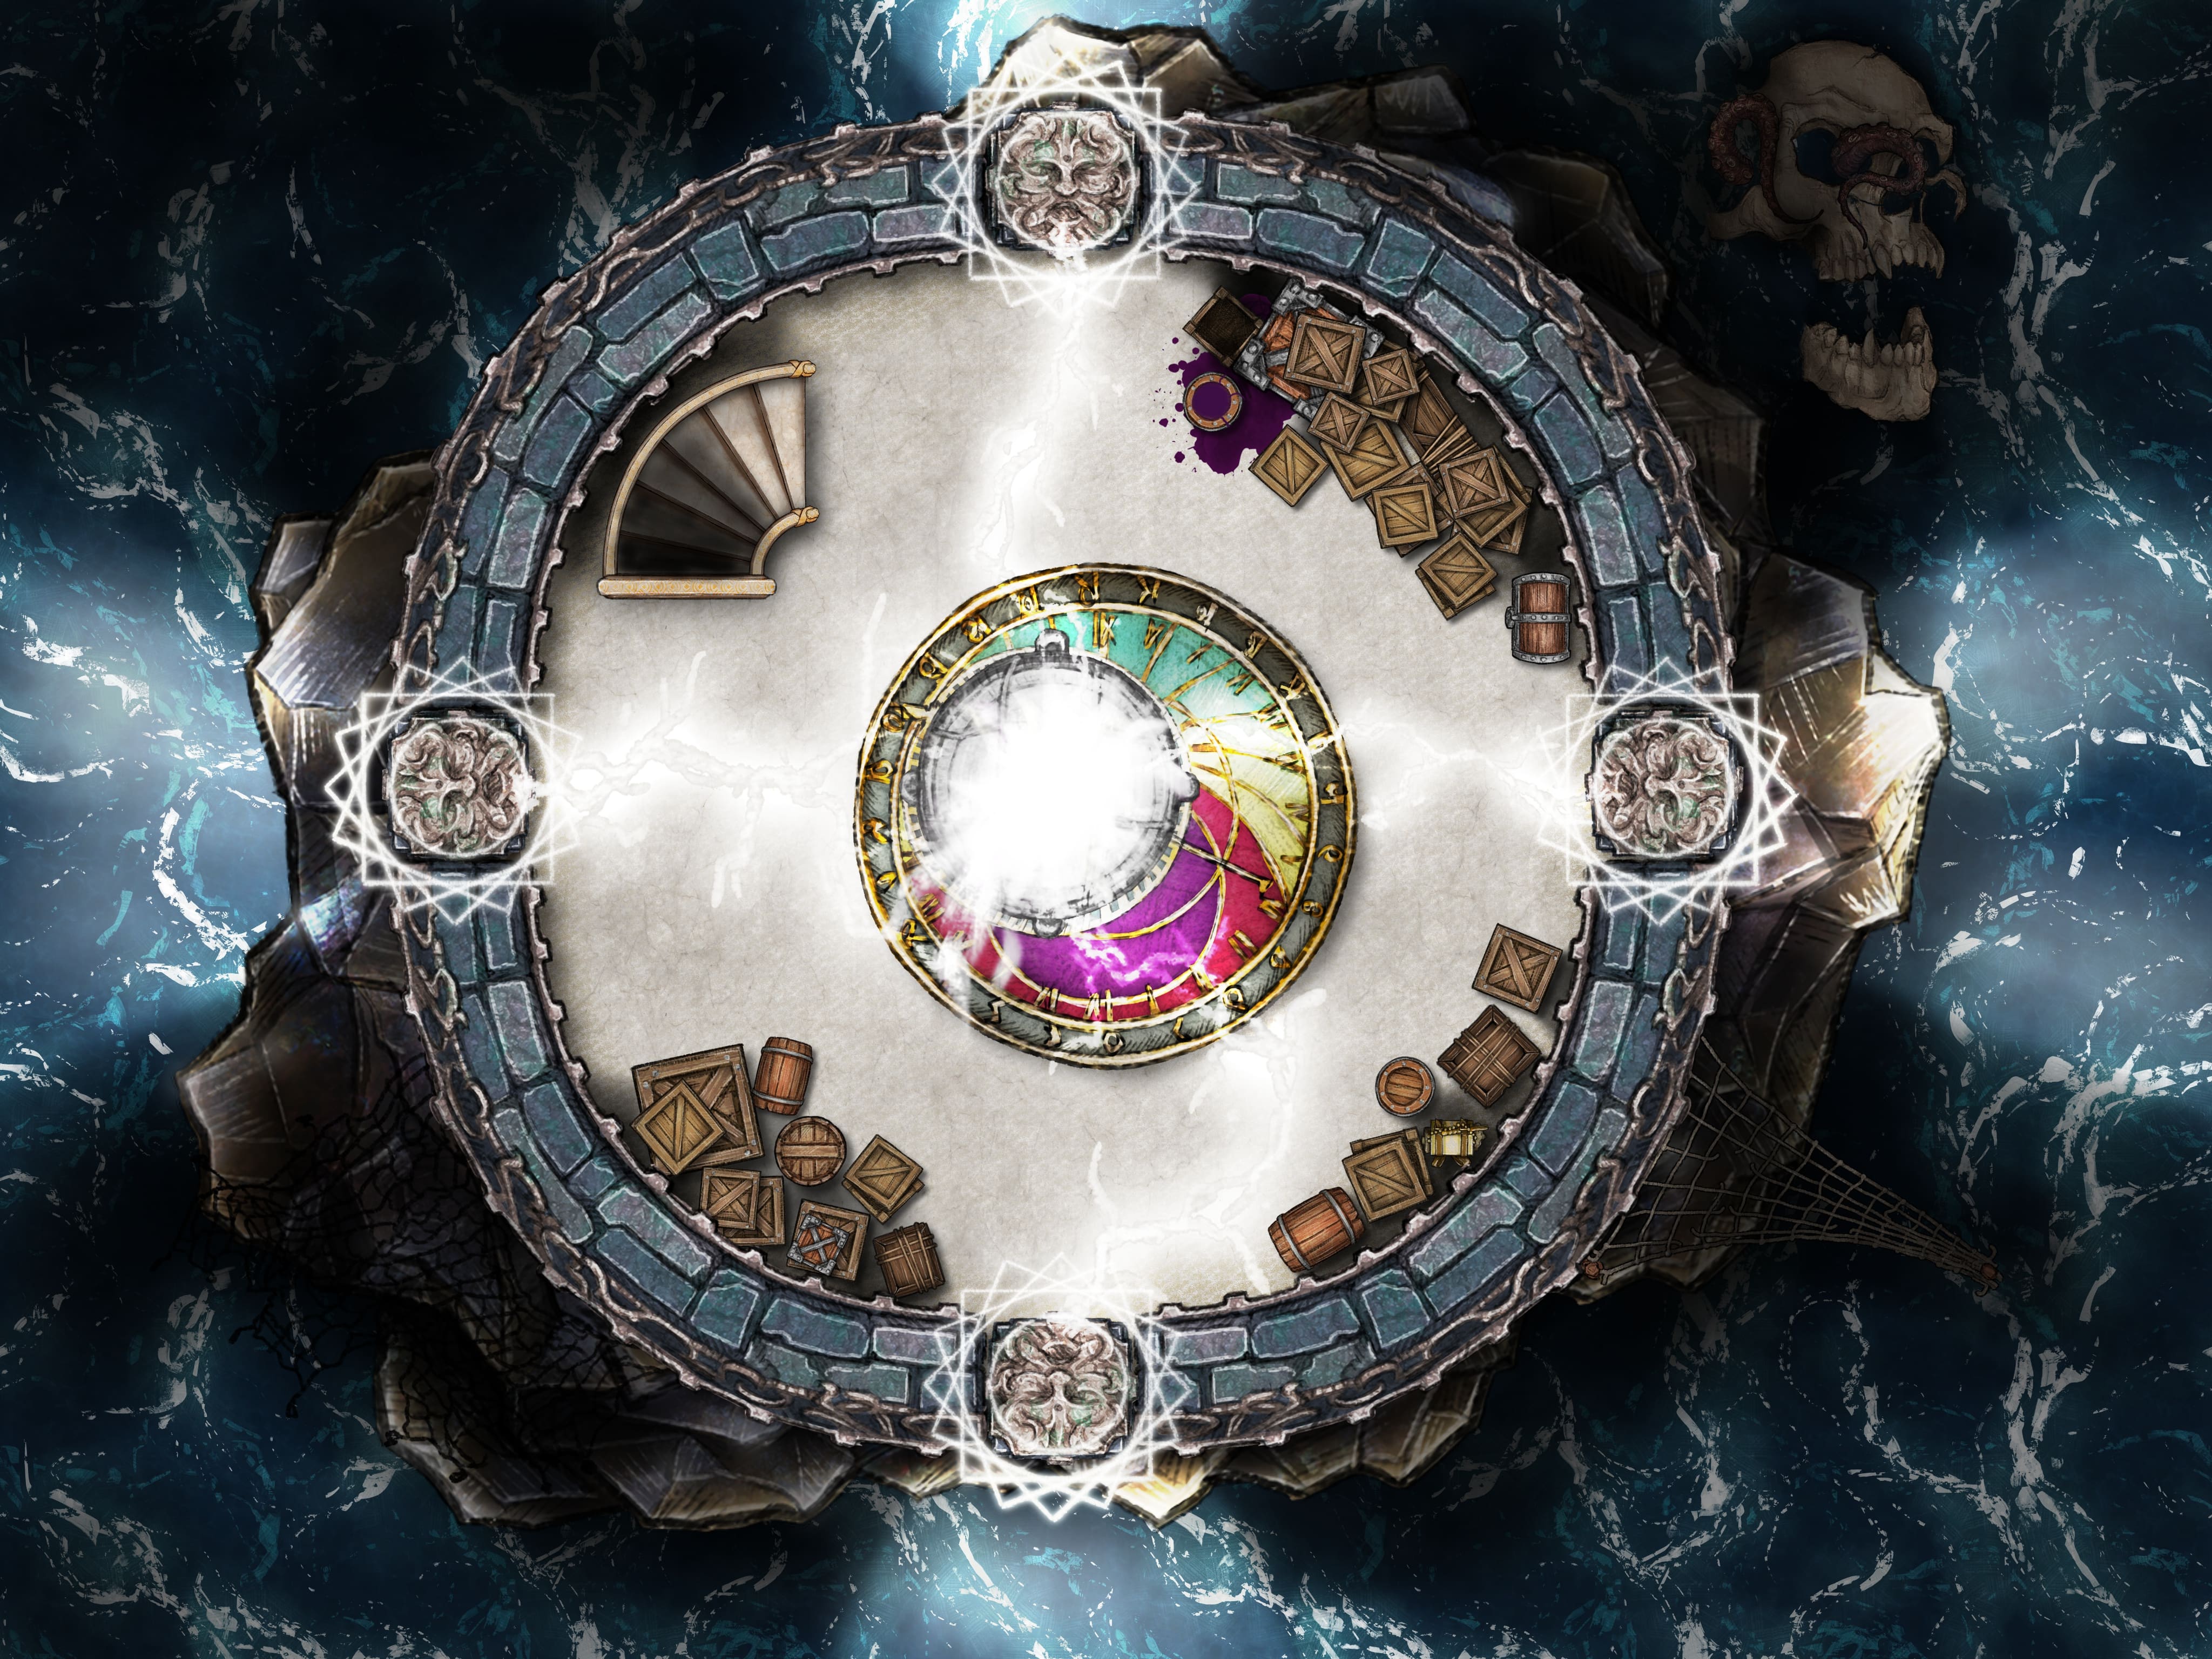
Scene 4: The Fight for the Eternal Flame
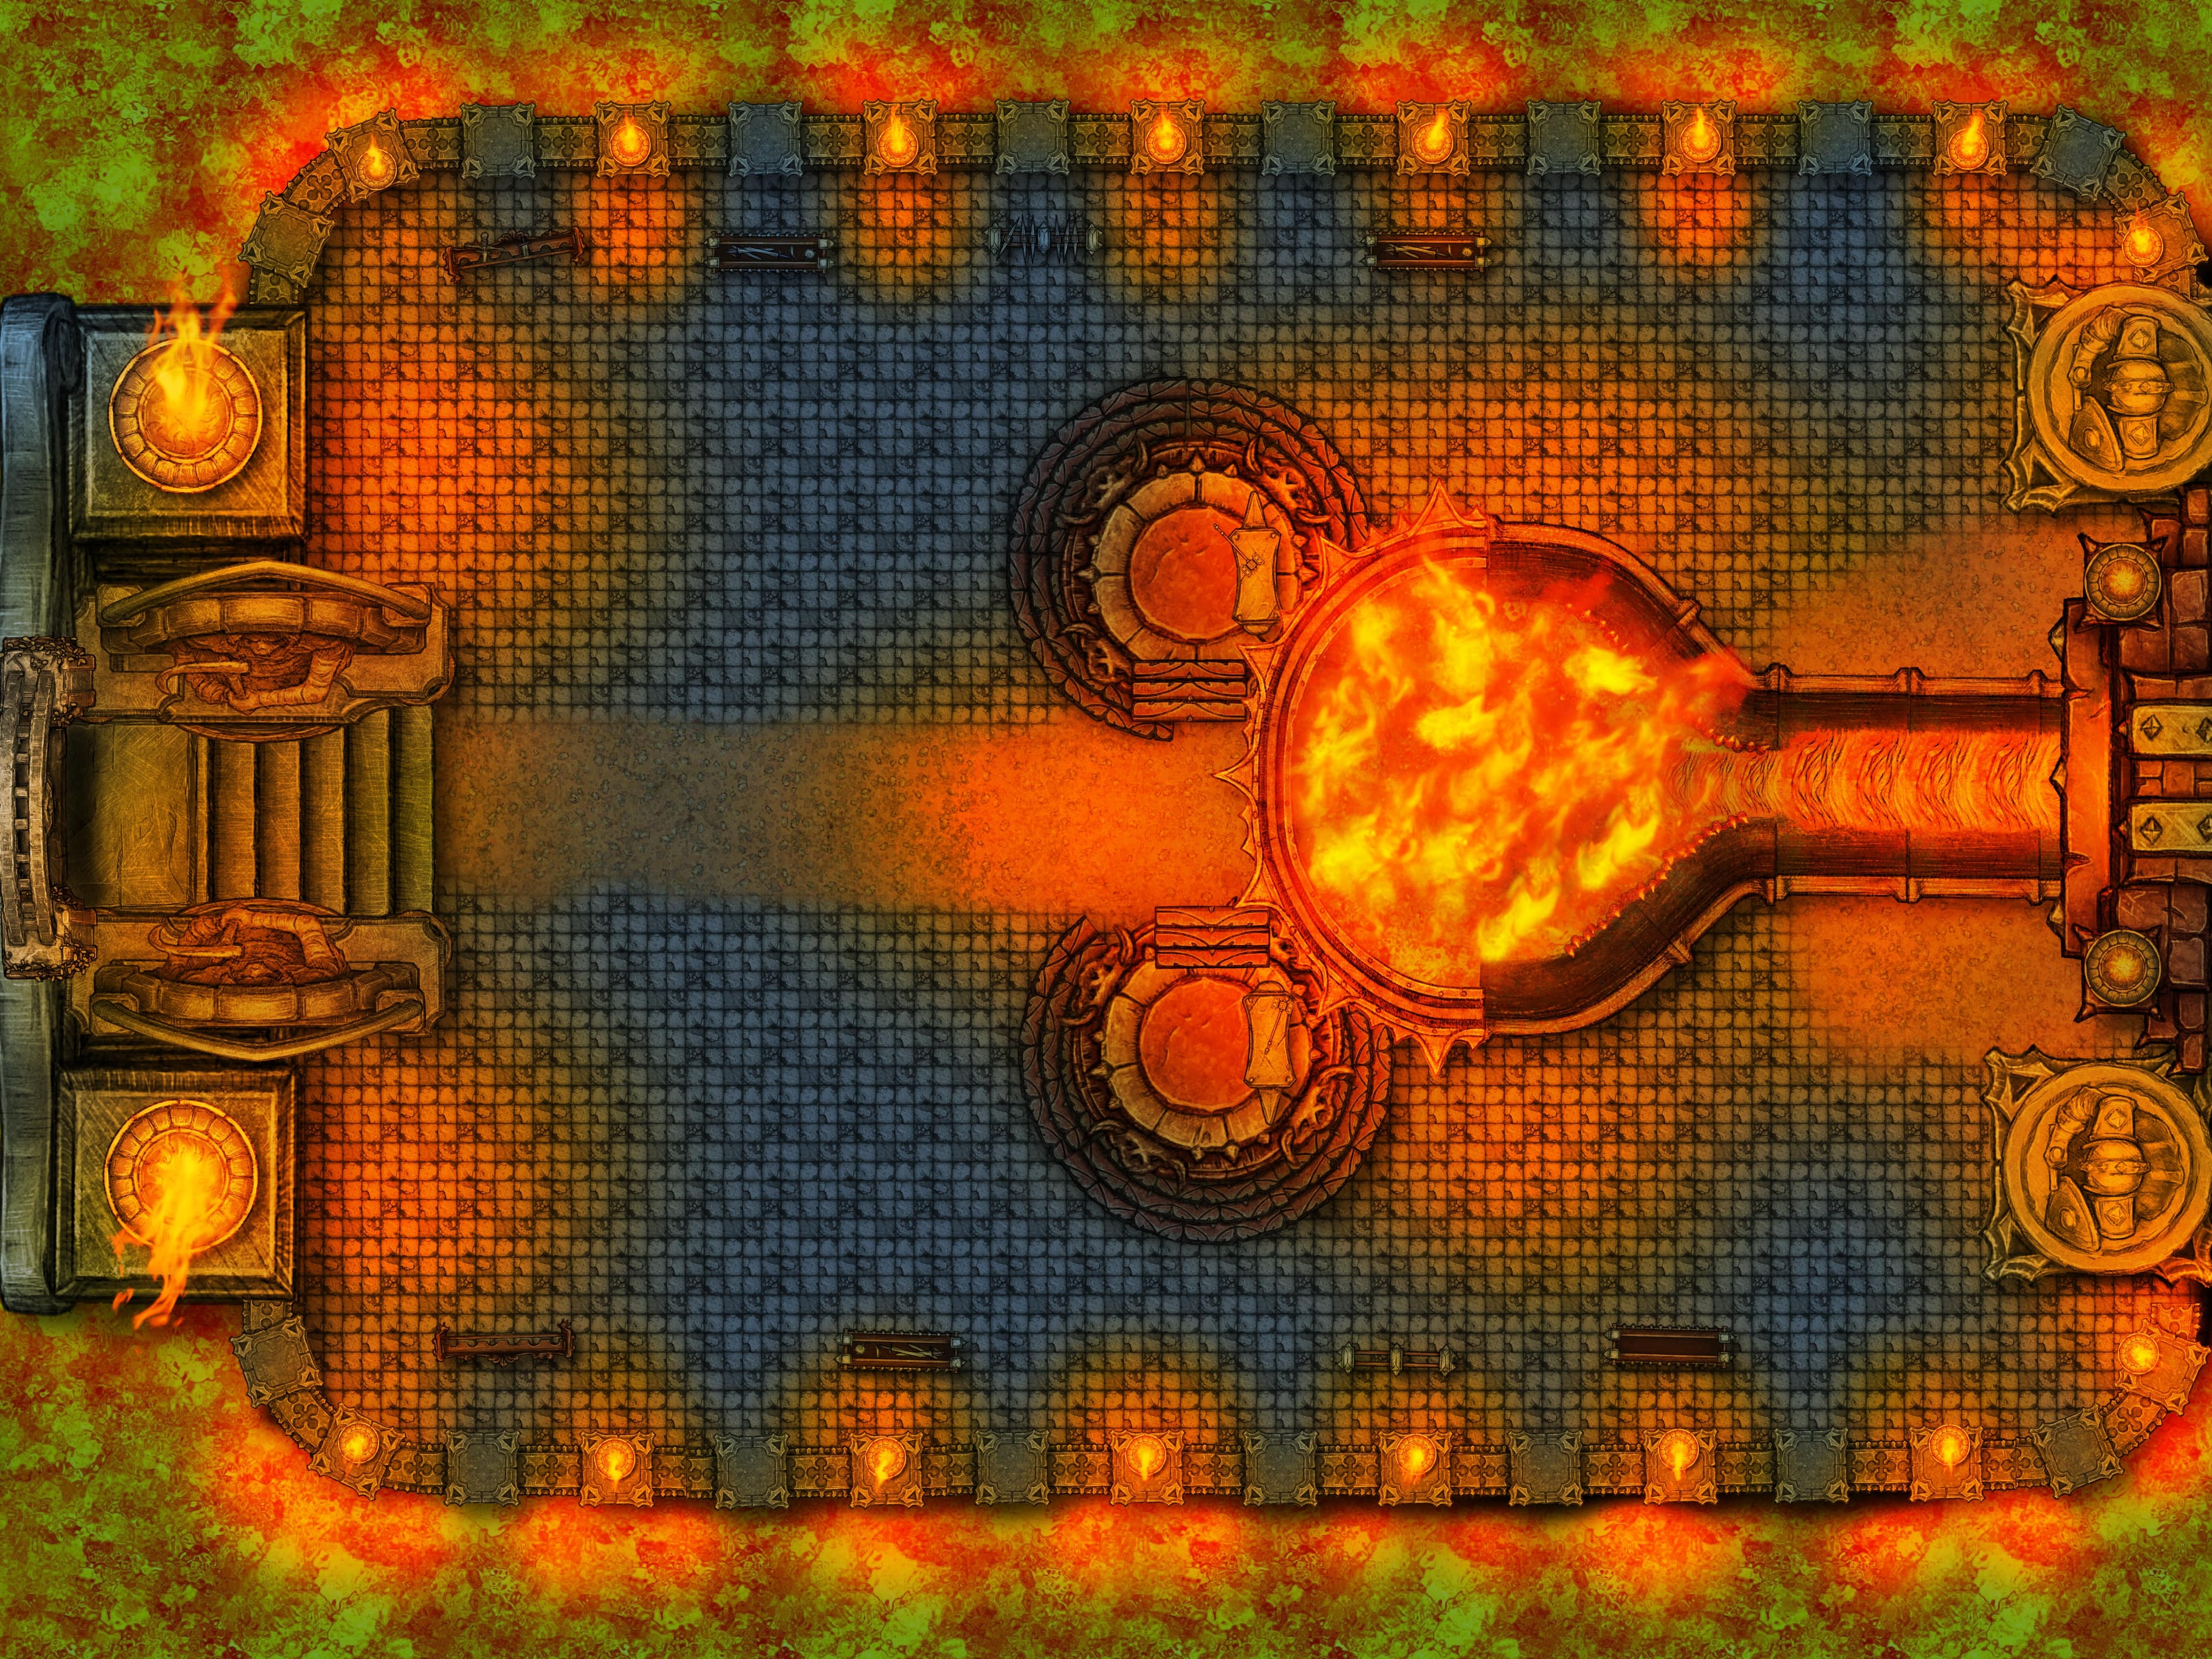
Description: The heart of the Volcano
As the party descend into the heart of the Forge Temple, they enter a vast, cavernous chamber illuminated by an otherworldly glow. Waterfalls of lava cascade down the chamber walls that flows into glowing rivers across the floor.
At the center of the chamber, set within an intricately carved stone pedestal, burns the Eternal Flame of Prometheus. Surrounding the pedestal are runes etched into the obsidian, pulsating with magic that seems to resonate with the flame.
After the Trial, the party is invited to go and see the Eternal Flame with guidance of the Forge Lords.
However, when party arrives the ceremony room, a terrifying scene unfolds. All the Forge Lords were turned into stone. At the middle of the room, a group of cultist are all doing the same ritual that Erebus did at Callista Temple. At the center, Torak Emberheart is holding a Basilisk's Head and as he laughs maniacally, he welcomes the party.
Combat: Use Torak Emberheart (Tier 2) and 1 Veteran Cultist (Tier 2) for the combat. If the combined Challenge Points are not enough to match party’ combined levels, you can add more Veteran Cultist (Tier 2).
If the party manage to unpetrify one of the Forge Lords, they will join the fight as a Dwarf Chief Miner (Tier 2).
If the party touches lava, they become Ignited (1d12) and take 3d12 fire damage (Moltenskins are immune to fire).
Scene 5: Epilogue
Erebus Wins
Screams of terror unfolds across the temple. The volcano suddenly erupts and lava starts to flow and melt the Temple's Hallways. In a short time, the Great Forge Temple of Hephaestus is no more.
Erebus Loses
After Erebus is defeated, the room calms down and the sound of flame and lava echo trough the chamber. Suddenly, the party senses the oil lamp that the Warriors of the Flame gave reacting. Read this passage, depending on how far in the adventure the party is:
-
If this is the first location they went: The oil lamp given by the Warriors of the Flame is partially restored by the Eternal Flame.
-
If this is the second location they went: The oil lamp given by the Warriors of the Flame is completely restored by the Eternal Flame. The party also has a vision of a snowy mountain. They sense it is called Mount Haimos and that it is at Demeter's Wellspring.
The dwarfs thank the party for their efforts. Greybeard welcomes back her daughter, and regardless of previous outcomes, nominates her as a Forge Lord. They shower the party with gifts and gold, as they are now seen as true heroes!
Rewards
- 2 Rare Items they choose for each party member, as the dwarfs can craft them there on the spot
- They Party gains 6 RP and 50 Gold Coins
- The Great Forge Temple will always have their doors open for them.
- They will also gain 6 Common Med Kits
- 3 Uncommon Magical Gems (for Spellcraft Tools) or 3 Uncommon Forging Material (for Smith Tools)
- Upon finishing this part, the party should level up.
Places in the Great Forge Temple of Hephaestus
While the party is visiting the Great Temple, they might want to visit the place and get sidetracked. Here are a couple of places they can visit.
The Molten Cup (Tavern)
Nestled in a sheltered alcove within the volcanic fortress, the Molten Cup is a loud and agitated Tavern. Tables and benches, carved from rock and stone. The air is filled with the hearty aroma of roasted meats and spiced ale, mingling with the faint scent of molten rock.
- Mugrin Sideburns (Tavern Owner): Is a Halfling Moltenkin that moved to the forge long ago. He makes such a good and strong beer that the dwarfs invited him to stay permanently on the Forge.
Hephaestus Anvil (Temple)
Hephaestus' Anvil, the grand temple carved into the heart of the volcanic fortress, stands as a testament to the moltenkin's reverence for their god of the forge.
Not only is a place of worship, but also a place to pass down knowledge. There is a library with walls lined with meticulously carved stone tablets, each inscribed with detailed techniques, secrets of forging, and divine knowledge passed down through generations.
- Krotos Firesoul (Hephaestus Priest): A Dwarf Moltenkin with 1 arm missing and half of its face melted away. Unlike most dwarfs around, he is understanding and patient with those who seek his guidance, taking the time to listen and offer thoughtful advice.
With a Religion Check (DC 15), Krotos Firesoul will give a Simple Rod (Uncommon Rod) and 2 Magic Scrolls containing the Words of Grandeur spells.
The Old Coal (Illegal Activities)
An underground haven for illicit activities, here the air is thick with the scent of smoldering embers and the murmur of hushed, excited voices. Dimly lit by flickering torches, the cavernous space hosts a variety of illegal entertainments: high-stakes gambling tables where coins change hands in an instant, and brutal fighting rings where contenders battle for both pride and prize.
-
Illegal Duels: First Combat is against a Dwarf Chief Miner (Tier 2). If they win, they can do a Short Rest and 4 gold coins. They can then fight the champion Dwarf Berserker (Tier 3) and if they win, they gain 50 gold and 5 RP. This should be a non-lethal duel, and it ends when Posture is broken, but things can escalate...
-
Gambling: They are playing liars dice. You can play the game with your players, or if you prefer, you can simply make a Luck Check (DC 15), or Deception Check (DC 17) to see the results. On a success, they double the amount they bet, but on a fail they lose all their money they bet.
The Forge Plaza (Marketplace)
Is a bustling marketplace where all sorts of travelers, merchants and adventurers come to trade goods and knowledge. Here, the party can buy Consumable Items and a few Special Items. Here are some suggestions of what is available, but you can add more things at your discretion:
Healing Consumables
| Loot | Price |
|---|---|
| Minor Healing Potion | 20-50 Silver |
| Healing Potion | 50 - 100 Silver |
| Potion of Unpetrification | 50 - 100 Silver |
| Antidote | 20-50 Silver |
| Med Kit | 20-50 Silver |
| Quick Med Kit | 50 - 100 Silver |
Runes
| Loot | Price |
|---|---|
| Rune of Climbing | 50 - 100 Silver |
| Rune of Darkness | 50 - 100 Silver |
| Rune of Heat | 50 - 100 Silver |
| Rune of Mantra | 50 - 100 Silver |
| Rune of Protection | 50 - 100 Silver |
Miscellaneous Items
| Loot | Price |
|---|---|
| Magic Pipe | 10 - 20 Silver |
| Light Stone | 10 - 20 Silver |
| Magic Pencil | 10 - 20 Silver |
| Magic Lock | 20 - 50 Silver |
| Snake Rope | 20 - 50 Silver |
| War Drum | 20 - 50 Silver |
Metal Items
| Loot | Price |
|---|---|
| Hardened Metal Helmet | 20 - 50 Silver |
| Metal Gauntlets | 20 - 50 Silver |
| Brace Weapon | 50 - 100 Silver |
| Blessed Gauntlets | 50 - 100 Silver |
| Wall Breaker | 50 - 100 Silver |
| Spiked Shield | 50 - 100 Silver |
| Polished Brilliant Shield | 50 - 100 Silver |
The Great Forge Temple of Hephaestus NPC's Sheets
The quest for Materials
Young Basilisk
Enormous, Monstrosity
Tier 2, Challenge Point 16, XP: 32
Attributes
AC 15 AP 3 HP 104 Posture 52
- Passive Insight/ Perception 14
- Senses: Blindsenses
- Language None
Movement
Base/Climb/Swim 20 Dash 50 Stats + Skills
STR +8 DEX -2 INT -3 WIS +4 CHA -3
- LU +1: Luck Points: 1; Critical Fail: 1
Abilities
- Petrified Look All creatures that look directly to you must succeed on an Endurance Save (DC 16), or become Cursed.
- While Cursed this way, that creature is Contained and it must repeat this Endurance Save at the start of its turn. If it fails again, that creature also becomes Paralyzed. If it fails for a third time, it turns into an inanimate statue and it does not repeat this Save.
- This Curse can be broken if the creature succeeds on the Endurance Save at least once, if it takes any acid damage, or if you die. The statue reverts back into that creature if touches acid or if you die.
Actions (2)
Enormous Bite Hit +8, Dmg 2d6 thrust
Swallow (Concentration): On a hit, the target must succeed on a Brawling Save (DC 16) or be swallowed by you if it’s Large or smaller. While swallowed:
• Shares the same space as you.
• Is in Full Cover.
• Becomes Paralyzed if it has 0 Posture.
• Takes 2d8 acid damage at the start of its turns. Any Construct or Armor/Shield/Weapon being used by a creature also takes 1 Corrosion Point when they take this acid damage.
You can have 1 creature swallowed at once, but you vomit if you lose Concentration.
Triumph: This Action has a limit of once per round.
Constrict Hit +8, Dmg 3d6 strike
Containment: On a hit, a Large or smaller creature becomes grappled by you. A creature grappled this way also becomes Contained.
You can only grapple 1 creature at once.
Reaction
- Sick Look When a creature within 60 feet from you makes an Endurance Save, you can use your Reaction and impose disadvantage on that Save.
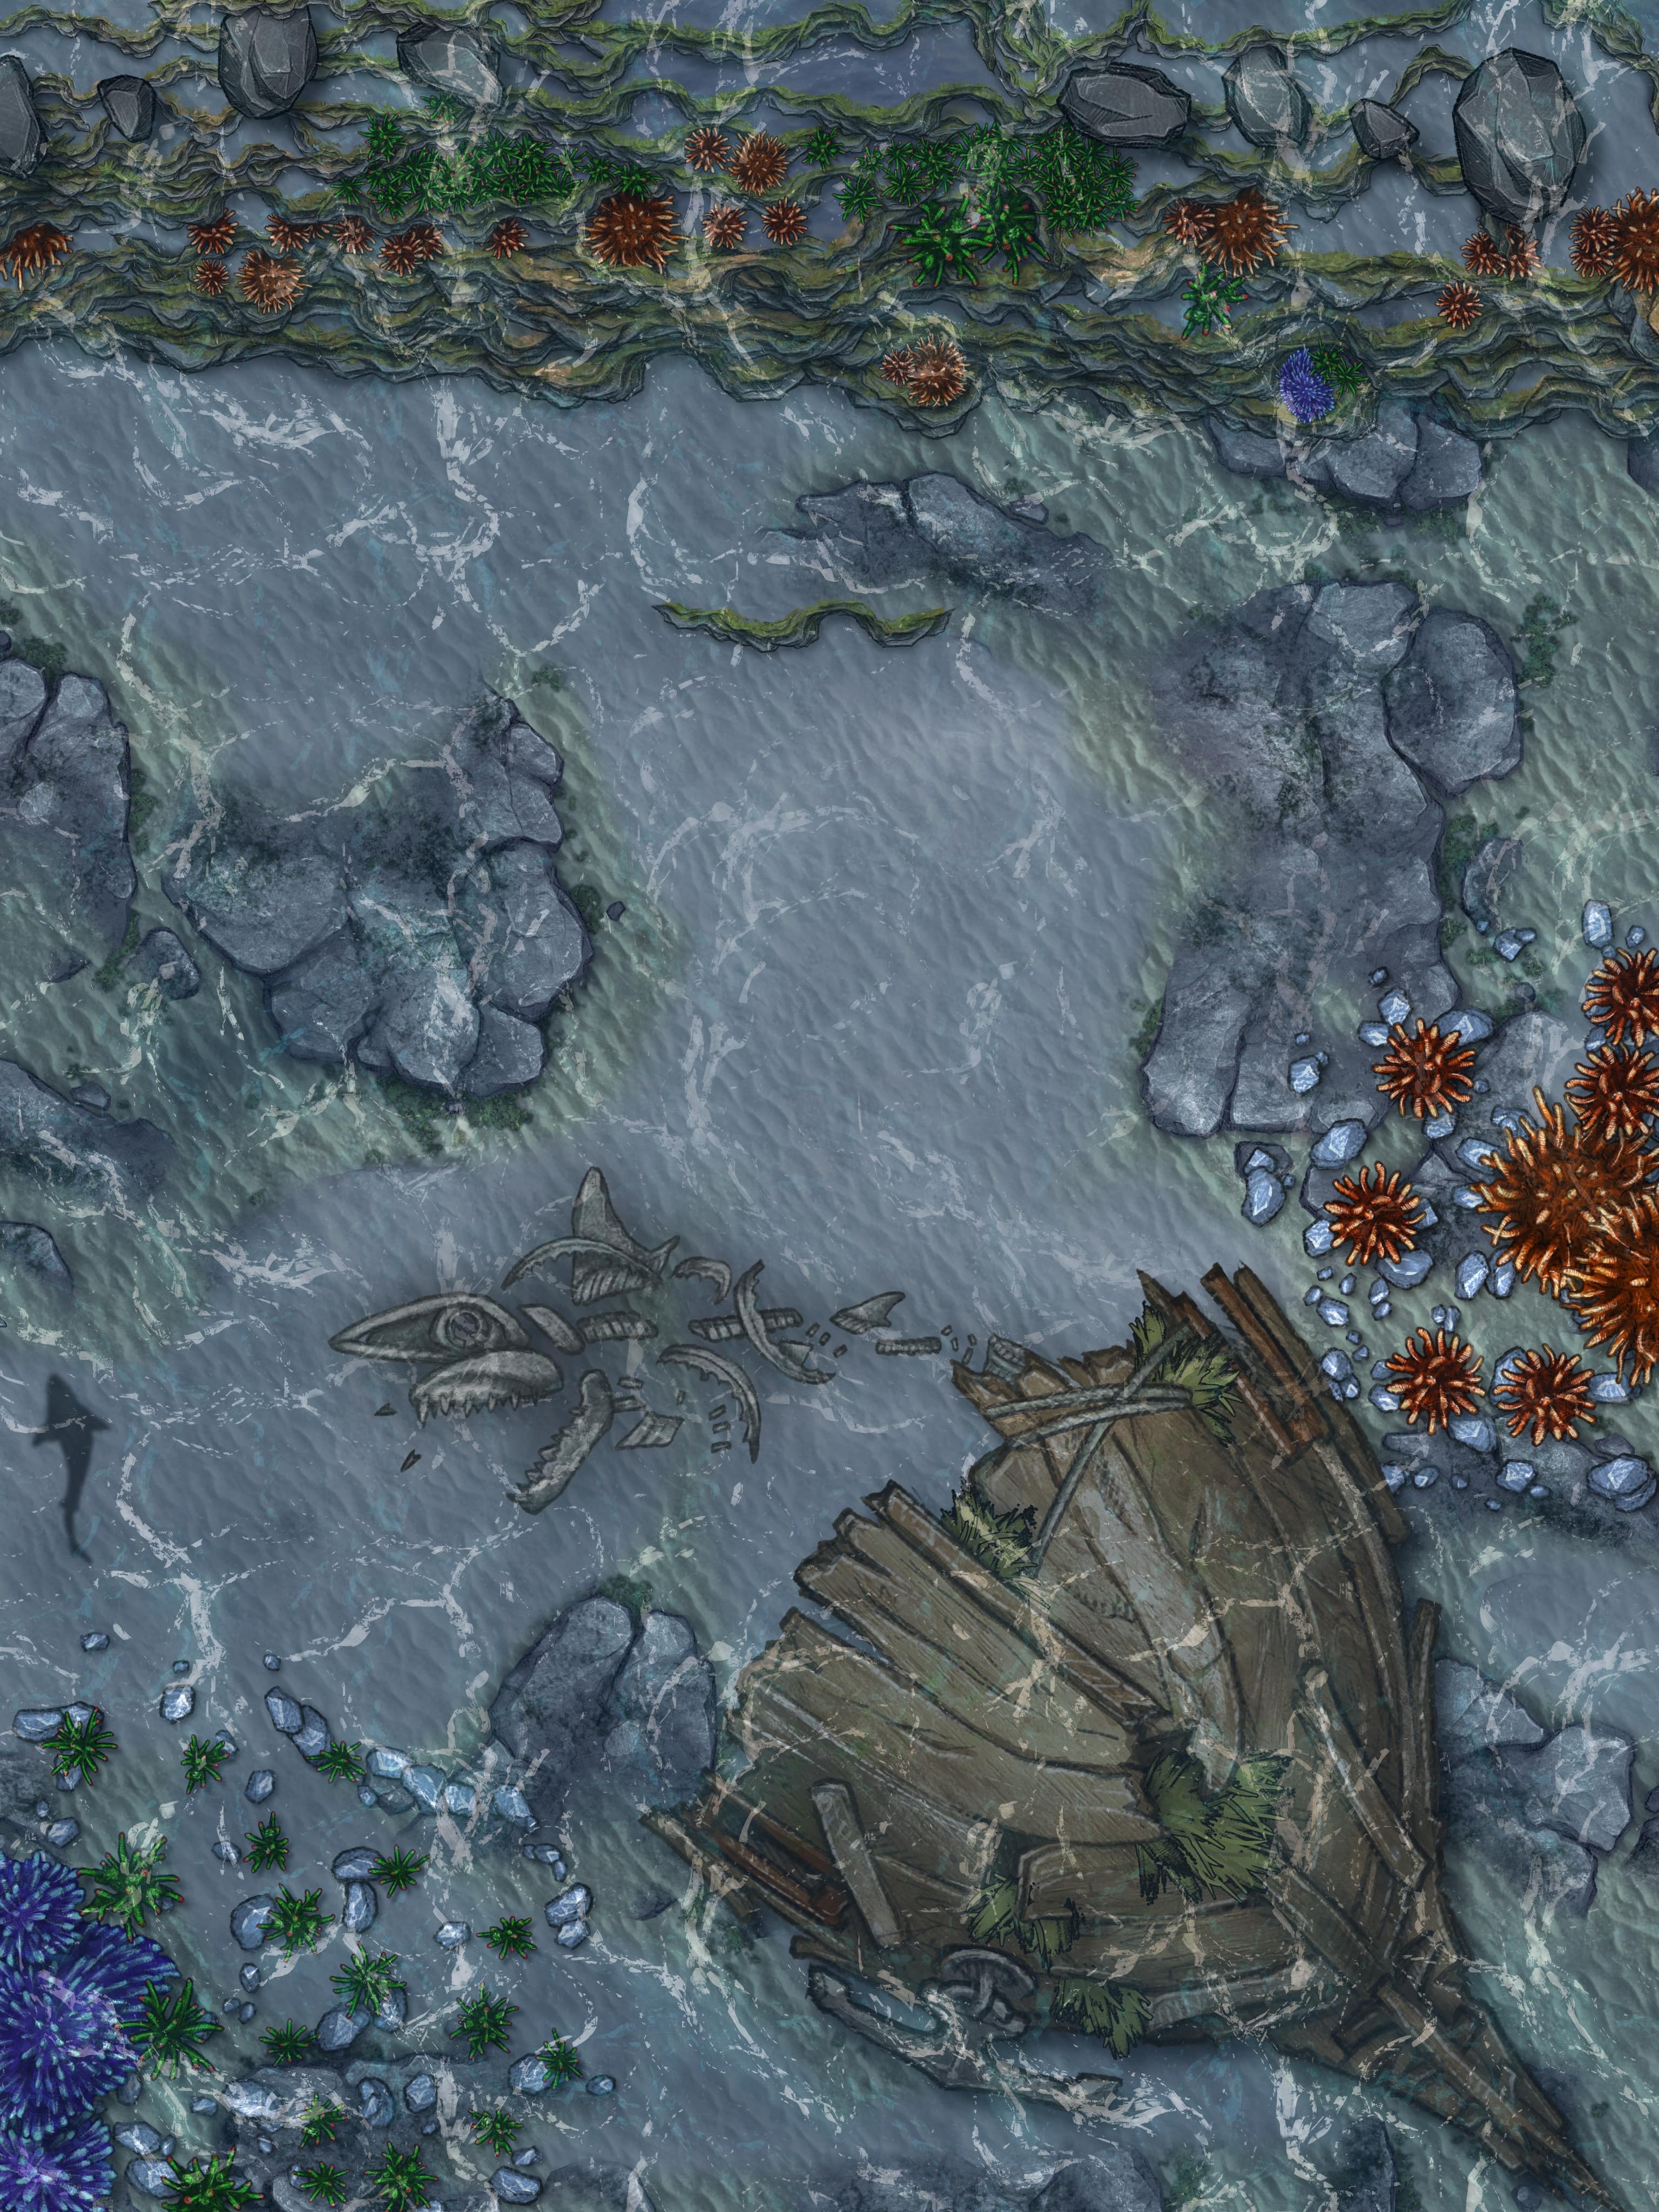
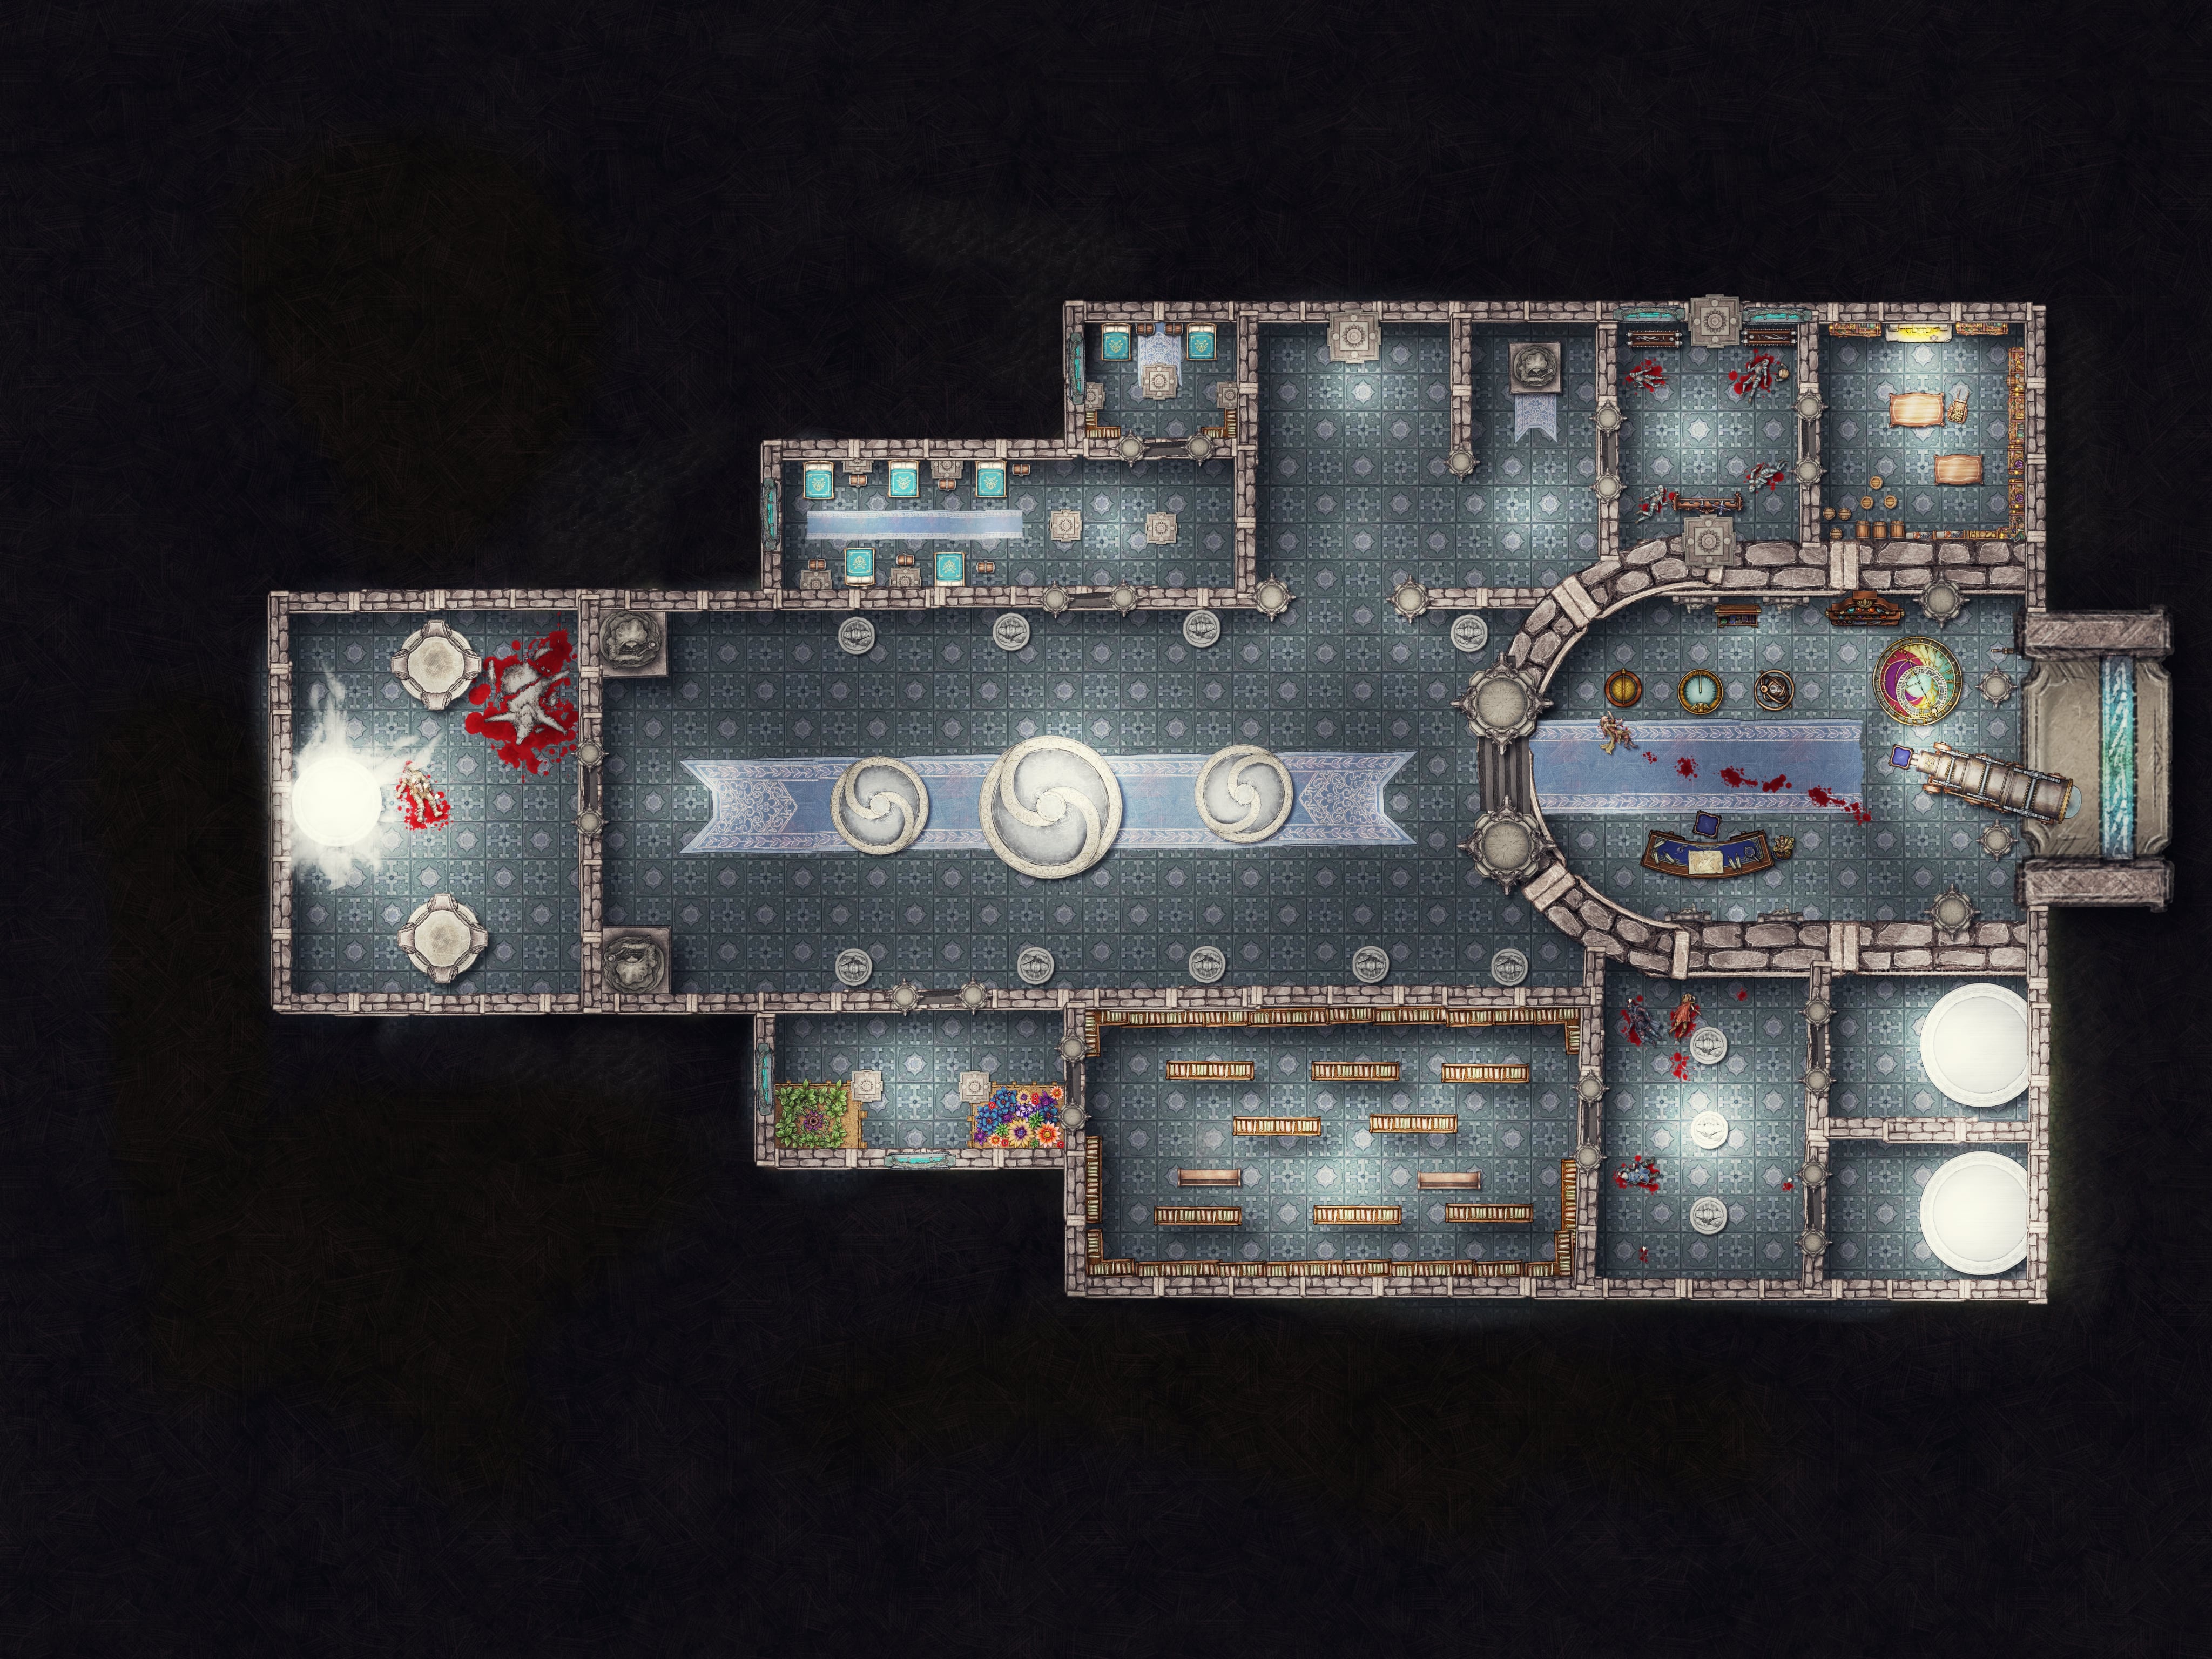
The quest for Materials Battlemap
The Demonstration
Dwarf Shield Bearer
Medium, Humanoid
Tier 2, Challenge Point 4, XP: 8
Attributes
AC 16/ Shield +1 AP 3 HP 38 Posture 16
- Passive Insight/ Perception 10
- Language Common, Dwarvish
Movement
Base 20 Climb/Swim 20 Dash 40 Stats + Skills
STR +6 DEX -2 INT +3 WIS +0 CHA +0
- LU +0: Luck Points: 0; Critical Fail: 1
Abilities
- Athletic You gain advantage to all your Athletics and Endurance Checks or Saves.
Actions (2)
- War Hammer: Hit +6, Dmg 1d10 strike or thrust
- Versatile: If you Attack with both hands, the damage roll of this weapon becomes 1d12.
- Favorite Weapon: You ignore 3 AP
Reaction
- Use Shield When an Attack would hit you, you can use your Reaction to gain a +2 bonus to your AC.
The Old Coal
- For the GM: Dwarf Chief Miner can be found at The Fight for the Eternal Flame sheet section below.
Dwarf Berserker
Medium, Humanoid
Tier 3, Challenge Point 10, XP: 30
Special Loot: Loyal Weapon (Uncommon Weapon)
Attributes
AC 16 AP 3 HP 88 Posture 40
- Passive Insight/ Perception 10
- Language Common, Dwarvish
Movement
Base 25 Climb/Swim 20 Dash 40 Stats + Skills
STR +8 DEX +1 INT -1 WIS +0 CHA +0
- LU +2: Luck Points: 2; Critical Fail: 1
Villain Action
- Frenetic Rage On the end of each creature turn, you can make 1 Attack against it if possible.
Abilities
- Athletic You gain advantage to all your Athletics and Endurance Checks or Saves.
Actions (2)
- Battle Axe: Hit +8, Dmg 1d10 slash or thrust
- Throw Weapon (20/30)
- Versatile: If you Attack with both hands, the damage roll of this weapon becomes 1d12.
- Favorite Weapon: You score a Critical Hit on any Attack rolls of 18, 19 or 20 with this weapon. These Critical Hits also deal extra 1d6 damage
- Special Effect: After you throw this weapon, it comes back to you at the end of a turn. You can then choose 1 creature that is between you and this weapon. That creature must succeed on a Reflex Save (DC 16), or take 1 hit from this weapon's Attack.
The Fight for the Eternal Flame
Torak Emberheart
Medium, Humanoid
Tier 2, Challenge Point 12, XP: 24
Attributes
AC 16 AP 2 HP 79 Posture 38 Mana 4
- Damage Immunities: Fire
- Passive Insight/ Perception 12
- Language Common, Dwarvish, Infernal Speech
Movement
Base 25 Climb/Swim 20 Dash 40 Stats + Skills
STR +7 DEX -1 INT -1 WIS +2 CHA +7
- LU +0: Luck Points: 0; Critical Fail: 1
Villain Action
Basilisk Head (Concentration) All creatures that look directly to you must succeed on an Endurance Save (DC 15), or become Cursed.
While Cursed this way, that creature is Contained and it must repeat this Endurance Save at the start of its turn. If it fails again, that creature also becomes Paralyzed. If it fails for a third time, it turns into an inanimate statue and it does not repeat this Save.
This Curse can be broken if the creature succeeds on the Endurance Save at least once, if it takes any acid damage, or if you die. The statue reverts back into that creature if touches acid or if you die.
If you lose your Concentration, the magic binding you and the head ends and you drop the head into the ground. You must use 1 Action to pick the head in the ground again to regain this ability.
Any creature can use 1 Action to kick this head away into the lava, unpetrifying any creature and also ending Cursed creatures.
Villain Magic Once per round, you can cast a spell at any moment, ignoring any restriction from Normal Spells
Ability
- Athletic You gain advantage to all your Athletics and Endurance Checks or Saves.
- Command Once per round, you can use a Free Action to make a friendly creature within 30 feet to take an Action on your turn.
- Insane When you take psychic damage, you regain Posture instead of taking that damage, but you also become Confused after.
- Necromancer You don’t lose HP when casting Necromancy spells that drain your own HP.
- Spell Skill Spell Hit +7, Spell DC (15)
Action (1)
- Cast Spell You cast the following spells:
- At will: Dark Orb, Fire Orb, Frost Bite,
Minor Lightning, Sense Good & Evil- Level 1 (1 Mana): Dark Pulse, Putrid Flesh, Flamethrower, Cold Whisper, Lightning Strike
Bonus Action
- Cast Spell You can cast the following spells:
- At will: Hex
Veteran Cultist
Medium, Humanoid
Tier 2, Challenge Point 2, XP: 4
Attributes
AC 11 AP 2 HP 7 Posture 11
- Passive Insight/ Perception 17
- Language Common, Infernal Speech
Movement
Base 25 Climb/Swim 10 Dash 20 Stats + Skills
STR -1 DEX -1 INT -1 WIS +7 CHA +7
- LU +0: Luck Points: 0; Critical Fail: 1
Abilities
- Insane When you take psychic damage, you regain Posture instead of taking that damage, but you also become Confused after.
- Spell Skill Spell Hit +7, Spell DC (15)
Action (1)
- Cast Spell You cast the following spells:
- At will: Dark Orb, Fire Orb, Frost Bite,
Minor Lightning, Sense Good & EvilBonus Action
- Cast Spell You can cast the following spells:
- At will: Hex
Dwarf Chief Miner
Medium, Humanoid
Tier 2, Challenge Point 4, XP: 8
Attributes
AC 16 AP 2 HP 39 Posture 16
- Passive Insight/ Perception 10
- Language Common, Dwarvish
Movement
Base 20 Climb/Swim 20 Dash 40 Stats + Skills
STR +7 DEX -2 INT +7 WIS +0 CHA +0
- LU +0: Luck Points: 0; Critical Fail: 1
Abilities
- Athletic You gain advantage to all your Athletics and Endurance Checks or Saves.
Actions (2)
- Cave Tremor While in a Cave, you can use your Action to make an entire Cave shake. All creatures of your choice within 60 feet of you must make an Athletics Save (DC 15). On a fail, they take 2d12 strike damage and become Knocked Prone. On a success, they only take half that damage.
- Big Triumph: You can only use this Action once.
- War Hammer: Hit +7, Dmg 1d10 strike or thrust
- Versatile: If you Attack with both hands, the damage roll of this weapon becomes 1d12.
- Favorite Weapon: You ignore 3 AP.
Fight for the Eternal Flame Battlemap
Poseidon’s Everbright Lighthouse
Background
A few days from the Kartelles coast, stands the Everbright Lighthouse—a gleaming sentinel in the chaotic sea of Egeon. This ancient structure, rumored to have been erected by Poseidon himself, is far more than a mere beacon for sailors. It is a symbol of stability in a world where stability is a fleeting myth, a bulwark against the shifting tides and islands that threaten to devour all who dare navigate these waters.
The lighthouse’s flame is no ordinary light. It burns with a spark from the Eternal Flame of Prometheus. Its glow is said to carry a fragment of the original spark of creation, an undying fire that pierces even the darkest nights and most furious storms. Visible from leagues away, it shines like a lone star amidst a sea of uncertainties. For all those who travel, the Everbright offers safety and guidance. But safety does not come freely; it is bartered for with coin, blood, and obedience to the one who claims dominion over this perilous region—the enigmatic Tide Master.
The Tide Master and His Dominion
The Tide Master, a Triton of indeterminate age, that commands the waters with the authority of a ruthless tyrant. Beneath his flowing blue-green hair, his eyes glow with the deep azure of the abyss, a gaze that can either bless a sailor with safe passage or doom them to be swallowed by the hungry waves.
To pass the Everbright, a toll must be paid—a toll that varies with the Tide Master’s whims. Sometimes it is gold or gemstones from distant shores; other times, it is knowledge, an oath, or a favor that may be called upon when least expected. For those who refuse or cannot pay, the Tide Master crew's boards the ship or pokes holes underneath its hull. One way or another, the Tide Master always gets his rewards.
Summary
Erebus has set her sights on the Everbright Lighthouse, a beacon of hope in Thalassa’s Infinite Islands. She has forged a dark alliance with a ruthless band of pirates, luring them with promises of untold riches and dominion over the Egeon Sea in exchange for their aid in a sinister assault. Their objective: to corrupt the Eternal Flame of Prometheus, shrouding the lighthouse in darkness and throwing the region into chaos.
If they succeed, Erebus may harness this power to resurrect a Giant Skeleton (Tier 3) that rests nearby.
To thwart this malevolent scheme, the party must first unravel Erebus’s hidden designs and win the favor of the Tide Master. Fortunately, Petra, a cunning and resourceful merchant, stands ready to assist. She can arrange a boat to the party to meet the Tide Master.
Scene 1: The Fishing Village of Doloma
The party arrives at a small coastal village, where the salty sea breeze mingles with the scent of fresh fish. As a familiar face in the village, Petra walks with confidence through the streets, exchanging nods with locals.
Petra leads the party straight to the docks. With a few words, she ensures the party can rent a boat for their next venture. It's a small, sturdy fishing boat, its hull weathered but reliable.
Petra says she is no warrior and would be more of a nuisance than a help. She bids the party farewell and says she will await their return at the local tavern. However, she entrusts the party 100 gold to pay the Tide Master's toll. She also gives more information about the Tide Master and the Lighthouse itself.
Encounter with a Siren
Description: Shark Siren Attack
After a couple days of travel, the party is sailing steadily away from the coast when a haunting melody rises, carried on the wind. Moments later, a sleek, shark-like figure—half woman, half sea predator—bursts from the water. Her skin glistens like wet stone, and rows of sharp teeth flash as her song shifts to a chilling hiss while she circles the boat. Sharks swim just beneath the surface, their fins cutting through the water as they flank the vessel.
"You think to cross my waters so easily?" the Shark Siren snarls, her eyes glinting with malice. "You’ll need more than that little boat to survive out here."
Without further warning, the sharks lunge at the boat, and the siren readies herself to strike.
The party must now face a dangerous battle at sea, fighting to keep their boat afloat while the siren and her deadly companions close in for the kill.
Combat: Use one Shark Siren (Tier 2) and two Sharks (Tier 2) for the combat. If the combined Challenge Points are not enough to match party’ combined levels, you can add more Sharks (Tier 2).
The Siren and Sharks can use one of their Actions to bite the boat. If the boat takes 8 bites, it is destroyed.
If the boat sinks but the Siren and Sharks are defeated, they will need to swim to the Lighthouse. They will need a Skill Challenge (4 Successes, before 3 failures) to survive and find their way to Poseidon’s Everbright Lighthouse. If they fail the Skill Challenge, they get lost and are stranded in a island were they wait days to get rescue, in the meantime the Lighthouse is corrupted by Erebus.
This Skill Challenge represents the party using their skills to find a way, to swim for hours and to face the harsh waters.
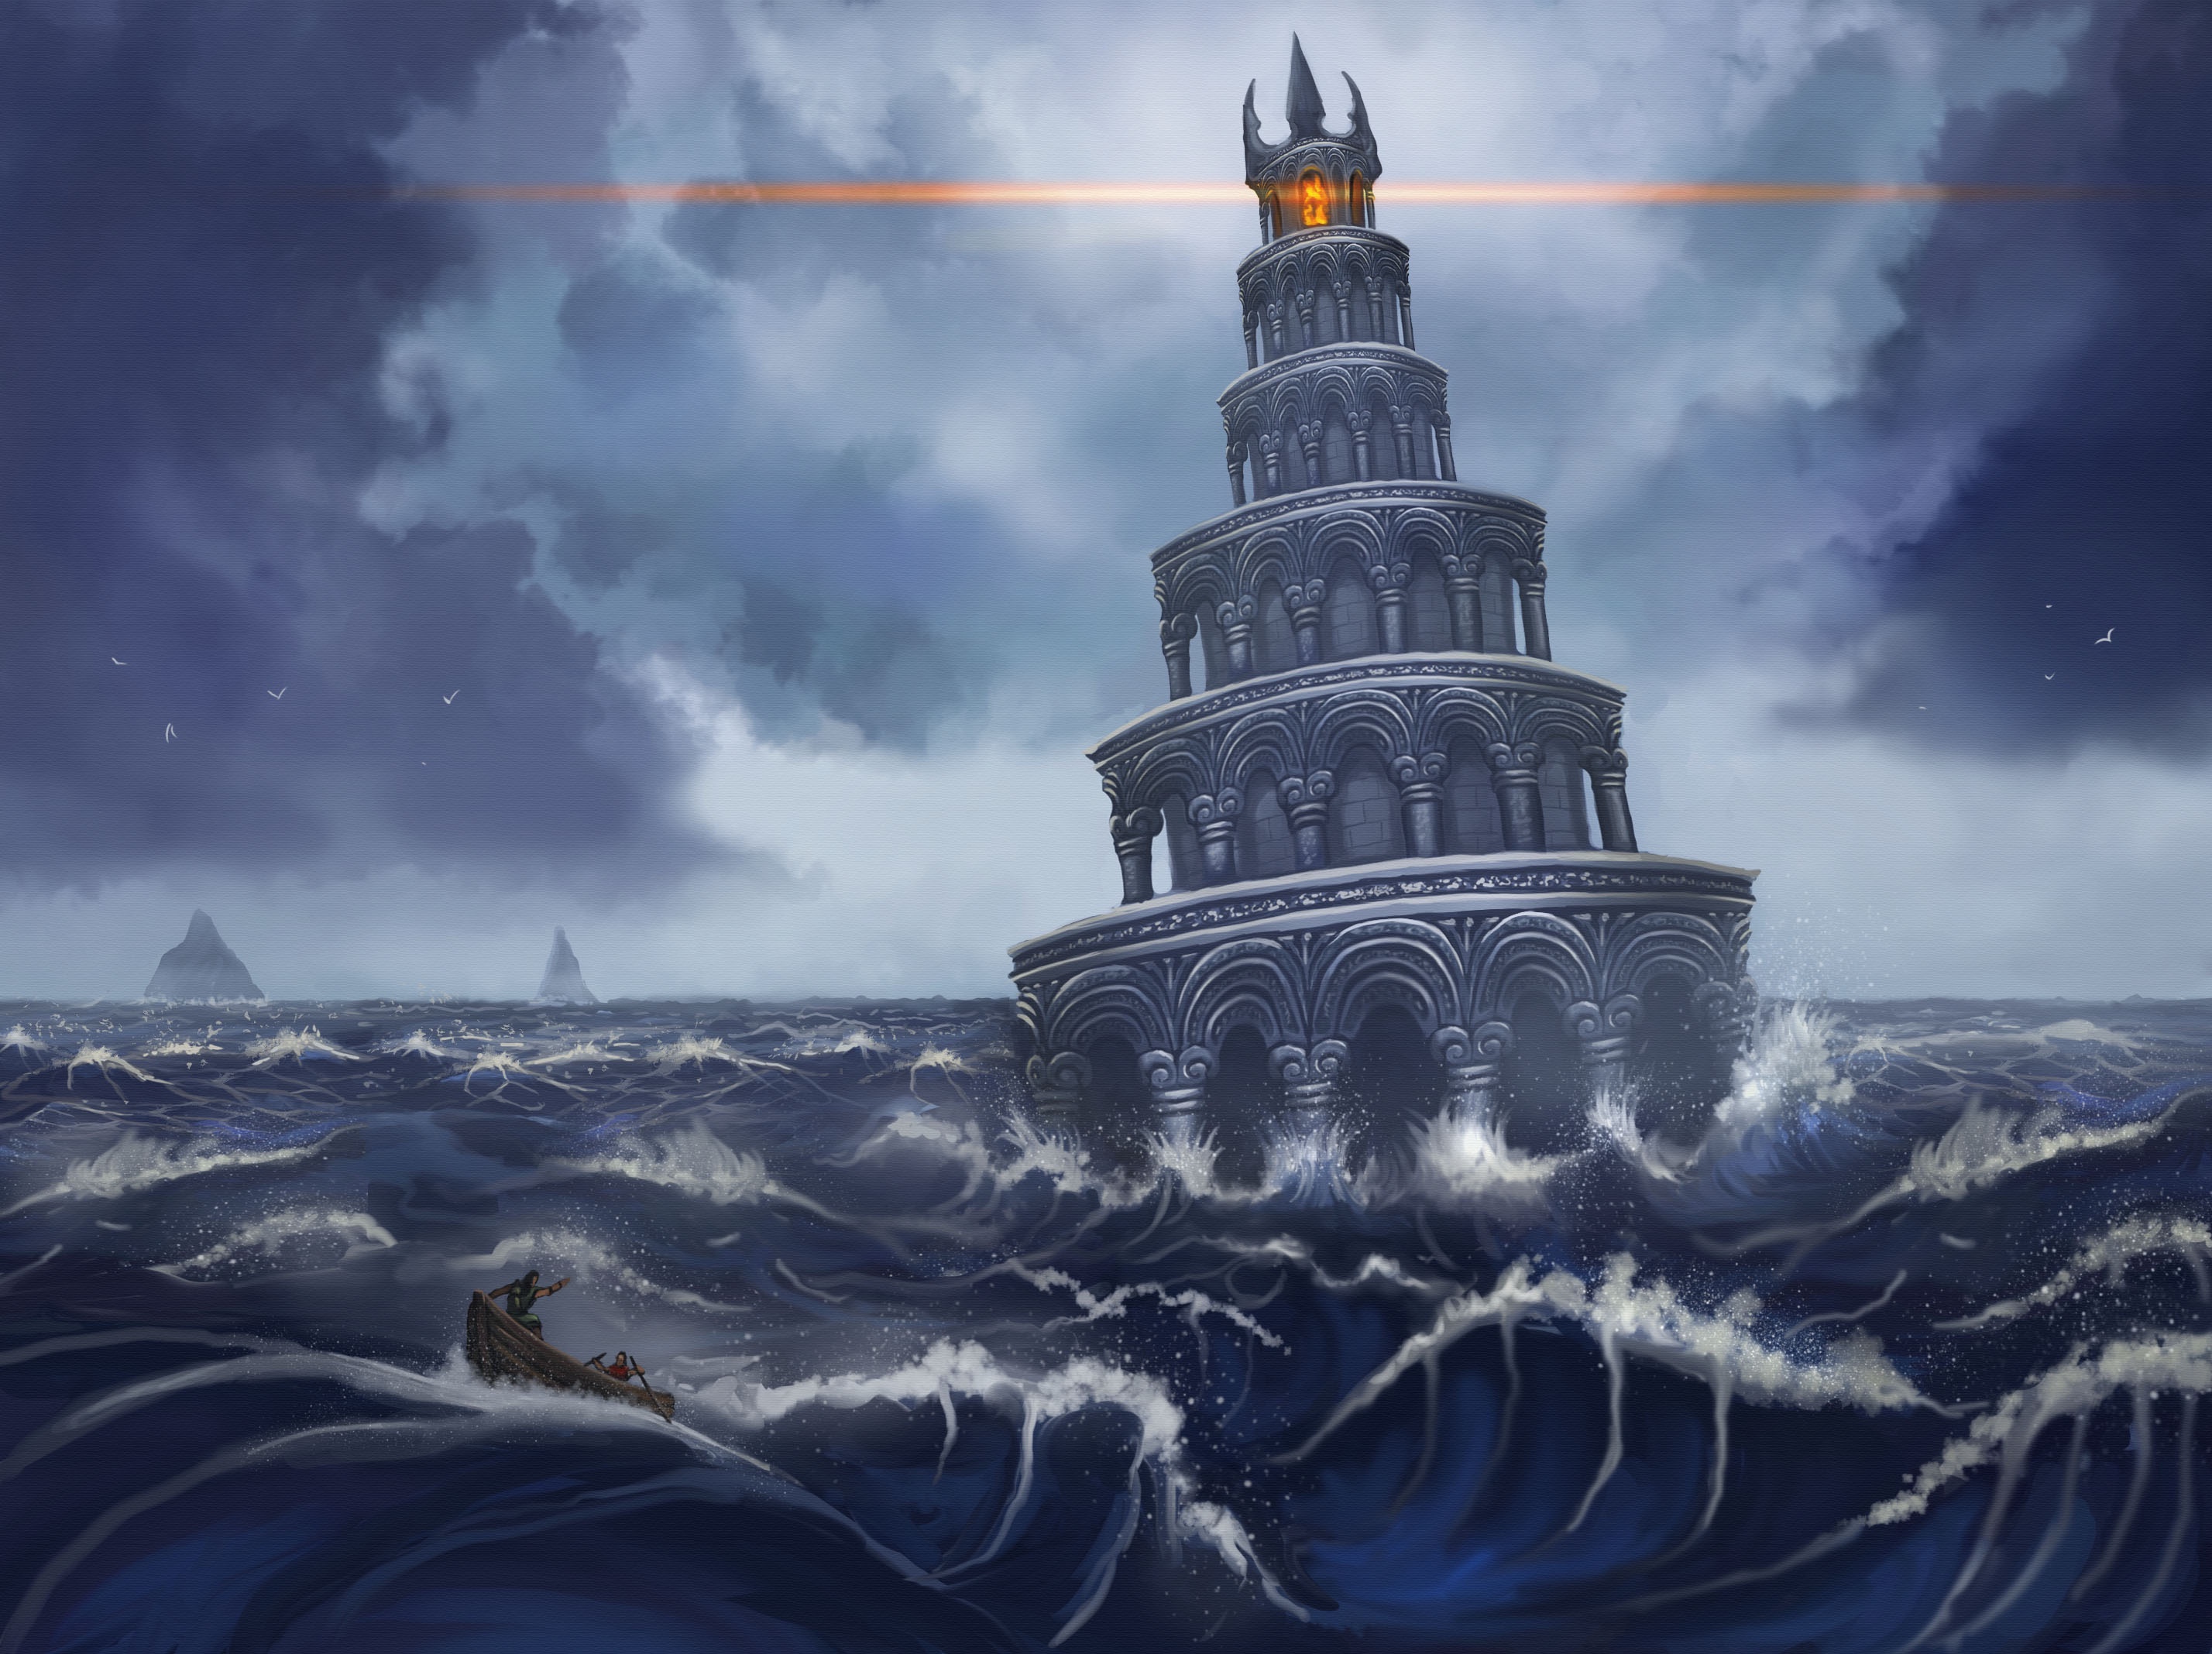
Scene 2: Arriving at the Lighthouse
Description: Arrival
The journey to Poseidon’s Everbright Lighthouse is rough, the small boat tossing on wild waves as cold winds sting your face. The lighthouse stands ahead, tall and leaning slightly to one side, like a crooked tower watching over the sea. Each stories is wrapped in arched colonnades, the delicate stonework worn but still proud, like the bones of a forgotten giant. Its walls are covered with murals and statues of Poseidon. Near the bottom, the carvings are worn smooth by the waves, while those higher up are still clear and sharp. As you step approach, the leaning tower looms above, its Eternal Flame flickering—a light from a place where old gods seem to still linger.
As the party approaches, Tritons emerge from the water, their bodies gleaming in shades of blue and green. They greet the party and cast a spell, allowing the party to breathe underwater, and guide them into the depths.
Description: Tide Master's Meeting
Beneath the waves, the lower levels of the Lighthouse are a submerged world of ancient stone and coral. The Tritons lead them to a grand hall where the Tide Master sits on a throne of seashells and driftwood. He is large and imposing, his long green hair flowing like seaweed in the current, and his eyes glow with the cold, deep blue of the abyss.
The Tide Master’s voice fills their minds through telepathy. "Why have you come here?" he asks, his tone amused but sharp. "Do you think you can cross my waters unchallenged? Perhaps you are spies of Erebus, sent to weaken me."
If the party explains Erebus’ plot to corrupt the Lighthouse, the Tide Master will reveal that he already knows of the coming threat. However, his suspicion grows. "Why should I trust you?" he demands. "Prove to me you are not weak or treacherous."
The party must make a Skill Challenge (4 Successes, before 3 failures) to earn the Tide Master’s trust. This Skill Challenge represents them using persuasion, insight, martial prowess, or other things to convince him they are allies.
If they fail, the Tide Master’s suspicion turns into action. With a wave of his hand, the water around them swirls and binds them in chains of kelp. "I do not trust the weak," he says, locking them away in an underwater prison.
If they succeed, the Tide Master accepts their help for the fight against Erebus.
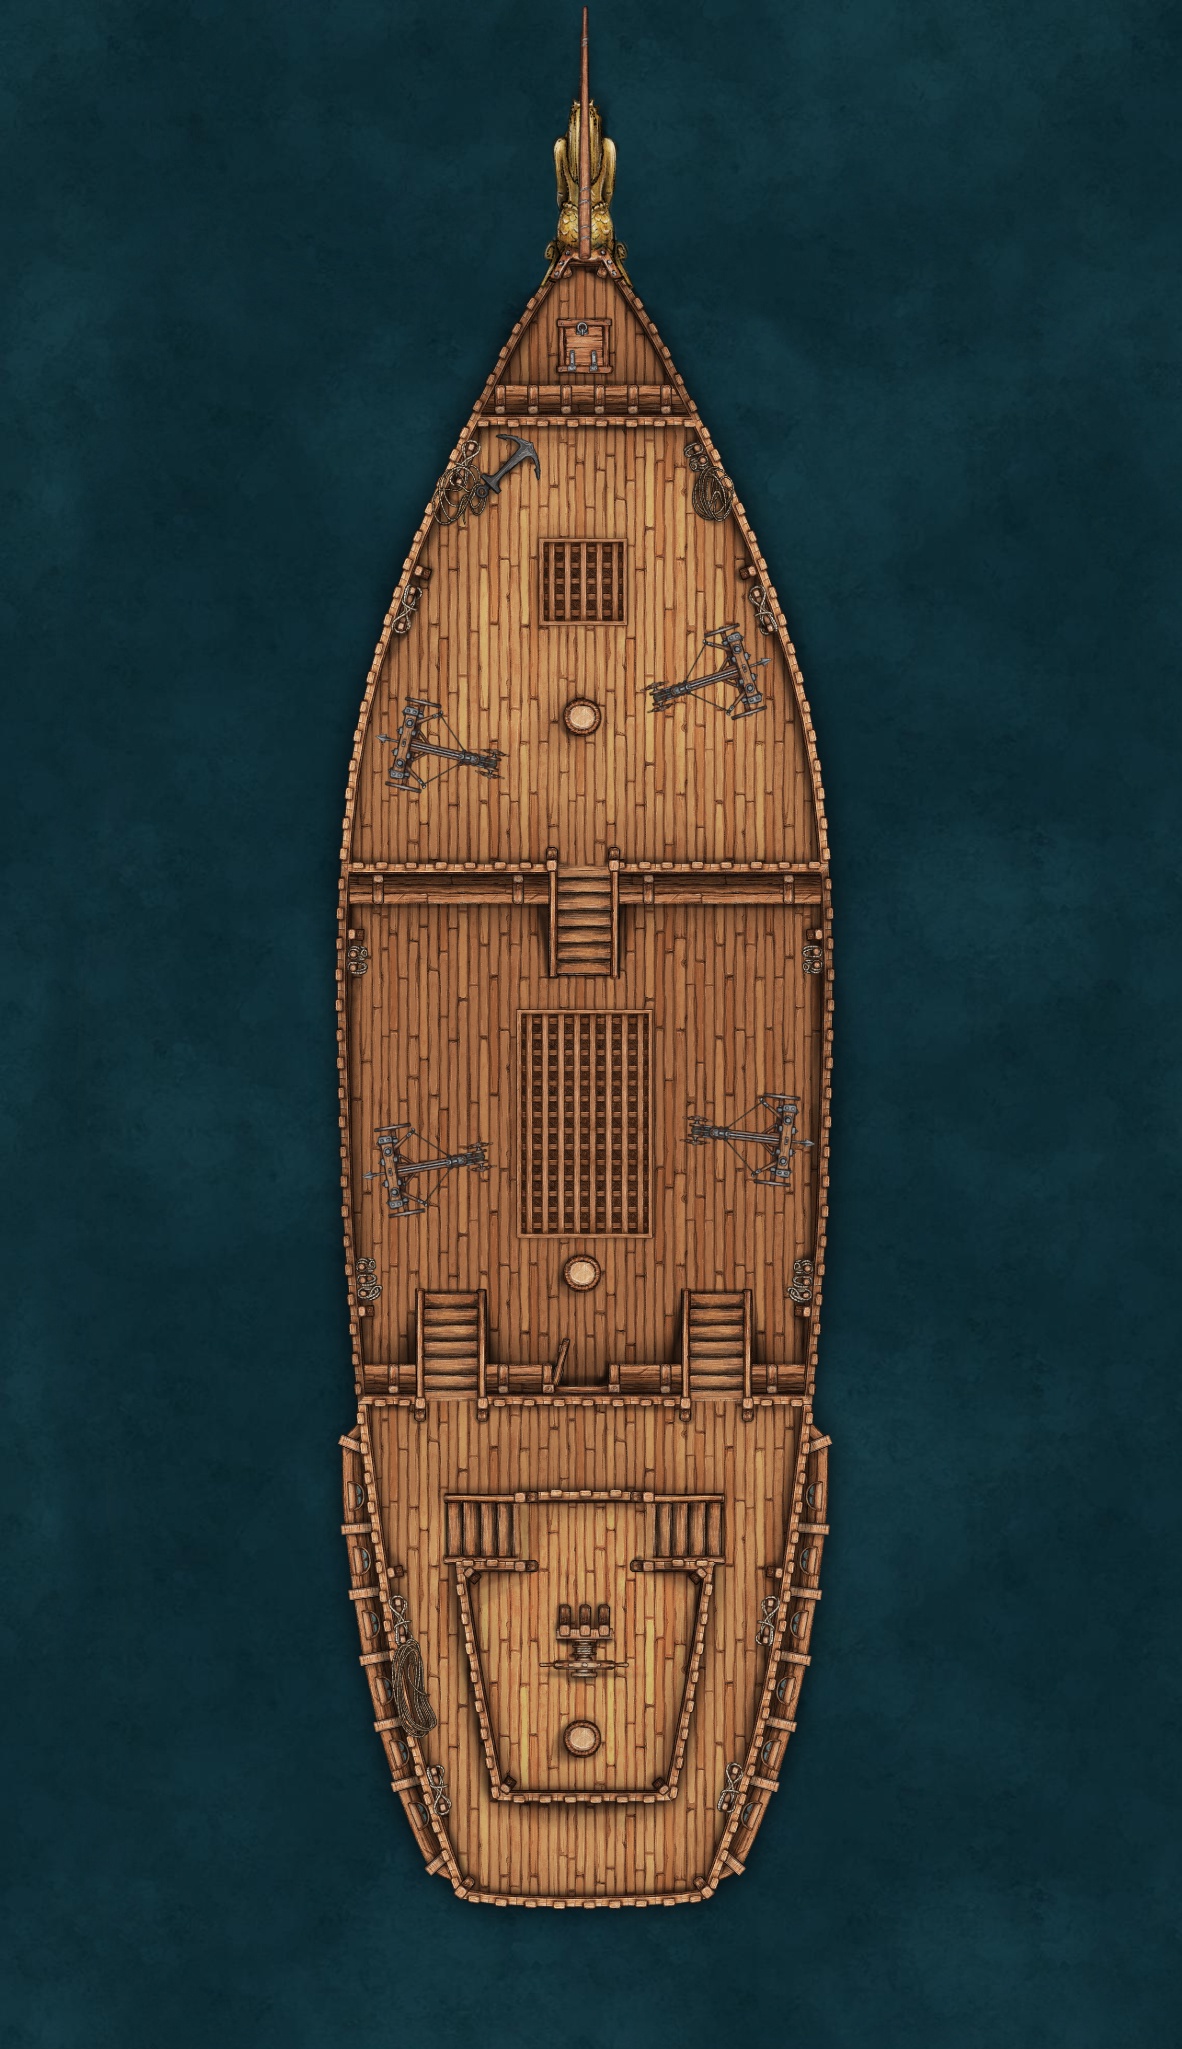
Scene 3: The Final Fight
Description: The Pirates Attack!
A storm brews on the horizon, lightning flashing in the distance. Through the swirling winds, a black flag rises—its tattered skull leering above a massive pirate ship. The ship's bow is no ordinary figurehead but a living siren, her cold eyes fixed on the Everbright Lighthouse as she rides the waves.
Pirates swarm the deck, preparing for battle as the ship cuts through the storm, its balistas poised to strike. Below the surface, skeletal figures march silently across the seafloor advancing toward the lighthouse, driven by dark magic.
The final assault begins, with the pirates and undead converging in a deadly assault against the Everbright.
The Start of the Fight
For the final battle, the party must succeed in a War Challenge. If they started in the prison, they will need 4 successes before 3 failures. Otherwise, they will need only 3 successes before 3 failures.
Below are some actions the party can take during the battle. As the GM, you should present these options to the party, but also allow them to come up with their own creative solutions if you approve.
- Escape the Prison (if they started there)
- Stop the Skeletons Advance
- Free the Siren Matriarch
- Defeat the Pirate Captain
- Help the Tide Master's Defense
- Defeat Erebus
War Challenge
War Challenges are used during epic battles with multiple things happening at once. Usually, the party is a small part of a larger force, but their actions will determine the outcome of the battle.
They will need to complete multiple tasks, which may include skill challenges, puzzles, or combat encounters. Each success adds 1 point, and each failure adds 1 point toward failure. The party typically needs to achieve a number of successes, determined by the GM, before reaching 3 failures.
Usually, the larger armies involved are part of the background, with only a few objectives or enemies directly interacting with the party.
Escape the Prison (if they started there)
To escape the prison, the party must succeed in a Skill Challenge (3 successes before 3 failures). This challenge represents the party’s efforts, like breaking their kelp chains, persuading, or distracting a Triton guard in order to escape.
If they fail the challenge, they can still escape and join the battle, but the fight will have already begun. For instance, a ballista from the battle above could destroy the wall where their chains are anchored, creating an opportunity for escape.
The stakes remain high, and the time they lose will affect the outcome of the final battle.
Stop the Skeletons Advance
A small army of skeletons marches relentlessly across the seafloor. These undead are the cursed remnants of sailors and pirates—victims of the Tide Master's brutal tolls.
The Tritons are locked in a losing battle, their spears and tridents shattering skeletons only for the bones to reassemble moments later. Some dark magic is at work, continuously resurrecting the fallen Skeletons. The battle seems endless unless the source of this magic is stopped.
Combat: The party face 1 Undying Bone Enchanter (Tier 2) and 3 Skeleton Warriors (Tier 1). If the combined Challenge Points do not match the party' levels, you can add more Skeleton Warriors (Tier 1) to increase the difficulty.
If the party win, the Tritons will notice other hidden Bone Enchanters responsible for the skeletons’ resurrection. With the party’ victory, the Tritons will hunt down and destroy the remaining Bone Enchanters, ending the undead threat.
If the party loses, they and the Tritons are pushed back to the lighthouse with many casualties.
Free the Siren Matriarch
The party may notice that a Siren Matriarch is trapped in the bow of the ship. She sings a sad melody as she cries, enchanting all Tritons nearby.
To free the Siren, the party must succeed in a Skill Challenge (4 successes before 3 failures). This challenge represents the party climbing the ship, resisting the melody charm, fending off a couple of pirates, and breaking her chains for example.
If they fail the challenge, she remains trapped, and many Tritons lose their lives as they follow her voice and are killed by the attackers.
If they succeed the challenge, they free the siren, and she starts singing a war song, inspiring the Tritons to fight.
Defeat the Pirate Captain
The party might try to attack the pirate ship, or kill the Pirate's Captain. With the help of the Tritons, they arrive at the ship, and can try to face their Captain, while the Tritons and the rest of the Pirate's Crew fight in the background.
Combat: The party face 1 Veteran Brute (Tier 2), which is Pirate Captain, 1 Veteran Bandit Archer (Tier 2) and 1 Veteran Thug (Tier 2). If the combined Challenge Points do not match the party' levels, you can add more Veteran Bandit Archer (Tier 2) to increase the difficulty.
If the party win, the Pirates will lose their leader. Most of them will surrender, and the rest will be killed by Tritons.
If the party loses, the Pirates advance continues, and more Tritons are killed in battle.
Help the Tide Master's Defense
The party might try to help the Tide Master's Defense.
They must succeed in a Skill Challenge (4 successes before 3 failures). This challenge represents the party helping reinforce the Lighthouse, killing a few of Skeletons that invaded, prepare traps for the enemy, and use the Eternal Fire power to purge the undead for example.
If they fail the challenge, the defender are taken back to the top of the lighthouse, where they have a last stand.
If they succeed the challenge, they will push back the attackers, and make the Lighthouse a place to retreat and rearm themselves.
Defeat Erebus
The party might try to focus on finding and defeating Erebus. She will be sneaking in the Lighthouse while using the entire battle as a distraction.
Combat: The party faces 1 Cultist Leader (Tier 2), which will be Erebus, and 3 Skeleton Warriors (Tier 1). If the combined Challenge Points do not match the party' levels, you can add more Skeleton Warriors (Tier 1) to increase the difficulty.
If the party wins, Erebus is defeated, but as she dies, he says the others will avenge her.
If the party loses, Erebus advances and begins to corrupt the Eternal Flame.
Description: Erebus
Erebus appears as a female Triton with a half-burned face, marred by dark, shifting tattoos that flicker with ancient power. Her fish-like traits extend to the sharp, fin-like ridges that crest the back of her skull and run down her spine.
Her eyes are black, reflecting the cold, unsettling aura of his presence. Flanking her are her skeletal bodyguards, their hollow sockets glowing faintly, their bones adorned in tattered remnants of spectral oceanic regalia.
Together, they exude a dark, otherworldly menace that hints at forbidden, ancient rites.
Scene 4: Epilogue
Erebus Wins
The Tide Master, despite the party’s aid, could not halt Erebus’ advance. With dark purpose, Erebus climbed to the summit of the Everbright Lighthouse and twisted the Eternal Flame, corrupting its once pure light. The party (if they managed to survive), along with a few surviving Tritons, managed a desperate escape to a nearby island.
As they reach the shore, their eyes are drawn back to the lighthouse, now engulfed in flames. With a deafening crash, it crumbles into the sea, and from the smoldering ruins, a massive skeleton rises, its empty eyes burning with malevolent light. The sky darkens as if night has fallen, and the world seems to shudder under the weight of the darkness unleashed.
Erebus Loses
After the brutal battle, with the skeletons shattered and the pirates defeated, the party ascends the lighthouse, where the Tide Master awaits them. Around them, battered and wounded Tritons still find the strength to cheer for their hard-won triumph.
The Tide Master, his pride softened, offers a rare apology for his earlier conduct and expresses his gratitude. He explains that the pirate ship was damaged and is in need of repair but promises it to the party as a reward once restored.
As the party prepares to depart, a strange feeling washes over them as the oil lamp given by the Warriors of the Flame reacts. Read this passage, depending on how far along the party is in the adventure:
-
If this is the first location they went: The oil lamp given by the Warriors of the Flame is partially restored by the Eternal Flame.
-
If this is the second location they went: The oil lamp given by the Warriors of the Flame is completely restored by the Eternal Flame. The party also has a vision of a snowy mountain. They sense it is called Mount Haimos and that it is at Demeter's Wellspring.
Rewards
- They Party gains 6 RP and 150 Gold Coins, including the gold Petra gave them earlier.
- A ship if they choose to come back later for future adventures.
- 1 Bubble Helmet (Uncommon Helmet) for each party member
- The Tide Master will never charge a toll for them, and they have safe harbor in the region.
- They will also gain 6 Common Med Kits
- 3 Magical Gems (if they have Spellcraft Tools) or 10 Fresh Exotic Cooking Ingredients (if they have Cooking Tools)
- Upon finishing this part, the party should level up.
Poseidon’s Everbright Lighthouses NPC's Sheets
Encounter with a Siren
Shark
Large, Beast
Tier 2, Challenge Point 4, XP: 8
Attributes
AC 10 AP 0 HP 30 Posture 18
- Passive Insight/ Perception 26
- Language None
Movement
Base/ Swim (breath) 30 Climb/Walk 0 Dash 50 Stats + Skills
STR +6 DEX +2 INT -4 WIS +6 CHA -3
- LU +0: Luck Points: 0; Critical Fail: 1
Ability
- Blood Frenzy: Once per round, you can Attack 1 target that is Bleeding as a Free Action.
- Electrical Sensors Your Passive Perception is increased by 10, but you become completely Blinded for 1 turn when you take electric damage.
- Swimmer You are in harsh terrain while on ground. While underwater, you are considered to be in fast terrain and you don't gain disadvantage on Attacks
- Water Breath If you are out of water for more than 1 minute, you start to Suffocate.
Actions (1)
- Bite Hit +6, Dmg 1d12 thrust
- Bloody Hit: If you deal damage to the HP of a creature, it starts Bleeding (1d6).
Shark Siren
Medium, Monstrosity
Tier 2, Challenge Point 4, XP: 8
Attributes
AC 16 AP 0 HP 22 Posture 18
- Damage Immunities: Sonic
- Passive Insight/ Perception 24
- Senses Blindsenses
- Language Druidic, Sign Language
Movement
Base/ Swim (Breath) 35 Climb 0 Dash 10 Stats + Skills
STR -2 DEX +6 INT -1 WIS +4 CHA +6
- LU +0: Luck Points: 0; Critical Fail: 1
Ability
- Blood Frenzy Once per round, you can Bite 1 target that is Bleeding as a Free Action.
- Electrical Sensors Your Passive Insight/ Perception is increased by 10, but you become completely Blinded for 1 turn when you take electric damage.
- Swimmer You are in harsh terrain while on ground. While underwater, you are considered to be in fast terrain and you don't gain disadvantage on Attacks
Action (2)
- Sing (Concentration) All creatures within 300 feet of you must make an Insight Save (DC 14).
- On a fail, that creature becomes Enchanted by you, until your Concentration ends, until it takes any damage, or until someone uses its Action to shake the target. On a success, the target becomes immune to this ability for the next 24 hours.
- While Enchanted by you, the target follows your voice, even if it would harm itself.
- Shark Bite Hit +6, Dmg 1d8 thrust
- Bloody Hit: If you deal damage to the HP of a creature, it starts Bleeding (1d4).
- Fish Tail Hit +6, Dmg 1d6 strike
- Water Bash: On a hit, a creature is pushed 10 feet away from you while underwater and take extra 1d6 strike damage. This Attack deal double Posture damage.
Stop the Skeletons Advance
Undying Bone Enchanter
Medium, Undead
Tier 2, Challenge Points 6, XP: 12
Attributes
AC 15 AP 0 HP 5 Posture 7
- Damage Immunities: Brain, Bleed, Poison, Psychic
- Damage Resistances: Thrust
- Damage Weakness Strike
- Passive Insight/ Perception 8
- Senses Dark Vision
- Language None
Movement
Base 30 Climb/Swim 10 Dash 20 Stats + Skills
STR -1 DEX +7 INT -4 WIS -2 CHA -4
- LU +0: Luck Points: 0; Critical Fail: 1
Abilities
Undead Mind You are immune to being Confused, Enchanted or Scared.
Undying When you reach 0 HP, you revive with full HP on the start of the next round. This ability can only be used once per Long rest.
Pretend Dead On the start of the next round after you revive, you can immediately Hide if possible.
Actions (2)
- Revive Skeleton Choose 1 Skeleton corpse that is within 60 feet of you. That Skeleton immediately revives with full HP.
Bonus Action
- Quick Hide You can Hide as a Bonus Action.
Skeleton Warrior
Medium, Undead
Tier 1, Challenge Points 2, XP: 2
Attributes
AC 15 AP 1 HP 9 Posture 9
- Damage Immunities: Brain, Bleed, Poison, Psychic
- Damage Resistances: Thrust
- Damage Weakness Strike
- Passive Insight/ Perception 8
- Senses Dark Vision
- Language None
Movement
Base 35 Climb/Swim 10 Dash 20 Stats + Skills
STR +1 DEX +5 INT -4 WIS -2 CHA -4
- LU +0: Luck Points: 0; Critical Fail: 1
Abilities
- Undead Mind You are immune to being Confused, Enchanted or Scared.
Actions (1)
Falchion Hit +5, Dmg 1d10 slash or thrust
Aquatic: Being Underwater does not impose disadvantage on the Attacks.
Versatile: If you Attack with both hands, the damage roll of this weapon becomes 1d12.
Favorite Weapon: If you deal damage to the HP of a creature, it starts Bleeding (1d6).
Rib Boomerang Hit +5, Dmg 1d6 strike
Throw Weapon (30/120)
Favorite Weapon: After you throw the Rib, it comes back to you at the end of your turn. You can then choose 1 creature that is between you and the Rib. That creature must succeed on a Reflex Save (DC 13), or take 1 hit from this weapon's Attack.
Bonus Action
- Forced Posture You can gain 3 Posture.
Stop the Skeletons Advance Battlemap
Defeat the Pirate Captain
Veteran Brute
Medium, Humanoid
Tier 2, Challenge Point 6, XP: 12
Attributes
AC 17 AP 3 HP 55 Posture 22
- Passive Insight/ Perception 8
- Language Common, Thieves' cant
Movement
Base 25 Climb/Swim 20 Dash 40 Stats + Skills
STR +7 DEX -2 INT -2 WIS -2 CHA -1
- LU +0: Luck Points: 0; Critical Fail: 1
Actions (2)
- Great Sword Hit +7, Dmg 1d12 slash or thrust
- Great Weapon: If you roll a 1, 2 or 3 on the damage roll, you can add a second 1d12 to this damage roll. You do not get to add a third 1d12.
- Heavy: You can gain advantage with this Attack, but all Attacks against you also gain advantage until the start of your next turn after this Attack.
- TwoHanded: Needs two hands to be wielded.
- Favorite Weapon: As an Action, you can swing this sword. All creatures within 10 feet of you must then succeed on an Agility Save (DC 15), or take 1 hit from this weapon's Attack.
- Great Hammer Hit +7, Dmg 1d12 slash or thrust
- Great Weapon: If you roll a 1, 2 or 3 on the damage roll, you can add a second 1d12 to this damage roll. You do not get to add a third 1d12.
- Heavy: You can gain advantage with this Attack, but all Attacks against you also gain advantage until the start of your next turn after this Attack.
- TwoHanded: Needs two hands to be wielded.
- Favorite Weapon: You ignore 3 AP
Veteran Thug
Medium, Humanoid
Tier 2, Challenge Point 4, XP: 8
Attributes
AC 14/ +1 Shield AP 3 HP 30 Posture 14
- Passive Insight/ Perception 9
- Language Common, Thieves' cant
Movement
Base 30 Climb/Swim 20 Dash 40 Stats + Skills
STR +6 DEX +2 INT -1 WIS -1 CHA +4
- LU +1: Luck Points: 1; Critical Fail: 1
Ability
- Force Attack (2) Once per round, you can make 1 Attack as a Free Action. You can only use this ability 2 times per Short or Long rest.
Actions (2)
- Longsword Hit +6, Dmg 1d10 slash or thrust
- Versatile: If you Attack with both hands, the damage roll of this weapon becomes 1d12.
- Favorite Weapon: If you miss an Attack with this weapon, you can reroll that result. You must use the second result and you cannot reroll it again
- Flail: Hit +6, Dmg 1d10 strike
- Armor Piercer: You ignore 1 AP.
- Favorite Weapon: You ignore the bonuses granted by Cover and Shields with this weapon’s Attacks.
Bonus Action
- Forced Posture You can gain 3 Posture.
Reaction
- Use Shield When an Attack would hit you, you can use your Reaction to gain a +2 bonus to your AC.
Veteran Bandit Archer
Medium, Humanoid
Tier 2, Challenge Point 2, XP: 4
Attributes
AC 16 AP 1 HP 13 Posture 12
- Passive Insight/ Perception 15
- Language Common, Thieves' cant
Movement
Base 35 Climb/Swim 10 Dash 20 Stats + Skills
STR +1 DEX +6 INT -1 WIS +5 CHA +1
- LU +0: Luck Points: 0; Critical Fail: 1
Abilities
- Sharp Shooter Once per round, if you miss a Ranged Attack, you can add a +2 bonus to the result.
- In addition, you can also make Ranged Attacks of Opportunity when a creature Posture breaks.
Actions (2)
Shortbow Hit +6, Dmg 1d8 thrust
- Ranged Weapon (60/120)
- TwoHanded: Needs two hands to be wielded.
- Favorite Weapon: If you miss an Attack with this weapon, you can reroll that result. You must use the second result and you cannot reroll it again
Bonus Action
- Steady Aim (Concentration) You gain advantage on all Ranged Attacks against a creature more than 20 feet away from you.
Defeat Erebus
To the GM: You can find the Skeleton Warrior Sheet in the Stop the Skeletons Advance section above.
Cultist Leader
Medium, Humanoid
Tier 2, Challenge Point 8, XP: 16
Attributes
AC 13 AP 2 HP 31 Posture 23 Mana 4
- Passive Insight/ Perception 17
- Language Common, Infernal Speech
Movement
Base 25 Climb/Swim 10 Dash 20 Stats + Skills
STR -1 DEX -1 INT -1 WIS +7 CHA +7
- LU +0: Luck Points: 0; Critical Fail: 1
Villain Action
- Villain Magic Once per round, you can cast a spell at any moment, ignoring any restriction from Normal Spells
Ability
- Command Once per round, you can use a Free Action to make a friendly creature within 30 feet to take an Action on your turn.
- Insane When you take psychic damage, you regain Posture instead of taking that damage, but you also become Confused after.
- Necromancer You don’t lose HP when casting Necromancy spells that drain your own HP.
- Spell Skill Spell Hit +7, Spell DC (15)
Action (1)
- Cast Spell You cast the following spells:
- At will: Dark Orb, Fire Orb, Frost Bite,
Minor Lightning, Sense Good & Evil- Level 1 (1 Mana): Dark Pulse, Putrid Flesh, Flamethrower, Cold Whisper, Lightning Strike
Bonus Action
- Cast Spell You can cast the following spells:
- At will: Hex
Defeat the Pirate Captain Battlemap
Defeat Erebus Battlemap

Act III - The Corruption of the Flame
The party might try go to the last location where the Eternal Flame is. However, upon reaching there, Erebus will already have corrupted the flame, and destroyed the place.
It will be up to the party to go to Mount Haimos and stop him from corrupting the First Flame.
Read this paragraphs depending on the last location:
The Molten Forge
The party arrives at the smoldering ruins of the Forge Temple of Hephaestus, where the acrid stench of burnt metal hangs thick in the air. The blackened stone walls, once etched with divine runes, now crumble under the weight of the molten rock that once gave the temple life. Rivers of cooling lava snake through the debris, hissing and cracking as they solidify into jagged, obsidian scars.
Amidst the devastation, a handful of dwarven survivors, their skin marred with molten cracks, stumble through the wreckage, their eyes hollow with grief. They clutch at their shattered tools, the remnants of their once-great craft, while their murmured prayers to Hephaestus go unanswered. The once proud temple, now a graveyard of ambition and betrayal, stands as a stark reminder of Erebus' dark triumph.
The Fallen Lighthouse
The party arrives at the quiet fishing village of Doloma, where the once tranquil shores are now strewn with debris from the lighthouse’s fall. The air is heavy with the scent of brine and smoke, the sky a muted gray as if mourning the loss. Triton survivors, their scales dulled and their eyes haunted, huddle by the water’s edge, tending to wounds both seen and unseen.
The villagers, faces etched with fear, whisper of the lighthouse’s final moments, of the corrupted flame that blazed before the sea claimed it. The distant horizon, where the Everbright once stood as a beacon of hope, is now marked only by the faint glow of unnatural light—a reminder of the darkness that now reigns.
The Dark Woods
The party arrives at the edge of what was once the Silver Woods, now twisted into the Dark Woods, where the air is thick with a putrid stench that clings to the throat. The trees, once tall and noble, are now gnarled and blackened, their branches reaching out like skeletal hands clawing at the sky. The lake, once a mirror of the Moon’s light, churns with a dark, oily substance, its surface broken by the occasional ripple of unseen horrors lurking beneath.
The very ground seems to pulse with the corruption that has spread from the defiled Moonflame Temple, seeping into every root and stone. In the distance, the anguished howls of twisted beasts echo through the forest, a mournful reminder of the land’s fall from grace. All traces of the ancient sanctuary are now buried beneath the darkness, and the Moon’s light, once a beacon of purity, is swallowed by the shadows.
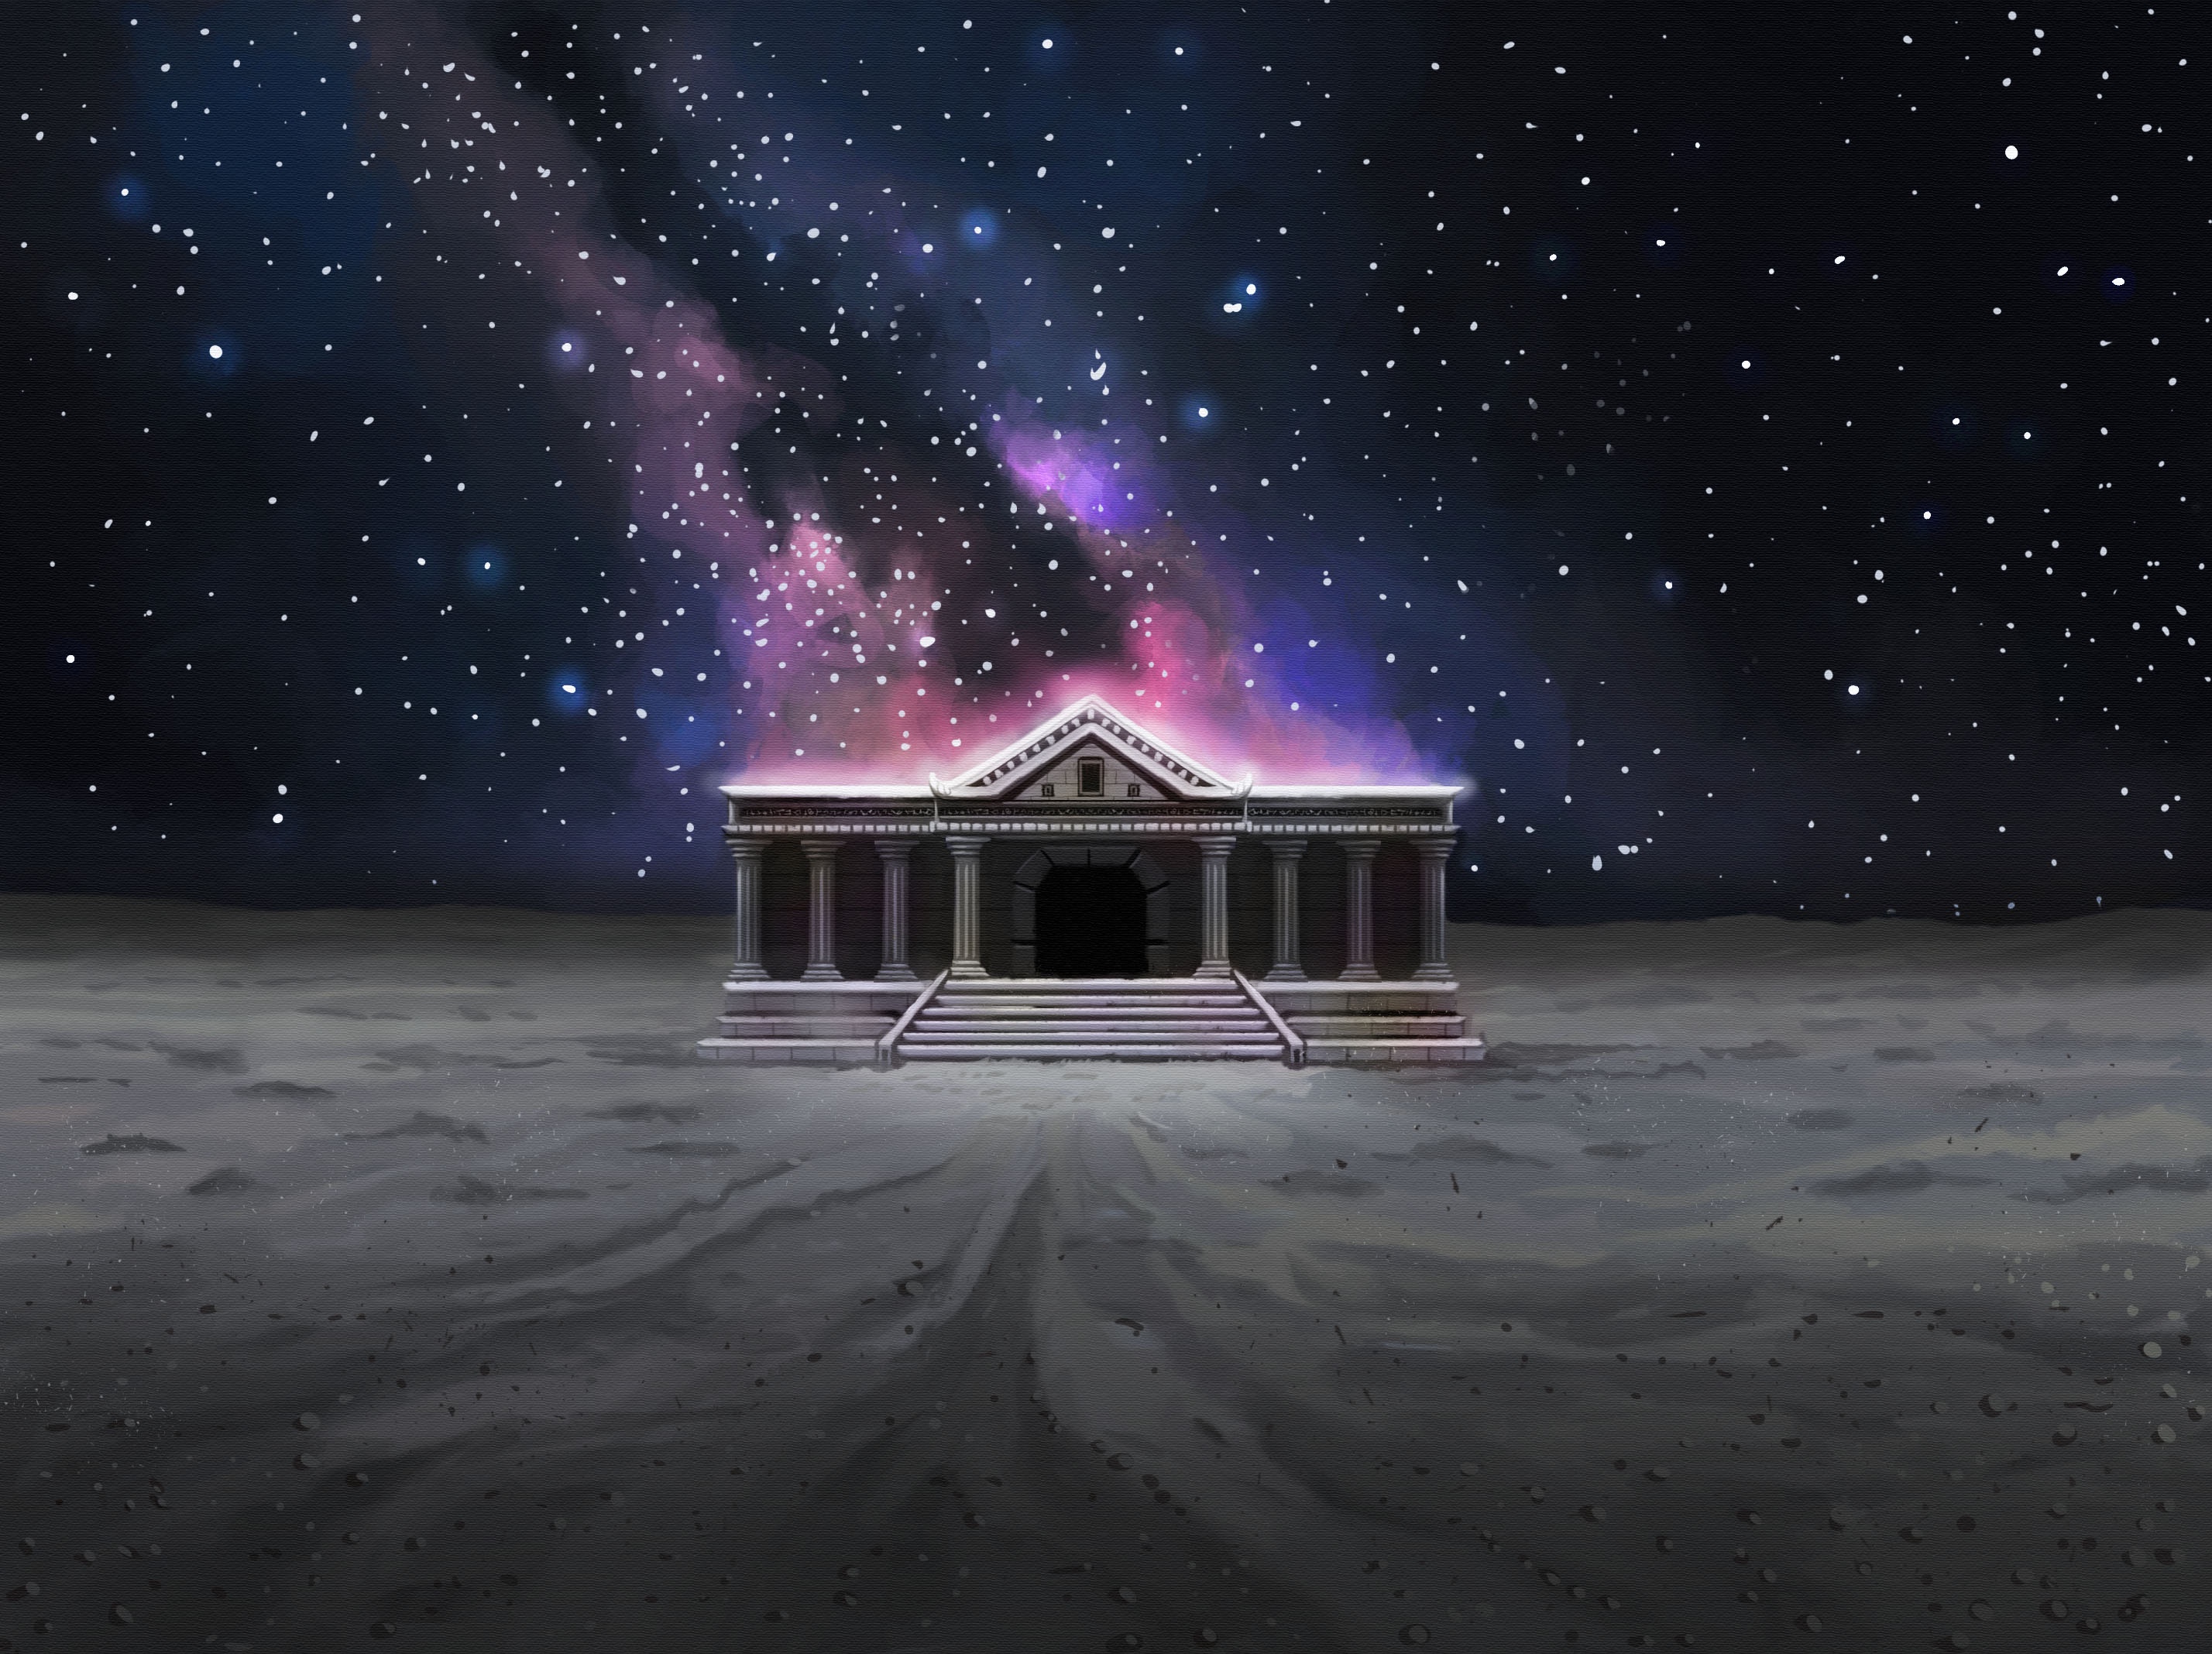
The Journey into Sorrow
As the echoes of their battles fade behind them, the party learns a truth colder than any winter’s bite—Erebus has what he sought. The corruption they battled was but a prelude, a dark note in his symphony of ruin. Now, his eyes are set on the ultimate prize: the original Eternal Flame, flickering still within the ancient heart of the Temple of Prometheus.
Their path leads them through the frozen desolation of Demeter's Wellspring of Sorrow, where the ground is hard and unforgiving, and the air carries the chill of lost hopes. From there, they must venture into the jagged peaks of Mount Haimos, shrouded in eternal ice and guarding the flame that has flickered since time immemorial.
In this frozen expanse, ancient dangers lie in restless slumber, and the winds carry whispers of impending doom. For if Erebus seizes the flame, even the stars themselves may tremble before his dark ambition.