Caged by Fire
TES for 5E: Caged by Fire
Adventure Overview
Caged by Fire is a short adventure inspired by The Elder Scrolls V: Skyrim by Bethesda Softworks. Originally created by d'Artagnan as The Aged Parchment 五: Airedge and revised by HeavensGates for his The Elder Scrolls for 5e Expansions, this version fixes issues in the original. Set in a cold northern territory, it challenges a party of 3-5 characters of levels 5-7, who are taken prisoner after being ambushed by bandits while crossing into the regionThe party are stripped of their equipment and imprisoned left to their fate. Before long, a dragon lands, the force of which causes the ageing brickwork of the bandit's fort to give way. Sending the party plummeting into an ancient nordic barrow.
The party fights their way through the inhabitants of the tomb, both living and dead, and finally come upon the tomb's guardian/prisoner. After a climactic battle, the party learns the words for the Dragonrend shout and make their way to the surface to slay the dragon.
How to run the Adventure
This document runs through most of what you need to know.
You will primarily require my Elder Scrolls Expansion books to run the adventure, you would need to convert it back if you wish to run without it. You can find all Elder Scroll related extras on my profile
The modified maps at the end of the document will have little nicknacks scattered around, although they aren't listed always as loot, I encourage you to let players have them. For example one of the first rooms has a crowbar and a rag lying with some urns, in their current state, both of these could encourage some creative thinking, the belt could work for sash to carry some gear for example.
You may have to alter somethings if the players choose to do something that doesn't quite match the description.
The Encounter
Occasionally you will encounter this header. Here I note some tactical or situational notes. Most of the undead fight blindly rushing towards the players, as such I don't specify tactics for them.
Loot
This is where I make notes on any interesting loot the players can obtain. If you track ammunition, every longbow comes with 2d8 arrows.
The Arrival
"Hey, you. You're finally awake. You were trying to cross the border, right? Walked right into that ambush, same as me. We're all brothers and sisters in binds now."
One of your captors demands that you shut up. The rest of the trip is one of silence and muttering.
Finally, you reach your destination, a walled fort with a watchtower in its center. As the waggon slows to a stop, Ralf looks around one last time and mutters:
"End of the line."
The PCs are bound and it is important that the PCs aren't really able to do much until you let them as if they didn't operate under refrigerator logic, the adventure would end early.
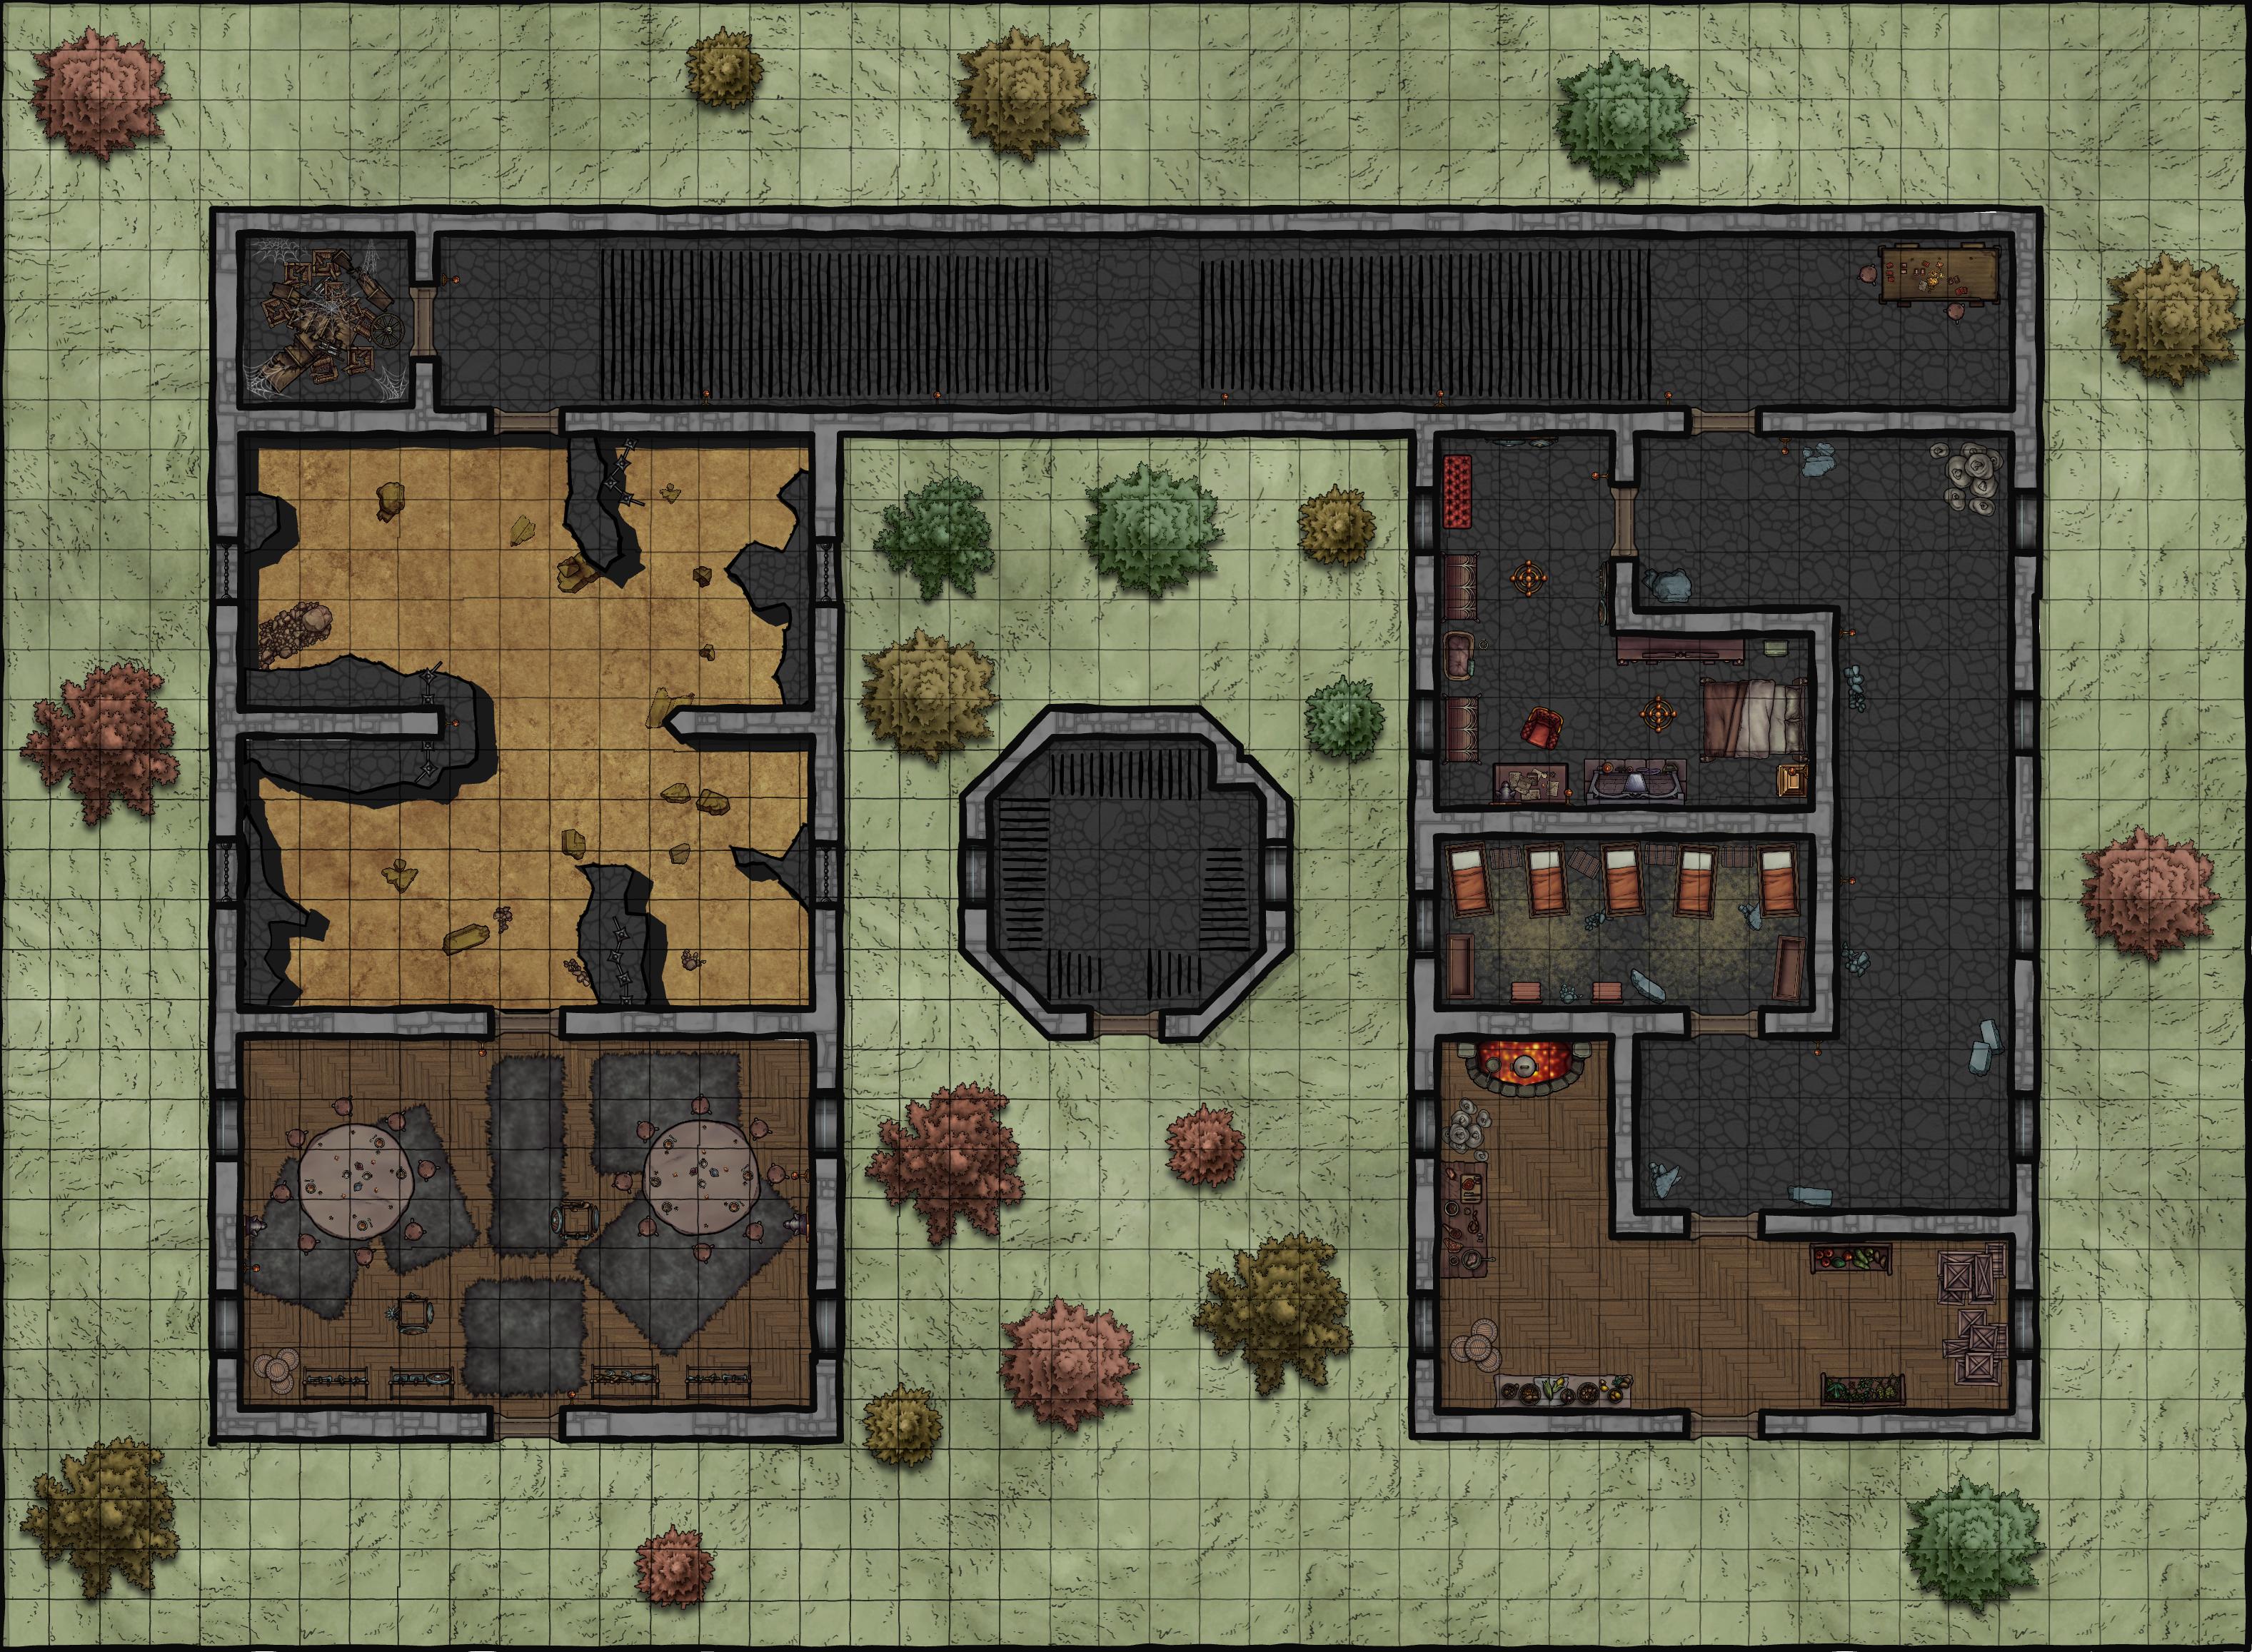
The Fort 45x33
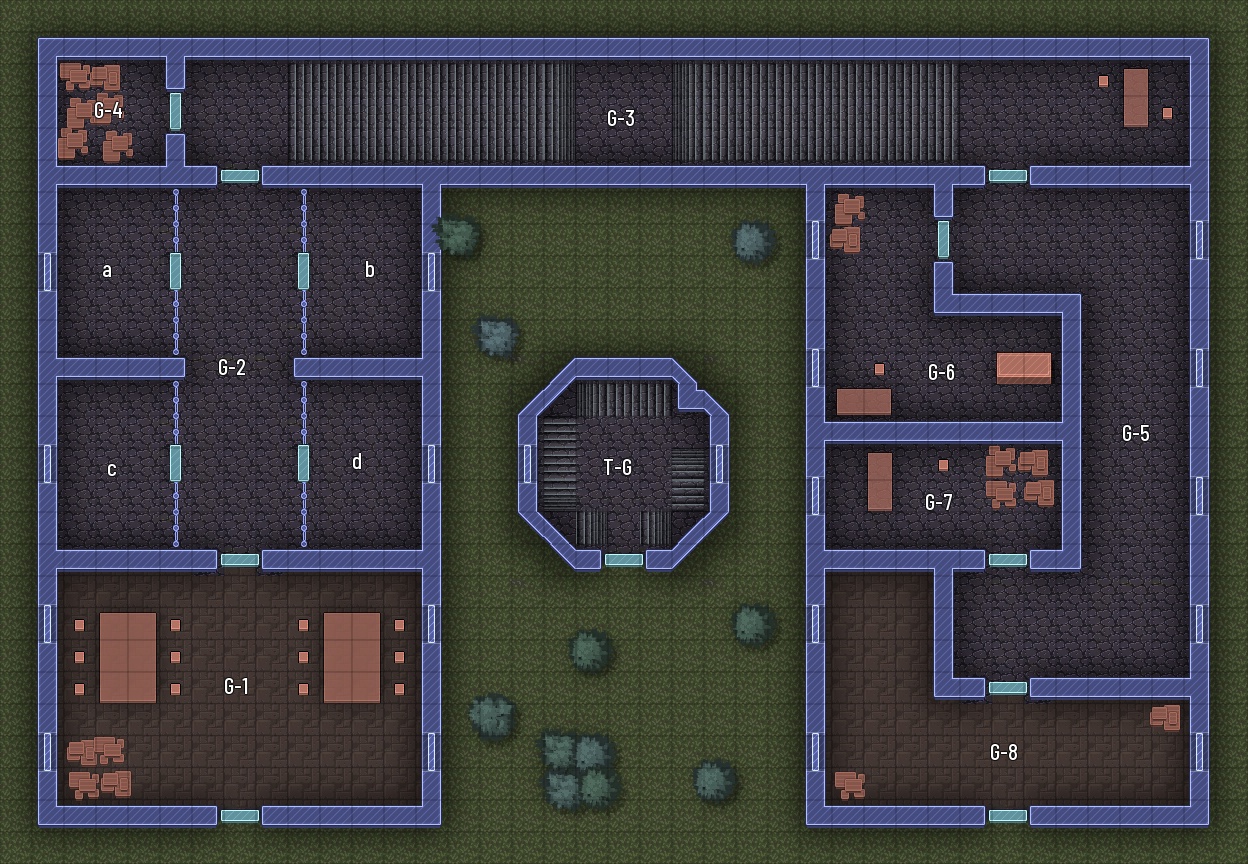
G-1 The Break Room
There are some amount of bandits lounging around in here, the PCs won't spend much time in this room as they are quickly escorted through it into the prison.
Loot
While the players don't spend a lot of time in this room itself, they can, however, come back once everything is said and done. The chests contain various items that the bandits have confiscated from the people they've kidnapped, killed, and robbed. That said, it does not contain any of the good stuff (if there ever was any) as that goes straight to the chief.
Ultimately you can decide what random tat is in there. The PCs will also find 600 Septims.
G-2 The Prison
"Motaad joore ahrk faas! Qiilaan wah Niiduraan uv hin lahney los daanik!"
You then hear a loud crash as whatever it is outside lands on the top of the watchtower, sending tremors through the ground. And then the ground falls out from beneath you and you plummet.This is mostly to make it so they don't avoid falling in the hole or breaking the cell doors down. Though, if they do happen to attack the doors and then attempt to grab ahold of them to not fall, make sure to have the door snap of the hinge and take them with it.
This decree when translated into Tamrielic reads:
Nii Du Raan
Which literally translates into: Object (or idea), Consume, and Animal.
Or as I've dramatically rephrased it: "A creature that consumes anything or The All-Consuming One."
While the players don't really have a way of knowing this, the dragon's name is Krahthurrok or:
Krah Thur Rok
Which literally translates into: Cold, Overlord, and Person
Or as I've put it:A person who lords over things coldly, or The Callous Overlord.
The fact that the humanoid has animal in his name and the "mount" has person in their name isn't a coincidence. The fact of the matter is that Niiduraan actually serves Krahthurrok, but the theatrics serves their purposes.
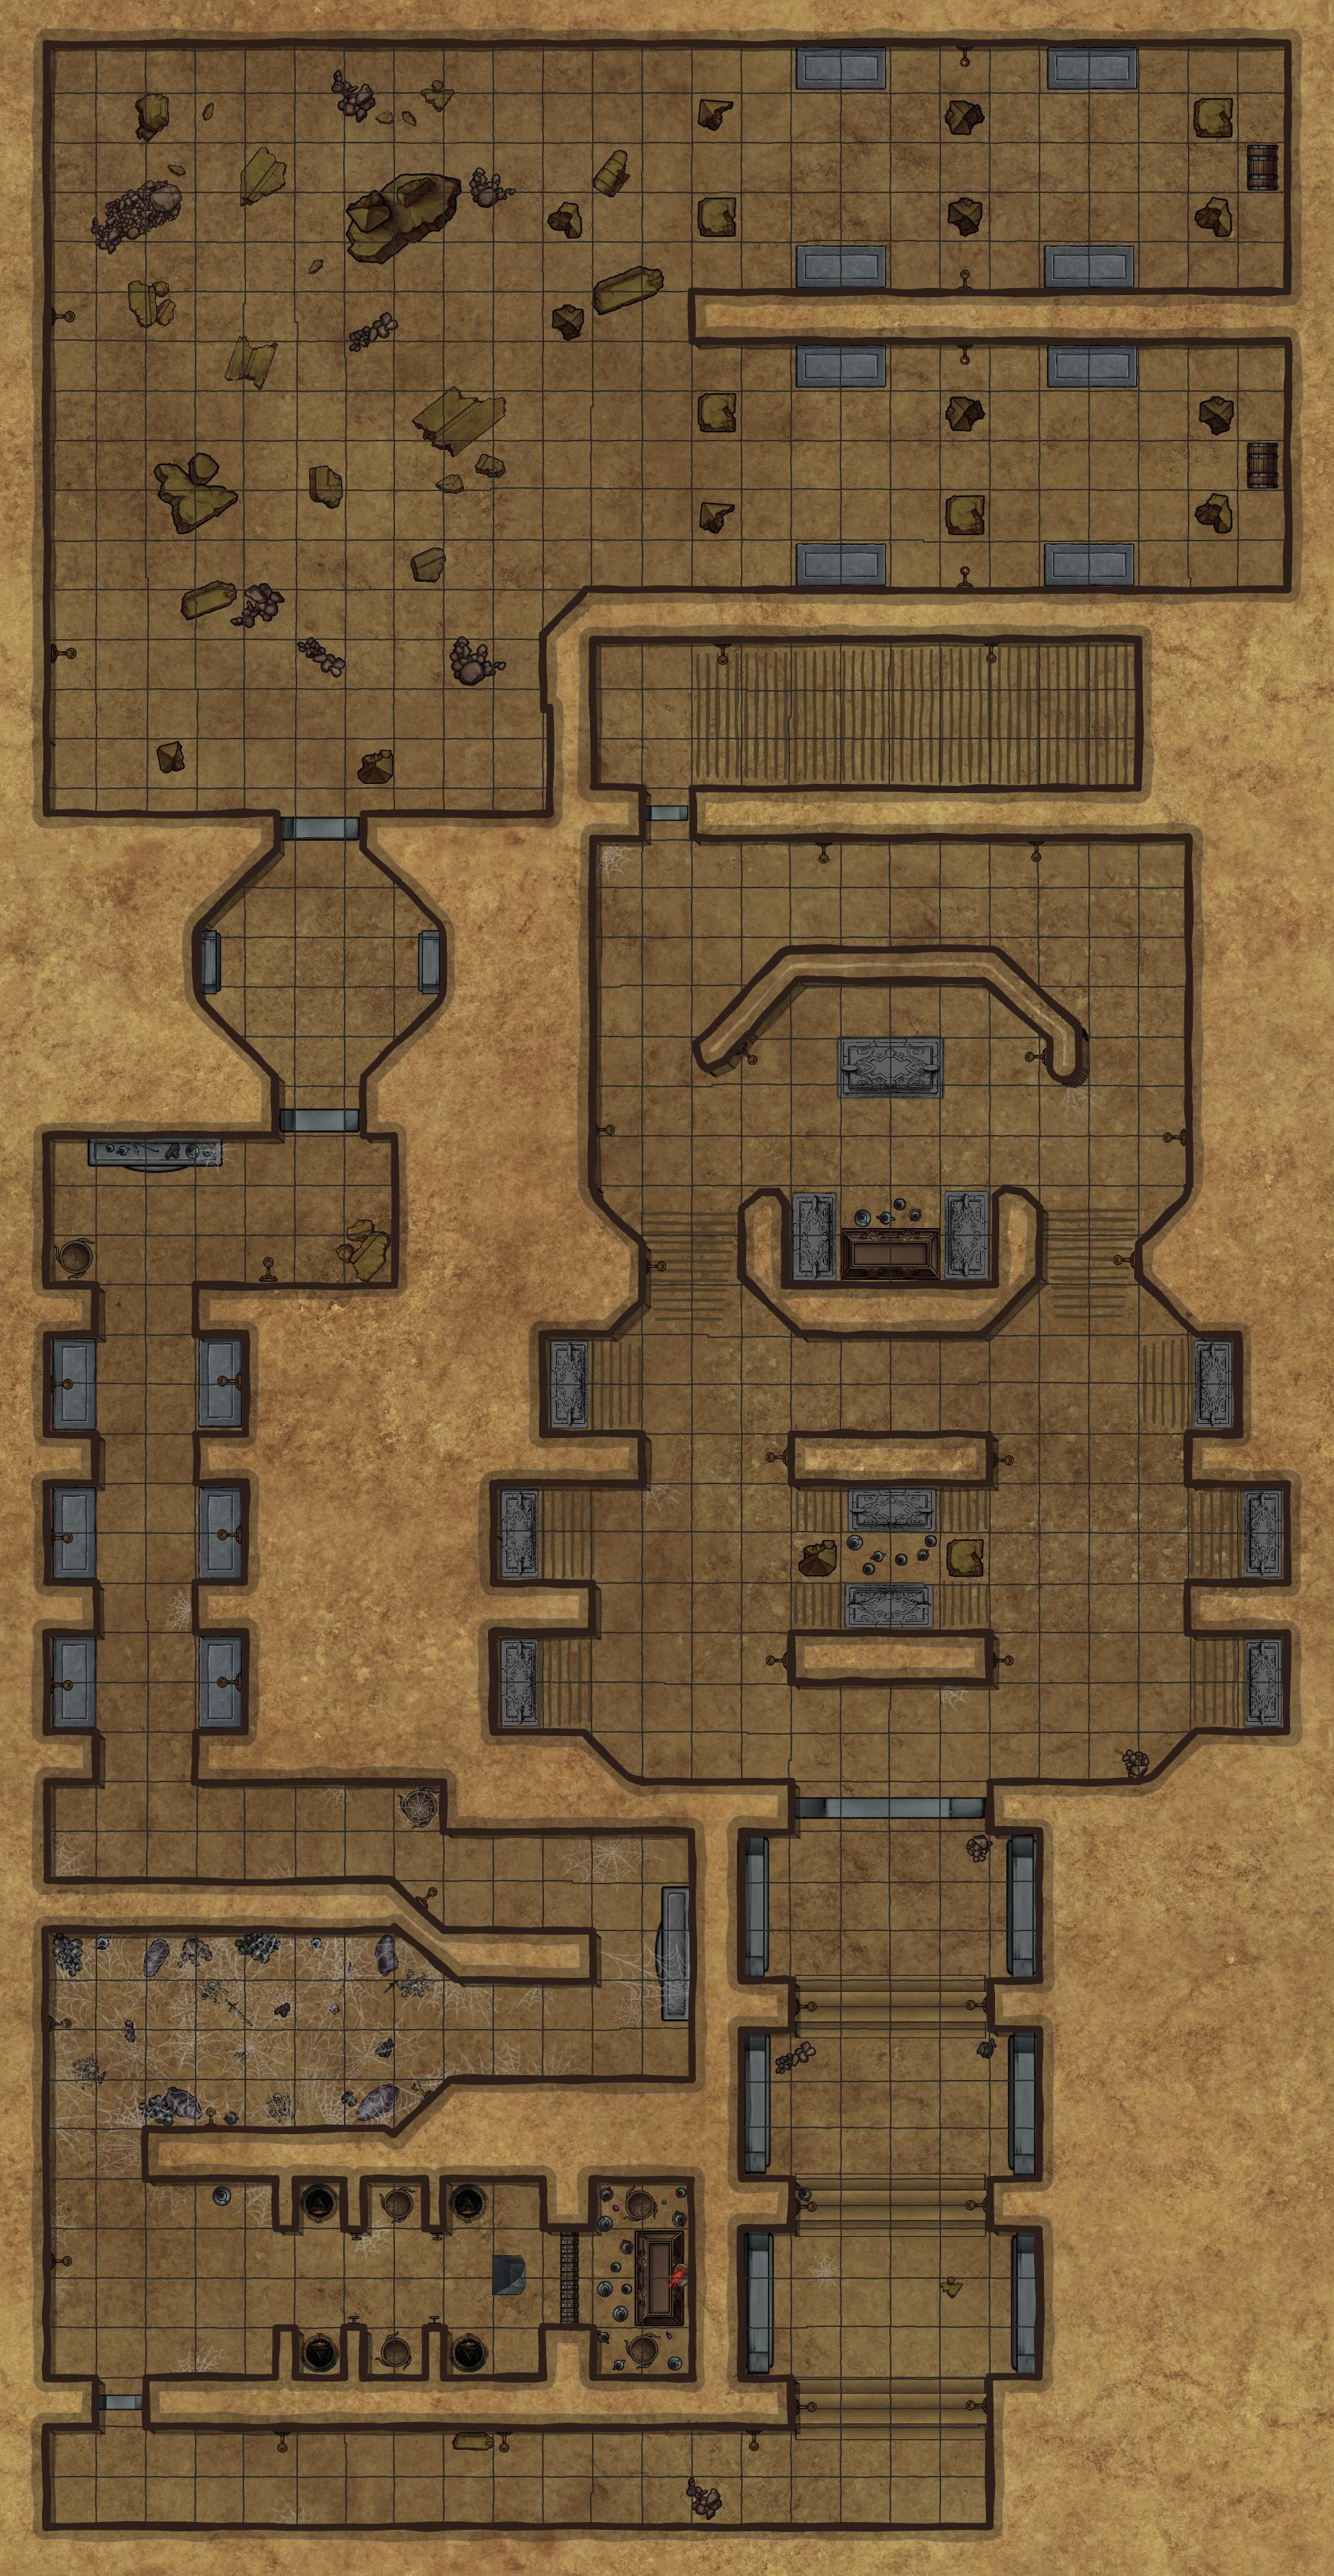
The Ruins 27x52
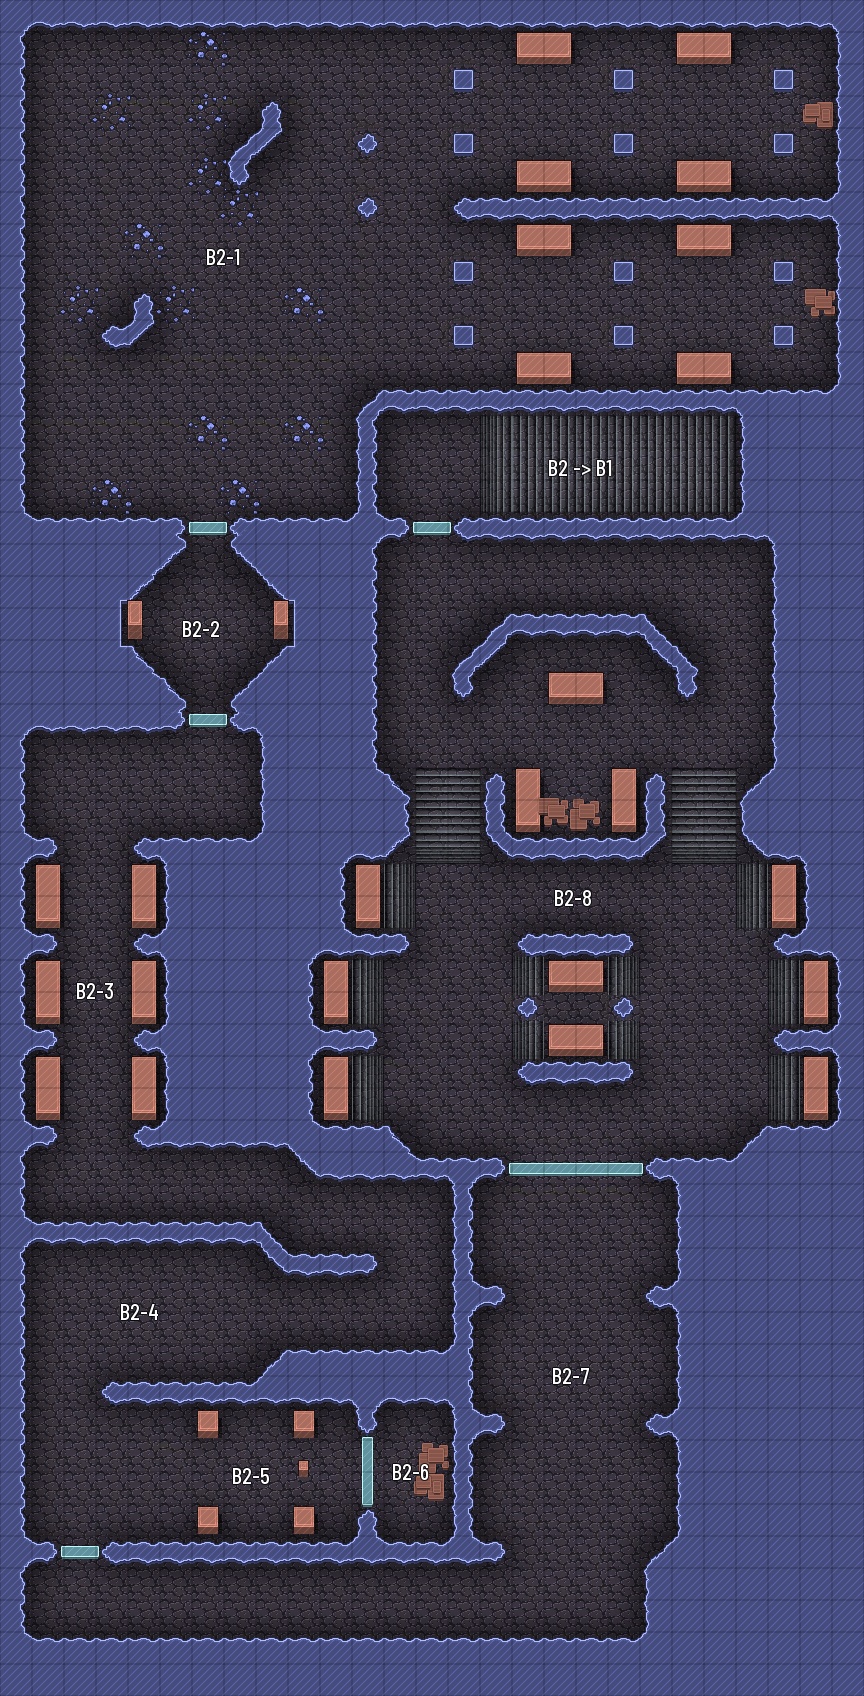
B2-1 Landing Zone
This is where the active portion of the adventure begins. Each player takes 2d6 falling damage from the cave in.
This room has clearly not seen anyone living for a long time. The more recent development is clear, there is a hole in the ceiling, which is the point that the PCs fell from.
Accompanying the players are two living bandits who also survived the fall, and scattered around are the corpses of bandits who did not, (enough to supply the PCs with weapons for the dungeon ahead), and that of Ralf whose purpose as a Skyrim meme, came to an end in the wagon.
The Encounter
The noise from the collapse has awakened the residents of this tomb and they are not happy. Four draugr push the lids off of their sarcophagi and climb out.
The PCs should still be tied up, so the bandits will assume a position of authority, demanding that the PCs deal with the draugr. The PC will probably object, insisting that they're tied up. Any insistence that they need to be released to do any combat will have the bandits cut the players loose.
Now that the players are free, initiative should begin.
Dealing with the Bandits
Armed, the players may consider taking their revenge against the bandits. While this is not the most advantageous response, it is a reasonable one.
- If the PCs do turn on the bandits, they panic and question why the PCs don't deal with the draugr first.
- If the PCs turn on them after the encounter, the bandits' response is a lot more measured, seeing this as the logical outcome of arming prisoners.
- If the PCs dispatched the draugr in a round or two, the bandits realise that they're clearly outmatched and beg for their lives.
- If the PCs don't turn on the bandits, the bandits will attempt demand that the PCs go first so that they act as human shields.
- Now the PCs can turn this around if they come up with a reasonable argument, or they can scare them into going first with a DC 12 Intimidation check. If the PCs dispatched the draugr in one or two rounds, the bandits will do pretty much anything the PCs say.
Loot
Looting the draugr won't yield much, each of them possesses an ancient longbow and an ancient longsword. A DC 13 Investigation check nets the players 1d10 Septims, the dead bandits are wearing leather armor, which, while not much, is probably better armor than the currently unarmored PCs. Additionally 2 bandits had backpacks, 6 torches, a tinderbox and some rations. Each bandit might have a different weapon, all will be of steel quality though.
Past the sarcophagi, at the back end of the room, are two chests. These chests are trapped, a passive Perception of 13 or higher will have a PC notice a tripwire leading from the back of the chest into the wall, as will spending any amount of time inspecting the chest. As additional DC 15 Perception check will then be required to notice the arrow slits in the wall, DC 20 if the PCs haven't found the tripwire.
There are two ways to deal with the trap, either a DC 15 Thieves' Tools check or just standing to the side of the chest and cutting the tripwire. Failing to disarm the trap sets it off. Any creature within 15 feet in front of the chest must make a DC 13 Dexterity saving throw or take 2d6 piercing damage and 1d4 poison damage.
Inside the chests are:
- 6d8 Septims
- 1d2 potions of healing
- 1 inexplicably fresh cheese wheel
- 1d4 inexplicably fresh produce
- 3d6 arrows
B2-2 Flanked
This small round room is, for the most part, empty. The door out is right in front of you, and dark stone sarcophagi are inset into the wall. Apart from the light filtering in from behind you, it is completely dark
This room is rather simple, it being dark impresses on the players that they will need to bring torches with them as most of the tomb is completely dark. Inside the sarcophagi is the next tier of draugr, two draugr wights guard this room, one in each sarcophagus.
If the players sneak through here with a Stealth roll that beats the wights' passive Perception of 13, then they can make their way through here unmolested. Otherwise, entering the room has the draugr opening their sarcophagi and attacking the PCs.
Loot
Equipment-wise, the wights don't have much better than the basic druagr, though their Scaled armor, while kind of gross, is better than the leather armor the PCs looted earlier.
The players may be tempted to cast a spell, like fireball, to try and pre-emptively destroy the undead. However, the lowest level spell that has any notable effect on the sarcophagi in the dungeon is the 4th-level spell stone shape.
B2-3 Pendulums
This room is a series of alcoves, within which sarcophagi reside, there are four active draugr in these sarcophagi, though a Stealth roll higher than 10 beats the draugr's passive Perception, allowing the PCs to continue.
However, that is not the true threat of this chamber. There is a tripwire at the base of the door in room B2-2 leading into this room a DC 18 Perception or DC 12 Investigation check finds it. If tripped, either by opening the door without disarming it, or failing a DC 17 Thieves' Tools check activates a series of pendulum traps.
In the middle of the four sets of protrusions next to the sarcophagi are the pendulum traps. A creature that passes through one of the pendulums must make a DC 15 Dexterity saving throw or take 1d6 points of slashing damage. A creature who ends their turn in the path of a pendulum also takes 1d6 points of slashing damage. a creature who makes a DC 13 Investigation check over the course of a minute can determine the exact timing of the trap and walk through without making a check, if out of combat, otherwise, they can make their saving throw with advantage.
The draugr make no real attempt to avoid the pendulums but mostly attack from a range.
Loot
The draugr have the same loot as in the first room.
B2-4 Frostbite Nest
The floor in this portion of the dungeon is considered difficult terrain.
The spiders will stick to the ceiling shooting the PCs with their web shot attacks, only descending if a PC stands under it, or if a PC is restrained by its web shot attack.
Setting the web on fire, either directly, with an area of effect attack will cause any creature standing in the webbed area to take 1d6 points of fire damage. Any creature restrained by the spiders' web shot while in the webbed area will instead take 2d6 points of fire damage and no longer be restrained. Spiders still on the ceiling will take 1d6 points of bludgeoning damage and fall prone.
Any ranged attack, that deals fire damage against the spiders on the ceiling, that misses by 5 or more will also set the web on fire.
The spiders can be harvested for 1 vial of frostbite venom each. Past the puzzle sits a portcullis from which the light filters, behind it, is a large chest with what appears to be a metal claw sitting on top. If the players fail this riddle, there's nothing stopping them from brute-forcing the solution as there are only twenty-four possible combinations. So rather than forcing them to endure their failure, just offer to skip it for them. Afterwhich, a bandit on the surface is slain and turned into an ash walker.
This room, once you get past the allure of treasure is rather unremarkable. Though this is the first room with light the PCs have seen in a while. The chest is locked with a DC 15 lock, but is not trapped. The weapon in the chest is intentionally non-specific, pick a weapon that best suits one of the PCs, there'll be another one later so don't worry about players feeling left out. There is also the typed claw, which is the key into the main burial chamber.Loot
B2-5 The Riddle
The third eats what it can, preferably number one.
The fourth fears the second, but only when alone.
All must be activated in order, if you wish to go home.B2-6 Treasure Room
Loot
Inside of the chest, the PCs will find the following:
B2-7 The Hall of Stories
This room is a corridor, adorning the walls is a series of alcoves featuring various bas reliefs. Most of the details have since been worn away with time, but one can definitely tell that they depict various tales, those of conflicts and triumphs of those entombed here.
The Puzzle Door
At the end of the corridor is a large stone door. At the center of the door is a disc with an impression of a dragon's foot with a series of holes where the claws would be. Around the central disc are three concentric stone rings, these rings appear to be able to spin if you apply enough effort. Each ring is divided into the equal portions, in the center of which is a circle with a relief of a creature.
The rings depict a wolf, an eagle, and a dragon in that order if spun clockwise.
- The outer ring currently displays a dragon.
- The middle ring currently displays an eagle.
- The inner ring currently displays a wolf.
This is not a difficult puzzle, as, in traditional Skyrim fashion, the typed claw has the solution: eagle, wolf, dragon. A detail that is immediately noticed if the players spend any time at all inspecting the typed claw instead of just pocketing it without thought.
This puzzle is intentionally not difficult or, indeed really, a puzzle at all. This is intentional as it blocks off the only path forward.
If, however, you wish to force your players to apply some thought as they needed for the earlier riddle, or they somehow failed to notice the solution on the underside of the claw, you can instead have the solution depicted on the murals as will be discussed below.
If this also somehow results in no answers, then the PCs can always brute force the lock, as there are only 27 possible combinations, though doing so results in the death of another bandit.
The Murals
Noticing the murals is not particularly hard if the players make a note to check them, there is no need for them to roll anything and you can give them the information they need.
If, however, the players do not directly mention the murals in the search, it is a DC 15 Perception check to notice that there may be something of use in the murals or a DC 10 Investigation check to see that there is a solution hidden in the murals.
- the first one shows a breeze.
- the second one shows a full moon in a night sky.
- and the third has a scaled figure wreathed in flame.
B2-8 The Main Burial Chamber
As before there are many sarcophagi set into the wall as well as various elevated sections. To the back is a single, large decorated sarcophagus before a wall inscribed with a series of claw marks.
Then the lid of the sarcophagus at the back bursts into the air and the dragon priest flies out. It is now a combat encounter.
In this chamber is 10 draugr wights and 1 draugr lich. Roll initiative for all of them. When it reaches an inactive draugr's initiative, unless there are fewer than 4 (or more if your party has more than 4 members) wights active, ignore it's turn otherwise activate it. The wights on the elevated sections prefer using ranged attacks while the rest run straight for the PCs. The dragon priest flies around, attempting to avoid getting attacked by the PCs. If the lich cannot find any PCs it uses Aura Whisper (Laas Yah Nir) to find them. Otherwise, it uses Battle Fury (Mid Vur Shaan) to boost the attack rate of the wights before it attempts to pick off the players from a distance. The dragon priest has a variety of tools so feel free to use them as you please. As a fun bonus fact, the dragon priest can true strike on itself right before it's turn using legendary actions if it wants to be particularly annoying. Once again, the wights only provide their equipment. The dragon priest yields 4500 Septims, a random assortment of gems worth 10d20 x 10 Septims and an arcane focus. Additionally, in the chamber, there is a chest between the two sarcophagi on the top level. This chest contains:The Encounter
Loot

The Word Wall
Behind the dragon priest's sarcophagus is a curved wall. This is a word wall that possesses the words for the Dragonrend Shout which will be necessary in the final encounter on the surface.
In Dovahzul the wall reads:
Nus pah sivaas ahst wahlaan lost aan zah qalos
Dovah los frul nust kos med pah laas faas dinok ahrk fin zeim
If a PC in the party can read Dov the wall reads:
But all creatures in creation have a finite existence
Dragons are temporary, they too like all life, fear death and the beyond
Dragonrend
Your voice lashes out at a drago's very soul, forcing the beast to land
| Word | Meaning | Recharge |
|---|---|---|
| Joor | Mortal | 6 |
| Zah | Finite | 6 |
| Frul | Temporary | 6 |
A Dragon within 60 feet of you must make a Dexterity saving throw with disadvantage or be forced to land for 2/3/4 rounds.
The Basement 37x28
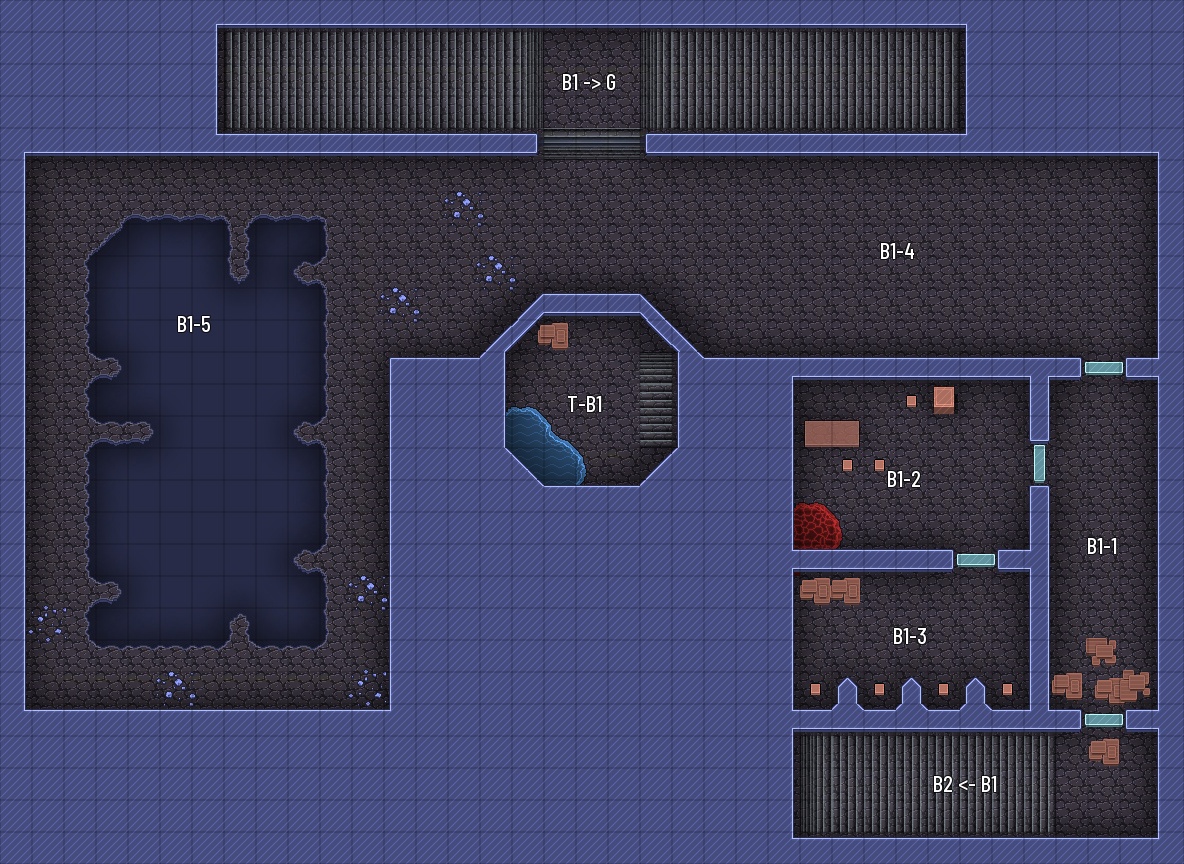
B1-1 The Blocked Room
As you reach the top of the stairs you see a crate in front of a door.
The crate is, in fact, empty and serves to dissuade the zombies from acting in a civilised manner and opening the door. Fortunately, the PCs are not zombies and can reason that moving the crate here might be helpful.
When the PCs open the door, they encounter a mass of crates blocking the doorway on the other side. This is in case the zombies managed to figure their way past one box and through a door.
Despite the crates, this room is empty.
B1-2 Smithy
This appears to be an empty forge. Well empty of people, the kiln is still warm and there appears to be a weapon halfway through being made or maintained or whatever.
There are several weapon and armor racks.
Loot
There are about 10 longswords, longbows and various medium armors.
B1-3 Training Room
This room pretty much contains four training dummies with 1d8-1 arrows in each. The crate contains 4 longbows, 2 shortswords and a rapier.
B1-4 Empty Room
This just appears to be a wide passageway.
B1-5 Broken Floor
The Fort... Again 45x33
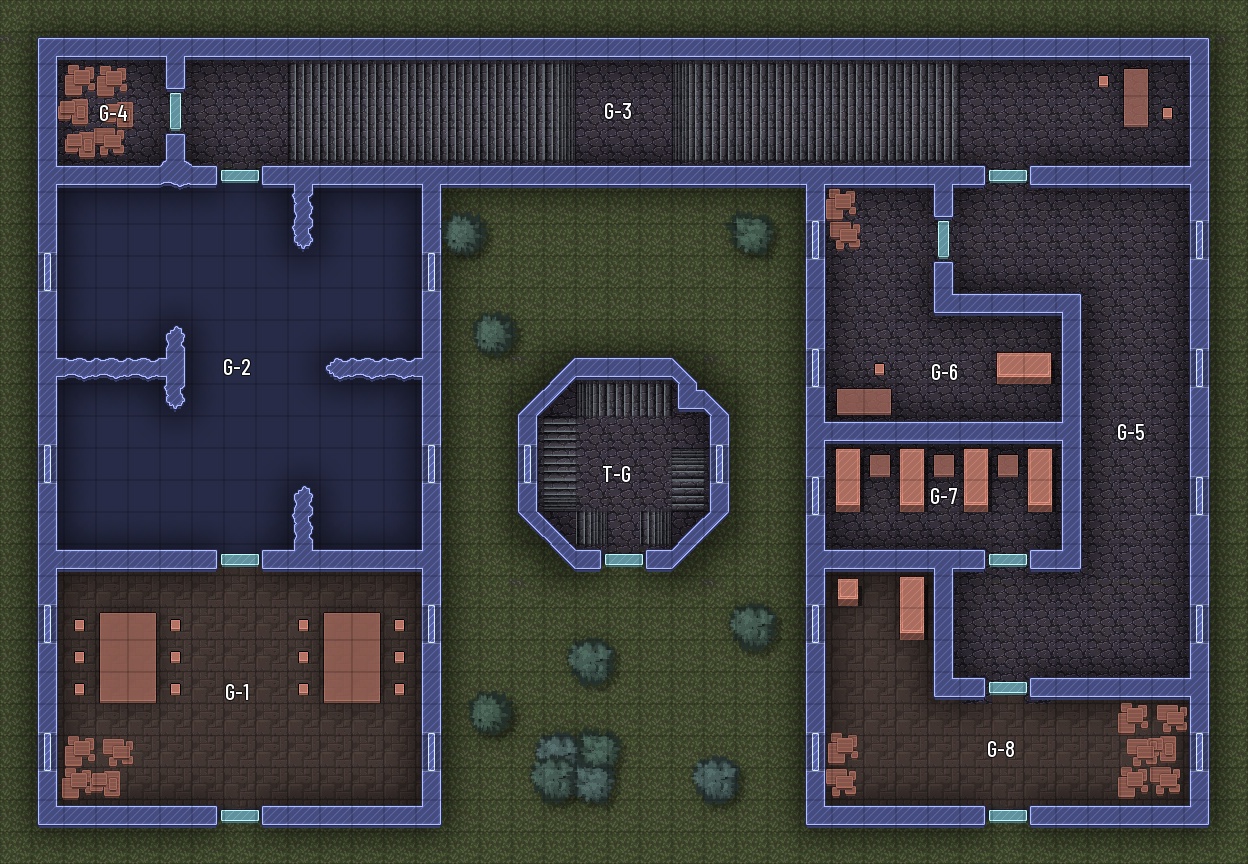
G-3 Stairwell
This is the main back corridor of the ground level of the bandit's fort. To the West is G-2, the prison. Heading this way is pointless because the floor is missing. G-4 is also in this direction. To the East is G-5.
Right outside of G-5 is a table around which 2 bandits are playing cards. They seem completely disinterested in the fact that there's a dragon outside killing their allies. The two bandits will completely ignore the PCs unless they bother them, at which point they will attack the PCs.
Loot
The bandits once again have leather armor, longswords and longbows. The table, however, has 500 Septims in a betting pool between the bandits and a set of playing cards.
G-4 Storeroom
This room is filled with broken and empty boxes. A general inspection determines that this largely contained supplies.
A DC 10 Investigation check turns up a 50-ft. rope, a burnt book, an empty vial and a hunk of stale bread.
A DC 15 Investigation check will net the above and 450 Septims in assorted coinage.
G-5 Corridor
This room is largely bare, connecting to three rooms: G-6, the Chief's Quarters; G-7, the Barracks; and G-8, the Kitchen.
G-6 The Chief's Quarters
What makes the bandit chief encounter fun is that it's a chance to use the PCs own gear against them, assuming that the party had interesting magic equipment before they were captured the bandit chief has that in addition to his usual stat block in the monster manual.
The bandit chief has studded leather, a scimitar, a dagger, 2 potions of healing, and 1000 Septims, over and above whatever equipment of the PCs he's using. The chest has any remaining equipment of the PCs not on the chief's person and the desk has an assortment of notes. This is a good excuse to stick plot notes in here, but otherwise, there's nothing in particular that I can stick here. This is where the rest of the bandits sleep. The room is empty short of the four beds and the single bandit hiding under the bed. This room has a few things that the PCs could find. First, there's whatever the bandit's carrying if the PCs feel like slaughtering him. And Second, with a DC 13 Investigation check, the PCs can find 2d6*10 Septims and a The Lusty Argonian Maid Vol 2. This is where the last of the surviving bandits are holed up. There are at most six bandits in this room cowering in fear. Meanwhile, outside Niiduraan, Krathurrok, and at least two ashwalkers are waiting. The number of bandits and ashwalkers are uncertain intentionally. After the collapse, there were 11 bandits still on the surface. The leader, the two playing poker, the six currently cowering in the kitchen, and two that were incinerated by dragonfire and raised as ashwalkers. The two were incinerated shortly after the dragon announced its decree. They went out to challenge this interloper and paid the price. The remaining six then realised their mistaken courage and have been cowering in the kitchen ever since. However, over time they are goaded out one by one and slaughtered. If the players take a short rest, two bandits are turned into ashwalkers, and then if the PCs brute force a puzzle, another bandit is turned into an ashwalker for each.Loot
G-7 The Barracks
Loot
G-8 The Kitchen
The Encounter
When the PCs enter the kitchen, decked out with their fancy equipment, the bandits immediately differ to their leadership. For each surviving bandit, remove an ashwalker and that bandit from the fight as they deal with it. Any remaining ashwalkers or bandits will act in the fight against the dragon.
When the PCs exit the kitchen and move to the tower, Niiduraan will taunt them before leaping off the tower stabbing the Bloodskal Blade into the ground, creating red fissures of energy. This doesn't do anything, but it does look cool.
Niiduraan is a melee fighter, he shouts whenever possible. He opens with his frightful presence and rushes towards the closest PC. If he can't reach one with his movement he makes an energy beam attack if one is within 15 feet or he takes the dodge action.
Krahthurrok prefers to swoop in and out of combat, using his breath weapon as frequently as possible. If he is forced into melee he will attempt to use Whirlwind Sprint (Wuld Nah Kest) to escape. If Niiduraan is slain, Krahthurrok flees.
When Niidurran dies, his body collapses into a pile (puddle?) of lava.
Loot
The kitchen has a variety of pots, pans and food. However, unlike the food underground, this food has no miraculous healing properties.
On Niiduraan's remains is a set of plate armor, and the Bloodskal Blade.
The Bloodskal blade is a weapon directly lifted from Skyrim: Dragonborn. It's really cool, so I added it.
The item description mentions that it is any sword, in this case, it is a greatsword, but you could change it if you wanted.
The Tower
The tower is largely bare and disinteresting, however, if the PCs head to T-B1 there is some loot down there.
Loot
In the crates are 2 greater potions of healing, some lockpicks and a scroll of mass cure wounds.
Concluding the Adventure
Once the PCs have slain driven off or (somehow slain) Krahthurrok, they are free to explore the frozen countryside.
You could work this in a greater campaign if you wish, though it might be hard since Shouts aren't really balanced for 5th Edition or perhaps 5th Edition isn't balanced for them. Though if you're brave enough you could fit it in somehow.
Bestiary
Ashwalker
Medium elemental, neutral evil
- Armor Class 8 (soot)
- Hit Points 22 (3d8+9)
- Speed 20 ft.
STR DEX CON INT WIS CHA 13 (+1) 6 (-2) 16 (+3) 3 (-4) 6 (-2) 5 (-3)
- Damage Vulnerabilities cold, thunder; bludgeoning from weapons that are magical or silvered
- Damage Resistances slashing and piericing from non silvered weapons
- Damage Immunities fire and poison
- Condition Immunities poisoned
- Senses Senses darkvision 60 ft., passive Perception 8
- Languages Tamrielic, Dovahzul but cannot speak
- Challenge 1/4 (50 XP)
Undead Fortitude. If damage reduces the ashwalker to 0 hit points, it must make a Constitution saving throw with a DC of 5 + the damage taken, unless the damage is cold, thunder, or is from a critical hit. On a success, the zombie drops to 1 hit point instead.
Actions
Slam. Melee Weapon Attack: +3, reach 5 ft., one target. Hit: 4 (1d6+1) bludgeoning damage.
Draugr
Medium undead, neutral evil
- Armor Class 12 (rotten leather)
- Hit Points 11 (2d8+2)
- Speed 30 ft.
STR DEX CON INT WIS CHA 11 (+0) 12 (+1) 12 (+1) 3 (-4) 11 (+0) 5 (-3)
- Damage Resistances cold
- Damage Immunities poison
- Condition Immunities exhaused, poisoned
- Senses Perception 10
- Languages (Cannot speak coherently) Ancient Nordic, Dovahzul
- Challenge 1/8 (25 XP)
Undead Fortitude. If damage reduces the draugr to 0 Hit Points, it must make a Constitution saving throw with a DC of 5 + the damage taken, unless the damage is radiant or from a critical hit. On a success, the draugr drops to 1 hit point instead.
Actions
Ancient Nordic Longsword. Melee Weapon Attack: +2 to hit, reach 5 ft., one target Hit: 5 (1d10) slashing damage.
Ancient Nordic Longbow. Ranged Weapon Attack: +3 to hit, range 150/600 ft., one target. Hit: 5 (1d8+1) piercing damage.
Draugr Wight
Medium undead, neutral evil
- Armor Class 14 (decaying scaled armor)
- Hit Points 45 (6d8+18)
- Speed 30 ft.
STR DEX CON INT WIS CHA 15 (+2) 14 (+2) 16 (+3) 10 (+0) 13 (+1) 15 (+2)
- Skills Perception +3, Stealth +4
- Damage Resistances cold, necrotic;
- Damage Immunities poison
- Condition Immunities exhaused, poisoned
- Senses darkvision 60 ft., passive Perception 13
- Languages Ancient Nordic, Dovahzul
- Challenge 1/8 (25 XP)
Undead Fortitude. If damage reduces the draugr to 0 Hit Points, it must make a Constitution saving throw with a DC of 5 + the damage taken, unless the damage is radiant or from a critical hit. On a success, the draugr drops to 1 hit point instead.
Actions
Multiattack. The draugr makes two attacks with its, longsword, longbow, or ice spike cantrip. It can use its shout in place one of any one attack.
Ancient Nordic Longsword. Melee Weapon Attack: +4 to hit, reach 5 ft., one target Hit: 7 (1d10+2) slashing damage.
Ancient Nordic Longbow. Ranged Weapon Attack: +4 to hit, range 150/600 ft., one target. Hit: 6 (1d8+2) piercing damage.
Ice Spike. Ranged Weapon Attack: +4 to hit, range 60 ft., one target. Hit: 4 (1d8) cold damage.
Shout: Fus Ro (Recharge 3-6). The first creature or object in a 15 foot line in front of the wight must make a DC 12 Strength saving throw or be thrown back 30 feet away from the wight or until they collide with something and are then knocked prone.
If the target collides with something they take 2d6 points of damage from the collision. If the the target collides with a creature, that creature must make a strength saving throw or take the same damage as the target creature and also be knocked prone.
Frostbite Spider
Large beast, unaligned
- Armor Class 14 (natural armor)
- Hit Points 26 (4d10+4)
- Speed 30 ft., climb 30 ft.
STR DEX CON INT WIS CHA 14 (+2) 16 (+3) 12 (+1) 2 (-4) 11 (+0) 4 (-3)
- Skills Stealth 7
- Senses blindsight 10 ft., darkvision 60 ft., passive Perception 10
- Languages -
- Challenge 1 (200 XP)
Spider Climb. The spider can climb difficult surfaces, including upside down on ceilings, without needing to make an ability check.
Web Sense. While in contact with a web, the spider knows the exact location of any other creature in contact with the same web.
Web Walker. The spider ignores movement restrictions caused by webbing.
Actions
Bite. Melee Weapon Attack: +5 to hit, reach 5 ft., one target Hit: 7 (1d8 + 3) piercing damage and . and target must make a DC 11 Constitution saving throw, taking 9 (2d8) poison damage on a failed save, or half as much damage on a successful one. A creature who fails their save cannot benefit from any ability that increases their number of attacks.
Web Shot. Ranged Weapon Attack: + 5 to hit, range 30 ft., one target. Hit: 2 (1d4) poison damage, and the target's speed is reduced by 10 until the start of the spider's next turn. This effect stacks. If this would reduce the target's speed to 0, the target is restrained. As an action, the restrained target can make a DC 12 Strength check, bursting the webbing on a success. The webbing can also be attacked and destroyed (AC 10; hp 5; vulnerability to fire damage; immunity to bludgeoning, poison, and psychic damage).
Dragon Priest, Draugr Lich
Medium undead, neutral evil
- Armor Class 16 (ancient dragonscale robes)
- Hit Points 65 (10d8+20)
- Speed 45 ft.
STR DEX CON INT WIS CHA 10 (+0) 16 (+3) 14 (+2) 20 (+5) 14 (+2) 16 (+3)
- Saving Throws Con +5, Int +8, Wis +5
- Skills +8, History +8, Insight +5, Perception +5
- Damage Resistances cold, lightning, necrotic
- Damage Immunities poison
- Condition Immunities charmed, paralyzed, poisoned, prone
- Senses truesight 120 ft., passive Perception 15
- Languages Ancient Nordic, Dovahzul
- Challenge 8 (3900 XP)
Legendary Resistance (1/day). If the dragon priest fails a saving throw, it can choose to succeed instead.
Spellcasting. The dragon priest is a 5th level spellcaster. Its spellcasting ability is Intelligence (spell save DC 16, +8 to hit with spell attacks). The dragon priest has the following wizard spells prepared:
Cantrips (at will): blade ward, chill touch, true strike, toll the dead
1st level (4 slots): color spray, fog cloud
2nd level (3 slots): shatter, enlarge/reduce
3rd level (2 slots): flash freeze (fireball with cold damage and Con save)Turn Resistance. The dragon priest has advantage on saving throws against any effect that turns undead.
Actions
Paralyzing Touch. Melee Weapon Attack: +8, reach 5 ft., one target. Hit 7 (2d6) cold damage. The target must succeed on a DC 16 Constitution saving throw or be paralyzed for 1 minute. The target can repeat the saving throw at the end of each of its turns, ending the effect on itself on a success
Shout: Fo Krah Diin (Recharge 6). The dragon priest exhales a 40-foot line of frost, all creatures within that area must make a Constitution saving throw or take 5d6 points of cold damage.
If the target collides with something they take 3d6 points of damage from the collision. If the target collides with a creature, that creature must make a Strength saving throw or take the same damage as the target creature and also be knocked prone.Shout: Laas Yah Nir (Recharge 6). The lich knows the location of all creatures within 300 feet of it for 5 rounds. This Shout is only audible up to 60 feet.
Shout: Mid Vur Shaan (Recharge 6). 3 creatures within 30 feet of the dragon priest, that can hear it, for 4 rounds when they make the Attack action, they may make one additional attack.
Legendary Actions
The dragon priest can take 2 legendary actions, choosing from the options below. One legendary option can be used at a time and only at the end of another creature's turn. The dragon priest regains spent legendary actions at the start of its turn.
Cantrip. The dragon priest casts a cantrip.
Shout. The dragon priest Shouts.
Recharge. The dragon priest attempts to recharge its ability to Shout.
Krahthurrok, The Callous Overlord
Huge dragon, chaotic evil
- Armor Class 17 (natural armor)
- Hit Points 105 (10d10+50)
- Speed 40 ft., climb 40 ft., fly 80 ft.
STR DEX CON INT WIS CHA 21 (+5) 10 (+0) 21 (+5) 14 (+2) 11 (+0) 19 (+4)
- Saving Throws Dex +3, Con +8, Wis +3, Cha +7
- Skills Perception +7, Stealth +3
- Damage Vulnerabilities cold
- Damage Immunities fire
- Condition Immunities condition_Immunities
- Senses blindsight 30 ft., darkvision 120 ft., passive Perception 17
- Languages All
- Challenge 8 and Xp
Dragonblood. Krahthurrok has no cooldown for his shouts.
Legendary Resistance (1/day). If Krahthurrok fails a saving throw, he can choose to succeed instead.
Actions
Multiattack. The dragon makes three attack: one with its bite and two with its claws.
Bite. Melee Weapon Attack: +8. reach 10 ft., one target. Hit: 16 (2d10 + 5) piercing damage plus 3 (1d6) fire damage.
Claw. Melee Weapon Attack: +8. reach 5 ft., one target. Hit: 12 (2d6 + 5) piercing damage.
Fire Breath (Recharge 5-6). The dragon exhales fire in a 25-foot cone. Each creature in that area must make a DC 16 Dexterity saving throw, taking 33 (10d6) fire damage on a failed save, or half as much damage on a successful one.
Magma Breath (Recharge 5-6). The dragon exhales fire in a 30 by 10-foot line. Each creature in that area must make a DC 16 Dexterity saving throw, taking 16 (5d6) fire damage and be restrained by the magma on a failed save, or half as much damage on a successful one.
If a creature has failed its initial saving throw, it can use an action to make a DC 16 Strength saving throw to escape.
Creatures that start its turn trapped by magma take 3 (1d6) fire damage.Shout: Mid Vur Shaan. 3 creatures within 30 feet of Krahthurrok, that can hear it, for 4 rounds when they make the Attack action, they may make one additional attack.
Shout: Strun Bah Rolz (1/day). Sets up a lair action. At initiative 10 a random creature within a 150-foot radius gets hit by a meteor. That creature must make a DC 15 Dexterity saving throw or take 16 (3d10) points of bludgeoning damage.
Shout: Wuld Nah Kest. The dragon rushes forward 90 feet. This movement does not provoke attacks of opportunity.
Reactions
Shout: Slen Tiid Vo. Creatures slain by the dragon's fire breath return as ashwalkers.
Legendary Actions
Krahthurrok can take 2 Legendary Actions, choosing from the options below. Only one legendary action can be used at a time, and only at the end of another creature's turn. Spent legendary Actions are regained at the start of each turn.
Detect. The Krahthurrok makes a Wisdom (Perception) check.
Tail Attack. The Krahthurrok makes a tail Attack.
Shout. Krahthurrok Shouts.
Niiduraan, The All-Consuming One
Medium humanoid (Nord), chaotic neutral
- Armor Class 18 (Steel Plate)
- Hit Points 69 (8d10 + 24)
- Speed 30 ft. fly 60 ft.
STR DEX CON INT WIS CHA 19 (+4) 8 (-1) 16 (+3) 12 (+1) 14 (+2) 17 (+3)
- Saving Throws Wis +5, Cha +6
- Skills Athletics +7, Insight +5, Intimidation +7, Religion +4
- Damage Vulnerabilities cold
- Damage Resistances fire
- Condition Immunities poisoned
- Senses Perception 12
- Languages Tamrielic, Dovahzul, Daedric, Nordic, Ancient Nordic
- Challenge 5 and Xp
Dragonborne. Somewhat Dovahzul in nature, Niiduraan can be affected by the Dragonrend Shout but makes his checks against it with advantage.
Great Weapon Fighter. When Niiduraan rolls of a 1 or 2 on a damage die for the Bloodskall Blade, he rerolls the die and must use the new roll, even if the new roll is a 1 or a 2.
Actions
Multiattack. Niiduraan makes two attacks with the Bloodskal Blade or one attack with the Bloodskal Blade and a shout.
Bloodskal Blade. Melee Weapon Attack: +7, reach 5 ft., one target. Hit: 12 (2d6+4) + 4 (1d6) force damage.
Energy Beam. An arc of red energy traced out by the blade flies out until it fades. All creatures in a 30-foot cone must make a DC 15 Dexterity saving throw or take 12 (3d6) force damage.
Inflict Wounds (5/day). Melee Spell Attack: +6, reach 5 ft, one target. Hit: 16 (3d10) necrotic damage.
Shout: Faas Ru Maar (Recharge 5-6). A creature within 30 feet must succeed a DC 15 Wisdom saving throw or become frightened of Niiduraan for 1 minute and must take the Dash action and move away from him by the safest available route on each of its turns unless there is nowhere to move. If the creature ends its turn in a location where it doesn't have line of sight to you, the creature can make a Wisdom saving throw. On a successful save, the spell ends for that creature.
Shout: Yol Toor Shul (Recharge 5-6). Niiduraan exhales a 20-foot cone of fire, all creatures within that area must make a DC 15 Dexterity saving throw or take 17 (5d6) fire damage.
Shout: Wen (Recharge 3-6). A creature within 30 feet of Niiduraan must make a DC 15 Strength saving throw or be thrown 20 feet upwards.
Legendary Actions
Niiduraan can take 1 Legendary Action, choosing from the options below. Only one legendary action can be used at a time, and only at the end of another creature's turn. Spent legendary Actions are regained at the start of each turn.
Recharge. Niiduraan attempts to recharge its ability to Shout.
Shout. Krahthurrok Shouts.
Equipment
Bloodskal Blade
Weapon (any sword), artifact (requires attunement)

Image by VulpsVulps from NewGrounds
This sword is the culmination of its creators, stained in the blood of their ambition. Not only was the sword the driving instrument of countless slaughters, but the weapon was also tempered in the blood of helpless innocents.
Item Details
Magic Weapon. When you hit with this magic sword, the target takes an additional 1d6 points of force damage.
Energy Beam. As an action, you can swing the Bloodskal Blade in a straight line, shooting out a line of pure energy.
All creatures in a 15-foot cone in front of you must make a Dexterity saving throw with a DC of 8 + your Charisma modifier + your Proficiency bonus or take 3d6 points of force damage as the line of force buffets through them.
Random Properties. The sword has the following randomly determined properties:
- 1 minor beneficial property
- 1 major beneficial property
- 1 minor detrimental property
Destroying the Sword. The only way to destroy the sword is to repent it of its creator's sins. For one year and a day, the blade must be washed in a bath of holy water whilst performing prayers of forgiveness to a goodly god.
Vial of Frostbite Venom
Adventuring Gear
You can use the poison in this vial to coat one slashing or piercing weapon or up to three pieces of Ammunition. Applying the poison takes an action. A creature hit by the Poisoned weapon or Ammunition must make a DC 11 Constitution saving throw or be unable to benefit from any ability that increases their number of attacks. Once applied, the poison retains potency for 1 minute before drying.
Honed Ancient Nordic Weapon of Freezing/Scorching
Weapon (any), rare
You have a +1 bonus to attack and damage rolls made with this magic weapon.
When you hit with an attack using this magic weapon, the target takes an extra 1d6 cold/fire damage.
Inexplicably Fresh Cheese Wedge
Adventuring Geaar
This wedge of cheese appears to fit perfectly into the cheese wheels found down in this tomb, but otherwise appears completely unaffected by the centuries they've spent down in a dank tomb.
As an action, you may eat any number of inexplicably fresh food. This cheese wedge heals 1 point of damage.
Combining a cheese wedge with a cheese wheel produces 1 potion of fire resistance.
Inexplicably Fresh Cheese Wheel
Adventuring Geaar
This wheel of cheese appears to be missing a wedge but otherwise appears completely unaffected by the centuries they've spent down in a dank tomb.
As an action, you may eat any number of inexplicably fresh food. This cheese wheel heals 1d4 points of damage.
Combining a cheese wedge with a cheese wheel produces 1 potion of fire resistance.
Inexplicably Fresh Produce
Adventuring Geaar
This apple, cabbage, carrot, gourd, leek, potato, or tomato otherwise appears as though it was picked yesterday despite the ravages time it has doubtlessly endured.
As an action, you may eat any number of inexplicably fresh food. Inexplicably fresh produce restores a single hit point.
Maps
The Fort New: 45x33
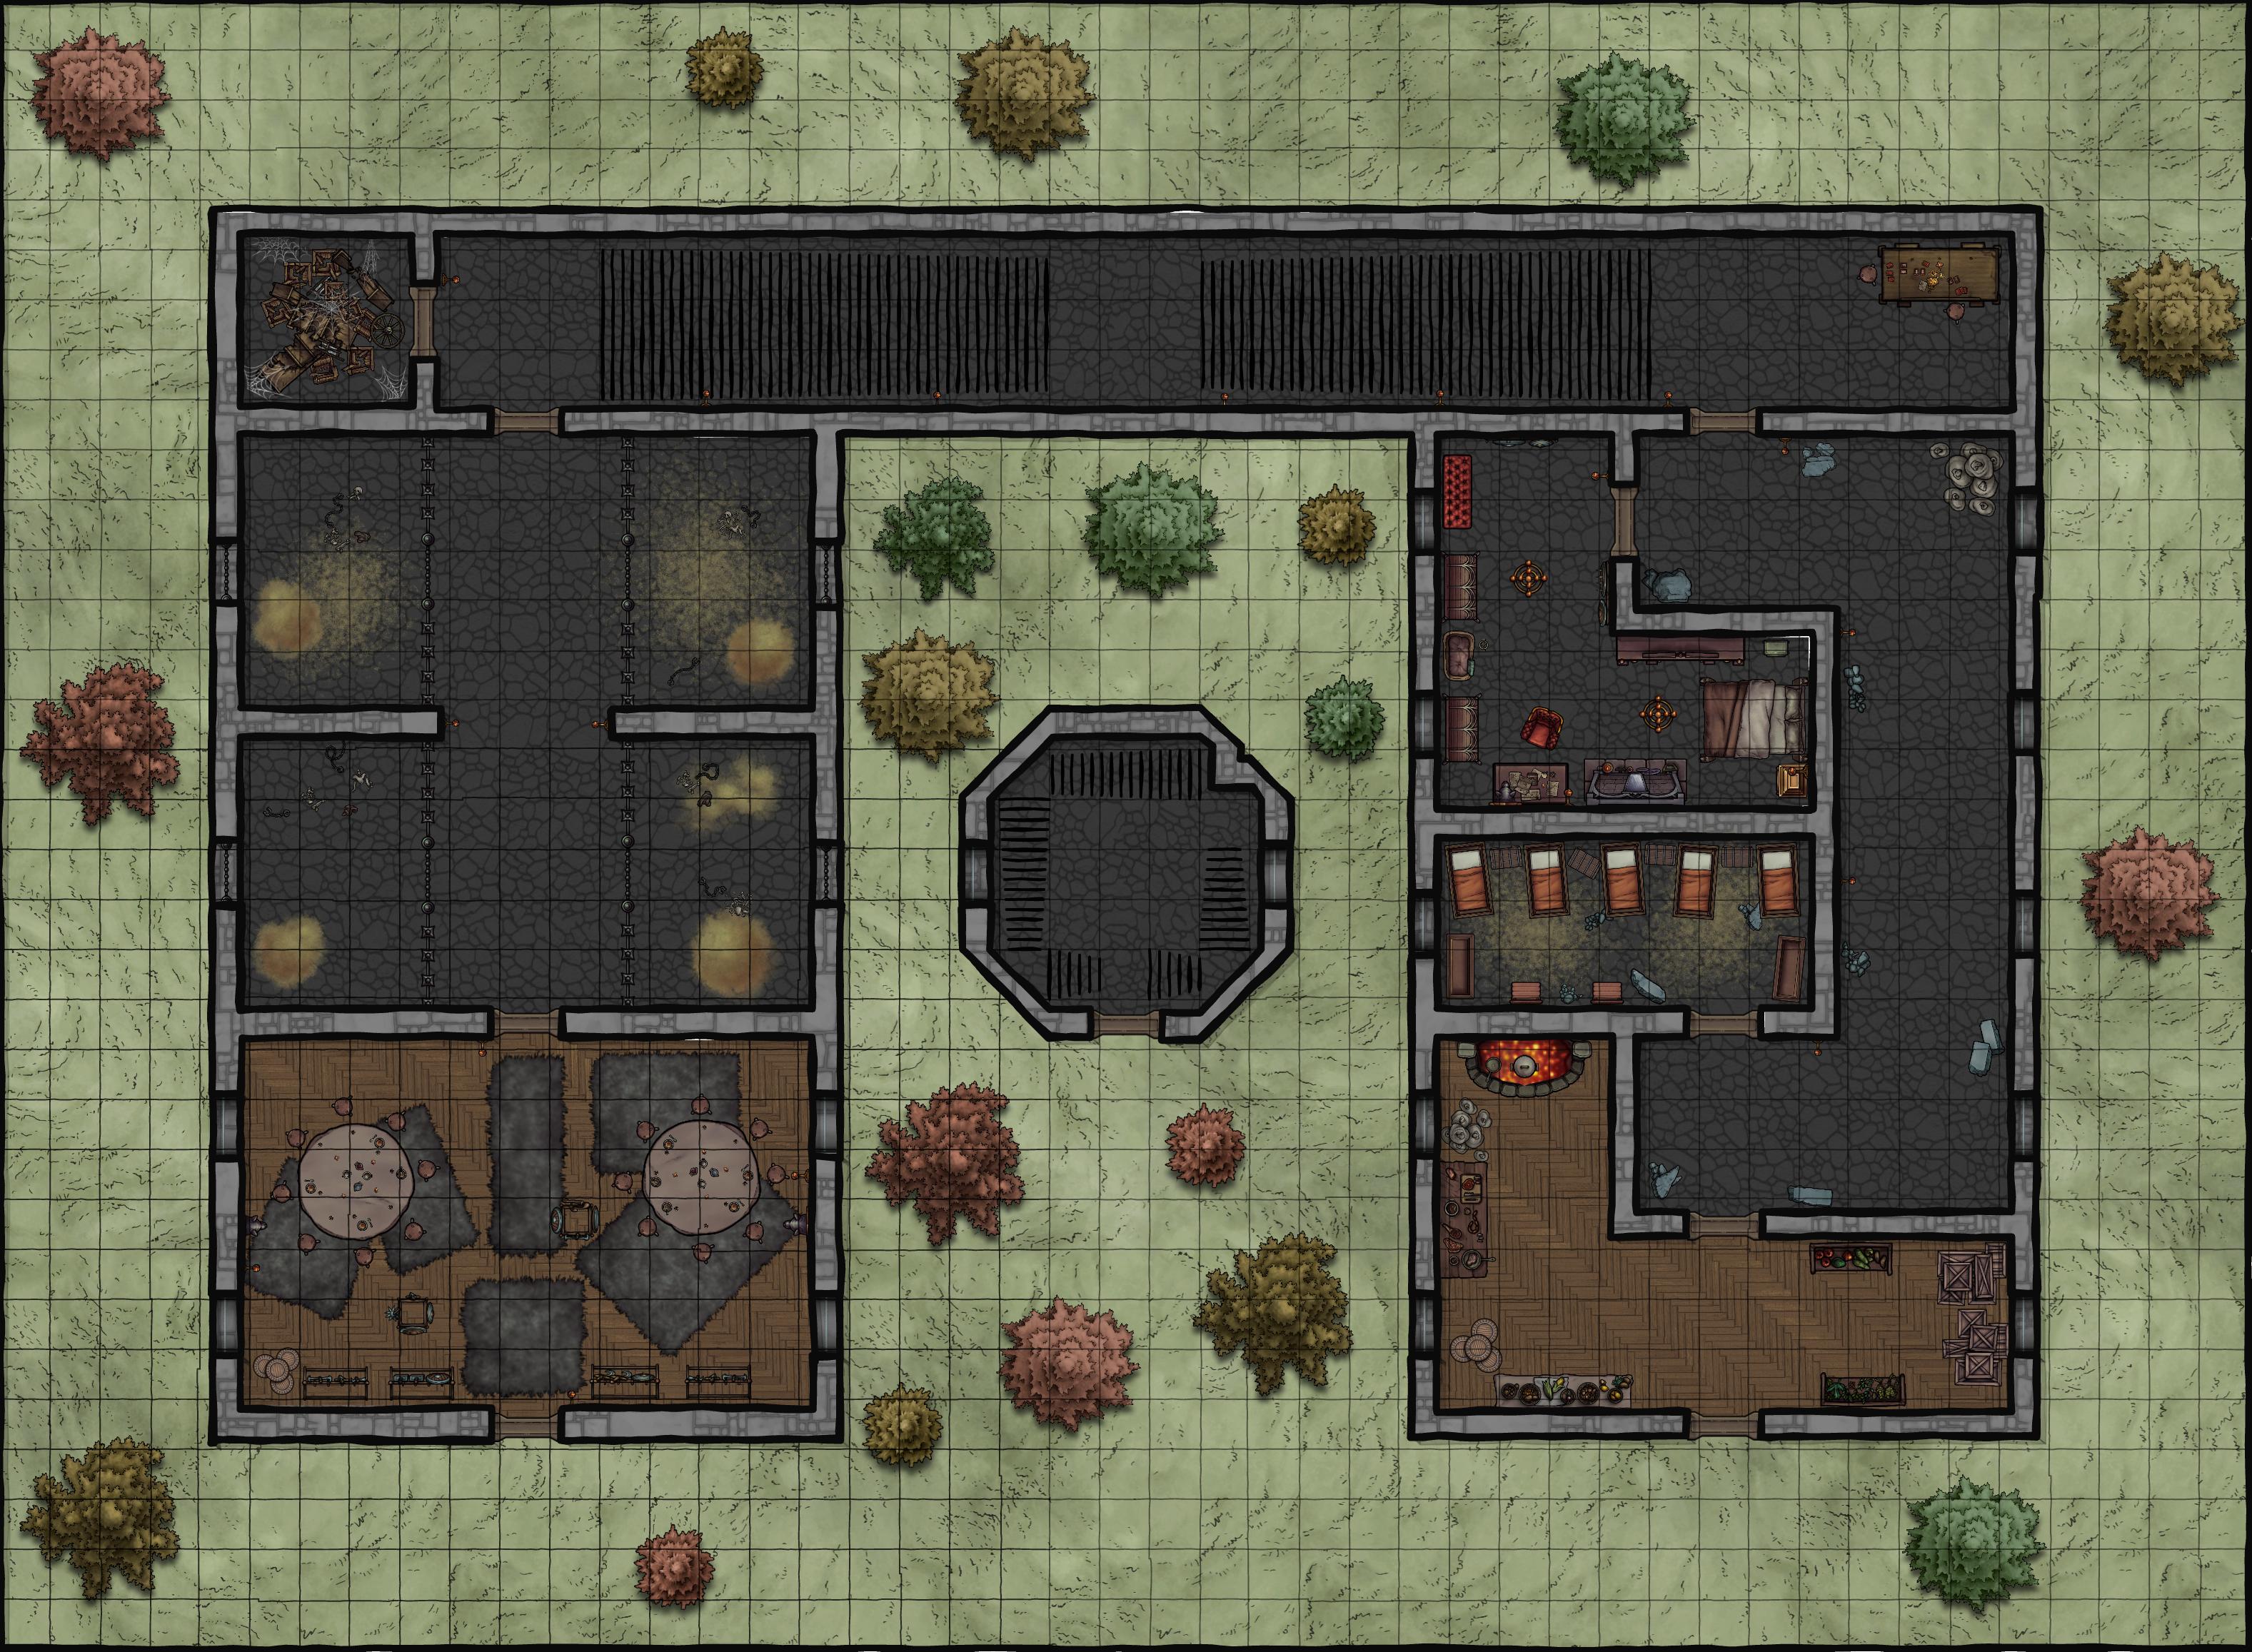
The Basement: 37x28
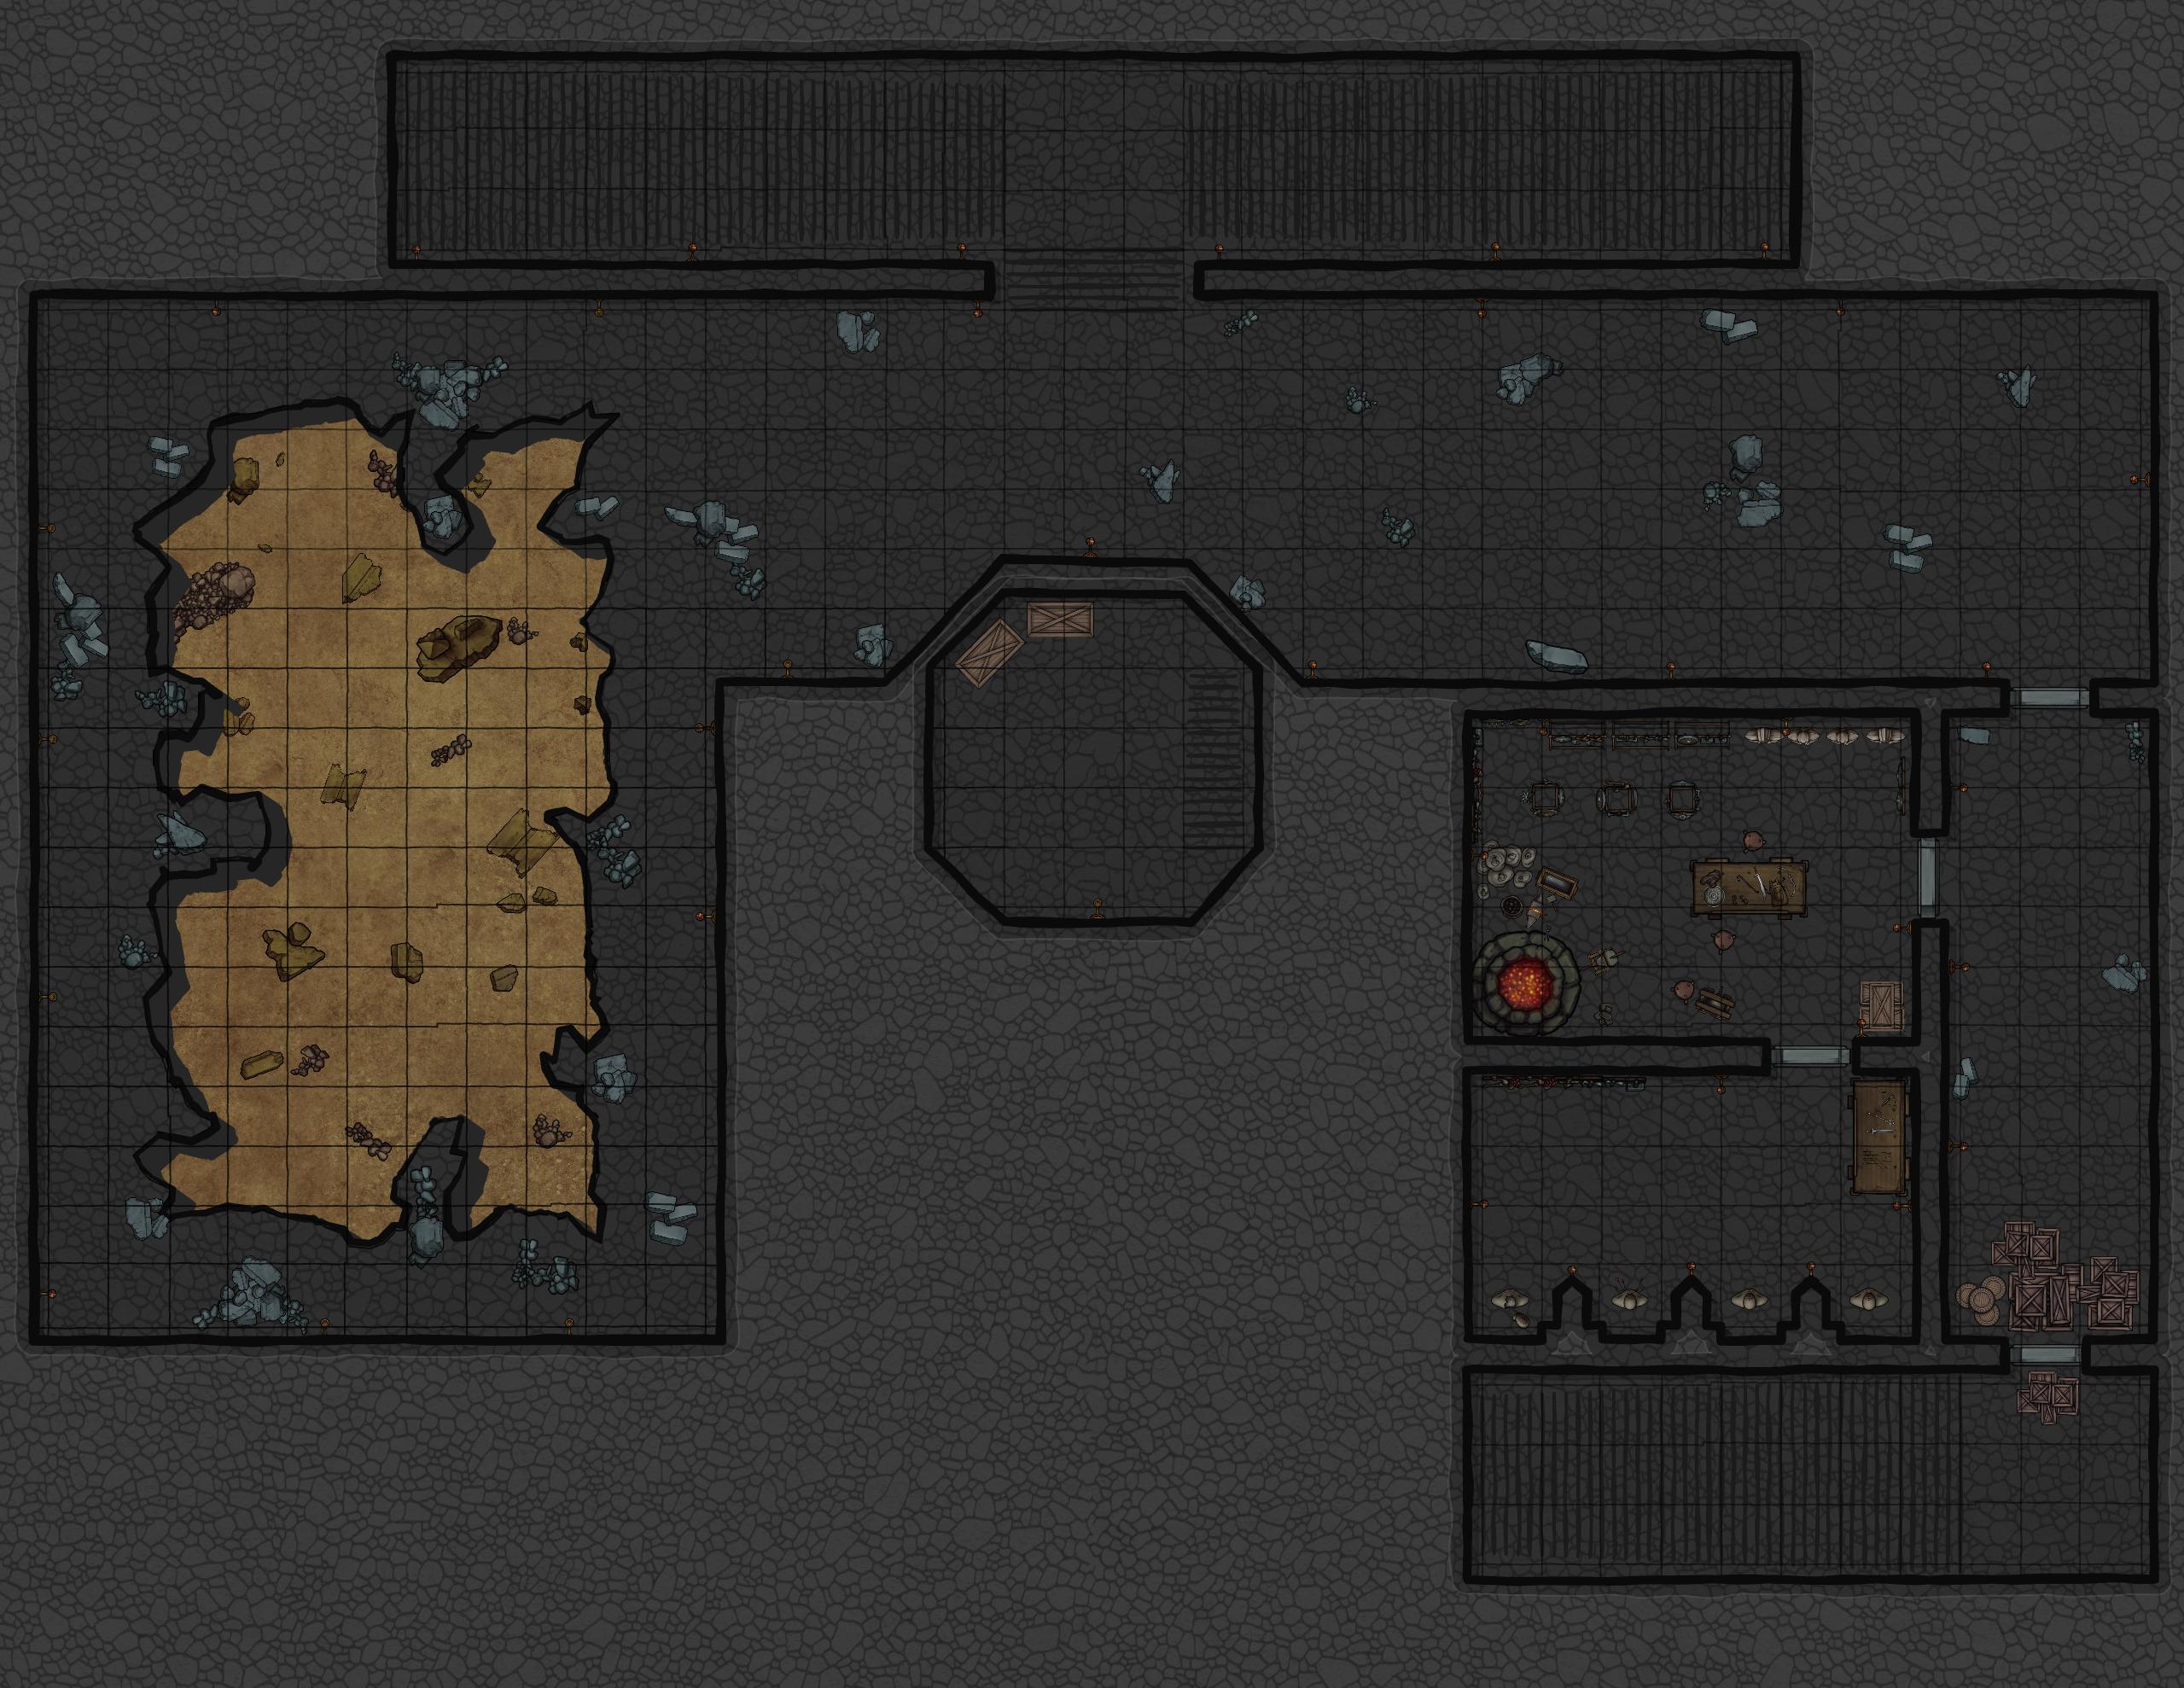
The Fort Ruined: 45x33
The Ruins: 27x52
Watch
The Skies
Traveler
This adventure was originally designed by d'Artagnan on DMs Guild, /u/dArtagnanDnD on reddit, or dArtagnanDnD on patreon and dArtagnanDnD on X
I rewrote his original adventure, which can be found here, due to it being outdated and being mostly unusable. Secondly this has been converted over to support my The Elder Scrolls for 5e expansions. Do note that my suplement is not finished but a more experienced DM should not find it too difficult to convert most things back. For Money just divide it by 10 to convert septims to gold. Happy adventuring.