Salvage Operation: Table of Contents
-
Introduction
- 3 Introduction
- 3 Opening Crawl
- 3 Background
- 4 Adventure Summary
- 4 Placing the Adventure
- 5 Salvagers Wanted
-
Emperor of the Dunes
-
Upper Deck
- 8 1. Main Deck
- 8 2. Work Station Shrine
- 8-9 3. Control Room
-
Lower Deck and Cargo Hold
- 9 4. Enmeshed Doorway
- 9 5. Droid Nest
- 9 6. Cold Storage
- 10 7. Krell's Cabin
- 10 8. First Mate's Cabin
- 10 9. Micro-Droid Chambers
- 10 10. Heretic Shrine
- 10 11. Galley
- 11 12. Cargo Hold
-
Death of the Emperor
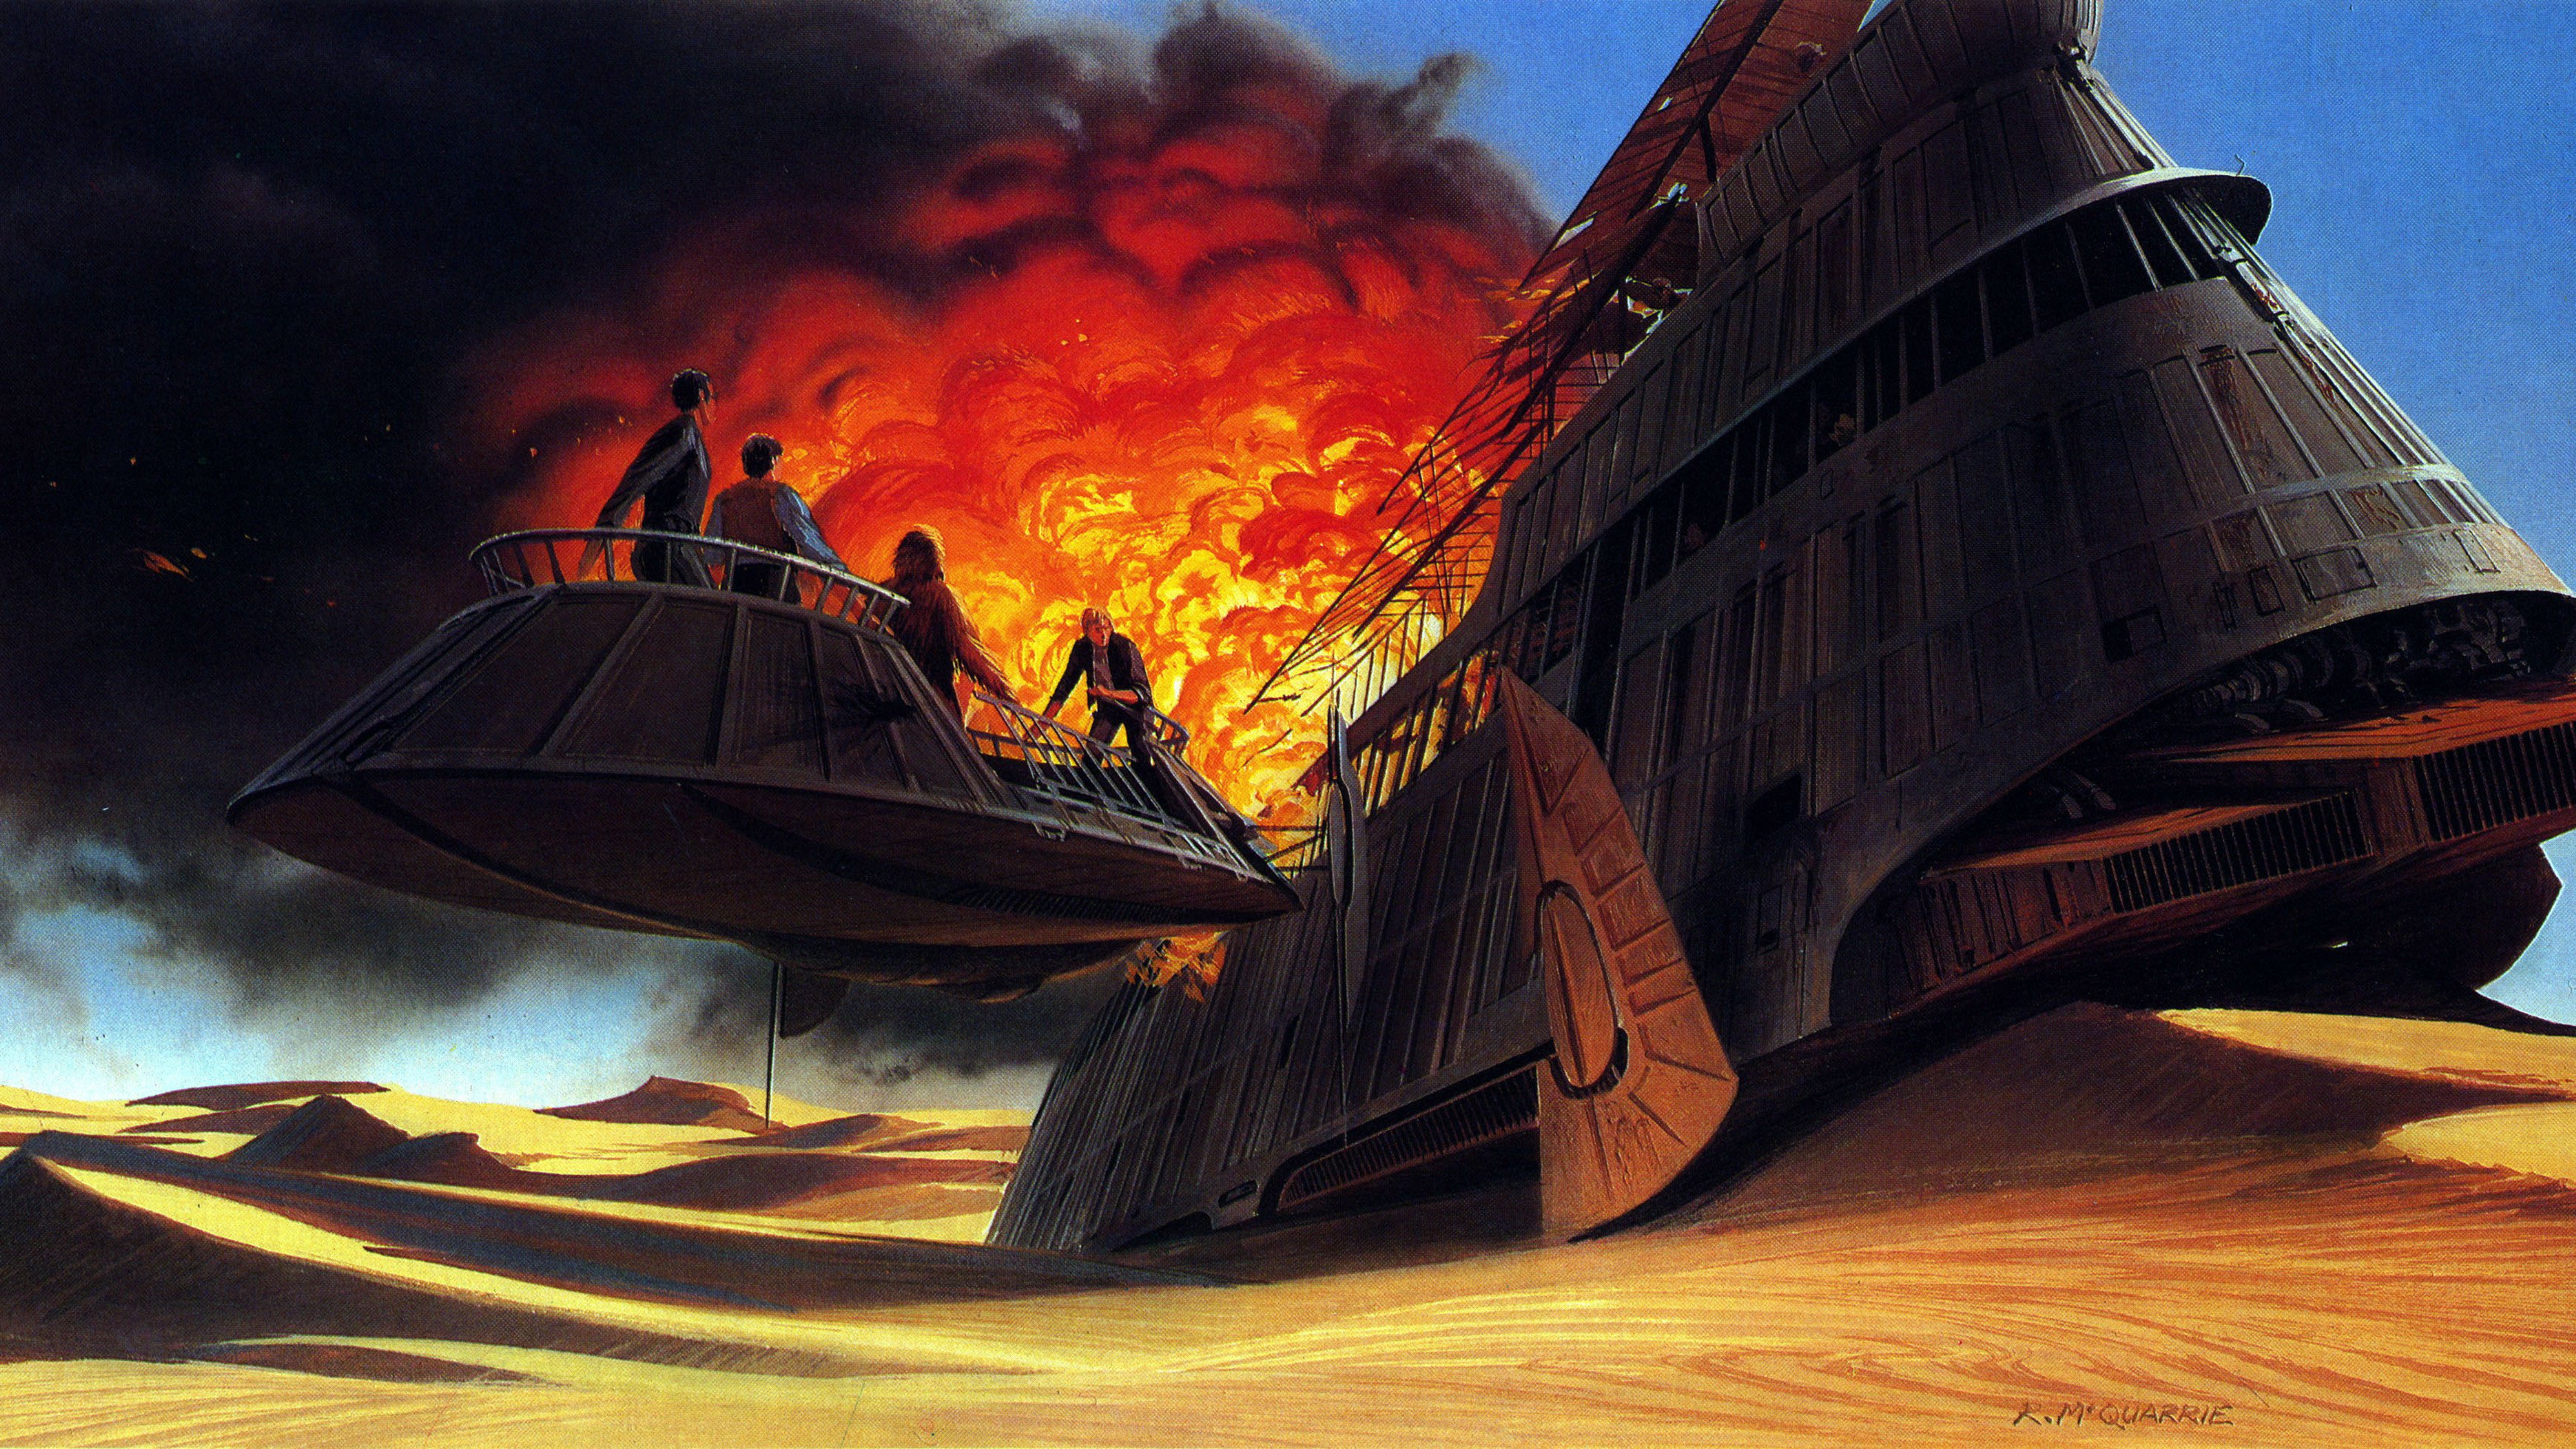
- 12-13 Sarlacc Attack
- 13 Moving Aubreck's Treasure
- 13-14 Sequence of Events
- 14 Getting Off The Emperor
-
Conclusion
-
Appendices
- 31-32 Appendix A: Enhanced Items
- 33-50 Appendix B: Creatures
- 51-52 Appendix C: Miscellaneous
Salvage Operation
Introduction
Salvage Operation is a Star Wars 5th Edition conversion of the Dungeons and Dragons 5th Edition adventure of the same name, which originated from the Dragon magazine published by Wizards of the Coast.
The adapted version of this adventure was released in the 5e sourcebook Ghosts of Saltmarsh, which included a collection of adventures from previous D&D editions adapted into 5e's format.
Much like the original module, this adventure takes players through an abandoned shipwreck in search of lost wealth - this time, with a distinctly-Star Wars flavour. Much of the content has been adjusted to match the official SW5e rules, but much of the adventure remains a flavourful conversion with minimal changes to the overall progression and difficulty.
Opening Crawl
For Game Masters who wish to have an opening crawl before their adventure, consider using the read-aloud text below. You may edit it as necessary to fit the context of your party:
Salvage Operation
In cities and settlements located across the vast dunes of the sand planet TATOOINE, nearly all local commerce and trade is overseen by the far-reaching hands of the HUTT CLANS. Without ties to the Hutts and their criminal enterprise, few can build an independent business free of their influence.
One such business has flourished in the past; the repulsorlift trading fleet of AUBRECK THE HUTT, an honest merchant whose staunch efforts to distance himself from the underworld have made him a favored trading partner for many. However, the tragedy of a significant investment and a lost cargo barge have rendered Aubreck nearly destitute.
Yet hope is not yet lost. Recent reports from the Dune Sea indicate that Aubreck's lost barge, the EMPEROR OF THE DUNES, has been found stranded and damaged. Desperate to reach the barge before salvagers or treasure hunters can, Aubreck has sent for reliable adventurers that are willing to brave the sands...
Background
The Hutt entrepreneur Aubreck Drallion - known affectionately as 'Aubreck the Hutt' - once counted himself among the richest law-abiding folk of Tatooine. His repulsorcraft fleet was one of the largest and most prosperous of its kind, with hundreds of terrestrial craft under his banner dodging sandstorms, Tusken raids, and desert-dwelling monsters to carry goods across the planet.
Yet Aubreck's success perhaps came too fast and too easily; although his profits eventually stabilized, his ambition kept expanding. Years ago, his contacts in the southern hemisphere reported that he could monopolize trade in rare machinery and medicines by making heavy investments in the area. Aubreck took the opportunity as a sure thing and leaped at the chance to get even richer. He sold off many of his assets and converted the proceeds to property deeds and promissory notes, encased within datacards. Avoiding a direct network transmission due to a fear of interception by business rivals or criminal elements, he instead secured that portable wealth aboard Emperor of the Dunes, a reinforced sail barge and the foremost repulsorcraft in his fleet.
Aubreck's plan was to convert these notes back into credits when the barge reached its destination in the south, but fate introduced a cruel twist, and Emperor of the Dunes disappeared. A vicious sandstorm separated the barge from its escort, and it was never heard from again. Devastated by the financial loss, Aubreck was reduced to the lifestyle of an ordinary merchant.
The true fate of Emperor of the Dunes is known only to a few. The barge was nearly disabled in the storm that drove it off course, but it remained operational, albeit without navigational tools. After the storm subsided, its surviving crew members touched down near a seemingly abandoned B'omarr monastery. When they disembarked to look for supplies, they discovered the monastery was inhabited by a cult of erratic droids and cyborg acolytes, ruled by renegade B’omarr monks whose spider-like droid bodies inspired the cult’s iconography. The monks promptly had the few remaining crew members dispatched by their underlings and claimed the barge as a sign of favor from their long-dead founder.
In time, the settlement's population became fractured into two factions, each of which tried to exterminate the other. One group claimed custody of the barge and used it as a headquarters, stocking it with supplies and defending it from assaults by the enemy group. When the civil war entered its final throes, the barge was in danger of being overrun by enemy forces. In response, rather than staying and fighting it out, the cultists aboard the barge reactivated the lifts — and thanks to jury-rigged repairs, they blasted away and left the settlement far behind.
Fifteen cycles ago, Aubreck received word that Emperor of the Dunes had been spotted broken down in the southern Dune Sea, apparently a ghost craft. The merchant promptly used a sizable chunk of his savings to hire a craft and crew to sail to the derelict. Aubreck believes he can restore his standing if he recovers the deeds and documents that remain with the barge. Now, all he needs are a few brave souls able to deal with whatever threats might present themselves aboard the Emperor and bring back his fortune.
Adventure Summary
Salvage Operation starts as an investigation adventure, in which the characters board Emperor of the Dunes and explore its upper decks. As they venture into the barge's lower decks, this scenario becomes more of a dungeon crawl in cramped, dangerous spaces, with droids and cyborgs attacking in close quarters. Characters who survive those threats and push on find the lowest holds packed with obstructive cargo and containing deadly assassin droids.
As the characters fight their way forward in search of Aubreck's goal, the perils of the dunes finally take their delayed claim on the Emperor, in the form of a hungry sarlacc. This creature first assaulted the barge several days before the characters arrive. Its previous rampage failed to scuttle the barge, though the sarlacc succeeded in devouring or crushing many of its living occupants before falling into temporary hibernation.
To say that the Emperor now has a skeleton crew would be an overstatement. Of all the cultists who escaped the monastery, only a single monk and his dedicated acolytes remain alive aboard ship. The B'omarr monk Krell Grohlg still maintains his creations inside the barge and is aided in his defense of the vessel by cybernetic acolytes, many-legged droids and his personal bodyguard Roil.
The climax of the adventure is a race against time as the sleeping sarlacc reawakens for a final onslaught, with decks breaking, the barge sinking, and characters scrambling through the disintegrating hull in a race for their lives. If Krell or his minions are still alive, they present an additional obstacle because they also don't want to go down with the barge.
In order for the characters to receive their payment from Aubreck, they must bring back a heavy box from the cargo hold — potentially forcing them to choose between making a quick escape and accomplishing their mission.
Placing the Adventure
Salvage Operation is intended to be era-agnostic in relation to the wider Star Wars timeline. Here are some suggestions for existing eras in which to place this setting:
- The Old Republic: An era where Sith and Jedi fight for the equally matched powers of the Galactic Republic and Sith Empire, battling in a seemingly endless war between light and dark.
- The High Republic: By this time in history, the once-great Sith threat is very nearly eradicated, and the Republic and Jedi Order are at the height of their power, prioritizing expansion and exploration.
- Fall of the Jedi: Since their peak, the Republic and Jedi Order have fallen into decline, allowing corruption of both political and moral nature to seep into their midst as the galaxy launches into a civil war between clone and droid armies.
- The Empire: By the end of the Clone Wars, the Republic has been reorganized into an Empire and the Jedi outlawed by the machinations of the insidious Emperor Palpatine, opposed only by the steady unification of resistance cells into the Rebel Alliance.
- The New Republic: After the defeat of the Empire at the hands of the Rebel Alliance, many efforts are taken to recover knowledge lost under the reign of the Empire and to combat the outlying Imperial remnants.
- Rise of the First Order: The fledgling New Republic faces a resurgence of Emperor Palpatine's forces under the banner of the First Order, once again throwing the galaxy into turmoil and forcing the formation of a Resistance to oppose them.
Salvagers Wanted
The adventure begins in the Tatooine locale of Anchorhead, with Aubreck's estate located only a few miles out of town. Player characters can already be part of a single party, or can come together as individual hires for Aubreck's mission.
Aubreck has charged his Klatoonian butler Vertheg with finding a suitable band of adventurers for his urgent mission. Tall, lanky, and awkward, the butler is notable for the single tusk that juts out from his lower jaw, and for the way his warty skin contrasts with his fine, neat clothing. Vertheg is often responsible for carrying out what few quasi-legal dealings Aubreck deals in, so he is well acquainted with the sorts of cantinas and hotels the characters might be found in.
When the characters are brought to Aubreck, they quickly note that he has seen better days. His estate is large but run down, and his accessories haven't been fashionable for at least a year. As one of the few Hutts with the capacity to grow hair, he keeps his iron-gray locks pulled back in a short ponytail, and his mustache is neatly tended.
Aubreck explains that the barge holds a heavily fortified box containing promissory notes and property deeds worth a total of 1,000,000 credits. He offers the characters a fee of 10 percent (100,000 credits) to recover it. As a gesture of good faith, he offers them an advance payment of 2,000 credits. (Even if they try their best but still fail to recover the box, Aubreck cannot afford to pay them anything more.) He says that the barge was recently spotted adrift and on low power, approximately five days out from Anchorhead.
The Hutt is worried that someone else might claim the barge's goods as salvage if he doesn't act quickly. He has already hired a Jawa-manned repulsorcraft - the Dream of Winter - to mount a mission to the derelict. Now he needs adventurers to go along and board the Emperor once they reach it, then find the box and bring it back.
Aubreck describes the box as made of shiny blue metal. It is packed inside a plasteel crate branded with a large symbol resembling the Aurebesh letter 'Aurek' - the first letter of Aubreck's name (see below).
The crate can easily be pried or broken open, but the box can't be opened except with a password known only to Aubreck. It contains all of Aubreck's deeds and promissory notes, encrypted onto datapads. The notes are drawn from one of Tatooine's largest independent banks that will pay them out only after the original owner of the assets gives permission, and their value will enable Aubreck to rebuild his business once he redeems them for himself.
Alternative Rewards
If the raw credit reward is either unenticing to players or too significant for an adventure of this level, you may choose to consider alternative rewards for the players that provide a power increase or additional adventure opportunities. A few suggestions for the nature of these rewards can be found below.
Enhanced Items
While forced to sell off many assets to stay afloat, Aubreck has not yet found buyers for all of his prized items. Enhanced clothing, jewellery, technology and even armor and weapons are available to those who desire a different sort of incentive.
Sister Ship
After losing Emperor of the Dunes, Aubreck was forced to cancel an order he lodged with Ubrikkian Industries for a sister ship of the same design. Should the party succeed in returning his goods, he is willing to reopen the order on the barge and gift it to them in memory of the original Emperor. Deck plans for a restored Emperor can be found in Appendix C.
Investment
Savvy-minded players may see the value in requesting stocks in Aubreck's newly-revived business once its resurgence is assured. This would be best applied in a longer-running campaign, ideally as a guaranteed income of credits between adventures.
Dream of Winter
Manned by a crew of skittish Jawas, Dream of Winter is a cargo barge run by her captain, Wolka Windune, who wears a personal translator to speak Basic. Unlike most Jawas, Wolka and his clan use this barge (originally purchased off of Aubreck) instead of a sandcrawler for their scavenging activities. To keep the characters from impeding his crew, he insists that they remain in their quarters, a cramped chamber below deck, during the voyage. The crew consists of thirty Jawas (represented by a Jawa Squadwa), all of whom remain aboard Dream of Winter during the adventure, since they have not been paid for anything other than transport.
If an individual Jawa needs to be used (such as during 'Trouble on the Way'), they will use the same statistics as the Squadwa except for having 7 hit points, only one Ion Pistol attack on each of their turns, no Squad trait, no saving throw proficiencies, and no damage or condition immunities. Slain Jawas have their health removed from the Squadwa's total.
Aubreck has purchased supplies for the characters' mission aboard the derelict - by agreement, the Jawas are only allowed to take whatever is not used by the characters for this mission. This gear, already aboard, includes: fiber armor for any character who wants it, two blaster carbines with two power cells each, five 50-foot coils of fibercord cable, two grappling hooks, twelve glowrods, two traumakits, six antitoxkits, two medpacs, and two sacks for carrying treasure out of the barge.
:max_bytes(150000):strip_icc()/a-56bcca995f9b5829f8508877.png)
Trouble On The Way
The journey to the derelict takes 1d4 + 3 days. If you want to spice up the trip, then about halfway through it a group of tusken raiders stumble upon Dream of Winter and attempt to board it as the barge stops for routine maintenance.
A band of 18 tusken raiders, led by a tusken shaman and a tusken chieftan, wait until late at night to slip aboard the barge by sneaking alongside and climbing to reach the deck. They try to slay the crew and passengers using stealth, hoping to avoid raising an alarm. Their plan is to clear out the barge, then lurk nearby to ambush anyone who comes to investigates the derelict.
The tuskens strike first at any sentries. Typically, a few Jawas from the squadwa are stationed on the deck at night as lookouts. If they are slain, the tuskens then split up to attack the cabins below. If you don't have access to a sample deck plan (such as the Cargo Barge map in Appendix C), assume the characters are divided between two cabins on the lower deck.
The tuskens fight until six or more of their group are slain. When that occurs, the survivors retreat to the sands and flee.
Emperor of the Dunes
After several days in the desert, Dream of Winter comes in sight of the looming, shattered hulk of the derelict Emperor of the Dunes. Wolka Windune brings Dream of Winter within 500 feet of the derelict along its starboard side, close enough to make out its major external features. Its masts have been shorn off, but the upper deck appears clear of debris, as if whatever hit the barge was strong enough to carry off the masts and sails. The starboard steering vane has also been torn off, leaving a jagged pole in its place.
Chief Wolka and the Jawas aboard Dream of Winter express amazement that the Emperor is still afloat. Any character with an appropriate background or proficiency with Piloting notes that the barge has suffered heavy damage across its upper decks, consistent with the effect of a heavy sandstorm. The vessel lists noticeably to port, evidence that the Emperor's portside repulsorlifts have partially failed, though the incline doesn't appear severe enough to make moving around on deck hazardous. The barge rides low to the ground, implying that the barge is on minimal power reserves. If no characters have the appropriate background or proficiency, Wolka can point these facts out. The chief also makes it clear that he suspects the barge is likely to lose power and become deadweight during the ten days it would take to tow it back to Anchorhead.
Not all of the barge's visible damage is due to time and weather. With a successful DC 15 Intelligence (Nature) check, a character can spot impact damage to the barge's hull that indicates it recently came under attack from a large creature.
The captain orders two Jawas to ferry the characters to the Emperor in a speeder skiff - though it is also a repulsorlift vehicle, it has suffered a significant malfunction that keeps it from rising more than five feet above the ground. The Jawas bring fibercord and grappling hooks to give the characters easy access to the main deck. Scaling the sheer hull of the barge without a rope requires a successful DC 10 Strength (Athletics) check. There are no viewports or large openings in the hull of the barge, making the main deck or quarterdeck the only way inside. All locations on the barge are identified on the next page's map.
Dream of Winter comes no closer than 500 feet to the derelict. After taking the characters up to the barge, the Jawas and skiff move 200 feet away from the Emperor and hold their position, waiting for the characters to reappear on the upper deck with the treasure from below.
GM Map
Player Map
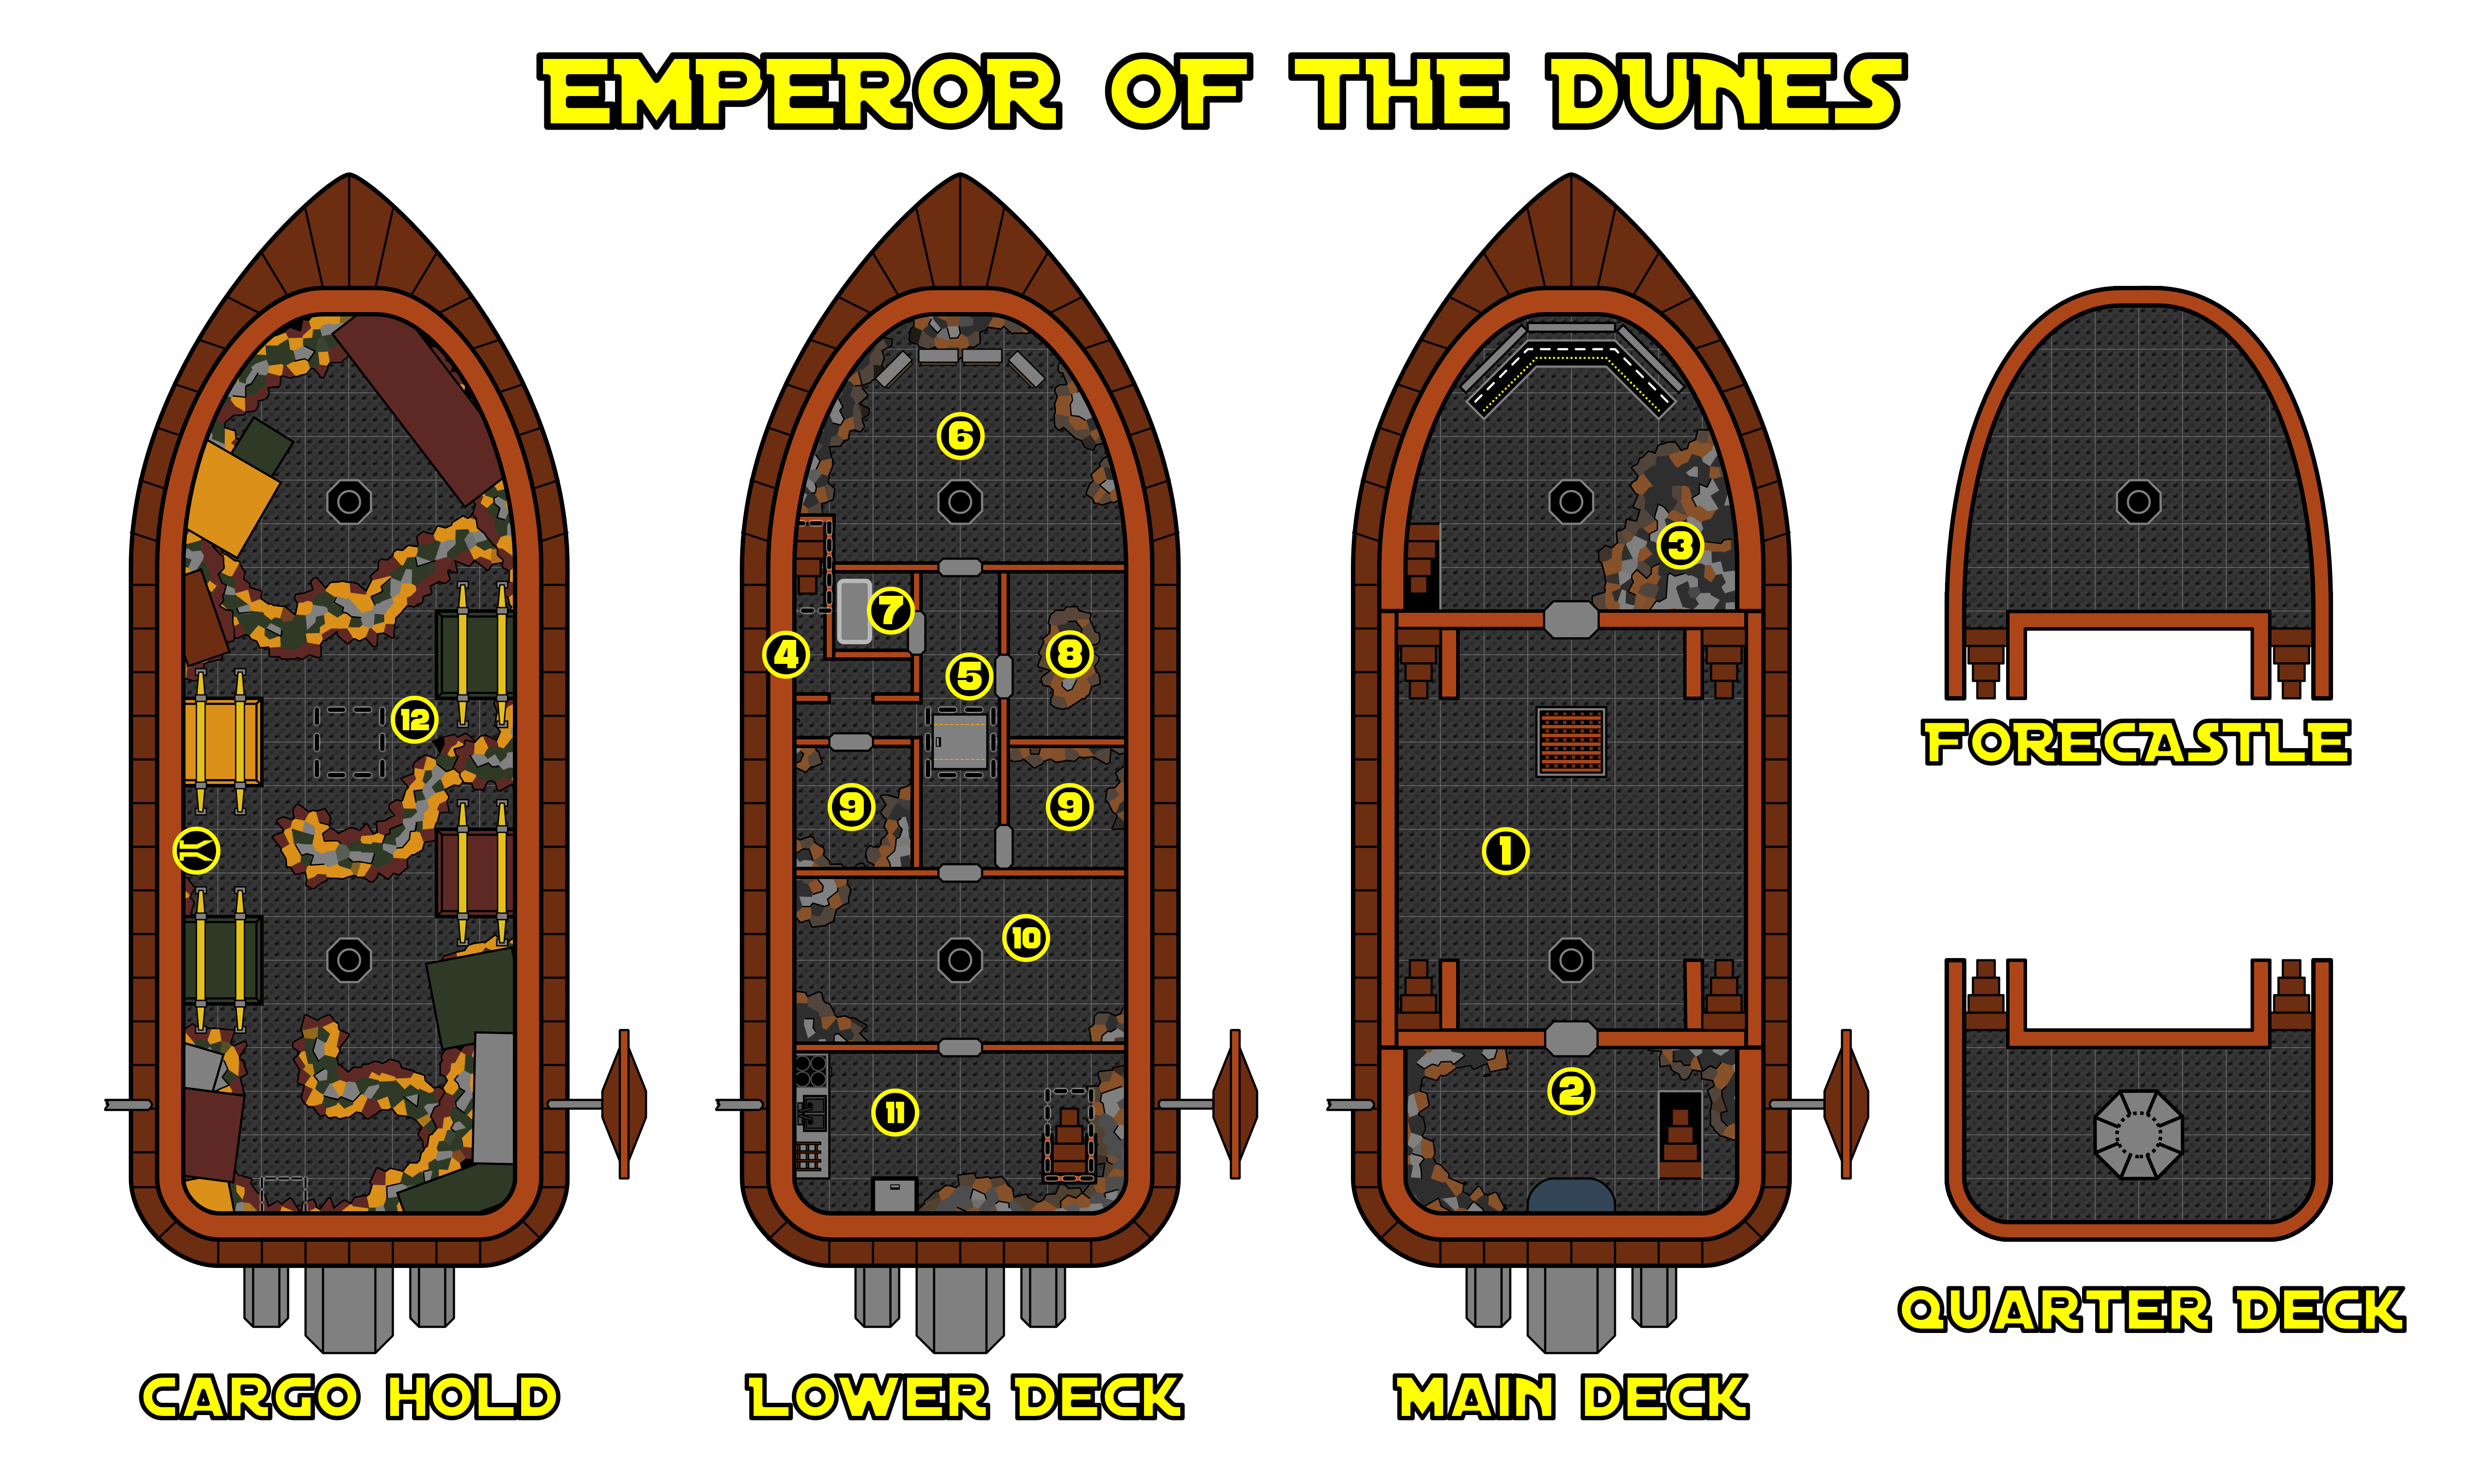

Upper Deck
The main deck of Emperor of the Dunes is likely the first part of the barge the characters explore — and will be the last stage of their desperate escape.
1. Main Deck
The Emperor's upper decks slope gently down toward the barge's port side. The forecastle and quarterdeck are empty, and short durasteel stumps are all that remain of the barge's masts. The low-tech doors leading to cabins fore and aft appear intact, as does the metal grate in the deck that offers access to the lower decks. Aside from the rhythmic creak of the barge's badly weathered plating, all seems quiet.
This area is unoccupied. The doors to fore and aft are not locked (but see area 3), and the only sign of the vessel's aft deck cannon is an empty gun carriage. A character who makes a successful DC 10 Intelligence (Technology) check determines that the gun carriage does not show signs of damage, indicating that the cannon was manually and carefully removed - unlike the damaged masts. Anyone with proficiency in martial ranged weaponry can determine that the cannon was an E-WEB Heavy Repeating Blaster.
The deck is marred in places by bloodstains, noticeable to someone who makes a successful DC 15 Wisdom (Perception) check. A successful DC 10 Wisdom (Medicine) check thereafter reveals that the stains are about three days old.
Through the grate set into the deck can be seen a ladder extending down to area 5, but the grate is rusted shut. It can be wrenched open with a successful DC 15 Strength (Athletics) check or smashed apart (AC 15; 10 hit points; immunity to fire, poison, and psychic damage). Anyone who peers down into area 5 after the grate is removed and succeeds on a DC 10 Wisdom (Perception) check spots several fist-sized droids crawling along the walls of the passage below. The droids immediately scuttle away from any noise or light.
2. Work Station Shrine
A steel work table dominates this cabin. Strange markings cover its surface, dried mud cakes the floor around it, and humanoid skulls ring the wall above, each mounted on a steel spike. The corners of this room are piled with garbage and debris — crudely fashioned steel plates, smashed furniture, torn sacks, shattered crates, and small piles of discarded circuitry. A staircase descends from the southeast corner, and an acrid odor fills the air.
This chamber was once the captain's cabin. Now it's a shrine and workstation for the cultists, dedicated to their insane ideology. The skulls are cracked, weathered, and obviously old.
Lurking under the garbage and debris is a host of the cult's forces — droids in spider-like frames and cyborgs with additional droid arms grafted to their sides. If anyone other than another cultist spends more than a few moments in this room, one BT-8 walker bursts from the webs on the port side, while a B'omarr heretic emerges from the starboard side of the room. At the same time, four swarms of micro-droids crawl through the deck from below. Any character who has a passive Perception score of 14 or lower is surprised. (In tight quarters, remember that a swarm can occupy the same space as another creature.)
Captain's Log
A character who searches through the debris in the room and succeeds on a DC 15 Wisdom (Perception) check finds the barge's ledger and the captain's log, both scribed on datapads in Basic.
The log details the barge's last voyage, including an account of the terrible sandstorm that threw Emperor of the Dunes off course and separated it from its escort. Running low on food and drinkable water, the barge was forced to set down in the hanger of an abandoned monastery. The last entry describes an attack by cyborgs that fought alongside droids of varying sizes. Though the crew fended off this initial attack, they suffered heavy casualties. The final entry records the captain's fear that this attack might have been the precursor to an even larger assault.
Treasure
A minor tribute to the cult's founder is concealed by the mud and litter on the deck. A search of the cabin uncovers a small sack containing ten red rubies (1,000 credits each).
3. Control Room
The door into this room from the main deck is held shut by a thick mass of web-like mesh behind it. It can be forced open with a successful DC 15 Strength (Athletics) check or broken through (AC 15, 18 hit points, immunity to poison and psychic damage, resistance to kinetic and ion damage).
Sheets of this mesh fill this room, such that anything more than 10 feet from the entrance appears as little more than a vague shape. Hidden in the webs are a narrow staircase down and, near the bow, a control station for the barge.
The weathered furniture here is worthless, but the control station continues to display a readout of the barge's systems. Reading the displays reveals that the barge's power supply will give out within only a few hours, and that all remaining power is currently routed toward the remaining repulsorlifts. This power routing cannot be altered in the time the characters have remaining.
A BT-8 walker and a B'omarr heretic lurk near the ceiling above the table, completely hidden in webbing and shadow. They attack the first creature to examine the displays, gaining surprise unless the creature has a passive Perception score of 17 or higher.
Combat in this area alerts the micro-droids in the decks below. Beginning 1d4 rounds after the BT-8's initial attack, one swarm of micro-droids boils up the stairs from area 4 each round, using the same initiative count as the BT-8. The swarms keep coming until four have entered the fight, unless the passage from area 4 is blocked somehow. Each swarm attacks the nearest creature.
Lower Deck and Cargo Hold
The cabins beneath the main deck are home to the monk Krell — and to the murderous droids and cultists under his control.
Obscuring Mesh
Except where otherwise noted, the lower deck of the Emperor is filled with sheets of a web-like mesh - a product of Krell's tinkering to grant his creations spider-like attributes. Areas filled with mesh are lightly obscured. Ranged attacks made against creatures in areas filled with mesh are made with disadvantage. In addition, the creatures found aboard the barge are adept at hiding among the mesh. As an action, any such creature can attempt Dexterity (Stealth) checks to hide from any character that it is more than 5 feet away from. Many of these creatures begin encounters having already tried to hide; make checks as appropriate to determine each creature's success at evading detection.
4. Enmeshed Doorway
This area is not shrouded in sheets of mesh, unlike most of the lower deck (see the "Obscuring Mesh" sidebar). A mesh of a different sort stretches across the doorway between this small chamber and the west end of area 5 (at the point marked with a dotted line). This freshly spun mesh is difficult to spot. A character who probes ahead with a pole or a weapon, or who has a passive Perception score of 17 or higher, can spot the mesh. Otherwise, the first character through the doorway blunders into it and is restrained, as if they had been hit by a BT-8's Mesh Launch attack.
If any creature is caught in the web, the occupants of area 5 are drawn into this area and attack immediately.
Treasure
A fine silver bracelet (2,500 credits) can be found on the floor against the wall in the northeast corner of this area.
5. Droid Nest
The north–south section of this hallway is filled with sheets of webbing (see the sidebar).
A BT-8 walker lurks in here, latching onto the ceiling over the door to area 6. Two BT-4 walkers are perched on either side of the doorway from area 4. They attack, gaining surprise over any creature with a passive Perception score of 16 or lower, when any creature is caught by the web in the doorway leading from area 4 or when any creature enters area 5 after that web is removed. Six swarms of micro-droids lie elsewhere in this area, with two swarms joining the fight each round.
If the characters enter this passageway from area 10 instead of from area 4, the droids wait until the characters' attention is focused on the hatchway (see below) before attacking.
Cargo Hold Access
A metal hatch covers a hole in the deck that leads down to area 12. The hatch is badly damaged, and its unsafe nature can be noticed only by a character who probes the floor ahead with a pole or who has a passive Perception score of 14 or higher. A character who puts their full weight on the hatch breaks through and falls into the cargo hold (area 12), taking 1d6 kinetic damage and falling prone. The fall into the cargo hold catches the attention of the assassin droids in the hold. The hatch can be opened or broken through easily by anyone who recognizes its condition before moving onto it.
6. Cold Storage
Thick mesh chokes this room, partially covering strung-up servos, stripped limbs of droids, and other electronic remains. Four large, boxy devices lean against the bow at the far end of the room, while harmless micro-droids scurry everywhere.
A character who observes the devices from afar and succeeds on a DC 10 Wisdom (Perception) check notices that they appear to be containment devices for carbonite blocks. Within each device is a carbon-frozen B'omarr heretic; former crew members trapped here as punishment. Krell and the other cultists caught these heretics attempting to hoard food, and froze them in carbonite while keeping them aware of their surroundings, driving them insane. Krell has yet to free them, because he worries they might overpower him in their madness.
A block can be unfrozen with a DC 10 Intelligence (Technology) check. When the first heretic is set loose, a wiring malfunction causes the others to do so shortly after, bringing the other heretics into the fight after one round has passed. These heretics are at half of their normal hit points and afflicted with the blinded condition, hampering their ability to fight significantly.
Treasure
A few bones and skulls of the original crew are hidden in the webbing. A character who makes a successful DC 10 Intelligence (Investigation) check finds a pair of gold earrings (2,000 credits) and a wire necklace set with an amethyst (2,500 credits) hidden among the webs.
7. Krell's Cabin
Thin sheet metal is piled up in one corner of this room to make a crude bed. Nearby, a vibrospear and an oblong heavy physical shield lean against the wall. The shield bears the symbol of a black circle with six lines raditating outward, and a large red dot at its centre. Two weathered humanoid skulls hang from steel pegs on the wall.
This room serves as Krell Grohlg's personal chamber. Unlike most of the lower deck, it is not covered in sheets of mesh. Ever since the attack by the sarlacc killed other cultists a few days ago, he has abandoned this room and spends most of his time tinkering in area 10 with his bodyguard.
Any character who inspects the bed finds several well-worn droid components mixed in with the steel sheets.
8. First Mate's Cabin
The smashed wreckage of a bed, dresser, and desk covers the floor of this room. Thick mesh extend from floor to ceiling, making it impossible to clearly see the walls beyond. Dozens of micro-droids move through the webs.
All parts of this room are engulfed in sheets of mesh. The cabin contains nothing of interest, and the micro-droids pose no threat.
9. Micro-Droid Chambers
This room is filled with smashed furniture, crushed plasteel boxes, and other debris, all covered with thick layers of mesh.
When the door to either of these web-filled rooms is opened, dozens of micro-droids scuttle for cover. These areas contain nothing of interest.
10. Heretic Shrine
The floor of this chamber is covered with mathematical symbols written in blood. A circle has been carved into the floor's plating and mesh covers the walls and ceiling. Two unplated droid chassis dangle from cords in the ceiling as micro-droids swarm all over them.
Krell Grohlg, the leader of the cultists who escaped the island, sequestered himself here after the first sarlacc attack. He fights alongside his bodyguard, Roil, using a unique system to trick intruders.
Krell is a modified BT-16 Brain Walker, having abandoned his organic body entirely to pursue his ambitions. His bodyguard, Roil, is a Gamorrean techcaster wearing a face-concealing helmet, which obscures Roil's vocalizations. Krell broadcasts his voice through Roil's helmet to trick his foes into targeting Roil first, allowing him to sneak behind foes using his Cosmic Phase ability before striking.
In addition to Krell and Roil, this cabin also contains two BT-8 walkers lurking in a far corner. Unless the characters were unusually quiet while making their way through the barge, Krell has heard them moving and fighting cultists in other areas. Before the fight begins, he has time to activate his Cosmic Phase ability, while Roil activates sonic fists, jet of flame and darkvision on himself (with 5 tech points left for the battle).
The two BT-8s try to protect Roil initially, but will shift to protecting Krell if he is cornered. One fights from the ground, while the other clings to the ceiling and attacks downward, enabling both Large creatures to remain in the fray.
Ending Hostilities
Krell knows that the Emperor won't stay afloat forever. He can be persuaded to leave with the characters instead of fighting them if someone in the party succeeds on a DC 20 Charisma (Persuasion) check to win the monk's confidence. This check has advantage if a droid character or one with significant cybernetics makes it, or if the players figure out that Krell is actually the BT-16. Once Krell is safe, he slips away to continue his foul designs.
Treasure
All the cultists' ceremonial objects and treasure are stored in a plasteel box along the port wall. The box contains a tech cipher of electromesh (a prototype of Krell's droid mesh), a tech cipher of toxin purge (an electronic 'leeching' device), a heroic booster, an amphibious booster, a B'omarr cloak and 5,269 credits.
11. Galley
The door here is damaged and held shut by rusty metal spikes. It must be forced open with a successful DC 15 Strength (Athletics) check or chopped apart (AC 15, 12 hit points, immunity to psychic and poison damage).
Judging from the stove along one wall of this room, this was once the galley. Now the area is cluttered with bones and debris. Badly damaged metal knives and other cookware hang from hooks in the ceiling, while the choking stench of rotting food fills the air. A stairway leads up near the stern. Tiny micro-droids crawl over everything.
The cultists kept this area free of mesh and used it for food storage. Then, after their supplies ran low, four of them barricaded themselves in this room to seize control of the remaining supplies. In response, the rest of the cultists stormed the area and captured the traitors, freezing them in carbonite and placing their carbonite blocks in area 6.
Cargo Hatch
A rusty hatch in this area leads down into the cargo hold. It can be easily spotted (no check required). The cultists were previously unable to access the cargo hold due to magnetic locks holding the hatch shut from unauthorized intruders. The steady loss of power has since released these locks and the hatch can be easily opened, though the cultists have not had the opportunity to realize this.
12. Cargo Hold
This deck runs the length of the barge and features no bulkheads or walls. Tossed and damaged crates, shipping containers and smaller packages placed here months ago are now strewn about, lining the walls and floor of the cargo hold.
Due to the dislodged cargo, characters moving through spaces occupied by debris treat it as unenhanced difficult terrain.
Of the containers on this deck, only four appear to have remained secured. Each of these contains a Hutt assassin droid, stowed away in the Emperor's hold months ago in an attempt to assassinate Aubreck for turning his back on the Hutt Clans.
If the party tries to open one of these containers, the droids burst out and attack, originally expecting to be unpacked at Aubreck's estate. They also do so if the party finds Aubreck's box, or if they must spend time searching for it (see "Aubreck's Box"). Any character whose passive Perception is 11 or lower is surprised by the droids when they attack.
Treasure
The surface-level cargo contains a few noticable items; a silver bracelet sculpted to look like a twisted tongue (750 credits) and a gem-studded belt (4,000 credits). The crates and boxes are rotted, and the goods in them are worthless — with one exception.
Aubreck's Box
Characters can attempt a DC 15 Wisdom (Perception) check (or spend at least ten minutes searching) to spot a crate marked with a stylized 'Aurek' symbol - its location is marked on the map. Opening it reveals the box inside, untouched and secure.
The blue metal box is made from enhanced materials that are impervious to rust and is effectively indestructable by any means the characters have on-hand. It has no visible lock or latch, and it can't be opened by any normal means. See "Moving Aubreck's Treasure" for details on carrying the box after the elder sarlacc attacks, and for getting the treasure safely off Emperor of the Dunes.
Death of the Emperor
While fleeing their old monastery, the B'omarr cultists accidently flew directly over the feeding grounds of an unmarked elder sarlacc. Seizing the vessel with its tentacles, the sarlacc made short work of the unfortunate crew on the main deck and any others foolish enough to investigate the disturbance. Though the sarlacc damaged the vessel enough to keep it from moving any further, it ended up consuming enough creatures to send itself into a temporary hibernation state, remaining dead to the world while using its newfound nutrients to rejuvinate itself.
Unfortunately for the party, the sarlacc emerges from its stupor just as the danger seems past. Once the party has defeated the assassin droids and located Aubreck's box, the sarlacc begins its attack anew, sensing fresh prey.
The sarlacc represents a real threat to the characters. As the creature attacks, emphasize the chaos that ensues in the barge. Swarms of micro-droids scramble across the walls and decks in a panic, assembling into ever larger masses. The barge creaks and lists more severely as something assaults it from the outside, its plates snapping and sand pouring through the widening cracks in the hull. Within moments, the characters can see the sarlacc's tentacles snaking through breaches in the hull, grasping for anything they can wrap around. From that point on, don't give the players the luxury of pondering their characters' next moves. Push them to make fast decisions and do everything you can to reinforce the idea that they're caught in a panicked flight from a collapsing barge.
Turn-Based Escape
There are a few different ways to run this section, but the basic assumption is that everyone is acting in turns and rounds like a normal battle. You may choose to have each character roll initiative separately, or simply have everyone act in any order of their choosing. If you instead choose to run this as a more narrative escape, keep in mind how the weight of the box and the effects of the sarlacc's attack will influence the party.
Sarlacc Attack
The sarlacc's attack shakes and tilts the barge so violently that moving around the barge becomes difficult. Any surviving creatures panic and seek to escape the barge, attacking the characters if they cross paths. If the characters make it to the upper deck, they must hail the jawas aboard the skiff from Dream of Winter and wait for the barge to reach them.
Movement
Movement is tricky as the barge rocks back and forth. Treat the floor as difficult terrain.
Climbing stairs or a ladder requires a DC 10 Strength (Athletics) check, unless a character has a climbing speed. On a failed check, a character falls prone in the space where the climb began.
Rescue
Once the characters reach area 1 and call for help, the jawas in the skiff try to rescue them. It takes 10 rounds for the skiff to reach the Emperor.
Observant players might realize that the sarlacc is focusing its efforts on the barge. Anyone who leaps overboard or gets into the skiff is safe from the sarlacc, though creatures aboard the barge that see characters jump follow suit and might attempt to swarm the skiff (see "Other Enemies" below).
Thrashing Tentacles
The sarlacc batters the barge, trying to smash holes and tearing away at any creatures it touches. The tentacles strike quickly, spearing through sides of the barge. Only luck can save the characters from being hit by them.
At the start of each character's turn, that player makes a DC 10 Dexterity saving throw. On a failed save, that character takes 7 (2d6) kinetic damage from the tentacles' frantic thrashing.
This effect also applies to the monsters aboard the barge. To keep things simple, rather than roll saving throws for them assume they take 3 (1d6) kinetic damage at the start of their turns.
Attacking the Sarlacc
A character can attempt to drive off the sarlacc by dealing damage to it. A character can use an action to make a ranged attack or melee attack, or to cast a power. Assume that any attack rolls hit but are not critical hits, and disregard any effect of the attack or power for this purpose other than the damage it deals.
If the total damage from all the attacks or spells used on the character's turn is 20 or higher, the sarlacc is momentarily slowed: each character does not need to make saving throws against the thrashing of the tentacles until the end of that character's next turn.
Other Creatures
If the characters left any of the creatures aboard the barge alive, those creatures try to escape the Emperor before it goes under. Krell, Roil and the heretics are intelligent enough to seek safety. They rush to the top deck and try to bait the skiff over; then, once the skiff arrives, they try to seize it and flee.
The insane heretics in area 6 break free on round 2 and rush to the upper deck. They attack other creatures indiscriminately, too maddened to think clearly. Each one assaults the closest creature that is not one of them.
The BT droids and micro-droid swarms aboard ship flee to the upper decks, reaching area 1 by round 3. They attack the characters on sight and fight to the death.
Shifting Sands
The awakening of the sarlacc has caused significant displacement of the sand in the area around the barge. The sand becomes difficult terrain, and begins drifting toward the open mouth of the sarlacc.
If a creature starts their turn on the sand during the sarlacc's attack, they must succeed on a DC 15 Strength saving throw or be pulled 15 feet toward the sarlacc - objects fail this save automatically. Any creature that falls into the sarlacc's mouth during this escape is killed instantly.
Moving Aubreck's Treasure
The metal treasure box is bulky and hard to handle. Once the elder sarlacc attacks, and the barge is pitching and breaking, the box becomes difficult to move.
One or two characters can try to carry the box. A character can use an action to pick up the box or pass it to someone else with a successful DC 12 Strength (Athletics) check. On a failed check, the character drops the box.
How fast someone moves with the box is based on their Strength score, as shown on the table below.
If two characters carry the box, the total of their Strength scores determines how fast they can move.
| Strength (Total) | Speed Penalty |
|---|---|
| 18 or higher | −10 ft. |
| 12 to 17 | −20 ft. |
| 8 to 11 | −30 ft. |
| 7 or lower | Cannot move the box |
The character with the higher initiative does not move on their turn and uses an action to assist the other carrier. On the second character's turn, both characters can move the box a distance equal to the lower of their two speeds.
If the two carriers are ever separated by more than 5 feet, or if one or both are knocked prone, both of them drop the box. The size of the box prevents more than two characters from trying to carry it at the same time.
Sequence of Events
Following is a round-by-round summary of how events progress as the sarlacc brings down the barge.
Round 1
The sarlacc begins its attack, wrapping itself around the barge and flailing away at the creatures inside with its tentacles, as described above in "Thrashing Tentacles."
Round 2
The sarlacc's weight and writing tentacles cause the barge to list 30 degrees to port. At the start of this round, every character must make a DC 10 Dexterity saving throw, falling prone and sliding 10 feet toward the port side on a failed save. Creatures climbing on the walls or ceiling do not need to make this saving throw.
From this time on, a character who falls prone slides 10 feet toward the port side.
Round 3
As the sarlacc crushes the barge, the floor in area 12 cracks open, revealing the sarlacc's gaping maw. Creatures found in areas 4 through 11 have fled to area 1 by this time, unless stopped by the characters. If engaged in combat, they attempt to disengage and flee.
Creatures in area 1 attempt to avoid being knocked overboard. In their frenzy, they attack any characters who emerge from below. If Krell is present, he spots the skiff heading for the barge and attempts to seize it once it arrives. He tries to hide himself near the barge's edge, then emerge to ambush the jawas aboard it.
Round 4
Even if the characters have not yet signaled for the skiff to pick them up, the jawas start moving toward the barge to stage a rescue. The skiff approaches on the starboard side of the barge, hoping to avoid any creatures that have gathered in area 1.
Rounds 5 through 13
Areas 4 through 11 start falling apart as the barge begins to be torn asunder by the sarlacc's tentacles. The tilted deck keeps the starboard edge 10 feet above the port edge.
Round 14
If the skiff began its approach on round 4, it arrives at the start of this round. If Krell is present, as detailed above, he attempts to launch his ambush at this point.
Rounds 15 through 19
At the start of round 15, the barge rolls over on its port side. Everyone in area 1 is thrown onto the sand, 2d20 feet in a random direction away from the capsized hull. The skiff moves 20 feet away from the hull in a bid to avoid any creatures. Any creature that ends up on the sand within 20 feet of the skiff tries to move toward it and board, attacking anyone who offers resistance.
Round 20
At the start of round 20, the barge breaks apart completely, torn in half by the sarlacc's attack. Anyone within 60 feet of the sarlacc should move away as quickly as they can, lest the creature decide a new target is in order.
Getting Off the Emperor
Once the skiff reaches Emperor of the Dunes on round 14 (or perhaps sooner), the blue metal box can be handed down from the deck of the Emperor into the skiff as an action. The skiff remains in place long enough for the box to be offloaded and for the characters to clamber aboard. Because the sarlacc focuses on Emperor of the Dunes, the skiff is not in imminent danger from the creature.
A lone character trying to move on the sand (see 'Shifting Sands') with the treasure box must succeed on a DC 20 Strength (Athletics) check at the start of their turn or be pulled 20 feet toward the sarlacc. Two characters working together to move and support the box take their turns simultaneously on the lower of their two initiative rolls. One character must succeed on a DC 15 Strength (Athletics) check at the start of the shared turn while the other character uses the Help action, or both characters are pulled back 20 feet. The two characters must remain within 5 feet of each other, or both of them drop the box.
If the box is dropped on the sand, it is pulled back 30 feet per round, which should quickly put it beyond the reach of most characters. If the box falls into the sarlacc's mouth, it will be impossible to recover by any of the character's available means.
Conclusion
If the characters return Aubreck's box to him, the Hutt is overjoyed. By redeeming the deeds and notes, he can reestablish himself in his city. He pays the characters the promised fee (or other incentives) and gladly replaces any mundane items they lost in the adventure.
In point of fact, the box is not impenetrable, but it is sealed with extremely powerful enhancements, requiring a successful DC 30 check to overcome with dispel tech. It can also be opened by speaking the password "Tildivarias," the name of Aubreck's massiff beast from his childhood. (Aubreck does not share this information with anyone.)
Aubreck could become a well-connected ally, and a continuing source of adventure for the party, if his fortune is restored — that is, if he doesn't become too greedy and eventually betray the characters.
Appendix A: Enhanced Items
A collection of enhanced items found across the adventure.
Power Cipher
Cipher, varies
A power cipher is an item that contains the machinations of a single power, imbued by the Force or built of technology. If your class is able to learn this power, you can activate the cipher and cast its power. Otherwise, the cipher is unusable. Casting the power by activating the cipher requires the power’s normal casting time.
If your class is able to learn the power but at a higher level than you can normally cast, you must make an ability check using your powercasting ability to determine whether you cast it successfully. The DC equals 10 + the power's level. On a failed check, the cipher is rendered permanently unusable with no other effect.
Once the power is cast, it is spent from the cipher, and the cipher itself disintegrates.
The level of the power in the cipher determines the power's saving throw DC and attack bonus, as well as the cipher's rarity, as shown in the Power Cipher table.
Power Cipher
| Power Level | Rarity | Save DC | Attack Bonus |
|---|---|---|---|
| At-will | Standard | 13 | +5 |
| 1st | Standard | 13 | +5 |
| 2nd | Premium | 13 | +5 |
| 3rd | Premium | 15 | +7 |
| 4th | Prototype | 15 | +7 |
| 5th | Prototype | 17 | +9 |
| 6th | Advanced | 17 | +9 |
| 7th | Advanced | 18 | +10 |
| 8th | Advanced | 18 | +10 |
| 9th | Legendary | 19 | +11 |
A cipher can take many forms. For a tech power such as explosion, a tech cipher containing it could be a simple grenade, or a small, one-use rocket launcher. Just as there are many ways to describe the form a tech power takes, there are just as many ways to describe their ciphers. A force cipher is likely more complicated to describe, but some options include it being an ancient scroll, a strange holocron, a Sith amulet, a brittle kyber crystal (unsuited for a lightsaber) that releases a stored power when crushed, and so on.
Found In: Area 10
Use of Ciphers in the Adventure
The 'Power Cipher' enhanced item is the creation of Aziz, intended as a SW5e replacement for spell scrolls. Make sure your players understand that these items are spell scrolls in all but name, and that the equipment used for them should not be used in ways other than recreating the original power's effects.
Heroic Booster
Consumable, prototype
For 1 hour after applying this booster, you gain 10 temporary hit points that last for 1 hour. For the same duration, you are under the effect of the stack the deck tech power (no concentration required).
Found In: Area 10
Amphibious Booster
Consumable, premium
You can breathe underwater for 1 hour after applying this booster.
Found In: Area 10
B'omarr Cloak
Adventuring gear, premium
Requires attunement
This protective cloak incorporates traditional B'omarr iconography onto its surface. You gain a +1 bonus to AC and saving throws while you wear this cloak.
Found In: Area 10
Appendix B: Creature Statistics
These creatures are sorted by their appearance within the adventure. Many are taken wholesale from the Scum and Villainy document, while others have been updated to reflect the abilities of creatures in the original adventure.
Aubreck Drallion / Aubreck the Hutt
A Hutt of distinction, Aubreck strives to shake off the stigma of greed and tyranny associated with his kind. Even so, he is not so foolish as to expect other Hutts not to attack him, and keeps himself appropriately equipped at all times.
Aubreck The Hutt
Large humanoid (hutt), lawful balanced
- Armor Class 14 (natural armor + survival instinct)
- Hit Points 136 (16d10 + 48)
- Speed 20 ft.
STR DEX CON INT WIS CHA 14 (+2) 8 (-1) 16 (+3) 18 (+4) 14 (+2) 18 (+4)
- Saving Throws Con +7, Int +8, Cha +8
- Skills Deception +8, Insight +6, Intimidation +8, Perception +6, Persuasion +8
- Damage Resistances poison
- Condition Immunities charmed, poisoned, prone
- Senses passive Perception 16
- Languages Basic, Huttese
- Challenge 9 (5,000 XP) Proficiency Bonus: +4
Dominating Presence (1/Day). As a bonus action on its turn, the hutt can attempt to exert control over a creature that is charmed by it or frightened of it. The target must succeed on a DC 16 Wisdom saving throw. On a failed save, on each turn the creature takes only actions the hutt chooses. If it doesn't receive any orders, it takes no actions. This effect lasts until the end of the hutt's next turn.
Force Resistance. The hutt has advantage on saving throws against force powers.
Innate Techcasting. The hutt’s innate techcasting ability is Intelligence (tech save DC 16, +8 to hit with tech powers). It can innately cast the following tech powers:
At will: assess the situation
3/day each: absorb energy, element of surprise, fabricate trap, oil slick, smuggle, spot the weakness, stack the deck, tactical barrier
1/day each: kolto cloud, tactical advantageLegendary Resistance (3/Day). When the hutt fails a saving throw, it can choose to succeed instead.
Reassemble (1/Day). The hutt can use a bonus action to call its allies towards it. It chooses up to 4 creatures that it can see within 60 feet of it. Each creature can use its reaction to immediately move directly towards the hutt, up to its movement speed. This movement does not provoke opportunity attacks.
Survival Instinct. The hutt and all allies within 10 feet of it gain a bonus to AC equal to half the hutt's Intelligence modifier (included).
Tyrant's Ferocity. The hutt has advantage on any attack roll against a creature that is charmed by it or frightened of it.
Actions
Multiattack. The hutt makes two slam attacks or two hold-out blaster attacks.
Slam. Melee Weapon Attack: +6 to hit, reach 5 ft., one target. Hit: 6 (1d8 + 2) kinetic damage, and the target must succeed on a DC 14 Dexterity saving throw or become grappled.
Tail. Melee Weapon Attack: +6 to hit, reach 10 ft., one target. Hit: 11 (2d8 + 2) kinetic damage, and the target is knocked prone.
Hold-Out Blaster. Ranged Weapon Attack: +3 to hit, range 30/120 ft., one target. Hit: 1 (1d4 - 1) energy damage.
Reactions
Call the Guards. When a creature the hutt can see targets it with an attack, it can command a willing ally within 5 feet of the creature to use its reaction to intercede. The ally becomes the target instead, and if the attack misses, the ally can immediately make a weapon attack with advantage against the creature as part of the same reaction.
Legendary Actions
The hutt can take 3 legendary actions, choosing from the options below. Only one legendary action option can be used at a time and only at the end of another creature's turn. The hutt regains spent legendary actions at the start of its turn.
Attack. The hutt makes one weapon attack.
Overwhelming Presence. The hutt can make a Charisma (Persuasion) or Charisma (Intimidation) skill check to attempt to charm or frighten a humanoid creature that can see or hear it within 60 feet. The target makes a contested Wisdom (Insight) check. If the hutt's check succeeds, the target is charmed by it if it used Persuasion, or frightened of it if it used Intimidation, until the end of its next turn.
Techcasting (Costs 2 Actions). The hutt casts a tech power.
Appears in: Scavengers Wanted
Vertheg
A dedicated servant of Aubreck, Vertheg's thuggish appearance conceals a sharp mind and broad skillset. This makes him ideal for the few law-skirting activities Aubreck is forced to undertake from time to time.
Vertheg
Medium humanoid (klatooinian), lawful balanced
- Armor Class 12
- Hit Points 27 (6d8)
- Speed 30 ft.
STR DEX CON INT WIS CHA 10 (+0) 14 (+2) 10 (+0) 12 (+1) 14 (+2) 16 (+3)
- Skills Deception +5, Insight +4, Investigation +5, Perception +6, Persuasion +5, Sleight of Hand +4, Stealth +4
- Senses passive Perception 16
- Languages Basic, any one other language
- Challenge 2 (450 XP) Proficiency Bonus: +2
Cunning Action. On each of its turns, the spy can use a bonus action to take the Dash, Disengage, or Hide action.
Sneak Attack. Once per turn, the spy can deal an extra 7 (2d6) damage to a creature it hits with a weapon attack if that creature is within 5 feet of an ally of the spy that isn’t incapacitated.
Actions
Multiattack. The spy makes two weapon attacks.
Techblade. Melee Weapon Attack: +4 to hit, reach 5 ft., one target. Hit: 5 (1d6 + 2) kinetic damage.
Hold-Out. Ranged Weapon Attack: +4 to hit, range 30/120 ft., one target. Hit: 4 (1d4 + 2) energy damage.
Appears in: Scavengers Wanted
Wolka Windune
Clan chieftain and captain of the Dream of Winter, Wolka works to ensure the safety and prosperity of his clan above all else.
Wolka Windune
Small humanoid (jawa), chaotic balanced
- Armor Class 17 (fiber armor and medium shield)
- Hit Points 82 (15d6 + 30)
- Speed 30 ft.
STR DEX CON INT WIS CHA 10 (+0) 16 (+3) 14 (+2) 10 (+0) 12 (+1) 14 (+2)
- Saving Throws Dex +5, Cha +4
- Skills Intimidation +6, Stealth +5
- Condition Immunities charmed, frightened
- Senses darkvision 60 ft., passive Perception 11
- Languages Jawaese, understands Basic but can't speak it
- Challenge 4 (1,100 XP) Proficiency Bonus: +2
Actions
Multiattack. The chieftain makes two weapon attacks.
Techblade. Melee Weapon Attack: +6 to hit, reach 5 ft., one target. Hit: 6 (1d6 + 3) kinetic damage plus 10 (3d6) lightning damage. The target must make a successful DC 12 Constitution saving throw or be shocked for 1 minute. A shocked creature repeats the saving throw at the end of each of its turns, ending the effect on a success.
Ion Rifle. Ranged Weapon Attack: +6 to hit, range 100/400 ft., one target. Hit: 5 (1d4 + 3) ion damage plus 10 (3d6) lightning damage. The target must make a successful DC 12 Constitution saving throw or be shocked for 1 minute. A shocked creature repeats the saving throw at the end of each of its turns, ending the effect on a success.
Inspiring Presence (1/Rest). The chieftain chooses up to six allied jawa it can see within 30 feet. For the next minute, the jawa gain immunity to the charmed and frightened conditions, and add the chieftain's Charisma bonus to attack rolls.
Reactions
Springspike Shield (5/Day). When the chieftain is hit by a melee attack within 5 feet, the chieftain can fire one of its shield spikes at the attacker. The attacker takes 3 (1d6) kinetic damage plus 3 (1d6) poison damage.
Appears in: Scavengers Wanted, Emperor of the Dunes
Jawa Squadwa
When properly equipped and ready to fight, a jawa clan can be a most formidable force to the unexpecting.
Jawa Squadwa
Huge squad of small humanoids (jawa), chaotic balanced
- Armor Class 13 (natural armor)
- Hit Points 142 (19d12 + 19)
- Speed 30 ft.
STR DEX CON INT WIS CHA 8 (-1) 14 (+2) 12 (+1) 12 (+1) 10 (+0) 8 (-1)
- Saving Throws Dex +5, Int +4
- Skills Stealth +5
- Damage Immunities poison
- Condition Immunities charmed, grappled, paralyzed, petrified, prone, restrained, stunned
- Senses darkvision 60 ft., passive Perception 10
- Languages Jawaese, understands Basic but can't speak it
- Challenge 5 (1,800 XP) Proficiency Bonus: +3
Nimble Escape. The jawa can take the Disengage or Hide action as a bonus action on each of its turns.
Squad. The squad can occupy another creature's space and vice versa, and can move through openings large enough for a Small humanoid. The squad is immune to any power or effect that would alter its form.
Actions
Multiattack. The squad makes four ion pistol attacks, or two ion pistol attacks if it has half its hit points or fewer.
Ion Pistol. Ranged Weapon Attack: +5 to hit, range 40/160 ft., one target. Hit: 4 (1d3 + 2) ion damage.
Massed Fire. The squad fires en masse at a point within 150 feet. Each creature of the squad's choice in a 10-foot radius sphere centered on that point must make a DC 13 Dexterity saving throw. On a failed save, a creature takes 16 (8d3) ion damage, or 8 (4d3) ion damage if the squad has half its hit points or fewer. On a successful save, it takes half as much damage.
Ion Grenade (3/Day). The squad throws a grenade at a point it can see within 20 feet. Each creature within 10 feet must make a DC 12 Dexterity saving throw. A creature takes 7 (2d6) ion damage on a failed save, or half as much as on a successful one. Any electronics within the blast radius are disabled until rebooted.
Appears in: Salvagers Wanted
Tusken Raider
Fierce in temperament and even fiercer in combat, tusken raiders are the bane of any who dare to cross the desert sands of Tatooine without their leave.
Tusken Raider
Medium humanoid (tusken), chaotic dark
- Armor Class 12 (combat suit)
- Hit Points 15 (2d8 + 6)
- Speed 30 ft.
STR DEX CON INT WIS CHA 14 (+2) 12 (+1) 16 (+3) 10 (+0) 10 (+0) 8 (-1)
- Skills Animal Handling +2, Survival +2
- Senses passive Perception 10
- Languages Tusken
- Challenge 1/2 (100 XP) Proficiency Bonus: +2
Aggressive. As a bonus action, the tusken can move up to its speed toward a hostile creature that it can see.
Actions
Gaffi Stick. Melee Weapon Attack: +4 to hit, reach 5 ft., one target. Hit: 7 (2d4 + 2) kinetic damage. This attack has the dire 1 and piercing 1 properties.
Cycler Rifle. Ranged Weapon Attack: +3 to hit, range 150/600 ft., one target. Hit: 5 (1d8 + 1) kinetic damage.
Appears in: Salvagers Wanted
Tusken Shaman
Spiritual leaders of the tusken people, shamans keep the traditions and lessons of their ancestors alive by passing it onto their clanspeople. In battle, they call upon these ideals to heal their allies and blind their foes.
Tusken Shaman
Medium humanoid (tusken), chaotic dark
- Armor Class 15 (mesh armor)
- Hit Points 82 (11d8 + 33)
- Speed 30 ft.
STR DEX CON INT WIS CHA 14 (+2) 14 (+2) 16 (+3) 12 (+1) 18 (+4) 12 (+1)
- Saving Throws Con +5, Wis +6
- Skills Animal Handling +6, Perception +6, Survival +6
- Senses passive Perception 16
- Languages Tusken
- Challenge 3 (700 XP) Proficiency Bonus: +2
Aggressive. As a bonus action, the tusken can move up to its speed toward a hostile creature that it can see.
Disruptive. When a creature is forced to make a Constitution saving throw to maintain concentration due to taking damage from the tusken, the DC for the check equals 10 or the full damage taken, whichever number is higher, instead of only half.
Field Surgeon (3/Day). When the tusken attacks a creature with a weapon attack, it can roll a d4 and add the number rolled to the attack roll. On a hit, the target takes additional damage equal to the roll. Hit or miss, the tusken can choose either itself or an ally within 15 feet of it that it can see. The creature regains hit points equal to 1 + the number rolled, and temporary hit points equal to 1 + the number rolled.
Actions
Multiattack. The tusken makes two weapon attacks.
Gaffi Stick. Melee Weapon Attack: +4 to hit, reach 5 ft., one target. Hit: 7 (2d4 + 2) kinetic damage. This attack has the dire 1 and piercing 1 properties.
Cycler Rifle. Ranged Weapon Attack: +4 to hit, range 150/600 ft., one target. Hit: 6 (1d8 + 2) kinetic damage.
Scouring Sands (Recharge 5-6). The tusken generates a blast of hot wind in a 30-foot line or a 15-foot cone. Creatures inside it take 14 (4d6) kinetic damage plus 7 (2d6) fire damage and are blinded for 1 minute; a successful DC 14 Constitution saving throw halves the damage and negates the blindness. A blinded creature repeats the saving throw at the end of each of its turns, ending the effect on itself on a success. The affected area (line or cone) is heavily obscured until the end of the tusken's next turn.
Appears in: Salvagers Wanted
Tusken Chieftain
Battle leaders of the tusken people, chieftains lead their warriors on raids and scout out new lands. Usually the strongest warriors of their clan, they also demonstrate leadership that rouses their soldiers to vistory.
Tusken Chieftain
Medium humanoid (tusken), chaotic dark
- Armor Class 16 (battle armor)
- Hit Points 93 (11d8 + 44)
- Speed 30 ft.
STR DEX CON INT WIS CHA 18 (+4) 12 (+1) 18 (+4) 10 (+0) 12 (+1) 12 (+1)
- Saving Throws Str +6, Con +6, Wis +3
- Skills Animal Handling +3, Intimidation +3, Perception +3, Survival +3
- Senses passive Perception 11
- Languages Tusken
- Challenge 4 (1,100 XP) Proficiency Bonus: +2
Aggressive. As a bonus action, the tusken can move up to its speed toward a hostile creature that it can see.
Actions
Multiattack. The tusken makes two gaffi stick attacks.
Gaffi Stick. Melee Weapon Attack: +6 to hit, reach 5 ft., one target. Hit: 9 (2d4 + 4) kinetic damage. This attack has the dire 1 and piercing 1 properties.
Cycler Rifle. Ranged Weapon Attack: +3 to hit, range 150/600 ft., one target. Hit: 5 (1d8 + 1) kinetic damage.
Battle Cry (1/Day). Each creature of the chieftain's choice that is within 30 feet of it, can hear it, and isn't already affected by Battle Cry gains advantage on all attack rolls until the start of the chieftain's next turn. The chieftain can then make one attack as a bonus action.
Appears in: Salvagers Wanted
BT-8 Walker
These heretical parodies of the B'omarr BT-16 brain walker have had their brain jars and blasters replaced with mechanical injectors, with various other enhancements to mimic the spiders on which they are based.
BT-8 Walker
Large droid (class IV), unaligned
- Armor Class 14 (natural armor)
- Hit Points 30 (4d10 + 8)
- Speed 30 ft., climb 30 ft.
STR DEX CON INT WIS CHA 2 (-4) 10 (+0) 14 (+2) 16 (+3) 12 (+1) 7 (-2)
- Skills Stealth +2
- Damage Vulnerabilities ion
- Damage Resistances necrotic, poison, psychic
- Condition Immunities diseased, poisoned
- Senses blindsight 30 ft., tremorsense 30 ft., passive Perception 13
- Languages Binary, understands Basic but cannot speak it
- Challenge 1 (200 XP) Proficiency Bonus: +2
Circuitry. The walker has disadvantage on saving throws against effects that would deal ion or lightning damage.
Targeting Systems. The walker uses its Intelligence modifier for attack, damage, and initiative rolls.
Spider Climb. The walker can climb difficult surfaces, including upside down on ceilings, without needing to make an ability check. It also ignores movement restrictions caused by mesh or webbing and can pinpoint the exact location of any creature touching the same mesh or webbing as them.
Actions
Injection. Melee Weapon Attack: +5 to hit, reach 5 ft., one target. Hit: 7 (1d8 + 3) kinetic damage, and the target must make a DC 11 Constitution saving throw, taking 9 (2d8) poison damage on a failed save, or half as much damage on a successful one. If the poison damage reduces the target to 0 hit points, the target is stable but poisoned for 1 hour, even after regaining hit points, and is paralyzed while poisoned in this way.
Mesh Launcher (Recharge 5–6). Ranged Weapon Attack: +5 to hit, range 30/60 ft., one creature. Hit: The target is restrained by mesh. As an action, the restrained target can make a DC 12 Strength check, bursting the mesh on a success. The webbing can also be attacked and destroyed (AC 10; 5 hit points; vulnerability to fire damage; immunity to ion, poison and psychic damage).
B'omarr Heretic
Cyborg cultists ruled over by their monk masters, these heretics have undergone significant modifications to bring themselves closer to the image of their masters.
B'omarr Heretic
Medium humanoid (any race), chaotic dark
- Armor Class 13 (natural armor)
- Hit Points 44 (8d8 + 8)
- Speed 30 ft., climb 30 ft.
STR DEX CON INT WIS CHA 14 (+2) 15 (+2) 13 (+1) 11 (+0) 12 (+1) 8 (-1)
- Damage Vulnerabilities ion
- Damage Resistances poison
- Condition Immunities poisoned
- Senses passive Perception 13
- Languages Basic, Binary
- Challenge 2 (450 XP) Proficiency Bonus: +2
Circuitry. The heretic has disadvantage on saving throws against effects that would deal ion or lightning damage.
Spider Climb. The heretic can climb difficult surfaces, including upside down on ceilings, without needing to make an ability check. It also ignores movement restrictions caused by mesh or webbing and can pinpoint the exact location of any creature touching the same mesh or webbing as them.
Actions
Multiattack. The heretic makes two attacks: one with its injection and one with its vibroblade.
Injection. Melee Weapon Attack: +4 to hit, reach 5 ft., one target. Hit: 6 (1d8 + 2) kinetic damage, and the target must make a DC 11 Constitution saving throw or be poisoned for 1 minute. The creature can repeat the saving throw at the end of each of its turns, ending the effect on itself on a success.
Vibroblade. Melee Weapon Attack: +4 to hit, reach 5 ft., one target. Hit: 6 (1d8 + 2) kinetic damage.
Mesh Launcher (Recharge 5–6). Ranged Weapon Attack: +5 to hit, range 30/60 ft., one creature. Hit: The target is restrained by mesh. As an action, the restrained target can make a DC 12 Strength check, bursting the mesh on a success. The webbing can also be attacked and destroyed (AC 10; 5 hit points; vulnerability to fire damage; immunity to ion, poison and psychic damage).
Swarm of Micro-Droids
Built using naught but scrap and rudimentary AI, these micro-droids are most deadly when directed as a swarm toward enemies of the cult.
Swarm of Micro-Droids
Medium swarm of tiny droids, unaligned
- Armor Class 12 (natural armor)
- Hit Points 22 (5d8)
- Speed 20 ft., climb 20 ft.
STR DEX CON INT WIS CHA 3 (-4) 13 (+1) 10 (+0) 1 (-5) 7 (-2) 1 (-5)
- Damage Resistances energy, ion, kinetic
- Condition Immunities charmed, diseased, grappled, paralyzed, petrified, poisoned, prone, restrained, stunned
- Senses blindsight 10 ft., passive Perception 8
- Languages -
- Challenge 1/2 (100 XP) Proficiency Bonus: +2
Squad. The swarm can occupy another creature's space and vice versa, and can move through openings large enough for a tiny droid. The swarm cannot regain hit points or gain temporary hit points. The swarm is immune to any power or effect that would alter its form.
Actions
Stab. Melee Weapon Attack: +3 to hit, reach 0 ft., one target in the swarm's space. Hit: 10 (4d4) kinetic damage, or 5 (2d4) kinetic damage if the swarm has half of its hit points or fewer.
BT-4 Walker
Smaller prototypes of the BT-8 Walker, these designs are nonetheless prized for their speed and power.
BT-4 Walker
Medium droid (class IV), unaligned
- Armor Class 13 (natural armor)
- Hit Points 11 (2d8 + 2)
- Speed 40 ft., climb 40 ft.
STR DEX CON INT WIS CHA 2 (-4) 10 (+0) 14 (+2) 12 (+1) 12 (+1) 4 (-3)
- Skills Perception +3, Stealth +2
- Damage Vulnerabilities ion
- Damage Resistances necrotic, poison, psychic
- Condition Immunities poisoned
- Senses blindsight 10 ft., tremorsense 10 ft., passive Perception 13
- Languages Binary, understands Basic but cannot speak it
- Challenge 1/4 (50 XP) Proficiency Bonus: +2
Circuitry. The walker has disadvantage on saving throws against effects that would deal ion or lightning damage.
Targeting Systems. The walker uses its Intelligence modifier for attack, damage, and initiative rolls.
Spider Climb. The walker can climb difficult surfaces, including upside down on ceilings, without needing to make an ability check. It also ignores movement restrictions caused by mesh or webbing and can pinpoint the exact location of any creature touching the same mesh or webbing as them.
Actions
Injection. Melee Weapon Attack: +3 to hit, reach 5 ft., one target. Hit: 4 (1d6 + 1) kinetic damage, and the target must make a DC 11 Constitution saving throw, taking 7 (2d6) poison damage on a failed save, or half as much damage on a successful one. If the poison damage reduces the target to 0 hit points, the target is stable but poisoned for 1 hour, even after regaining hit points, and is paralyzed while poisoned in this way.
Appears in: Area 5
Krell Grohlg
The heretical B'omarr monk known as Krell Grohlg considers himself an exemplar of his order's teachings. Once apprenticed to the cult's founder Lo'lith, he works to perfect the designs of the BT-16 Walker and apply its visage as far across the galaxy as possible. In addition to his walker's capabilities, his monastic training has provided him with a unique and deadly phasing ability.
Krell Grohlg
Medium droid (class IV), chaotic dark
- Armor Class 14 (natural armor)
- Hit Points 52 (8d8 + 16)
- Speed 30 ft.
STR DEX CON INT WIS CHA 2 (-4) 10 (+0) 14 (+2) 16 (+3) 12 (+1) 16 (+3)
- Saving Throws Int +5, Wis +3, Cha +5
- Skills Deception +5, Lore +5, Perception +3, Persuasion +5
- Damage Vulnerabilities ion
- Damage Resistances necrotic, poison, psychic
- Condition Immunities charmed, diseased, frightened, paralyzed, poisoned
- Senses blindsight 60 ft., tremorsense 60 ft., passive Perception 13
- Languages Basic, Binary, Huttese
- Challenge 3 (700 XP) Proficiency Bonus: +2
Targeting Systems. The brain walker uses its Intelligence modifier for attack, damage, and initiative rolls.
Actions
Multiattack. The brain walker makes two repeating blaster cannon attacks and uses its Mind Thrust.
Repeating Blaster Cannon. Ranged Weapon Attack: +5 to hit, range 60/240 ft., one target. Hit: 10 (2d6 + 3) energy damage.
Mind Thrust. One creature within 60 feet of the brain walker must make a DC 13 Wisdom saving throw, taking 14 (4d6) psychic damage on a failed save, or half as much on a successful one.
Bonus Actions
Cosmic Phase (1/Day). For one minute, the brain walker psychically phases itself into a different layer of existence through the Force. As a bonus action on its following turns, it can change between being phased and unphased. While phased, the brain walker is unable to interact with anything physical while phased or vice versa, but it can view the physical world in a 30-foot radius around itself using its normal senses and move up to its movement speed in any direction without falling. If it is phased at the end of this minute, it returns to the physical world at the start of its turn.
Appears in: Area 10
Roil
A curious being amongst the cultists, the Gamorrean named Roil has not been subjected to the same modifications as his brethren, owing to a unique biological incompatibility with most cybernetics. Nonetheless devoted to the cause, however, Roil acts as the personal bodyguard of Krell Grohlg and has developed a knack for techcasting to better serve his master.
Roil
Medium humanoid (gamorrean), lawful dark
- Armor Class 16 (battle armor)
- Hit Points 60 (11d8 + 11)
- Speed 30 ft.
STR DEX CON INT WIS CHA 18 (+4) 12 (+1) 13 (+1) 15 (+2) 12 (+1) 11 (+0)
- Skills Intimidation +2, Medicine +3, Technology +4, Perception +3
- Senses darkvision 60 ft. (tech power), passive Perception 9
- Languages Basic, Binary, Gamorrean
- Challenge 2 (450 XP), PB +2
Techcasting. The gamorrean is a 4th-level techcaster. His techcasting ability is Intelligence (tech save DC 12, +4 to hit with tech attacks). He has 10 tech points and knows the following tech powers:
At-will: jet of flame, mending, venomous strike
1st-level: overload, prepardness, sonic fists, translation program
2nd-level: darkvision, overheatActions
Sonic Fists (Tech Power). Melee Weapon Attack: +6 to hit, reach 5 ft., one target. Hit: 9 (1d10 + 4) sonic damage and if the target is Large or smaller, the gamorrean can choose to push it 5 feet away from him.
Jet of Flame (Tech Power). Ranged Tech Attack: +4 to hit, range 30 ft., one target. Hit: 4 (1d8) fire damage.
Unarmed Strike. Melee Weapon Attack: +6 to hit, reach 5 ft., one target. Hit 6 (1d4+4) kinetic damage.
Appears in: Area 10
Hutt Assassin Droid
These reprogrammed war droids serve the interests of the Hutt Cartel, specializing in infiltration and assassination. Intended to be disposable, they fight until themselves or their target have fallen, and have no qualms about who dies in pursuit of that goal.
Hutt Assassin Droid
Medium droid (class IV), unaligned
- Armor Class 15 (natural armor)
- Hit Points 49 (9d8 + 9)
- Speed 30 ft.
STR DEX CON INT WIS CHA 12 (+1) 16 (+3) 12 (+1) 14 (+2) 12 (+1) 6 (-2)
- Skills Perception +3, Stealth +5
- Damage Vulnerabilities ion
- Damage Resistances necrotic, poison, psychic
- Condition Immunities diseased, poisoned
- Senses darkvision 60 ft., passive Perception 13
- Languages Basic, Binary, Huttese
- Challenge 2 (450 XP) Proficiency Bonus: +2
Circuitry. The assassin droid has disadvantage on saving throws against effects that would deal ion or lightning damage.
Droid Synergy. Once per turn, the assassin droid can deal an extra 3 (1d6) damage to a creature it hits with a weapon attack if that creature is within 5 feet of an ally of the battle droid that isn’t incapacitated.
Actions
Techblade. Melee Weapon Attack: +5 to hit, reach 5 ft., one target. Hit: 6 (1d6 + 3) kinetic damage.
Blaster Carbine. Ranged Weapon Attack: +5 to hit, range 60/240 ft., one target. Hit: 6 (1d6 + 3) energy damage.
Stealth Field Generator. The assassin droid becomes invisible. Anything the assassin droid is carrying is invisible as long as it is on the assassin droid. The assassin droid may end the invisibility as a free action. The invisibility ends if the assassin droid attacks.
Appears in: Area 12
Bonus: E-WEB Heavy Repeating Blaster
Though this turret does not directly appear in this adventure, its capabilities are outlined here for the purposes of characters who want to identify the turret that once sat on the gun carriage in Area 1. This can also be optionally provided as part of the optional Sister Ship reward outlined in 'Salvagers Wanted', or to be used by the Jawas of Dream of Winter while defending their prized barge from borders. For this purpose, a token for it has been included with the Cargo Barge maps in Appendix C.
E-WEB Heavy Repeating Blaster
Medium construct, unaligned
- Armor Class 10 (natural armor)
- Hit Points 36 (8d8)
- Speed 0 ft.
STR DEX CON INT WIS CHA 16 (+3) 10 (+0) 10 (+0) 14 (+2) 10 (+0) 4 (-3)
- Skills Perception +3
- Damage Vulnerabilities ion
- Damage Resistances necrotic, poison, psychic
- Condition Immunities diseased, poisoned
- Senses darkvision 60 ft., passive Perception 13
- Challenge 5 (1,800 XP) Proficiency Bonus: +3
Circuitry. The construct has disadvantage on saving throws against effects that would deal ion or lightning damage.
Engineer Operated. The construct is fully operational only with an engineer. If the engineer takes the Regulate action, the gunner may take the Saturate action. Otherwise, the only action the gunner may take is the Burst Fire action.
Explosive Destruction. When the construct is reduced to zero hit points, it explodes. Each creature within 20 feet of it must make a DC 13 Dexterity saving throw, taking 21 (6d6) fire damage on a failed save, or half as much on a successful one.
Gunner. The construct requires an active gunner to take any actions, and if the gunner is subjected to any conditions that the construct is not immune to, the gunner is also subjected to those conditions. The gunner may take their own action or one of the actions granted by the construct.
Targeting Systems. The construct uses its Intelligence modifier for attack, damage, and initiative rolls.
Actions
Engineer. The engineer may use its Regulate action.
Regulate. The engineer actively monitors and controls the energy regulation and cooling systems, allowing enhanced performance. The gunner may spend its action to take the Saturate action.
Gunner. The gunner makes two burst fire attacks. If an engineer takes the Regulate action, the gunner may take the Saturate action.
Burst Fire. The construct sprays a 10-foot-cube area within 200 feet with shots. Each creature in the area must make a DC 13 Dexterity saving throw, taking 15 (2d12 + 2) energy damage on a failure, or half as much on a success.
Saturate. This action may only be taken on a round in which the Regulate action has been taken on this construct. The construct thoroughly saturates a 15-foot-cube within 200 feet with shots. Any creature who enters the saturated area or begins its turn in the area must make a DC 13 Dexterity saving throw. On a failure, the target takes 28 (4d12 + 2) energy damage and is restrained until the start of their next turn. On a success, the target takes half damage and must succeed on a DC 13 Wisdom saving throw or become frightened until the start of their next turn.
Appendix C: Miscellaneous
Additional details that cannot be fit into the adventure itself can be found here, including adaptations of existing 5e rules and optional content for the adventure.
Object Hit Points and Armor Classes
While the D&D 5e Dungeon Master's Guide provides expected armor classes for most materials, many locations in the Star Wars universe, even ancient strongholds, are liable to make use of more advanced compound materials than simple iron or wood. This is particularly important to consider with the addition of the Shatterpoint weapon in this adventure, which actively encourages object destruction.
As such, here is an updated version of the DMG's Object Armor Class table for use with this adventure, alongside an accompanying hit point table:
Object Armor Class
Substance AC Polymer (cloth, fiber, wool) 11 Crystalline (gems, glass, ice) 13 Composite (wood, plasteel) 15 Ceramic (stone, plascrete) 17 Metal (iron, flexisteel, durasteel) 19 Beskar 21 Phrik 23
Object Hit Points
Size Fragile Resilient Tiny (cup, lock) 2 (1d4) 5 (2d4) Small (chest, helmet) 3 (1d6) 10 (3d6) Medium (crate, table) 4 (1d8) 18 (4d8) Large (speeder bike, 10-ft.-by-10-ft. window) 5 (1d10) 27 (5d10)
Refer to the "Objects" section in part 4 of the D&D Basic Rules for further guidance on running attacks against objects and dealing with Huge and Gargantuan objects.
Bonus Maps and Tokens
GM Map (Gridless)
Player Map (Gridless)
GM Map (Background)
Player Map (Background)
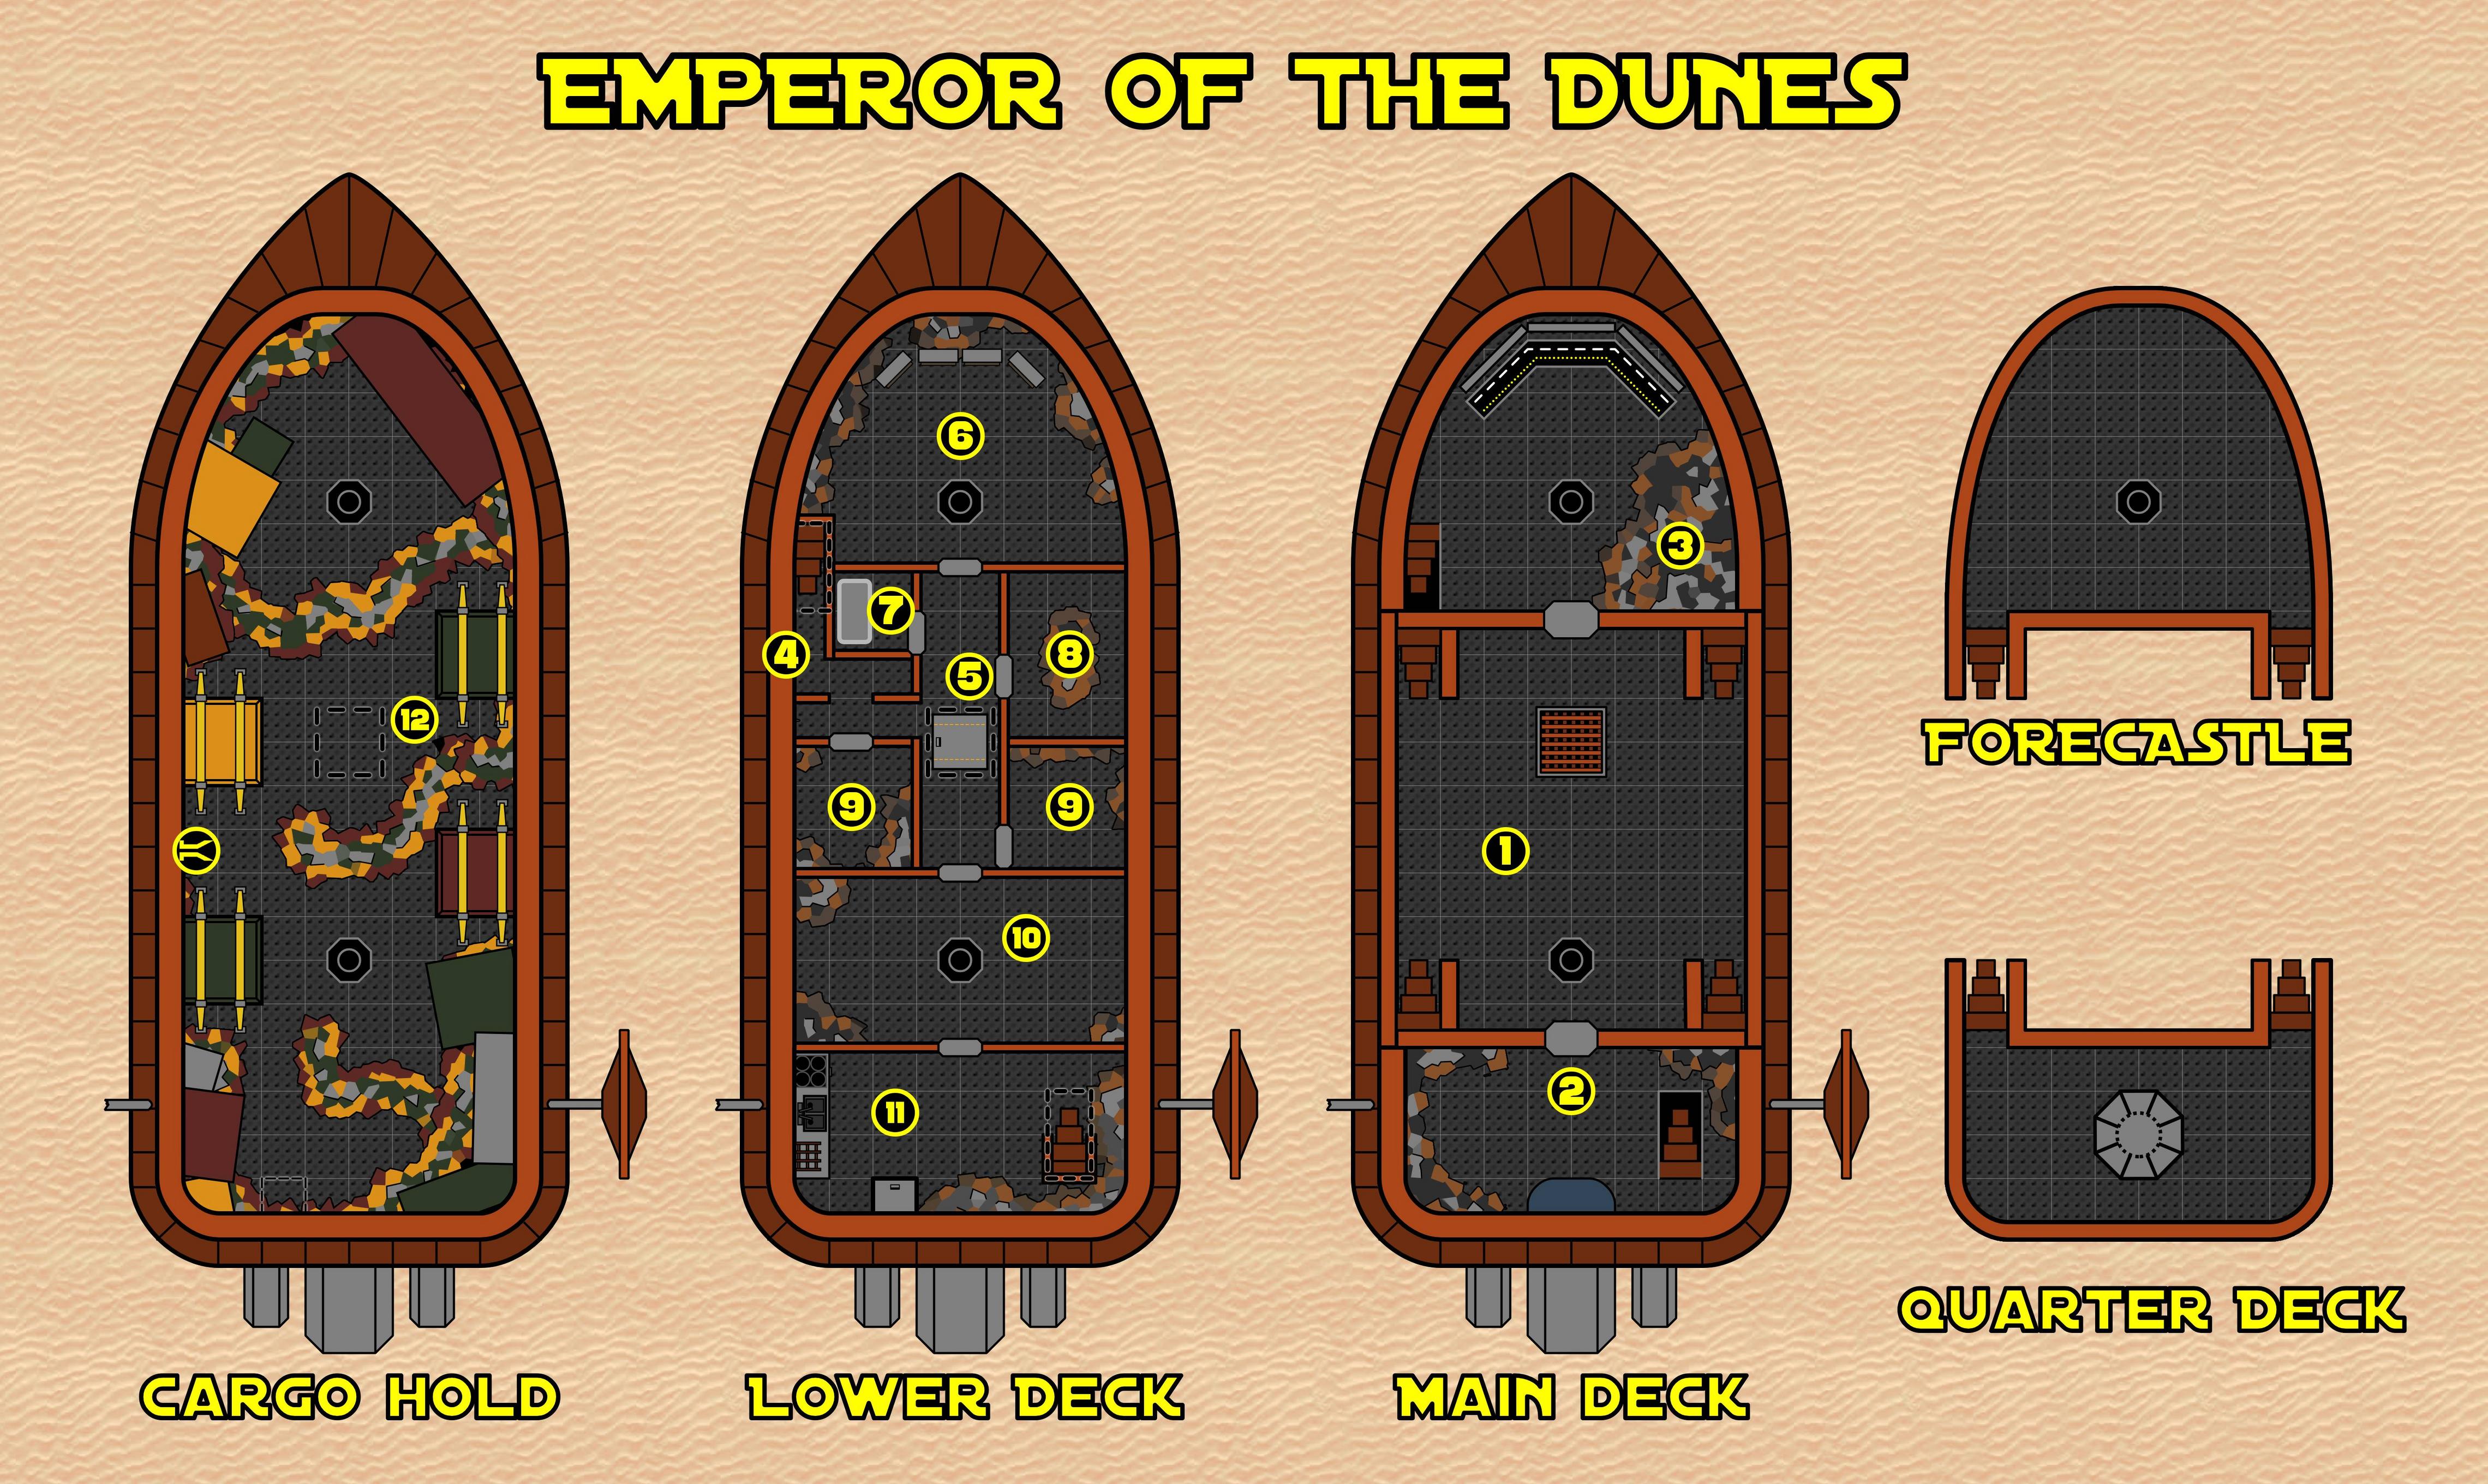

GM Map (Gridless, Background)
Player Map (Gridless, Background)
Cargo Barge (Grid)
Cargo Barge (Gridless)
Using The Cargo Barge Map
The following are the intended possible uses this 'Cargo Barge' map during this adventure:
- A layout of the Emperor of the Dunes, which Aubreck may be able to provide to the party if requested
- The layout of the Emperor's sister ship, which is a possible alternative reward for this adventure
- May be used during 'Trouble On The Way' as the deck plan for Dream of Winter - if you want to keep the Emperor's layout a secret, consider only using the outdoor sections for this encounter
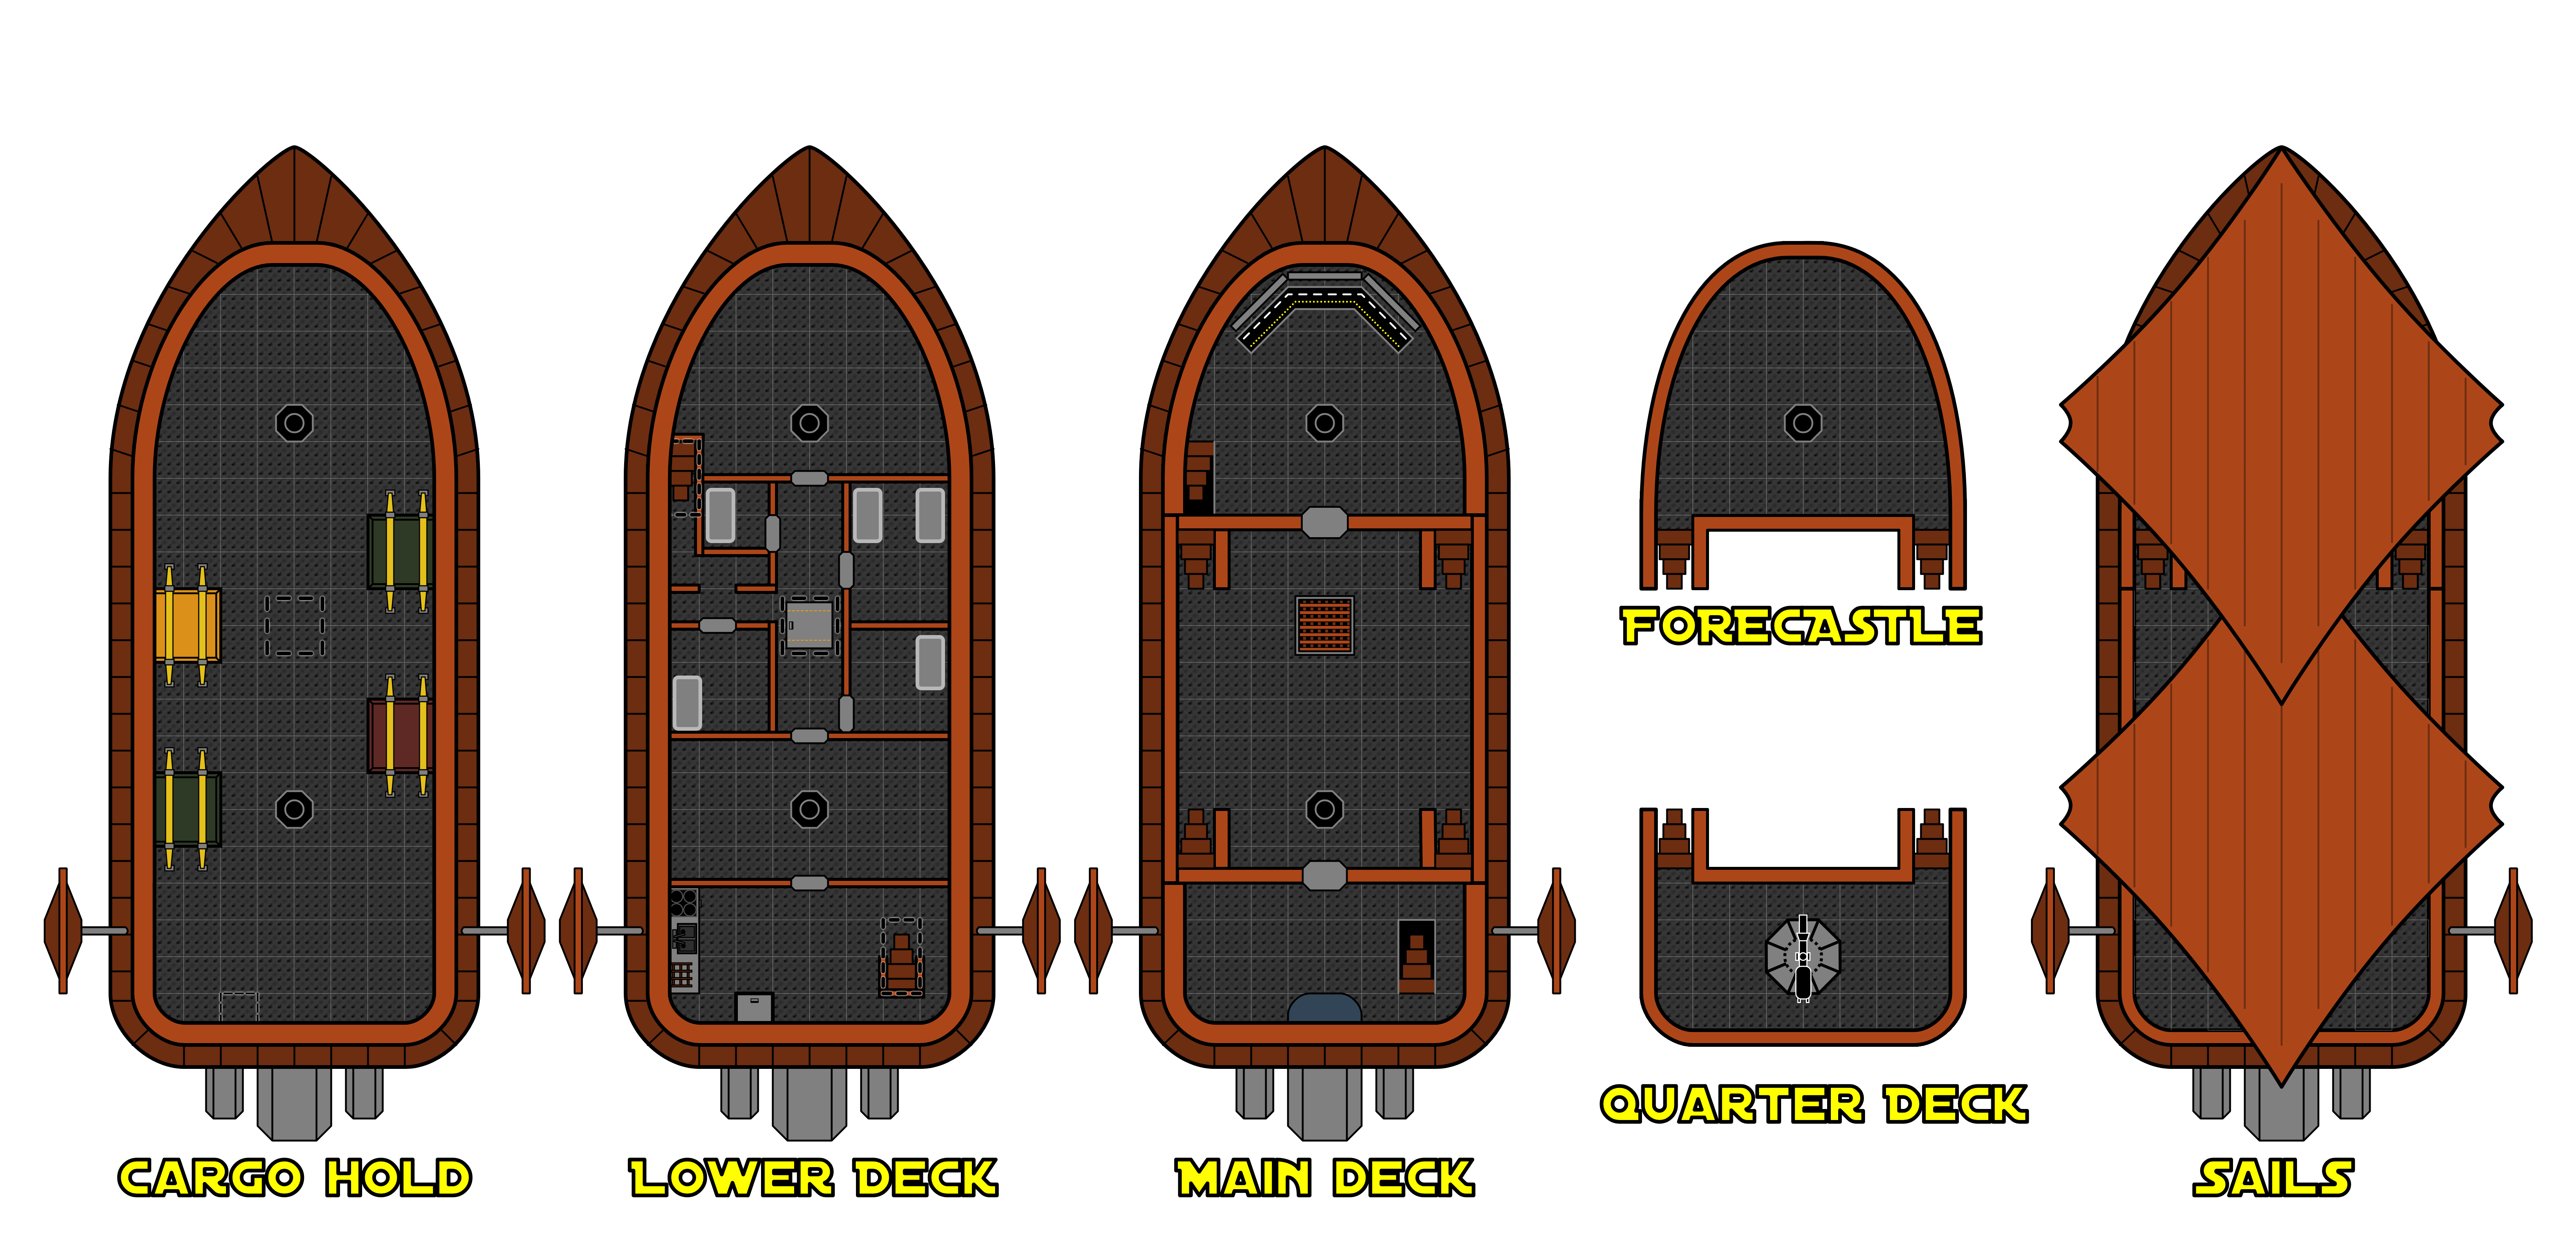
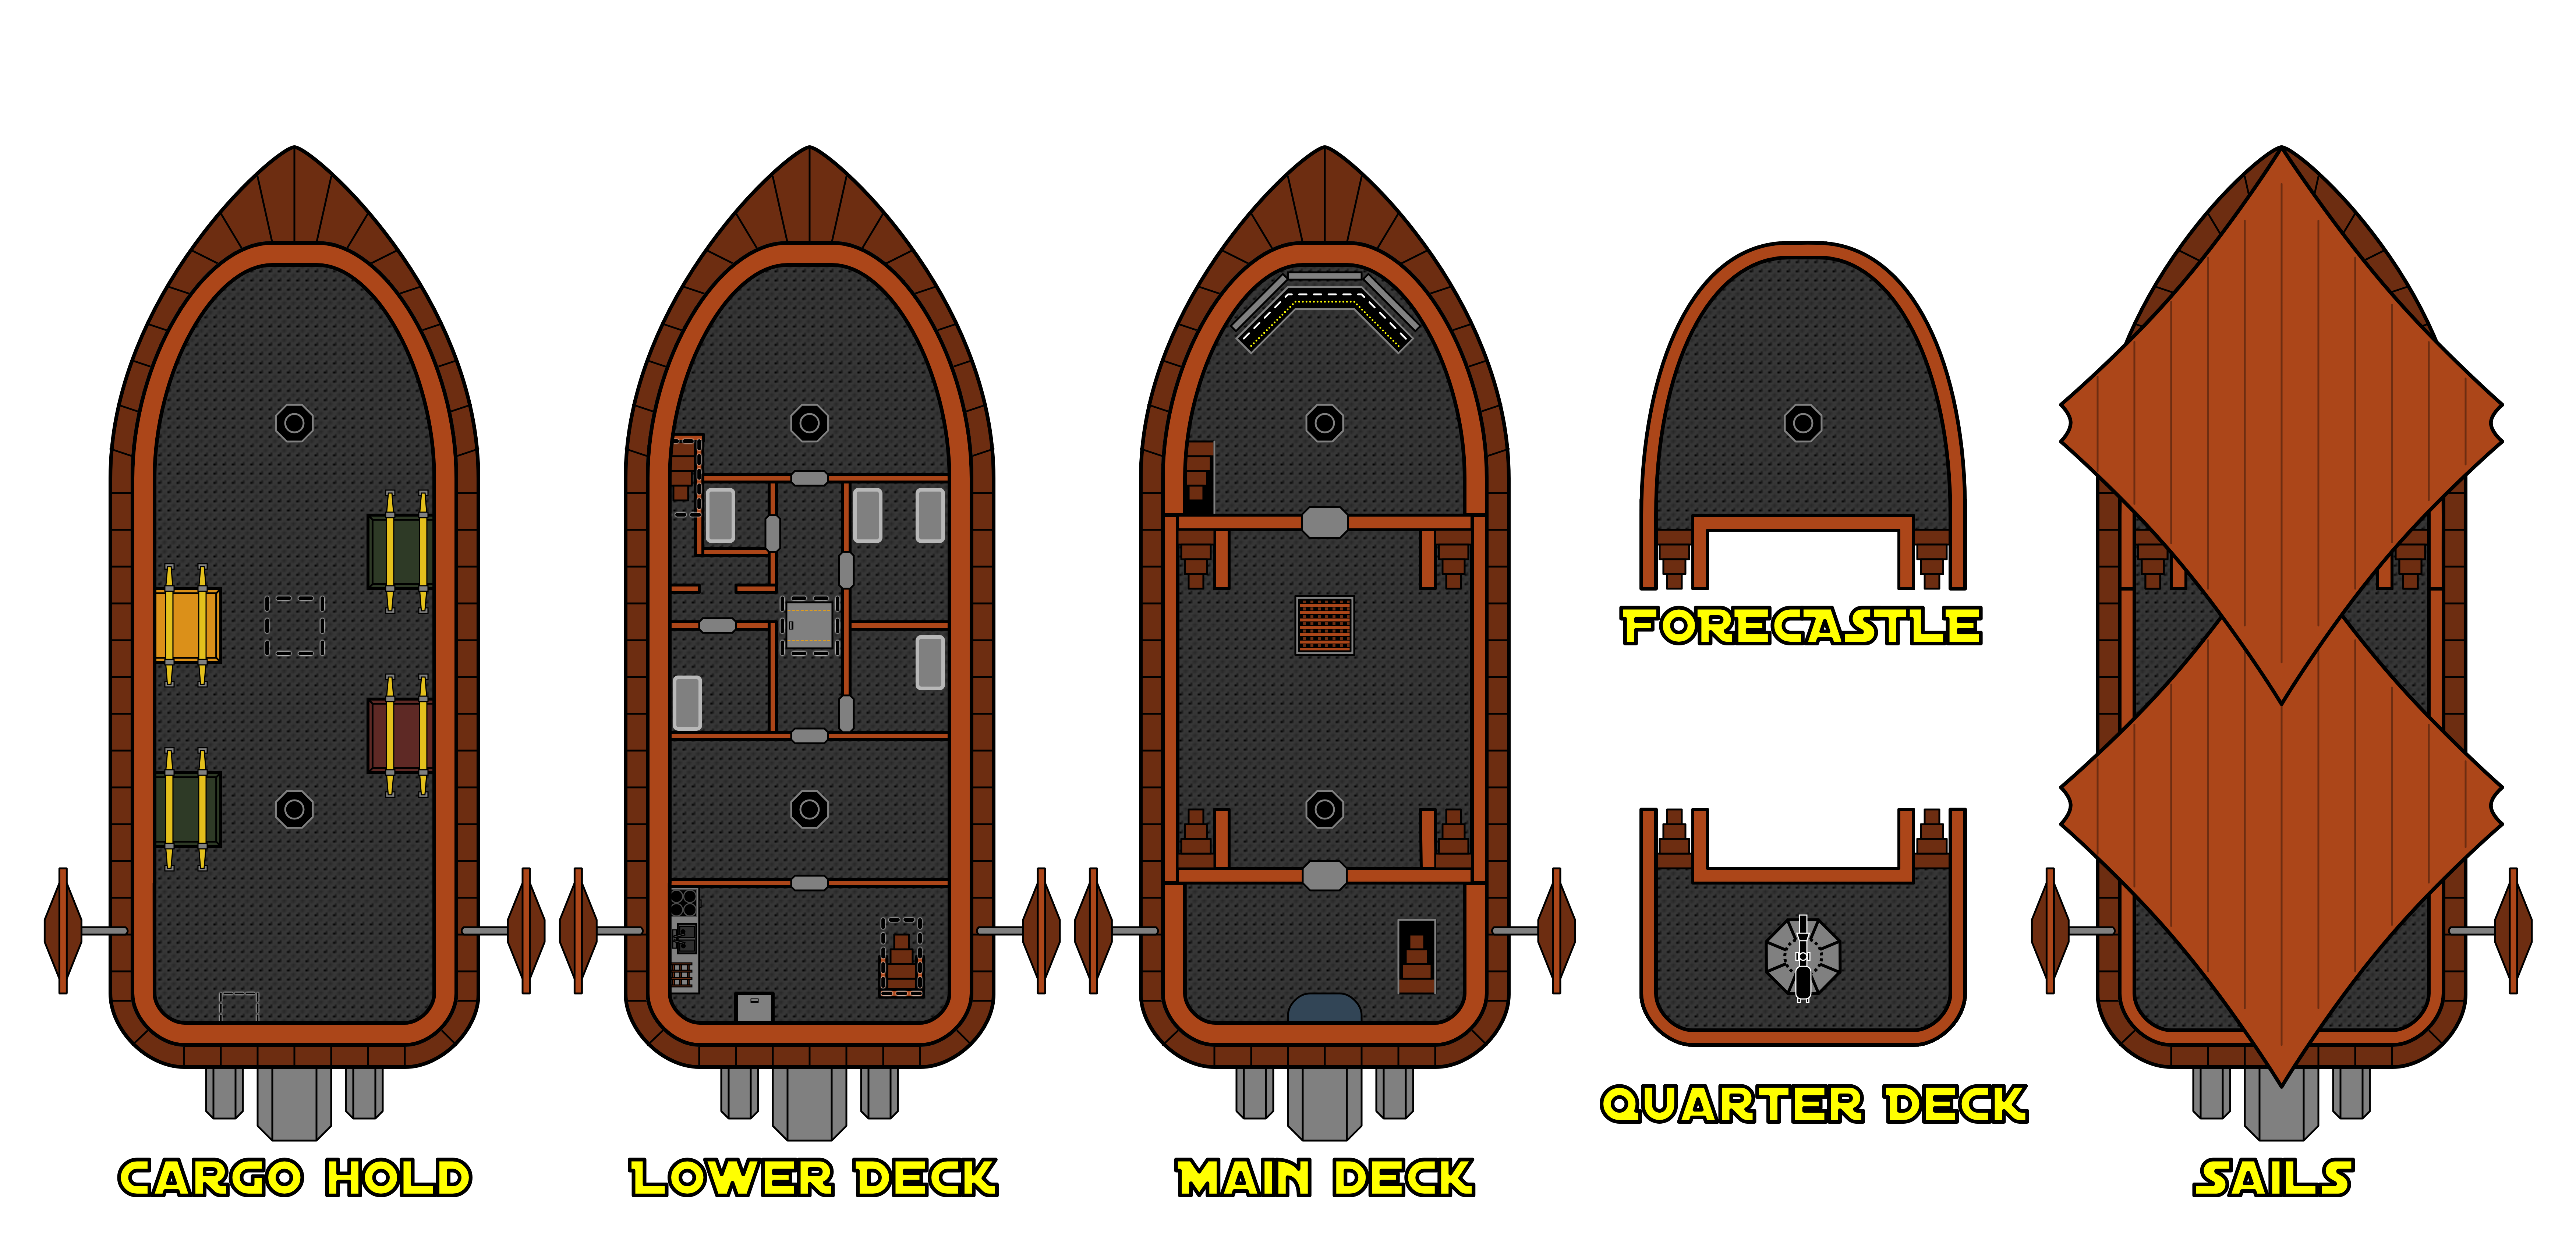
Sarlacc (Beak)
Sarlacc Tentacle (Curved)
Sarlacc Tentacles
These tentacle tokens are intended to 'link' to one another to create a single strand. The sarlacc tokens provided at the top of this page show how these should look when connected up.
A string of tentacle tokens can be used to provide players with a visual guide of the sarlacc's attacks. They may also be used if you want to change how the escape sequence plays out - for example, with tentacles instead being used to 'block' certain routes to force the players to navigate their way out of the barge.
Sarlacc (Beakless)
Sarlacc Tentacle (Straight)


Speeder Skiff (Grid)
Speeder Skiff (Gridless)
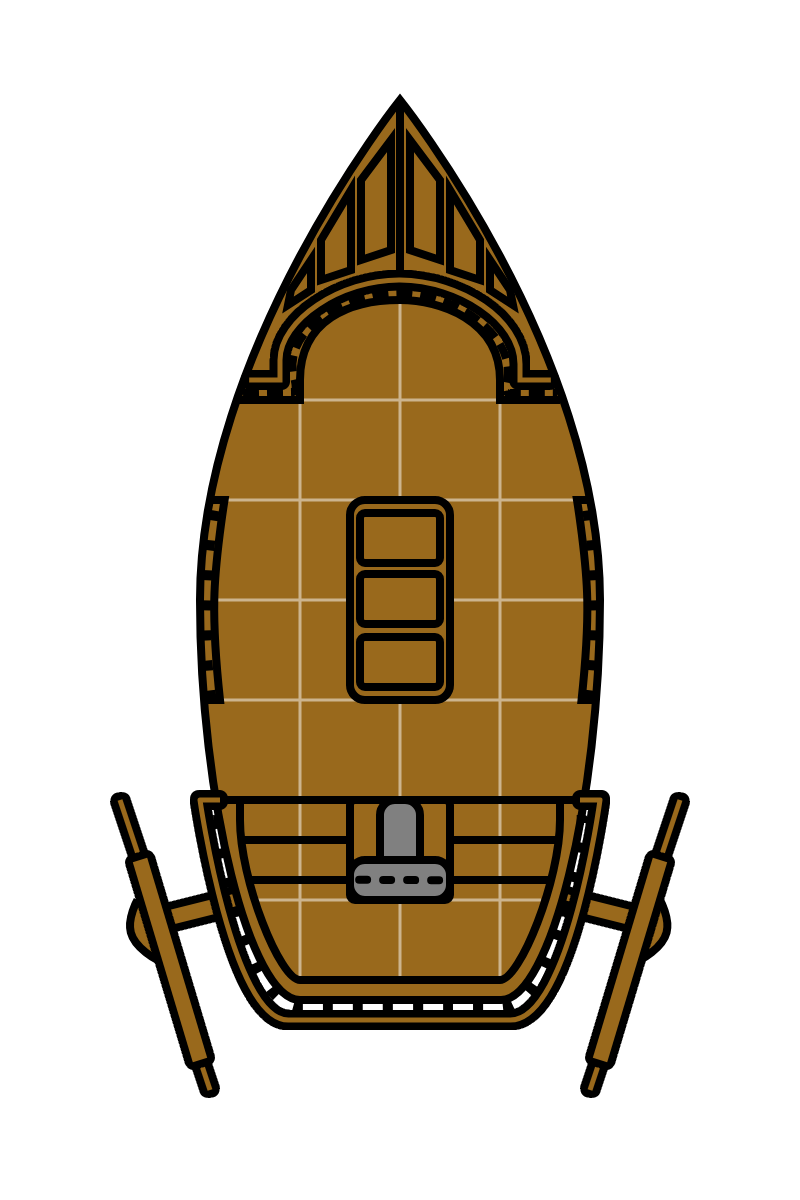
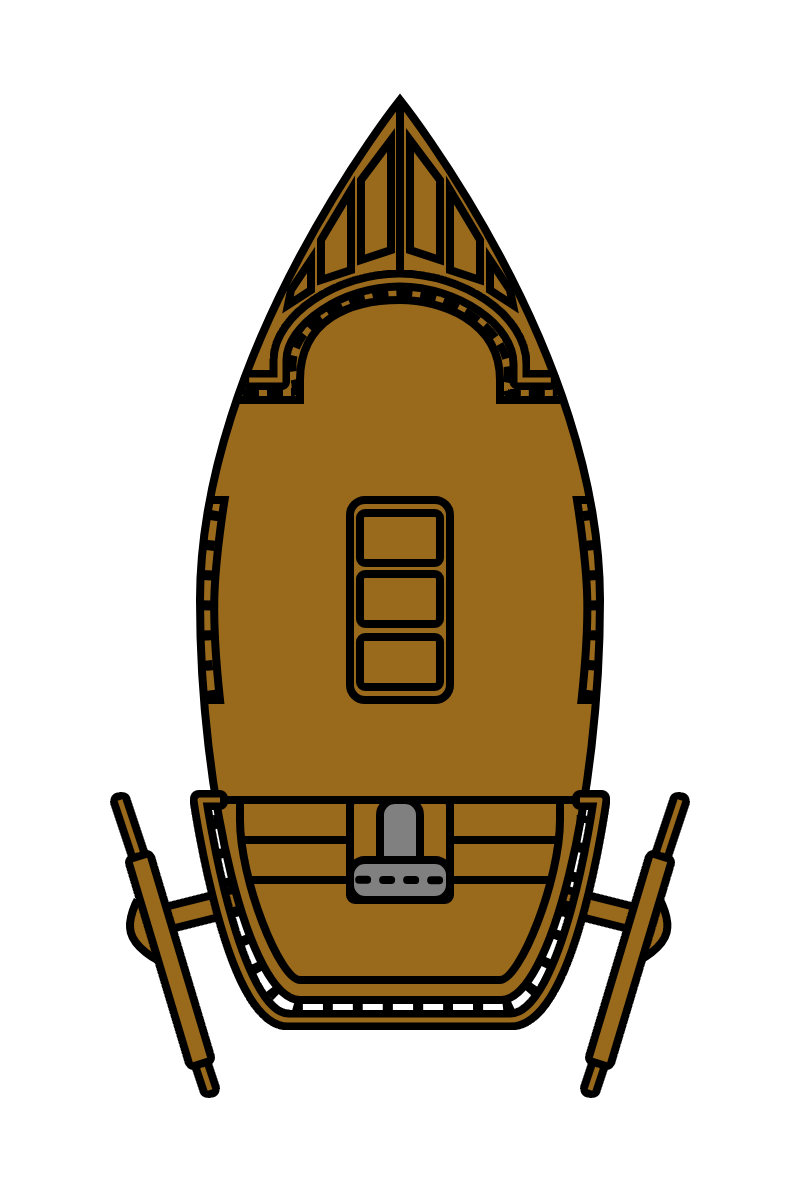
Credits
Content
Salvage Operation (5e) - Ghosts of Saltmarsh, Wizards of the Coast, 2019.
Official SW5e Content - Steev and all other contributors
Power Ciphers Enhanced Item - Aziz, 'Power Ciphers'
Images
Ralph McQuarrie Exploding Sail Barge Art (Cover/pg 1) - https://wall.alphacoders.com/big.php?i=764252
Red Aurek Symbol (pg 6) - https://www.liveabout.com/read-the-star-wars-way-3860118
Downloadable Map Images (Copy and Paste link into browser window to open map image for saving)
https://www.gmbinder.com/images/heSWLGD.png - Default GM Map
https://www.gmbinder.com/images/pS8jfBg.png - Default Player Map
https://www.gmbinder.com/images/HhoO2uM.png - GM Map, Gridless
https://www.gmbinder.com/images/HhoO2uM.png - Player Map, Gridless
https://www.gmbinder.com/images/yA7Q9wG.jpeg - GM Map, Background
https://www.gmbinder.com/images/m0A1VZo.jpeg - Player Map, Background
https://www.gmbinder.com/images/KiaPGYb.jpeg - GM Map, Background/Gridless
https://www.gmbinder.com/images/nt3NQ0F.jpeg - Player Map, Background/Gridless
https://www.gmbinder.com/images/bFPTC0u.png - Cargo Barge, Grid
https://www.gmbinder.com/images/RIus3SW.png - Cargo Barge, Gridless
https://www.gmbinder.com/images/Awe3dFy.png - Sarlacc, Beaked
https://www.gmbinder.com/images/s7eh9Xs.png - Sarlacc, Beakless
https://www.gmbinder.com/images/IwBspmD.png - Sarlacc Tentacle, Curved
https://www.gmbinder.com/images/NW9zc7I.png - Sarlacc Tentacle, Straight
https://www.gmbinder.com/images/8K5R9MS.png - Speeder Skiff, Grid
https://www.gmbinder.com/images/QEmlpS1.png - Speeder Skiff, Gridless