Table Of Contents
- 4 1. COMET's XIV Role-Playing System:
- 6 2. Credits Page
- 5 2.1 System Patch List
- 7 3.0 The Basics
- 7 3.1 The Nine Stat Points
- 9 3.2 System Terminology
- 11 5.1 Solo Jobs
- 12 6.1 Player Stat Tiers:
- 12 6.2 How do I get more stat points?
- 13 6.2.1 "Levequest" vs "Campaign"
- 15 7.1 Racial Traits
- 19 11.1 Specialty Mastery Levels:
- 20 11.1.1 Aetherology:
- 21 11.1.2 Magics:
- 22 11.1.3 Technology:
- 23 11.1.4 Alchemy:
- 24 11.1.5 Combat & Hunting:
- 25 11.1.6 Health & Healing:
- 26 11.1.7 Information & Espionage:
- 27 11.1.8 Culture & Religion:
- 28 11.1.9 Artistry & Crafting:
- 29 11.1.10 Wilderness & Exploration:
- 30 11.1.11 Archaeology:
- 31 11.1.12 Economics & Recordkeeping:
- 32 12.1 The Defender
- 32 12.2 The Assailant
- 32 12.3 The Support
- 32 12.4 The Healer
- 34 14. Endurance (END):
- 34 14.1.1 General Perks
- 34 14.1.2 Defender Perks
- 34 14.1.3 Assailant Perks
- 35 14.1.4 Healer Perks
- 35 14.1.5 Support Perks
- 36 15.1.1 General Perks
- 36 15.1.2 Defender Perks
- 36 15.1.3 Assailant Perks
- 37 15.1.4 Healer Perks
- 37 15.1.5 Support Perks
- 38 16.1.1 General Perks
- 38 16.1.2 Defender Perks
- 38 16.1.3 Assailant Perks
- 39 16.1.4 Healer Perks
- 39 16.1.5 Support Perks
- 40 17.1.1 General Perks
- 40 17.1.2 Defender Perks
- 40 17.1.3 Assailant Perks
- 41 17.1.4 Healer Perks
- 41 17.1.5 Support Perks
- 42 18.1.1 General Perks
- 43 18.1.2 Defender Perks
- 43 18.1.3 Assailant Perks
- 44 18.1.4 Healer Perks
- 44 18.1.5 Support Perks
- 45 19.1.1 Tier 1:
- 45 19.1.2 Tier 2:
- 45 19.1.3 Tier 3:
- 45 19.1.4 Tier 4:
- 46 19.1.5 Tier 5:
- 47 20.1.1 Tier 1:
- 47 20.1.2 Tier 2:
- 47 20.1.3 Tier 3:
- 47 20.1.4 Tier 4:
- 48 20.1.6 Tier 5:
- 49 21.1.1 Tier 1:
- 49 21.1.2 Tier 2:
- 49 21.1.3 Tier 3:
- 49 21.1.4 Tier 4:
- 50 21.1.6 Tier 5:
- 51 22 Creating Items & Rules
- 51 21.1 Creation Item Types
- 53 22.1.1 Tier 1:
- 53 22.1.2 Tier 2:
- 54 22.1.3 Tier 3:
- 54 22.1.4 Tier 4:
- 54 22.1.5 Tier 5:
- 59 28.1 Positive status effects:
- 59 28.2 Neutral status effects:
- 60 28.3 Negative status effects:
- 61 28.4 Elemental mechanics:
- 61 29. Status Effects Mechanics
- 62 30.1.1 Roll Initiative
- 62 30.1.3 "What Can I Do On My Turn?"
- 63 30.1.4 TL;DR: Damage Calculation
- 64 30.5 Fall Damage
- 65 31.1.1 Earning a LIMIT BREAK
- 66 32.1.1 Tank Limit Break: Failnaught Barrier
- 66 32.1.2 Healer Limit Break: Failnaught Miracle
- 66 32.1.3 Damage Limit Break: Failnaught Assault
- 66 32.1.4 Support Limit Break: Failnaught Unity
- 68 34.1 Status Resistance
- 69 34.2 Using Scan:
- 69 34.3 Nobody Likes Fractions
- 69 34.4 Nonplussed on +X
Comet's XIV Role-Playing Combat System:
This system was designed by the members of COMET of Mateus, when one of our events went mysteriously and suddenly awry. While simply rolling /random had worked out for the large part... a particular group of 900+ rolls from a group of Porrogo minions serving a Sharlayan master nearly wiped out the entirety of the brave Seekers of COMET who had been sent to investigate the matter. It was then that the staff of COMET realized that relying entirely on /random rolls was no longer a viable option if we were to have the sorts of fantastic and mythic adventures we had been clamoring for. Players were now looking for a measure of control over their rolls, having had their closest brush with death since joining, and thus, this system was born from the desire to keep to the traditional /random system... with some tweaks. This Homebrewery book is here to serve as an extension of that system!
So what you're telling me is that /random is now useless.
Oh no. The opposite of that, actually. The system COMET uses is here to enhance /random rolls, not get rid of them entirely.
Alright, so what's involved?
Participation in a system like this will require a bit of basic math (addition and subtraction) and a character sheet. While most people balk at the idea of these things, as it reminds them of D&D... we promise, we tried to make the system as uncomplicated and fun.
If I wanted to roll dice and have character sheets I would just play D&D...
The rolls in this game, and all of the actions of both enemies, NPCs, and players alike, still take place within Final Fantasy XIV: A Realm Reborn -- however, the number values for custom stats will typically be stored on a simple to use, easy to read sheet for you and your DM--(Dungeon Master, Game Master, whatever you want to call it)-- to view on another window, or on a mobile device. The COMET system has its similarities to Dungeons and Dragons, yes, but the overall experience is still immersed in what Roleplaying in Final Fantasy XIV is all about: creating adventures and sharing things alongside fellow members of the Roleplaying Community.
That being said, you can't expect everybody to like our system, but we do expect those who roleplay in our FC to adhere to it. Make sure that this is the type of roleplay you want to do. This system was created to aid our free company's roleplay, not to impose our way of doing things onto others. This is simply a tool to benefit others and make things more fair and balanced without entirely relying on fate and chance.
Evolution and Changes
This system is a constant work in progress as we keep breaking it and putting it back together, seeing what can potentially be abused, things that could ultimately make short work of things that should be a lot harder, or simply toning down monsters or abilities that should not be as strong as they are. Don't be frustrated if you see a "Patch Update!" COMET and her allies are working hard to make sure that this system is as fair and balanced to as many people as possible. We promise that any updates are with very good reason and that we try to minimize people needing to remake their sheets too often.
Getting started
It all begins once you understand who and what you want your character to be. You likely already have an idea of who your character is from before joining COMET. From there, all you have to do is follow the handy, dandy index provided to get all of the answers you seek. You can also use CTRL+F to find specific words as needed!
Copyright Information & General Notice:
This book or parts thereof may not be reproduced in any form, stored in any retrieval system, or transmitted in any form by any means -- electronic, mechanical, photocopy, recording, or otherwise -- without prior written permission of the publisher, except as provided by the United States of America copyright law. For permission requests, write to the publisher with the following heading: "Attention: Permissions Coordinator" at the following points of contact --
- Business Website: www.cometofmateus.quest
(Check "Contact Us!") -
- Post: 325 Ninth Avenue, Seattle, WA 98104
- Phone: 206-731-3000
System Patch List
- Core System (1.0) [Released 09/07/2018]
- Shattering the Chains (2.0) [Released 10/21/2018]
- Dark Moon (2.5) [Released 01/09/2019]
- Shields and Shadows (2.8) [Released 03/14/2019]
- Strength Together (3.0) [Released 05/01/2019]
- A New Sun (4.0) [Released 09/21/2019]
- New Horizons (5.0) [Released 11/24/2019]
- Final Encounters (6.0) [Released 07/09/2020]
- Edge of Refulgence (6.5) [Released 09/26/2020]
- A Moment's Reprieve (6.8) [Released 02/28/2021]
- Expanding Sights (7.0) [Released 12/21/2021]
- In the Balance (7.5) [Released 07/13/2023]
- White Stone, Black Feathers (8.0)
[Released 04/04/2024] - Infinite Horizons (8.1) [Released 06/22/2025]
- Scale and Measure (8.5) [Released 10/03/2025]
- Bygone Serenity (9.0) [Released 12/07/2025]
Credits Page:
This page is dedicated to those who have spent countless hours, pouring over and balancing the COMET RP system. Giving credit to artists, no matter what form their art takes, is an essential part of a functioning and healthy community, and we at COMET will always ensure those who have put in the effort are given their dues.
Designed the original version of the COMET and 1.0 Raven's Keep systems from scratch. Overviewed, playtested, and balanced checked every aspect of every patch of the system since it was originally created. Some dumbasses once told her she did less than 50% of the work for the Free Company.
Aided in working out the kinks on the jobs added in the "New Horizons" patch. Stayed up in the wee hours of the morning when he should've been asleep, listening to Joy complain about job imbalances and provided insight that led to the DEFEND and FLEE options added in combat. Implemented the Legendary Weapons system and is the inspiration, designer, and balancer for Time Mage.
Kept Joy sane during the New Horizons patch, as well as mediated and facilitated during very, very frustrating DM meetings regarding said patch. Made key changes regarding certain jobs, such as Fencer, Gambler, and Raptor. Reworked the ENDURANCE stat (4.0.0). Playtested and balance assisted for 8.0. Constructed the PvP system for 8.0.
The man who basically came up with every single one of the Seeker Group abilities, and made sure we didn't have too many of them. Originally suggested the system to begin with. The math wizard of COMET who keeps Joy sane. Showed incredible strength, guidance, and gave morale during 8.0's grueling patch cycle. Completely revamped the Creation system to ACTUALLY WORK where so many people had miserably failed before him in 8.5.
Helped create the Judgemagister job, balancing jobs across the board, designed Pictomancer, and came up with the original concept for the Trust System. (COMET FC Exclusive) The true epitome of a lawful good Paladin, in and out of character.
Developed the original version of the character sheet (COPIUS amounts of coding), and assisted with the development and balance of patches 5.0 to 6.5.0, including the introduction of various new jobs, the addition of Archetypes, and the implementation of Legendary Weapons.
The Nine Stat Points
When the system was designed, players in COMET voiced a desire to have allocated stat points that could affect certain rolls in particular situations, such as looking around for clues, defending against attacks, or trying to convince someone into not calling the Immortal Flames on you in spite of the fact you are the only person around at the scene of a gruesome murder. That being said, COMET has created the following stat allocations to make RPing a little more customizable.
Growing your Character
It goes without saying that the more points you put into a stat, the stronger it will become---however, it does not stop there: The COMET system allows for "Perks" that grant more dynamics to certain playstyles as the character grows with each encounter.
Combat Stats
In a world full of magic, wonder, and dangerous things...you're bound to get wrapped up in some kind of trouble somewhere down the road. These stats will help you fight whatever comes your way, and can help in other ways, too!
Endurance (END)
Your character's overall hit points (HP) has everything to do with this stat. Characters with higher END ratings will be better suited not only to soak up more damage and live longer in combative situations, but also surviving long periods without food, water, or shelter. They are also slightly more resistant to poisons, and activities that would otherwise exhaust characters with lower END ratings.
Strength (STR)
This stat allows for greater physical strength. Physical weapon users that rely mostly on raw power (Swords, Greatswords, Axes, Katanas, Fists, etc.) will use this stat and its modifiers (bonuses) to deal damage to opponents. This stat also allows for things such as lifting heavy objects, or climbing rock walls.
Dexterity (DEX)
This stat allows for greater precision. Range weapon users (Bows, Guns, throwing knifes —anything that is used to hit opponents at a distance) will use this stat and its modifiers (bonuses) to deal to opponents. Also applies to dexterous actions taken in melee range (stitching the wounds of allies, using a rapier or dagger, etc.) It may also be used to test for balance and nimbleness.
Defense and Evasion (DEF/EVA)
Putting points into this stat will allow for your character to have a lower chance of being struck by enemy attacks--be it through the sheer power of your character's armor, or their ability to dodge. This "Hit Class" gives players and enemies a flat threshold for things to either hit them, or miss.
For Example:
A character might have stats in their DEF/EVA that gives them a "Hit Class" of 400. That means any /random roll lower than that 400 won't land on that character!
Magical Power (MP)
This dictates how powerful your character's magical abilities are. In combat, mages and magic users (White Mages, Black Mages, Arcanists, Summoners, Scholars, Red Mages, Geomancers, Dancers, etc.) will use this stat to determine how hard your spells will hit. We recognize that all jobs in FFXIV use magic in some shape or form---don't worry, it'll be explained in better detail further on!
Additionally, this stat allows for characters to more easily interact with magical artifacts, remove magical barriers, and sense the Aether around them.
Non-Combat Stats
Of course, life does not revolve around combat, and neither should your character's abilities! Sometimes the mind is sharper than any weapon you can hold---you don't have to swing a sword to make a difference!
Investigation (INV)
Investigation represents your character's awareness and perception. Investigating a room for clues, looking out for danger, or poring over the finer details of a strange object are all examples of this perceptive prowess.
Charisma (CHA)
Charisma represents your social abilities, whether it's gathering information, calming a frantic NPC, causing distractions, performing in front of others, or determining if someone is lying, Charisma covers everything that has to do with interacting with NPCs or your character's "street smarts."
Reason (RSN)
Reason represents a Seeker’s critical thinking, mental fortitude, and ability to think back on previous knowledge in a pinch. With Reason you can recall previous knowledge, to get hints on a tough puzzle, or ensure your character isn’t mentally rattled in stressful situations.
Creation (CRE)
Creation represents your ability to, quite literally, make new things! This can be objects, techniques, or even spells. Creation has its own system of creating items and abilities that you will see later in this book!
System Terminology
Cooldown (CD)
A period of time in which an action cannot be used. Cooldowns tick down at the start of your turn.
Turn:
A turn is a period of time when a character is taking (most) actions in combat. This equates to about 1-5 seconds in-character.
Initiative:
The order in which allies and enemies take their turns during combat.
Round:
When everybody in the initiative order has performed their turn, this is considered a round of combat.
HP: Hit Points
How much health a character has. The higher this value is, the more durable something is.
HC: Hit Class
How tanky or evasive a character is. If an attack rolls under the target's HC, it misses or is blocked.
Basic Attack:
A normal attack rolled with either your MP, DEX, or STR bonus added to it. While all attacks work this way, not all attacks are technically "Basic Attacks". This is mainly important in that some Job abilities or special actions in the COMET system only interact with Basic Attacks, something simply called an "attack" will not count.
Auto Attack:
These function much like any other attack with one exception - even if the roll is less than the target's HC, this attack will still do 1 damage (plus any damage bonuses and other effects).
DM: Dungeon Master
A term from the popular tabletop game "Dungeons & Dragons", a Dungeon Master is the person running an RP event. They are typically the ones guiding the story along, and are usually the last word on decisions made.
Advantage:
When you have Advantage on a roll, you roll twice and take the higher outcome.
Disadvantage:
When Disadvantage is placed on a roll, you will roll twice and take the lower outcome.
StA: Standard Action
The most common kind of action in the system. These are abilities or actions that, in a realistic time setting, would take up the majority of your turn. You get one StA per turn.
SwA: Swift Action
Typically less powerful than Standard Actions, normally used to follow up or accompany Standard Actions, and usually not as common in our system. You get one SwA per turn.
RA: Reaction
An action that is typically used as a reaction to something else, typically an enemy ability or a certain set of circumstances, or otherwise can be used at any time in combat. You can use one RA every round of combat.
PA: Passive
Passives usually provide a constant effect that does not require any action to begin, unless otherwise stated. Every character gets one Passive Action per turn, but Passive Actions are very rare, primarily for switching Stances.
MA: Movement Action
Allows your character to move up to 2 IRL seconds on their turn. You get one MA per turn.
FA: Free Action
An action that can be used at almost any time in combat. There are no limits to how many Free Actions you can take in a round, making them extremely powerful and rare.
OPC: Once Per Combat
These abilities can be used once per combat encounter.
OPL: Once Per Leve
These abilities can only be used once per Leve.
Raw Roll:
A roll made without using any bonuses. Just the natural value of /random or /dice. This can also refer to the outcome of a roll before bonuses are applied.
True Damage:
An attack that treats the target's Hit Class as 0 and ignores the resistances, elemental immunities, and other damage reducing effects on the target. True Damage does not ignore Positive Status Effects such as Reflect.
Flat (Damage/Healing)
Flat damage or healing is not affected by any damage or healing bonuses your character may have.
System Terminology (continued)
Summoned Companions
The general term used to describe "pets" in the COMET system. Summoned Companions are considered "true pets", which means they have their own HP, HC, and so on. Most Summoned Companions are granted as a part of certain Job's Passives. [See the end of the Job Book for a full list of rules about them!]
Assurance
A player cannot roll lower than the listed number assured to them. This is specific to racial abilities only. [See: Picking Your Race]
Backstory Bonus
This is a 20% Specialty Mastery to your rolls on any specialties or abilities that pertain to your character's backstory. [See the Specialties page for more!]
Limit Break / Team Attack / LB3
Powerful abilities that are generated with Limit Break Coins (earned by rolling 900+) that can make or break your combat encounters. For more information, see the [Limit Break] section.
The Help Action
Either cleanse 1 Negative Status Effect from a target or give a target Advantage on their next roll (cannot target yourself). If they would already roll with Advantage, they gain +100 instead. This is performed as a Standard Action. (StA)
Positive, Neutral, and Negative Status Effects
These refer to a very specific set of effects in the COMET system. Please see the sections on them for more information.
Building Your Character
You likely already have a good idea of who your character is as a person. If not, that's okay, you can build them up further over time! For now let's focus on how they will interact using our roleplay system. We'll start by giving them stats, then applying their race, then picking their jobs! Note that jobs are listed in our other book.
Step 1: Stat Points
You will be given 35 POINTS to put into COMBAT STATS (END, DEF, STR, DEX, MP) and 30 POINTS into NON-COMBAT STATS (INV, CHA, CRE, RSN). Don't forget to double-check your math! Your END, DEF, STR, DEX, and MP should equal 35 when added together---your INV, CHA, RSN, and CRE should add up to 30! You can gain more stats later at the cost of 5 commendations per point.
Stronger ≠ Better
Your character doesn't have to excel in everything to be interesting! Sometimes a flaw, like being physically weak, or lacking an understanding in magic, can make a character more alive and relatable! You can reflect these sorts of flaws in your character stats---after all, nobody is good at everything!
Step 2: Picking your Jobs
COMET elected to place Jobs in-game in order to allow players to better customize their characters and more personalize their styles of combat. You can decide which jobs best represent your character and be given bonus perks and abilities that may help you and your allies in a pinch! Remember that you can flavor any job's abilities to fit how your character would fight!
Please note that new jobs will be added, removed, balanced, or changed during expansions and major patches as the game evolves! The COMET staff requests your patience as new items are taken care of.
A Word About Solo-jobbing:
If you decide that you only want to be in one job, that's okay too! A character that solo jobs will receive 5 stat points to place in a category along with an Archetype related to their job for free, and a free access to a FREE custom item of your own design; if at a later date they pick up a second job they lose these benefits. BOUND jobs also get these benefits! These items go beyond what a created spell can normally do! Work alongside DMs in order to create a spell with a custom effect, cooldown, and flavour!
Example:
Bob chooses to be only a paladin, as a result he places +5 in STR and then chooses to Archetype his DEF for free.
Players can pick up to TWO (2) jobs from the list below!
Click here to see the list of available jobs, and what they do!
Stat Tiers, Stat Points, & How To Earn Them:
Player Stat Tiers:
- Tier 1: 1 point - 7 points
- Tier 2: 8 points - 14 points
- Tier 3: 15 points - 35 points
- Tier 4: 36 points - 42 points (Only THREE STATS can be tier 4)
- Tier 5: 43 points (Only TWO STATS can be Tier 5)
"How do I get more stat points, though?"
You can trade in COMMENDATIONS for stat points!
5 Commendations = 1 stat point
If you have UNDER 400 TOTAL Commendations:
- You gain +2 COMMENDATIONS by participating in FC Levequests, Content Night, or Social Night.
- You gain +1 COMMENDATION for every Journal Post, Mission Report, or Event Report you post on the forums - and for participating in Forum-based RP in the Roleplaying Section (Max 3 commendations earned this way per week).
- You gain +15 COMMENDATIONS by participating in a COMET Tutorial Leve (once per character).
- You gain +30 COMMENDATIONS by finishing the "Starter Kit" (2 Journal Posts, 1 Mission Report, 3 events (Once per character)).
- You gain +3 COMMENDATIONS by creating and running your own Levequest.
You can earn them the following way:
- Earn 1 spin for every objective you complete in the Monthly Pack. But take note: new members (those with less than 100 TOTAL commendations earned) will earn double the spins from the Monthly Pack, potentially getting an extra 3 spins per month! See the Monthly Pack section of the main COMET Discord for more information.
Members With Over 400 TOTAL Commendations:
- You gain 1 Commendation from Levequests & Content/Social Nights.
All other sources of Commendation earnings remain the same! This is to promote older members to run more events, and combat what we call "Commendation Bloat."
"But Can I move my COMET COMMENDATIONS from my main to my alt?"
Alternative characters earn commendations and stat points separately from your main. This is to ensure that players don't abuse the system by playing one character to beef up another.
However, members who have neen within the Free Company over a year are permitted to move commendations between characters as they see fit, as they have been deemed knowledgable on the system, as well as trustworthy enough to do so.
"Can I Change Jobs/Move Stat Points/Change my Archetypes?"
- Yes, you can change your job using the following expense chart.
- Yes, you may change your archetypes, though it comes with several caveats!
- No, you may not move stat points freely (unless otherwise specified.)
Depending on how new you are, you may get leeway to change some of these. This is especially true if you're totally new to the system. When in doubt, ask a staff member!
A Note On Archetype Changes:
In addition to the Commendation expense, a character's archetype should only change when said character has gone through a major change. [EX: An assailant decides they don't want to destroy anymore and switches off to support to better aid their allies in battle.] This change must happen during an active RP, with another person present, and it is encouraged that a journal post be made in addition to this!
What's the difference between a "Levequest" and "Campaign"?
-
A Levequest is a one time event that is made by one of your fellow RPers!
-
A Campaign is a set of Levequests connected to one another. Attending an entire campaign of 3 leves or more as the same character will grant a bonus stat point at the DM's discretion.
Keeping up with your stats:
Making sure that you keep good track of your stats and COMMENDATIONS is important, and ensures that everybody is playing fairly! There is a tab on your character sheet for doing just that!
THE GREAT BIG CHART OF SPENDING COMMENDATIONS:
| Stat Point | Archetype | Legendary Weapon | Gambler's Wheel Spin |
Job Change | General Specialty | Focused Specialty | Gearset | Legendary Weapon Exchange |
|---|---|---|---|---|---|---|---|---|
| 5 | 30 | 100 | 10 | 50 | 25 | 50 | 100 (1st) | 60 |
| - | ─ | ─ | — | — | 25 (Per Lvl) | 50 (Per Lv.) | 200 (2nd) | - |
Stat Decay:
Why Have Stats Decay at All?
Time is the one thing that nobody, not even the most powerful of beings, can stop indefinitely. Much like a muscle, if your character doesn't keep at working out aspects of their abilities, they may atrophy over time. In order to help stagnate an issue the COMET staff calls "Commendation Bloat" -- where players have more commendations than they could ever reasonably spend -- when you reach a certain point in your character's growth, stat decay activates.
How Stat Decay Works:
Upon reaching Tier 5 in any stat, you will need to continue to put in points in order to maintain that level of excellence in that skill and the abilities associated with it.
When you first get your Tier 5 ability, you will not get any stat decay for the first month after you achieve it. However, after this month has passed, spending 5 COMET Commendations every IRL month will allow you to maintain your current tier.
Keep in mind, you must do this for every stat you have at Tier 5. This means the more stats you have at Tier 5, the more you'll have to give every month in order to keep them up. Being good at so many things takes a lot of effort!
What if I Can't Be Around?
When you toggle your VACATION MODE in the COMET Discord, the stat decay will be paused automatically, so as not to punish people who may need to take care of things IRL, or may want to just take a break from the game for a little while.
To keep players from abusing the Vacation Mode system to prevent their stat decay, Staff keeps an eye on everybody coming in and out, so things can be fair for everybody! Make sure you're letting people know when you need to take breaks, so you can do so worry free!
How Quickly Do My Stats Decay?
When active, your Stat Decay will be -1 Stat Point every Month. No more, no less. This is to make sure that upkeeping stats is not unreasonable, and if someone does fall out of Tier 5, they can quickly recover by simply coming to events or running their own.
How Low Can My Stats Deteriorate?
Fear not! Your stats will only ever sink below T5 when Stat Decay is active for your character, and can't go any lower than T4. (AKA: 36 stat points)
Don't Worry!
Because you lose stat points so slowly, it would take you 10 months to fully fall from T5 to the bottom of T4 if you toggle vacation mode!
The Power of the Echo
The Echo is a "gift" from the mysterious entity known as Hydaelyn--the Mothercrystal. Though it is incredibly rare to be a recipient of such powers, not all Echoes are the same for each person, indeed, few seem to exhibit all of the powers detailed being used by the Warrior of Light, and appear to have only a few scant uses. If you decide to give your character the Echo, know that its powers may come with a heavy cost. Though not much is currently known about the details of the Echo, its users seem to trust the enigmatic sources of its power...
• Base Echo Ability: Protection against Primal Influence
The Echo passively, in a melee AoE range, allows for both the holder of the Echo and those around them to be immune from the Tempering effects of Primals.
Chronovisual
A person with a Chronovisual Echo will be able to glimpse into the pasts of others, though it is never in their control to do so. More often than not, it is thought the Mothercrystal allows those with this gift to peer into the veils of time and space, granting them sight into events they were not there to witness in order to help them on their way... though, many have pointed out it rarely appears in a timely fashion, and seems to activate at pure random.
Linguistics
With this type of Echo, you are able to comprehend languages, regardless of their speaker, and in spite of the fact you have never heard it spoken before. A helpful, but often overlooked sort of tool in the proper hands. This does not work with languages that are written, however.
Empathy
The Empathy Echo can grant the user the ability to sense the whispers of the very soul of others, allowing them to sense what others are feeling. Though the gifted can only assume things, generally, their ability rarely leads them astray.
Using Your Echo:
When you would like to use the Echo for your character, you will be asked to do a FLAT RAW ROLL (meaning no modifiers and no bonuses of any kind – this is quite literally the luck of the draw.) Using this chart, you and the person running the event can determine what happens via your roll.
| Roll | Consequence |
|---|---|
| Below 100 | You are overwhelmed, and pass out. You can be stirred awake by a companion. |
| 101-300 | You are unable to determine anything, but are still conscious...and in pain. You retain a Disadvantage for the next 5 rolls you make. |
| 301-600 | You glean some information, but not much. |
| 601-900 | You gain more information, but there are still things that are unknown. |
| 901+ | Hear, Feel, Think...you're able to discern a clear answer to your question. |
Picking Your Race
A detailed list of the traits can be found on the following page.
Please do not ask for additions to the racial features that include the following:
• Half/Quarter/etc. Voidsent/Sin Eater/Primal, etc.
• Ascians
• Changlings
• Chimera (This includes Nightkin ["Vampires"], Allagan Experiments, & Transfigured)
"What if my character is a race that isn't on this list?"
That is actually fine, and we will actually help you figure out custom racial traits that would benefit the type of character you're playing! Whether you're a Bangaa from the Dalmascan deserts, or a Lopporit from the far reaches, we can find something that works for your character!
Bi-Racial & Inter-racial Characters:
Though Highlander/Midlander, Sunseeker/Moonkeeper, etc. characters aren't terribly common, it is plausible for them to exist. They are not often highly thought of amongst the commonfolk, and are largely detested outside of some few places, typically the subject of overt racism and are usually outcast from the majority of population centers.
However, in the vein of Inter-racial (Hyur/Elezen, Au Ra/Hyur, etc.) children, the creators of Final Fantasy XIV lore have been explicit in just how incredibly rare it is for a child born of two different races to be conceived, let alone survive until birth. To many who are unused to the concept, the very existence of such people is unheard of, and those of this birth are highly ostracized from the world.
Racial Traits
Within the bounds of this RP system, racial traits are displayed via a pair of small bonuses each character attains on their character sheet. As a rule of thumb each race's subspecies will normally have the same secondary trait but a different primary. If a character is a half-breed between two of the races represented in the system then their traits will some mix of the two, automatically calculated when filling out their information.
PLEASE NOTE: If you have a trait that adds an additional specialty (like Viera's "Survivalist"), please consider this a FREE specialty! We know that the sheets are not calculating this correctly (this is unfortunately due to Google Sheets and cannot be fixed–) and will say you're 1 Specialty past what its calculations say you should have.
Hyur
Adaptable
Both Hyur subspecies share the adaptable trait as their secondary, though Midlanders are exceptionally adaptable; select a single General Specialty, and a single related Focus Specialty to gain.
Midlander - Adaptable
Midlanders are exceedingly adaptable as a race; within the bounds of this system that is represented by having an additional speciality, two if a pureblooded Midlander.
Highlander - Natural Strength
Know for their stalwart disposition, a Highlander has an Assurance of 300 on STR-related rolls. This bonus does not apply to Attack Rolls. A pureblooded Highlander will have Adaptability as their secondary trait.
Ishgardian - Drakescaled
When you would take damage from any source, you may choose to take 2 less damage.
Miqo'te
Improved Balance
Miqo’te are natural-born hunters, and walk the world with a predator’s grace. A Miqo’te has an Assurance of 300 on DEX-related rolls. This bonus does not apply to their DEX Attack Rolls, but they do gain +100 to these rolls.
Sunseeker - Plainsstalker
Seekers of the Sun are attuned for pursuit hunting. Seekers of the Sun have an Assurance of 300 on Investigation checks dependent upon hearing or smell, and additionally gain one second of movement.
Moonkeeper - Gloomwalker
Keepers of the Moon are attuned to ambush hunting. Keepers of the Moon are not Disadvantaged by low-light conditions. Additionally, Keepers of the Moon automatically purge the Visible status at the beginning of their turn.
Lalafell
Swiftness
Many a foe has been caught off guard when faced with a Lalafell, underestimating just how much ground these diminutive Eorzeans can cover. The natural speed of their tiny footfalls is represented with an additional 2 seconds of combat movement.
Plainsfolk - Natural Alacrity
Plainsfolk have long dealt with a status as prey creatures, before developing to the point of being Spoken, and this shows in their natural reflexes. A Plainsfolk Lalafell has an Assurance of 300 on DEF-related skill checks. They also receive a +100 bonus to their Hit Class.
Dunesfolk - Desert Adaptation
Dunesfolk society has a long and sordid history with poison, even to the point that some partake of scorpion venom in their teas. A Dunesfolk reduces the duration of Poison, Blind, and Elemental Weakness (Fire) by one turn, and makes all checks to avoid these conditions at Advantage.
Oceanic - Tidal Wisdom
The stories, magicks, and knowledge of the Oceanic Lalafellan tribes has been passed down from generation to generation, preserved from the dredges of time. This translates to an Assurance of 300 on Reason-related skill checks.
Elezen
Adaptable
Elezen are possessed of a longer lifespan than Hyur, including a longer childhood. This extended precocious state allows Elezen to learn more rapidly in childhood, and gain more skills in the same length of time. Select a single General Specialty, and a single related Focus Specialty to gain.
Duskwight - Sharp Hearing
Gelmorra is especially dark. Without the benefit of natural light sources, Duskwight Elezen have, over time, developed a means of overcoming the shadow. INV rolls are made at an Assurance of 300.
Wildwood - Natural Dexterity
Wildwood Elezen, by virtue of generations lived in the Twelveswood, are possessed of an agility unmatched by the other Spoken Races. A Wildwood Elezen have an Assurance of 300 on DEX-related rolls. This bonus does not apply to Attack Rolls.
Ishgardian - Survivor of the Song
Ishgardian Elezen have been changed by generations of combat with the Dravanian Horde. An Ishgardian Elezen does not become Winded until -3 HP, and does not become Unconscious until -5 HP.
Roegadyn
Natural Fortitude:
Roegadyn are massive, and solidly built, providing them a level of resilience rarely seen among the Spoken Races. A Roegadyn has an Assurance of 300 on END-related rolls. Additionally, they have +2 HP.
Seawolf - Sea’s Fury:
You channel the rage of waves. You may choose to deal +2 damage with all attacks until your next turn begins, but take +2 damage from all sources until your next turn begins. This is a Passive Action with no cooldown.
Hellsguard - Land's Calm
Hellsguard have a famously even temper. Any Negative Status Effect which impacts the mind (including, but not limited to, Fear, Berserk, Debravery, Defaith, and Delibra) last one fewer turn than normal, and makes all checks to avoid such conditions at Advantage.
Au'Ra
Spatial Awareness
Au Ra’s unique resonant hearing provides them a unique perception of the world around them. Once per Combat, they can negate the cooldown of any one ability.
Raen - Natural Charisma:
Social Chameleons of the highest order, Raen are so in-tune with people that, if not for their scales, you'd never know they were a diaspora. Raen Au Ra have an Assurance of 300 on Charisma rolls, or on rolls involving Seeker of Culture Specialties they have. If the roll is Charisma-based, and a Culture Specialty applies, they have Assurance of 500.
Xaela - First to Fight
Xaela are especially combative by nature. In combat, they may make any one roll at Advantage. This is normally Once per Leve, but gains a second use the first time the Xaela hits 0 HP.
Hrothgar
Natural Strength:
Hrothgar, despite their bidpealism, are built like Jungle Cats. A Hrothgar has Assurance of 300 on STR-related rolls. This bonus does not apply to their STR Attack Rolls.
Helion - Survivalist
Whether assailed by the Garlean Empire or living in the untamed wilds of Tural, Helions have become adept at surviving no matter the situation. They gain the General Specialty “Survival”, as well as one level in any one Focus Specialty related to Survival, with an assurance of 200 on rolls pertaining to those specialties.
The Lost - Band Together
The Lost foster companionship wherever they can find it. You can spend any action to ‘Help’, gaining an assurance 200 and advantage; if removing a status, you are healed +1.
Viera
Survivalist
All Viera are keen survivalists that live in small groups among hardy and less tamed regions of the world, they gain the General Specialty “Survival”, as well as one level in any one Focus Specialty related to Survival. Rava Viera must select the Forest Focus. Veena Viera may select any Survival focus other than Cartography or Wildlife Ecology.
Rava - Sharp Hearing:
Despite leaving their forest homes, Rava are incredibly skilled hunters, able to use their hearing to detect danger even when hidden. INV rolls are made at an Assurance of 300.
Pureblood Garlean
Third Eye
Pureblooded Garleans are most noted by the presence of a third eye, which gives them extra perception to the world around them. A Garlean have Assurance 300 on rolls relating to movement, mounts, vehicles, or magitech, roll Initiative at Advantage, and they make all Ranged Attacks at a +50 bonus. (Note: For the purposes of this ability, a Creature Mount counts as a vehicle)
Adaptable
Normally a trait attributed to Hyur and Elezen, none could contradict the sheer tenacity of the Garlean people, having built their empire from the heart of an unforgivingly bitter land. Select a single General Specialty, and any one related Focus Specialty to gain.

Cross-Shard Variants:
To facilitate characters that may have traveled from other shards (Such as The First, Ninth, or Thirteenth--) the COMET system has included "Cross-Shard Variants." This will allow you to obtain a unique trait from your character's shard of origin. While these traits are reflective of the conditions your character has grown up in, they do not come without cost -- if you are from another shard, the system will not allow you to do half-race characters. (This is mostly due to math issues on the character sheet, we may be able to support this at a later time.)
The People of Norvrandt: (The First, Vrandtic)
Resilient:
The people of the First are a strong, hopeful sort, who have struggled to survive against the tide of stagnant light and the Sin Eaters for a century or more...and they are just getting started rebuilding their realm. Due to the hardships daily life within this shard has put its people through, they are tougher and more durable than most -- equating in a +100 to Hit Class.
The People of Alexandria: (The Ninth, Alexandrian)
Advanced Craft:
The incredibly versitile nature of electrope shaped the nation of Alexandria on the Ninth Shard as one of the powerhouses in a brutal war, but it was their willingness to accept perspectives from all walks of life that allowed them to survive the horrors that persisted within their realm. An open-minded and adamant people, Alexandrians benefit from two additional specialties -- Focus: Systems and Methodology and Focus: Cooperation and Communication with an assurance of 200 for rolls using these specialties.
The People of Baron: (The Thirteenth, Baronic)
Aethersup:
Overtaken by a flood of darkness and forged in lengthy conflict between Memoriates, there are scant few denizens of the Thirteenth that have been able to retain their sense of self and pushed past the all-consuming hunger that has driven so many of them to desperation and madness. Voidsent in all but nature and temperament, those who have found a way to exist within the Source have few ways to sate their need for aether -- this is reflected in their primary trait. When you roll an attack that is naturally over 700, you will heal yourself 1 HP.
Picking your Specialties
Specialties allow your character to have intimate knowledge in specific fields. After all, no person knows EVERYTHING! This prevents people from being too good at everything, and allows characters and players to feel more unique in their talents! Please note that having a specialty implies great skill in that subject, and should be roleplayed accordingly!
How many Specialties do I get?
• +6 from your backstory
• +3 for every 20 years your character has been alive. (This caps at 100 years of age.)
• +3 for every Seeker Group you're in.
• +4 if you're head of a Seeker Group.
EXAMPLE:
Billy is 40 years old and has studied swords all of his life. He would gain 6 Specialties of his choice, due to his age, and an additional 6 for just...existing.
Billy is part of the Seekers of Artistry and Seekers of Challenge–so he would get 6 total from his participation in two different Seeker Groups! Mind you, he does not need to make these all pertain to Artistry or Challenge, it just allows for further options.
This gives Billy a total of . . . 6+6+3+3 = 18 Specialties!
But what do Specialties do?
When you encounter something within a leve that matches up with a specialty your character has, you will either gain access to doing something you couldn't normally do or will gain a bonus to a roll corresponding to that specialty.
Earning New Specialties
COMET at its core is a research group, and through character development you may end up learning and mastering new things! To reflect this, you may earn new specialties by spending commendations. Regardless of how many base specialties you get from age, backstory, seeker position, or race, you may also purchase additional specialties at a scaling cost.
| Additional Specialties | Commendations |
|---|---|
| General | 25 |
| Focused | 50 |
General Specialties vs. Focused Specialties
With the 7.0.0 update "Expanding Sights" specialties have been divided into two different types -- General and Focused. These updates allow for players to specify more clearly what their characters are knowledgeable of -- after all, nobody knows everything!
General Specialties:
These are topics with broad amount of subsections and categories. Taking up these specialties shows that your character is informed of the basics and core of this field in particular.
When a General Specialty applies, you gain +50 to your rolls concerning topics of this field.
Focus Specialties:
A subsection of General Specialties, Focus Specialties allow for you to showcase what it is your character is truly informed about -- things they have studied in great depth, or experienced firsthand.
When a Focus Specialty applies, you can +50 to your rolls concerning topics of this field.
"But what if I have a General and a Focus Specialty that apply to a situation?"
When a GENERAL and a FOCUS specialty both apply to a certain scenario, you are granted a roll with Advantage -- allowing for you to roll twice, and take the higher of the two rolls!
"Do I need a General Specialty to use the Focus Specialty associated with it?"
The short answer is NO. However, having both is always a benefit!
Specialty Mastery Level
When your character has spent enough time studying and working on specific fields of research, they naturally gain more experience with it over time. The COMET system reflects this attention to one's dedication with "Mastery Levels" for Specialties, which give you further bonuses for time and effort put into roleplaying your character's advancements.
You can gain Mastery Levels in a Specialty you have by spending commendations, each granting you an additional bonus to your rolls.
Each Mastery Level towards your specialties costs Commendations, and grants an additional +25 to your rolls.
By the time you reach 100% Mastery level of a Specialty, it will grant you an additional +100 to any rolls involving that specialty, and this stacks with other bonuses mentioned before!
Backstory Bonuses
Some things your character may have been interested or exposed to from their earliest years, and so these backstory bonuses reflect on those things that have happened in your life. These bonuses give you an extra boost to things your character has been doing since before they joined the Seekers of COMET!
A backstory bonus will grant you a free 25% specialty mastery on any specialty that came with your character's backstory.
Players can only apply 2 backstory bonuses to specialties that came with their character's backstory.
Aether Specialties:
General: Fundamental Aetherology
Many do not understand the basics of how aether works, choosing to focus only on how it can benefit them. Those who take the time to learn the fundamentals, however, will find themselves with a much richer understanding of aether.
- Focus: Aetheric Interactions -- You have spent more time than usual studying how different types of non-elemental aether interact with one another across the world of Hydaelyn.
- Focus: Elemental Aetherology -- The elements have their own rules and methods of interaction, and you have chosen to focus on their study.
- Focus: Celestial Aetherology Aether from outside of the star can have its own impact upon it. Topics like gravity, inertia, and the transfer of energy are what you focus on. (I.e. this is physics)
- Focus: Skywatching -- You have studied how aether swirls around the world, observing weather patterns carefully and know how they change and affect one another.
General: Practical Aetherology
This field of aetherology focuses on topics that pertain to daily life and how it can benefit all peoples. Many choose to forgo the basics and focus only on this field, as it proves to be the most immediately beneficial for the average layperson.
- Focus: Crystal Aetherology -- You study how crystals play a major part in everyday life across Hydaelyn, from artisans using them to hone their crafts, to how they interact with the land itself.
- Focus: Corporeal Aetherology -- Corporeal aether is the aether within physical lifeforms all around us, making up the form of living beings and sustaining them.
- Focus: Aetheric Lifeforms -- Elemental beings like sprites and carbuncles are different from normal physical life, yet they’re all around us. It’s your goal to understand how they function.
- Focus: Aetherotech Studies -- You primarily focus on how ceruleum and other similar materials are used to power machinery.
General: Theoretical Aetherology
Many theories and hypotheses about aether cannot be studied easily, relying on advanced models and equations to make sense of them. Yet one would be foolish to dismiss it easily, as the concepts in this field have proven to be very real - and important.
- Focus: Echo Aetherology -- The Echo is an uncommon gift, though not exceedingly rare. With how its power manifests in different ways for each person, it’s your goal to understand it.
- Focus: Soul and Memory -- The aether that makes up memories and the soul are difficult to study due to their intangible nature, but you have gone out of your way to understand the theories behind both.
- Focus: Lifestream Specialist -- Lifestream theory is constantly changing and evolving, but its lack of tangibility makes for a challenging topic of study. You know how aether enters and exits the lifestream and how aetherytes function.
- Focus: Eikon Specialist -- Hypothesized to be advanced elemental beings, Eikons are a category of their own. Few have studied these “Primals” and lived to tell the tale.

Magic Specialties:
General: General Magicks
These individuals have a general understanding of magicks, such as those found in Thaumaturgy or Conjuration. A strong grasp on the fundamentals can be far more important than fancy techniques.
- Focus: Unaspected Magicks -- Magicks that don’t fall under any element as well as knowledge of astral and umbral aspects.
- Focus: Elemental Magicks -- Magicks that can be found in the circle of elements, including Fire, Water, Earth, Ice, Wind, and Lightning.
- Focus: Life Magicks -- Magicks that deal with lifeforce directly, including healing spells and life-draining spells such as Drain and Miasma.
- Focus: Wards and Barriers -- Magicks meant to prevent entry or mitigate physical and magic damage.
- Focus: Livithiomancy -- Magicks that bring inanimate objects to life. Simpler objects like brooms are simpler, while objects like statues or golems are much more difficult.
General: Niche Magicks
The study of magicks that restricted, but not necessarily forbidden, understanding their complexities despite their rarity. Most of these magicks require some form of soul crystal as part of their teachings.
- Focus: Astromancy -- Limited to Sharlayan astronomers, Astromancy is the study of taking aether from celestial bodies in the sky, including the sun, the moon, and stars.
- Focus: Scholarship -- The ancient magicks of the Nymians which involved using a faerie simulacrum to assist in healing and shielding.
- Focus: Summoning -- The ancient Allagan arts of binding primal energy to yourself to summon miniature versions under your control. While quite rare, the Sons of Saint Coinach have been known to unearth some of the ancient soul crystals holding the summoning arts.
- Focus: Somanoutics -- The Sharlayan-born healing profession of Sage uses a technique of healing and harming through surrounding the target with mystical stones. A mixture of aetherology, sorcery, and medicine, Somanoutics is a unique method of spellcasting known only to a select few.
- Focus: Geomancy -- The far eastern arts of manipulating earth, wind, and water for working with spirits and kami. This school of magic can also tell fortunes, though many modern Geomancers focus on the monetary value their fortune telling can provide.
- Focus: Abstract Magicks -- There exist obscure magicks such as Green and Blue magicks that don’t quite fit into any other category. Blue Magicks especially hail from people of the New World.
General: Forbidden Magicks
These folks delve into the forbidden arcane, spells that are generally illegal or were thought wiped away from history for their danger.
- Focus: Black Magicks -- The magicks of Mhach have a long and bloody history, focusing on using a soul crystal as a life-saving catalyst and the aether of the surrounding world to make way for power. After the Fifth Umbral Calamity black mages were hunted to obscurity.
- Focus: White Magicks -- The white mages of Amdapor siphoned aether from the land to heal others and bring order, even using their powers in advanced vivimancy of golems. Now these arts are restricted to the Padjal... Normally.
- Focus: Void Magicks -- The art of summoning and binding creatures from the Void is an easy road towards corruption and death, but a surefire way to gain power, no matter how unethical.
- Focus: Necromancy -- Different manners exist to raise the dead, such as imbuing voidsent into them or using alchemical powders to make them rise. These practitioners are often considered vile for their defilement of sacred death, and are heathens to the Order of Nald'thal.
- Focus: Time Magicks -- One of the most dangerous forms of magic due to the myriad unknown consequences it can produce. Thankfully these spells are highly difficult to learn and master, but that hasn't stopped some mages from trying.
General: Magic Lore
With a focus more on the knowledge of spellcraft and things related to Magicks moreso than different schools of magicks, these lot break spells down to their most basic of components.
- Focus: Spellsmithing -- You are an expert in crafting new spells for various uses, or potentially repairing or enhancing lost magicks.
- Focus: Spell Translation -- You can easily translate spell tomes, scrolls, and ancient magic languages.
- Focus: Rituals -- Rituals are spells which require more work than instantly casting from a focus. You know all about creating rituals, the items they need, and what their effects are.
- Focus: Void Lore -- You have studied the hierarchy of Voidsent and can identify them or Void-related items and magicks.
- Focus: Rune Lore -- You understand the principles of rune magic and how to inscribe runes carefully to enchant weapons and items.
Technology Specialties:
General: Engineering
Engineering oversees designing, evaluating, developing, testing, modifying, installing, and inspecting various products and systems, both electricity-based and otherwise.
- Focus: Maintenance -- Your focus is based on keeping things from breaking, as well as functioning properly. Be it Airships or the mechanical workings of the estate, your duties are what help keep things running.
- Focus: Vehicles -- From Airships to tanks, you aid in designing, creating, driving, and repairing them all.
- Focus: R&D -- The heart of the Technology department, Research and Development's drive is to develop new services and products, while improving existing ones.
- Focus: Mammetry -- The creation, maintenance, and development of mammets.
- Focus: Circuitry -- You study aethero-circuitry that allows for magitech to function, and basic electrical outputs.
General: Magitek Study
Many drawn to technology are most interested in machinery powered by external sources like Ceruleum.
- Focus: Magitek Arms -- The development, maintenance, and testing of weaponized magitek.
- Focus: Machina -- You create, repair, and field test machina of different types, from generators to warmachina.
- Focus: Ceruleum Study -- You have a good understanding of the properties of Ceruleum, and how it interacts with other objects.
- Focus: Forgekin -- Distinct from mammets, automatons given rudimentary forms of life are of interest to many technologists.
General: Allagan Technology
The mysteries of Allag are one of the most interesting among many fields, especially those interested in their inventions and machina.
- Focus: Biomagitek -- You research, develop, and create magitek designed to enhance the capabilities of living creatures, typically by implementing them onto the subject themselves.
- Focus: Allagan A.I. -- Your focus is on the artificial intelligence of Allagan Nodes; how they function and even how to mimic their abilities.
- Focus: Allagan Reproduction -- You study how to reproduce technology from Allag or produce technology based on Allagan designs.
General: Unusual and Abstract Technologies
Beyond the scope of those technologies commonly studied in Garlemald, the city-states of Eorzea, and the ancient examples of Allag, there are many other places and peoples with their own technologies. Those who study these fringes also tend to appreciate the more abstract side of technology.
- Focus: Beast Tribe Technologies -- From the tinkersmithing of the wandering Goblins to the constructs of Vylbrand’s Kobolds and beyond, you are familiar with those technologies employed by the various Beast Tribes that inhabit the star.
- Focus: Foreign and Niche Technologies -- From the Hanyas and Kiyofusas of the Far East to other technologies employed by people far afield and little known, you have taken the time to study those works that are generally on the fringe of what most technologists work with. Even when you encounter technologies totally foreign and unknown to the world at large, you are likely to be able to glean at least some information from them.
- Focus: Systems and Methodology -- Technology is the application of knowledge in the creation of material and immaterial things that are meant to achieve objectives, from spoons to Magitek armor to business models to laws. You have studied these things on a broader scale - the way laws come together to create a judicial system, the way metal pieces come together to create a Magitek armor, the way people organize and create systems that are more than just the sum of their parts. Technology is, in this way, also technique - the way things are done, the methods we employ to achieve our goals. You do not understand all systems and methods in detail, but you are skilled at analyzing them in a broader sense.
- Focus: Cooperation and Communication -- You have spent much time learning how technology can be used to improve the lives of others. You are skilled in analyzing situations to figure out how to improve efficiency and solve issues through the use of new techniques and creations. This Specialty also covers the study and use of communication technologies, such as linkpearls.
Alchemy Specialties:
General: Fundamental Alchemy
Brave are those who seek to make sense of the physical world down to the molecule. Those who do know some tried and true mechanisms of the world with which to form their hypotheses.
- Focus: Metallurgy -- You understand the composition of metals and how to identify and form alloys.
- Focus: Potioncraft -- A simple affair, but one that can easily be done wrong! You know the ins and outs of making potions and other liquids.
- Focus: Combustion -- Fire is much more than simple magic, and you know how various forms of matter combust, and how to stop them from doing so.
- Focus: Aetheric Ink Creation -- You know the foundation of creating aetherically-conductive ink for use in creation of tomes and aetheric circuits.
- Focus: Enchantment -- Bestowing special traits and abilities into items is a hallmark of alchemy, and something you know well.
General: Organic Alchemy
All life is made up of similar substances, enough so to justify their study as its own field. Organic alchemists narrow their focus on these interesting reagents.
- Focus: Bioalchemy -- You focus on the study of living specimens and how to improve their quality of life through alchemy.
- Focus: Poisons and Toxins -- You understand the substances that prevent the continuation of life, whether to prevent them or use them nefariously. This does not mean you have them on hand at all times
- Focus: Fuels -- The combustion of certain life substances allows devices to function, making an understanding of these fuels crucial in some industries.
- Focus: Edible Alchemy -- Cooking is as much a science as an art, but you focus on the former. You can determine if a substance is edible, how to prevent foodborne illness, and how to season food perfectly.
- Focus: Naturalist Alchemy -- Folklore teaches the benefits and detriments of different plants passed on through generations. You study the alchemical value of plants and herbal remedies.
General: Experimental Alchemy
Alchemy requires more than simply copying the experiments of others, but at times it can become dangerous. Still, a scholar isn’t worth their salt if they aren’t willing to get their hands a bit dirty. Or their eyebrows singed off.
- Focus: Aetheric Alchemy -- Aether is in all things, but applying it to physical objects can be dangerous. Less advanced than Allag’s Aetherochemistry, Aetheric Alchemy is a blend of modern-day aether studies to enhance or change an alchemical reaction.
- Focus: Bestial Essences -- Most organic substances are derived from plants, with only a handful being taken from animals. You go above and beyond, studying how the essence within monster parts can be harvested and used to their full effect.
- Focus: Extreme Material Handling -- There are many prized but dangerous materials capable of use in alchemy, and handling them with intense care is a highly important skill. Some even dedicate their lives to the handling of these substances alone.
- Focus: Chimera Study -- Beasts formed by the Allagan Empire of eld, many alchemists see these creatures as the pinnacle of alchemical prowess. Creating them nowadays is near impossible, but studying them and knowing how to care for them is a field full of potential.
Challenge Specialties:
General: Fighting Styles
Many people know how to fight, but the actual study of fighting, also known as Hoplology, is equal parts an art and science. You study and can recognize different fighting styles.
- Focus: Unarmed Arts -- Practitioners of unarmed combat know that their body can be as deadly as any blade when trained right. You can recognize when someone is trained in unarmed combat.
- Focus: Melee Weapon Arts -- You can recognize when someone is trained in melee weapons such as swords, axes, and spears, and can get an idea of the quality of a melee weapon.
- Focus: Ranged Weapon Arts -- You can recognize when someone is trained in ranged weapons such as bows, firearms, and throwing weapons, and can get an idea of the quality of a ranged weapon.
- Focus: Magic Combat Arts -- While not trained in the finer understandings of magic and aether, you can recognize when someone is capable of casting different types of offensive magicks or how they weave aether in with other combat arts.
General: Glory Hound
Seeking out fame and recognition is what being a student of Challenge is all about! You know how to boast, and often how to put action behind your words too.
- Focus: Trophy Hunter -- You collect trophies of your accomplishments, and can tear off or find these trophies with ease.
- Focus: Ambush Tactics -- Sometimes glory is all about getting the upper hand first. You know how to set up a fight ahead of time in your favor, should you already be aware of it.
- Focus: Reckless Antics -- Some fly by the seat of their pants rather than understanding everything they’re actually doing, and that’s just fine. These spur of the moment antics are what you excel at. Just don’t expect things to go smoothly.
- Focus: Pickpocketing & Heist Planning -- "What's yours is mine" is a simple way of living, and you live it well. Whether it's deftly taking things live and in person from someone's pockets, or spending your hours plotting to delve into the realm's most guarded vaults, you live your life on the edge...one sneaky score at a time.
General: Know Thine Enemy
Most fighters naturally learn about the different types of enemies they face over time. You’ve taken it a step further, having actively studied how to beat some of your targets efficiently.
- Focus: Monster Hunter -- Eorzea is made up of all types of beasts, and you know just how to track and take them out.
- Focus: Man Hunter -- The peoples of Eorzea can be far more dangerous than mere beasts. You know effective ways to cripple or even kill others should you have the need to, and can easily track people down if it's required.
- Focus: Void Hunter -- Creatures of the Void are among some of the most terrifying, leading some to pursue hunting them down as a life’s work. You are able to track Voidsent and have some know-how in dismantling their charms and magicks.
- Focus: Primal Hunter -- Only the most fierce of warriors fight against Primals or Primal-like beings and live to tell the tale. You are one of them, and know how to prepare for an encounter with one.
- Focus: Military Tactics -- You can easily analyze enemy positions and uncover safe or advantageous positions for you, your foes, and your party members. Identifying good ambush points for your friends and imposing disadvantages on your opponents is a simple task for you.

Health Specialties:
General - Health Studies
A good physician is forged from the pillars of astute observation, acute knowledge, and compassionate bedside manners. You’ve learned the fundamental procedures of the medical field such as treating basic wounds, caring for patients, and diagnosing common illnesses.
- Focus: Psychology - You are dedicated to the study of mental health, and go above and beyond to try and keep those you study in a healthy state of mind.
- Focus: Chirurgeony - Over the years, you've gained a deft hand, and a knowledge of surgical techniques.
- Focus: Pathology - You're studying the causes and nature of diseases. Through microscopic examination and clinical lab tests, pathologists work to diagnose, monitor, and treat diseases. They examine tissues, cells, and body fluids, applying biological, chemical, and physical sciences within the laboratory. They may examine tissues to determine whether an organ transplant is needed, or they may examine the blood of a pregnant woman to ensure the health of the fetus.
- Focus: Healing Magicks - Through your studies, you’ve gained a proficient skill in dealing with wounds through the use of healing magicks. You’re also able to quickly identify magically afflicted ailments and diseases to ensure the safety and proper treatment of your others.
General - Medicine
Magicks are not the only form of healing a physician may learn; sometimes it takes one with the proper knowledge and ingredients to save one’s life. You’ve proven yourself capable of concocting basic potions, tinctures, and medicines to treat your fellow man in their times of need.
- Focus: Emergency Medicine - Your focus is care for patients in emergency situations (deadly wounds, loss of limbs, etc.)
- Focus: Preventative Medicine - You work to prevent disease by promoting patient health and well-being, covering elements of biostatistics, epidemiology, environmental and occupational medicine. The field combines elements of medical, social, economic, and behavioral sciences to understand the causes of disease and injury in population groups.
- Focus: Anesthesiology - Those who enter this field of study are typically dedicated to pain relief in their patients.
- Focus: Internal Medicine - You study diseases of the heart, blood, kidneys, joints, digestive, respiratory, and vascular systems.
General - Anatomy/Physiology
Proper knowledge of the body is the foundation to a physician’s study; you know of the inner workings of the body as well as its organs.
- Focus: Physical Rehabilitation - You try to help patients with disabilities of the brain, spinal cord, nerves, bones, joints, ligaments, muscles, and tendons. Unlike other physicians, these folk work to improve patient quality of life, rather than seek medical cures.
- Focus: Neurology - Neurologists diagnose and treat diseases of the brain, spinal cord, peripheral nerves, muscles, autonomic nervous system, and blood vessels.
- Focus: Autopsy - A physician’s work is never done even for those who have fallen. People who focus upon this line of study are more than capable of identifying the cause and manner of one’s demise.
Information Specialties:
General: Information Gathering
Not everything for these persons involves espionage, in fact, most of their work is the accruing and analyzing of information in many forms.
- Focus: Rumormonger -- From a life with their “ear to the ground” so to speak, these folk are adept at taking the idle chatter of the masses and wringing truth from it.
- Focus: Data Analysis -- These folk spend much of their time behind a desk, yet, they’re no less vital for it; no others can look at masses of raw information, looking for the finest details until they find what they're looking. They can very easily determine trends or anomalies, even through paperwork that would make most people's eyes glaze over...
- Focus: Forensics -- Dealing with crime is an unfortunately common part of being a follower of Information, these people have a hawk’s eye when it comes to examining the scene of physical law-breaking.
- Focus: Interrogation -- Anything from skilled questioning to flat-out torture is what these people focus on, making sure they get information from an individual one way or another.
General: Espionage
The other side of the coin to gathering information, these individuals are deployed to more dangerous situations in order to examine the foes and potential threats.
- Focus: Sabotage -- Skilled hands and rudimentary knowledge of many things from magic to technology, these people while incapable of using this knowledge to make or repair instead use it for negative goals; to destroy, to lame, or to disfigure.
- Focus: Shadowing -- When it comes to following a mark or vanishing into a crowd, you are above the grade; hours of training allow them to melt into the surroundings while following or observing a target.
- Focus: Codes and Cyphers -- No spy would be caught dead unable to decipher hidden messages in things invisible ink, encrypted missives, or dots and dashes.
- Focus: Disguise -- Whether weaving magicks to create illusions or if you're an expert on prosthetics and makeup, you can alter yourself and others to enough of a degree where people wouldn't look twice. [Within REASON.]

General: Unsavory Insight
The dark side of society; banned goods, money changing, and fugitives. You immerse yourself in the dredges of the world in order to aid their allies.
- Focus: Underworld Trading -- These folk ply the dark markets of the world; keen on finding illicit goods they know just where to find them and how to behave in such circles.
- Focus: Mark Tracker -- From finding those who've vanished, have gone on the lamb, or those with a price on their head; these individuals ply the dark tides of society to find their mark.
- Focus: Illicit Appraiser -- While an Underworld Trader finds and procures goods, these people draw on experience to determine whether illicit goods are genuine, if they’re illegal in the first place, and just what the heck they’re looking at when it comes to items procured outside of the law.
- Focus: Source-Finding -- You can easily find people willing to talk about things to you, on a variety of subjects. If there's something someone needs to find, you likely know someone who can point you in the right direction...
Culture Specialties:
General: Religion
Faith moves mountains, and is often the reason for many cultural phenomena. You understand theological ideas and studies.
- Focus: The Twelve -- The most widely worshiped religion in the world, especially in Eorzea. It includes the gods Halone, Menphina, Thaliak, Nymeia, Llymnlaen, Oschon, Byregot, Rhalgr, Azeyma, Nald’thal, Nophica, and Althyk. This includes the myriad Saints of the Twelve, people who accomplished great deeds for the good of all.
- Focus: The Kami -- A religion practiced in the Far East, including Doma and Hingashi. The Kami cover many things including celestial entities, deified people, long-lived flora and fauna, or items that gained divine spirits. There are also greater deities said to have descended from the heavens called Amatsukami, who include Amaterasu, Tsukuyomi, and Susano.
- Focus: The Manusya -- Practiced by the people of Thavnair, the Sisters and other divine beasts play a large role in Thavnairian religion.
- Focus: Azim and Nhaama -- The faith of the Azim Steppe in Othard. Azim, or the Dawn Father, is represented by the Sun, while Nhaama, the Dusk Mother, is represented by the Moon. It is believed that Raen are the offspring of Azim and Xaela are the offspring of Nhaama.
- Focus: The Light of Kiltia -- The old faith of Dalmasca which had its worship banned and institutes abolished by Garlemald after its occupation. It followed a pantheon of gods headed by Faram, the god of light. Other gods within the faith included Miriam, Arnath, Artemis, Nike, Kali, Ravana, Asura, Kadesh, Marduk, Palolo, and Tamulis.
- Focus: Tribal Gods -- Many of the Beast Tribes of the world have their own deities and customs surrounding them. You have taken the time to study these lesser-known deities and their religious worship.
- Focus: Minor Religions -- There are some regions of the realm with lesser known religions and coinciding deities. You study these fringe religions.
General: People of Etheryis
The many people of Etheryis have all come to rest where they are through migration and survival. Rather than nations and countries, you focus on the different ethnicities of Hydaelyn and their societal origins.
- Focus: Western Natives -- You study the origins and development of Hyur, Elezen, Miqo’te, Roegadyn, and Lalafell in Eorzea and Sharlayan.
- Focus: Near Eastern Natives -- You study the origins and development of Hyur, Viera, Bangaa, Seeq in Thavnair, Corvos, Uznair, and Dalmasca.
- Focus: Far Eastern Natives -- You study the origins and development of Hyur, Au Ra, Lupin, and Roegadyn in Othard and Hingashi.
- Focus: Northern Natives -- You study the origins and development of Garleans, Roegadyn, Miqo'te, and Hrothgar in Ilsabard, Corvos, and Aerslant.
- Focus: Far Western Natives -- You study the origins and development of natives to the New World, including Hyur and Mamool Ja.
- Focus: Southern Natives -- You study the origins and development of Hyur, Lalafell, and other natives in the South Sea Isles and Meracydia.
- Focus: Beast Tribes -- You study the origins and development of beast tribe societies such as Goblins, Amalj’aa, Ixal, Kobolds, Sylphs, Sahagin, Namazu, Kojin, Vath, Vanu Vanu, Moogles, etc.
- Focus: Dravanians -- You study the origins and development of dragons, their broods, and transformed Ishgardians.
General: National Cultures
Modern borders between countries and states are important to the politics of the world and global interactions.
- Focus: Eorzea -- You study the country of Eorzea’s culture, history, laws, and politics. This includes the city-Ul’dah, Limsa Lominsa, Gridania, Ishgard, and Ala Mhigo.
- Focus: Sharlayan -- You study the country of Sharlayan’s culture, history, laws, and politics.
- Focus: Thavnair -- You study the country of Thavnair’s culture, history, laws, and politics. This includes neighboring regions like Corvos.
- Focus: Dalmasca -- You study the country of Dalmasca's culture, history, laws, and politics.
- Focus: Nagxia -- You study the country of Nagxia's culture, history, laws, and politics.
- Focus: Doma -- You study the country of Doma's culture, history, laws, and politics.
- Focus: Hingashi -- You study the country of Hingashi's culture, history, laws, and politics.
- Focus: The Azim Steppe -- You study the country of the Azim Steppe's culture, history, laws, and politics.
- Focus: Bozja -- You study the country of Bozja's culture, history, laws, and politics.
- Focus: Garlemald -- You study the country of Garlemald's culture, history, laws, and politics.
- Focus: The New World, Tural -- You study the Tural continent and what is currently known about it and the culture of its inhabitants.
- Focus: Meracydia -- You study the southern continent of Meracydia and what is currently known about it and the culture of its inhabitants.
- Focus: Modern Linguist -- While most civilizations have defaulted to Eorzean as their main language, there are some civilizations that still primarily speak a national tongue. You study these languages and may know how to speak them.
Artistry Specialties:
General: Craftsman
You know the basics of working with different materials, turning items from the natural world into practical items for everyday use.
- Focus: Blacksmithing -- These crafters specialize in working with black metals like iron and steel, usually to make items like tools.
- Focus: Goldsmithing -- These crafters specialize in working with white metals and gems, usually to make jewelry.
- Focus: Carpentry -- These crafters specialize in shaping wood into various items, tools, and furniture pieces.
- Focus: Stoneworking -- These crafters specialize in shaping stone into various items, tools, and furniture pieces.
- Focus: Weaving -- These crafters specialize in using plant and animal materials to make wearable clothing and other cloth items.
- Focus: Leatherworking -- These crafters specialize in using animal hides to make wearable and decorative items.
General: The Arts
There are many skills and crafts that don’t seem to have any utilitarian value, but appeal to the emotional soul. You are skilled not only in your own ability, but have a keen eye for methods used by others with similar crafts as your own.
- Focus: Painting -- Your skills lay in painting, whether it be landscapes, still life, or portraits.
- Focus: Songsmithing -- Your focus is on weaving word and song to create memorable and elaborate musical pieces.
- Focus: Wordsmithing -- Poetry, stories, and tales have their value in teaching lessons and preserving culture. You too are adept in these ways.
- Focus: Culinary Arts -- The balance of flavor, presentation, and timing are all unique to the Culinary Arts. Your focus lies in understanding these methods and applying them accordingly.
- Focus: Architecture -- Without a proper architect, structures crumble and lives suffer. Your unique eye for detail concerning the building methods of various lands, ages, and cultures allows you to recognize and imitate these abilities, as well as develop your own.
- Focus: Performance -- You're able to sing, dance, or perfom in your own way to provide entertainment to others.
General: Arms Knowledge
There is an art to crafting weapons and armor that separates their creation from other crafts. You understand this well.
- Focus: Armor and Shields -- You comprehend the methods used to create and repair all manner of shields and armors, from heavy platemail, to scale male.
- Focus: Bladed Weapons -- You are knowledgeable in the skills needed to create, identify, and repair various bladed weaponry from all over the realm, from daggers to swords to greatswords.
- Focus: Polearms -- Your abilities allow for you to understand the methods used to forge and properly handle all manner of polearms, from the scythes of Reapers to the spears of Ishgardian Dragoons.
- Focus: Gauntlets -- You have skills relating to the design, forging, and handling of weapons traditionally used by martial artists, Monks of the Fist of Rhalgr, and pugilists.
- Focus: Throwing Weapons -- You understand what it takes in order to create and make weapons designed to be launched by hand, such as the kunai of ninjas.
- Focus: Hafted Weapons -- Weaponry such as axes, clubs, maces, flails, whips, and warhammers are your skillset.
- Focus: Ranged Weapons -- You are knowledgeable in the skills needed to create, identify, and repair all manner of bows, crossbows, pistols, and other ranged weaponry.
- Focus: Foci -- Your abilities allow for you to comprehend the methods used to create magical foci, such as tomes, nouliths, staves, wands, and rapiers used by Red Mages.
Land Specialties:
General: Survival
You’re an outdoorsy person who understands the basics of surviving and thriving out in the wilderness.
- Focus: Cartography -- You can easily read, decipher, and create maps.
- Focus: Wildlife Ecology -- You focus on how plants and animals relate to one another within the delicate balance of their ecosystems.
- Focus: Mountains -- You know how to navigate mountainous and rocky terrain and know the wildlife usually found in them.
- Focus: Grasslands -- You know how to navigate plains and flatlands and know the wildlife usually found in them.
- Focus: Coastal -- You know how to navigate in coastal areas and shallow waters, and know the wildlife usually found in them.
- Focus: Deep Sea -- You know how to navigate on the open sea and deep beneath the waves, and know the wildlife usually found there.
- Focus: Caverns -- You know how to navigate through caverns and other dark places, and know the wildlife usually found in them.
- Focus: Forests -- You know how to navigate through different types of forests and woods, and know the wildlife usually found in them.
- Focus: Deserts -- You know how to brave deserts and badlands, and know the wildlife usually found in them.
- Focus: Arctic -- You know how to survive in very cold climates and know the wildlife usually found in them.
- Focus: The Clouds -- You know how to survive above the clouds, atop airships, floating islands, or otherwise.
General: Geology
You understand Hydaelyn’s physical structure and substance, its history, and the processes that act on it.
- Focus: Stone Identification -- You have studied rocks, minerals, and ores, and have the ability to identify them easily.
- Focus: Mining and Quarrying -- You know how to wield mining tools effectively, where to find ore veins, and how to quarry useful stones.
- Focus: Paleontology -- You can find and identify fossils of varying types, and can extract them easily.
- Focus: Soulkin Study -- Living creatures formed of stone with a unique Soul Stone core, Soulkin are mysterious and interesting to geologists and aetherologists alike.
General: Botany
You study the physiology, structure, ecology, distribution, classification, and economic importance of plantlife.
- Focus: Plant Identification -- You have studied many different types of plants and can identify them easily.
- Focus: Plant Husbandry -- You can cultivate different types of plants and grow your own, even possibly modifying them to suit your needs.
- Focus: Harvesting and Logging -- Taking materials from a plant without too much damage is an important skill, and you can do so with both small plants like herbs or large plants like trees.
- Focus: Seedkin Study -- Living creatures formed of nothing but plant material, Seedkin are of great interest to some botanists and plant lovers.
General: Zoology
You study the many creatures of Hydaelyn, including the evolution, classification, habits, and distribution of all animals, both living and extinct, and how they interact with their ecosystems.
- Focus: Animal Husbandry -- You can breed, feed, and take care of animals of all types.
- Focus: Scalekin Study -- You understand the physiology of scaled creatures and can easily identify or work with them.
- Focus: Cloudkin Study -- You understand the physiology of most flying creatures and can easily identify or work with them.
- Focus: Beastkin Study -- You understand the physiology of warmblooded land animals and can easily identify or work with them.
- Focus: Vilekin Study -- You understand the physiology of insects and can easily identify or work with them.
- Focus: Wavekin Study -- You understand the physiology of sea-based animals and can easily identify or work with them.
Archaeology Specialties:
General: History
Some do not take the time to learn history as a whole. The focus on history allows archaeologists to share the importance of it, and explain why time throughout the eras are important.
- Focus: First Umbral/Astral Era -- Also known as the end of the Age of Gods and the beginning of the Age of Man. Following the Calamity of Wind, this point in time covers the invention of tools and basic sciences and the beginning and end of hunter-gatherer lifestyles. How long ago this was is a mystery to this day.
- Focus: Second Umbral/Astral Era -- Also known as the Age of Prayer. Following the Calamity of Lightning, this point in time covers the migration of people to caves during nature-made “eternal darkness”, the creation of prayer-based magicks, the rise of theocracy, and the advancement of arts and steelwork. This time was well over 6,000 years ago.
- Focus: Third Umbral/Astral Era -- Following the Calamity of Fire, this point in time covers the holy wars, the witch hunts, and the subsequent rise and fall of the Allagan Empire up to 6,000 years ago.
- Focus: Fourth Umbral/Astral Era -- Following the Calamity of Earth, this point in time covers the great loss of knowledge and the eventual reversion of technology back to pre-Allagan levels as mankind rebuilt.
- Focus: Fifth Umbral/Astral Era -- Following the Calamity of Ice, this point in time covers the migration of many people including the Miqo’te and the creation of modern magicks, including the pioneering of black magicks, white magicks, and scholarship.
- Focus: Sixth Umbral/Astral Era -- This point in time covers the start and end of the War of the Magi, the start of many modern nations including Eorzea, the start of the Dragonsong War, and much of recent history in the last 1,572 years.
General: Ancient Studies
Your skillset lies in the knowledge hidden beneath the earth, uncovering information lost within shattered pottery and lost bones.
- Focus: Artifact Lore -- You can easily identify magicked items that are found in ruins, and understand not only their abilities, but what their purpose.
- Focus: Skeletal Lore -- The remains of the dead can tell a tale of times long past, and you have the ability to comprehend them.
- Focus: Ancient Tales -- Your knowledge of the stories of eld can often help you uncover greater mysteries before you and your companions.
- Focus: Preservation -- A skillset requiring keen eyes and cautious hands, your calling is to ensure relics uncovered are kept unbroken and, eventually, restored to their former glory.
- Focus: Chronology -- To understand the future, you must understand the past...and to see a clear picture, one must put things back in order. Your focus is to uncover how events happened...and when.
- Focus: Ancient Civilizations -- Nations long dead by way of war, calamity, or misfortune are where you specialize. You've spent much time studying these realms and understanding how their cultures impacted modern society.
- Focus: Ancient Linguist -- Your focus is on languages long lost, recovering the written and spoken word of places and people long since passed.
General: Archaeological Fieldwork
Fortune favors the bold. Not all information is found in a history book. There are some lost shards of history still deep in the ruins of old. Relic hunters primarily focus their efforts on the field and dig sites alike.
- Focus: Dungeoneering -- You can carefully navigate ancient ruins without becoming lost.
- Focus: Trapfinding -- Seeing potential traps and disabling them appropriately can save the lives of yourself and others.
- Focus: Excavation -- Being able to carefully and quickly unearth potential relics is a staple of archaeology, and you are no exception.
- Focus: Surveying -- Before you dig for ruins and treasure...you must first know where to look.
- Focus: Soft Touch -- A clumsy hand can cost you the entire measure of your precious treasure's worth. Blessedly, you have the skills to handle delicate work.
Records Specialties:
General: Economics
Knowing how money changes hands is a highly coveted skill within developed societies.
- Focus: Accounting -- You have knowledge of funds going in and out of the organization and other companies of interest.
- Focus: General Market Studies -- You can easily navigate markets, tell when you’re getting swindled, can haggle easily, and can tell when trends in the markets are going to rise or fall.
- Focus: New Market Opportunities -- Your knowledge of the markets lends you an easy eye for spotting which up and coming items may be priceless or highly demanded, and which are only passing fads.
- Focus: Money Fraud -- Your ability to notice trends in a sea of numbers and paperwork can detect when someone is pulling the wool over someone’s eyes. You can also spot fake currency with a bit of study.
- Focus: Bartering -- With your knowledge of how money trades hands, you’re better at striking deals and ensuring you make the most out of an exchange.
General: Tome Handling
You know how to treat a book and the skills best used to quickly locate information held within them.
- Focus: Tome Restoration -- You have studied techniques on how to carefully restore damaged books, tomes, and scrolls of various materials.
- Focus: Transcription -- You are able to copy the materials from one or more written works into another, and can quickly jot down notes from them.
- Focus: Translation -- You understand how to translate written works from one language to another, provided you either know the language or have a translational dictionary.
- Focus: Archivist -- You assess, collect, organize and maintain records and tomes for long-term preservation.
- Focus: Speed Reading -- Skimming through a tome to find specific information you need is a practiced skill. What could take hours to find among pages and passages, you can locate quickly by logical assessment of paragraphs from the first few lines.

All About Archetypes
The Archetype system allows for players to more clearly define the role they are performing in a given situation. Magic and weapon styles are not static, stuck to just one job, and therefore the archetype system allows people to be more specific about how they're using their abilities!
THE DEFENDER
Defenders are precisely what they sound like, using their weapons, armor, magic, and more in order to keep themselves or their allies safe from harm. For those who follow the Defender path, putting points into certain stats will allow you for greater range of how you go about protecting what you consider important!
THE ASSAILANT
When battle comes, your ultimate goal is to deal as much damage to the enemy as possible, through whatever means needed. Raw damage is your entire focus, no matter what you have to sacrifice in order to see it done. Putting points into damage stats, such as Strength, Magical Power, and Dexterity will give you further benefits to up your numbers!
THE SUPPORT
In times of strife, sometimes sheer power isn't enough to bring down a foe--and this is where the Support shines. Buffing their allies and bringing slings to their opponents makes the fight much easier with the Support on your side. Putting points into specific stats will only help you perform this goal better!
THE HEALER
Without a Healer by the side of their party, they would most assuredly fail--it is a mammoth task, that few don't take for granted. While it is true that any player of any kind can stitch a wound or drink a potion, fewer are more skilled and adaptable at soothing hurts than someone in the Healer archetype. Placing your stat points into certain stats will only further your ability to keep yourself and your party upright and in the fight will only seek to further that ability, and allow for more challenging opponents!
NOTICE: You can only choose up to TWO (2) Archetypes! You can apply them to any number of stats though (one Archetype per stat).
EXAMPLE:
Bob is a DEFENDER and SUPPORT
Bob applies DEFENDER to his DEF stat and pays the appropriate Commendations to unlock things.
Bob now gets DEFENDER perks from his DEF stat, on top of his base stats.
Gaining Archetype Perks:
Depending on which Archetypes you pick, you will be allowed to select one of them to apply to each stat! Applying an archetype to a stat will allow you to customize your character and your playstyle to better suit whichever Archetypes you have selected! There's a wide variety to chose from, and many ways to customize your character to be uniquely yours!
Important Perk Notice:
Most perks are listed as either Swift Actions (SwA) or Reactions (RA). It's important to keep these things in mind when you're deciding what to do with your character's turn!
IMPORTANT NOTICE: The cost of applying Archetypes to stats!
Applying an Archetype to a stat point will cost 30 Comet Commendations which will apply the archetype to the stat, and unlock all perks up to your current tier.
YOU CAN ONLY SELECT ONE ARCHETYPE TO APPLY TO EACH STAT.
Stat Tiers
With each point put into a stat, you get closer and closer to reaching the next "Tier" of power. Tiers are the system's way of measuring and comparing levels of power.
Tier 0:
The level of your average, ordinary person, creature, and non-adventuring sort. The absolute weakest any character could possibly be, with the exception of younger or older creatures/children.
Stats of this tier add -100 to all of their rolls.
Tier 1:
The normal level of any typical adventurer, or someone with particularly high racial traits. (A Roegadyn NPC, for example, is likely to have higher STR than a Lalafell NPC.) Has a few fights under their belt, but nothing terribly impressive.
Stats of this tier add 0 to their rolls.
Tier 2:
More experienced adventurers. By no means experts, but with a few more scuffles to their name and a measure of understanding on bigger things going on in the world. Think members of the Scions of the Seventh Dawn.
Stats of this tier add +50 to their rolls.
Tier 3:
A Master combatant, mage, etc. Seasoned fighters in their respective classes who are fully prepared to use all their techniques should the need arise.
Stats of this tier add +100 to their rolls.
Tier 4:
A powerful opponent, a little stronger than someone who has studied their whole lives fighting. Think Gaius Van Baelsar or any of his cohorts. NPCs of this level will definitely be taking a lot of hits and packing a significant punch.
Stats of this tier add +150 to their rolls.
Tier 5:
This tier is the Warrior of Light in any cutscene. You're cutting through enemies, blasting powerful spells, all within the reason of a mortal being. You will have your match in forces of nature such as primals and other powerful beings, however. This tier is as far as any player characters can reach.
Stats of this tier add +200 to their rolls.
General Notice:
Please note that only NPCs can reach tiers above T5. For more information, see the COMET RP SYSTEM, Dungeon Master's Guide [Click]
Endurance (END):
Endurance Chart
| Archetype | Tier 1 | Tier 2 | Tier 3 | Tier 4 | Tier 5 |
|---|---|---|---|---|---|
| Defender | Defense Up | Rampart | Recover | Still Standing | Resilient Soul |
| Assailant | Accuracy Up | Bloodbath | Recover | Relentless | Revenge |
| Healer | Healing/Shielding +1 | Prolong | Recover | Surecast | Relinquish |
| Support | Support Up | Preparation | Recover | Shared Vigor | Reawakening |
HP Chart
| Archetype | Tier 0 | Tier 1 | Tier 2 | Tier 3 | Tier 4 | Tier 5 |
|---|---|---|---|---|---|---|
| Base | HP 5 | HP 7 | HP 8 | HP 8 | HP 8 | HP 8 |
| Defender | HP 5 | HP 7 | HP 8 | HP 10 | HP 12 | HP 15 |
| Assailant | HP 5 | HP 7 | HP 8 | HP 9 | HP 10 | HP 12 |
| Healer | HP 5 | HP 7 | HP 8 | HP 9 | HP 10 | HP 12 |
| Support | HP 5 | HP 7 | HP 8 | HP 9 | HP 10 | HP 12 |
"Archetype HP Block Replacement"
When an Archetype is applied to END, the Base HP values are replaced, not added.
General Perks
RA Recover:
Make a Raw Roll. If it is 700+, you may cleanse a single Negative Status Effect from yourself.
DEFENDER PERKS
Defense Up: PA
You take -1 damage from the first attack made against you each round.
Rampart SwA :
PA Still Standing:
PA Resilient Soul:
Your body can withstand the fiercest punishments, granting you Max HP beyond what any other Archetype offers.
ASSAILANT PERKS
PA Accuracy Up:
Your first Basic Attack each round gains +50 to hit.
SwA Bloodbath:
PA Relentless:
PA Revenge:
HEALER PERKS
PA Healing / Shielding +1:
Your heals have a +1 healing bonus. Shields you apply have +1 HP.
SwA Prolong:
PA Surecast:
SwA Relinquish
SUPPORT PERKS
PA Support Up:
Whenever you use the Help ability, you may use it on two targets instead of one.
PA Preparation:
The target of this ability (cannot target yourself) receives an extra +X HP the next time theyare healed by another target (cannot be yourself). If END Tier is 1 or 2 X=2, if END Tier is 3 or 4 X=3, and if your END Tier is 5 X=4.
SwA Shared Vigor:
SwA Reawakening:

Strength (STR):
Strength Chart
| Archetype | Tier 1 | Tier 2 | Tier 3 | Tier 4 | Tier 5 |
|---|---|---|---|---|---|
| BASE stat perks | Tougher Stuff | +50 STR | Resistance Mastery & +100 STR | +150 STR | Maximum Force |
| Defender | Defensive Training | Heavyweight | Bulwark | Permanent Protector | Immovable Fortress |
| Assailant | Focused | Leg Sweep | Empowered Blow | Double-Down | Fury Forged |
| Healer | Healing Stockpile | Thickening Agent | Alter Terrain | Double-Dosage | Sundries Galore |
| Support | Support Stockpile | Something Extra | Momentous Effort | Toughen Up | Special Delivery |
General Perks
Tougher Stuff:SwA
PA Resistance Mastery:
You gain +100 to your "Tougher Stuff" rolls.
Maximum Force StA
DEFENDER
Defensive Training PA :
When you use the defend ability, it grants you an extra +50 HC
Heavyweight SwA :
Bulwark StA :
Immovable Fortress PA
You may use the Defend, Tougher Stuff, Heavyweight, or Bulwark abilities by giving up your Movement Action on your turn (cooldowns still apply).
Assailant
Focused PA :
When you use Concentrate, instead of +1 damage, you gain +1 damage and +50 to hit on your next attack. If your STR is T5, this increases to +1 damage and +100 to hit.
Leg Sweep SwA :
Empowered Blow StA :
Double-DownPA :
Fury Forged PA :
You may use the Concentrate ability as a Reaction or by giving up your Movement Action on your turn, and you may use the Concentrate ability without using an action at the end of any turn in which you dealt damage.
HEALER
Healing Stockpile SwA :
You begin each Leve with a number of consumable items equal to your STR Tier that either heal one target for 2 Flat HP or cleanse one Negative Status Effect from on target. At Tier 5 STR, this effect becomes 3 Flat HP or cleansing 2 negative effects. Cannot target yourself.
Thickening Agent PA :
The target of your Stockpile items also gains a 1 HP Shield. [2 turn CD]
Alter Terrain RA :
Double Dosage PA :
When using one of your Stockpile items, you may use two at the same time instead of one. Each of these can affect a different target.
Sundries Galore PA :
The total number of Stockpile items you begin each Leve with is now 8.
"What Rolls use Strength?"
Lifting objects that might be heavy
Using weapons such as Swords, Knives, Rapiers, Axes, Fists, Whips, Spears, Katanas, Greatswords, and Gunblades
Specific situations (IE: Holding onto a cliff face, climbing the side of a building)
SUPPORT
Support Stockpile SwA :
You begin each Leve with a number consumable items equal to your STR Tier that either grant a target +2 damage/healing for two rounds or cleanse one Negative Status Effect from one target. At Tier 5 STR, increase the damage/healing to +3 or cleanse 2 status effects. Cannot target yourself.
Something Extra PA :
When you use Help, you may use one of your Stockpile items at the same time. Stockpile items used this way can only be used by your Help ability target.
Momentous Effort SwA:
Toughen UpSwA :
Special DeliveryPA :

Dexterity (DEX):
Dexterity Chart
| Archetype | Tier 1 | Tier 2 | Tier 3 | Tier 4 | Tier 5 |
|---|---|---|---|---|---|
| BASE stat perks | Second Chance | +50 DEX | Unbroken Gaze & +100 DEX | +150 DEX | Tactical Strike |
| Defender | Saw That Coming | Quick Maneuver | Fool Me Once | Nice Try | Flowing Steps |
| Assailant | Third Chance | Sudden Strike | Follow Up | Super Speed | Fierce & True |
| Healer | Second Heal | Touch Up | Hands-On | Aegis | Efficient Application |
| Support | Second Hand | Swift Assistance | Peleton | Timely Aid | Efficient Alacrity |
General Perks
Second ChanceRA :
Unbroken GazePA :
Tactical StrikeStA :
DEFENDER
Saw That Coming PA :
Your HC is upped by +100 against the first attack made against you by each enemy in a combat encounter.
Quick ManeuverStA :
Fool Me OnceSwA :
Nice TryRA :
Flowing StepsPA :
Whenever you successfully dodge an attack you gain 1 extra second of movement on your next turn, and -1 damage taken to the next successful attack made against you. These effects cannot stack.
Assailant
Third ChancePA :
Grants another use of Second Chance.
Sudden StrikeSwA :
Follow UpRA :
Super SpeedPA :
Fierce & TruePA :
HEALER
Second HealPA :
You may use the Second Chance ability to reroll a healing roll that you make that is 200 or less.
Touch UpSwA:
Hands-OnPA :
When healing targets within melee range, you gain +1 to healing and +50 to your healing rolls.
Ephemeral AegisSwA :
Efficient ApplicationPA :
Whenever you directly heal a target, all healing they would receive past their Max HP is converted into a Shield equal to 1/2 the amount of overheal. When you directly heal a target that has 1 HP or less, they are healed for an additional 2 Flat HP.
SUPPORT
Second HandPA :
You may use the Second Chance ability to allow an ally to reroll an attack they missed instead of yourself.
Swift AssistancePA :
PeletonSwA :
Timely AssistanceRA :
Emergency AlacrityMA :
"What Rolls Use Dexterity?"
Trying to aim at things from a distance.
Using weapons such as Throwing Knives, Bows, or Guns.
Catching things that may be thrown at you, or falling quickly.

Magical Power (MP):
Magical Power Chart
| Archetype | Tier 1 | Tier 2 | Tier 3 | Tier 4 | Tier 5 |
|---|---|---|---|---|---|
| BASE stat perks | Aether Eye | +50 MP | Aetheric Mastery & +100 MP | +150 MP | Conjured Miracle |
| Defender | Arcane Defense | Magic Barrier | Veil | Seamless Shell | Counterspell |
| Assailant | Arcane Sight | Elemental Adept | Expose Weakness | Power Surge | Doublecast |
| Healer | Arcane Aid | Mage Circle | Expansive Treatment | Esuna | Reraise |
| Support | Arcane Succor | Enspell | Debilitate | Magic Touch | Grand Arcana |
General Perks
Aether EyeSwA :
Aetheric MasteryStA :
Conjured MiracleStA :
DEFENDER
Arcane DefensePA :
When you use the Aether Eye ability, if you roll 700+, you also gain +100 HC against attacks made by the chosen target for 2 rounds.
Elemental BarrierSTA :
VeilSwA :
Seamless ShellPA :
You passively gain "Shell". If you would be granted Shell by some other ability, item or effect, give an ally in melee range Shell instead.
CounterspellRA :
Assailant
Arcane SightPA :
When you use the Aether Eye ability, if you roll 700+, your next attack against the target will deal +2 damage.
Elemental AdeptRA :
When you deal elemental damage to a target that matches their elemental weakness, you deal an extra +1 damage. If the target has no elemental weaknesses, your attacks against them gain +50 to hit. At T5 MP, this effect is increased to +100.
Expose WeaknessStA :
Power SurgeSwA :
DoublecastStA :
HEALER
Arcane AidPA :
When you use the Aether Eye ability, if you roll 700+, your next heal on the chosen target will heal them for an additional 1 Flat HP.
Mage CircleSwA :
Expansive TreatmentStA :
EsunaRA :
ReraiseSwA :
SUPPORT
Arcane SuccorPA :
When you use your Aether Eye ability, if you roll 700+, you also use the Scan ability on the chosen target.
EnspellSwA :
DebilitateStA
Magic TouchPA :
Whenever you use the Help ability, the target also gains the effects of your Enspell ability. They cannot gain Enspell while the effect is on cooldown.
Grand ArcanaSwA :
"What Rolls Use Magic Power?"
Identifying Aether or magical signatures (Using Aether Eye)
Casting Magic (Spells)
Using / identifying magical items

Defense / Evasion (DEF/EVA):
Defense Chart
| Archetype | Tier 1 | Tier 2 | Tier 3 | Tier 4 | Tier 5 |
|---|---|---|---|---|---|
| BASE stat perks | Defend | +50 Hide | +50 Hide | +50 Hide | - |
| Defender | Provoke | Shoulder to Shoulder | Defender's Blink | Protector's Gift | Stoic Heart |
| Assailant | Best Defense | Good Offense | Reversal | Assailant's Blink | Bend & Break |
| Healer | Hallowed Bastion | Guarded Seal | Union | Healer's Blink | Aetheric Transfer |
| Support | Dirge | Forespoken | Sirvente | Support's Blink | Vigilance |
Hit Class Increases
| Archetype | Tier 0 | Tier 1 | Tier 2 | Tier 3 | Tier 4 | Tier 5 |
|---|---|---|---|---|---|---|
| BASE | 75 | 175 | 250 | 325 | 375 | 450 |
| Defender | 75 | 175 | 250 | 375 | 475 | 600 |
| Assailant | 75 | 175 | 250 | 350 | 400 | 500 |
| Healer | 75 | 175 | 250 | 350 | 400 | 500 |
| Support | 75 | 175 | 250 | 350 | 400 | 500 |
Archetype Hit Class Replacement
When you select an Archetype to apply to the Defense stat, you will replace the BASE Hit Class values with that of the selected Archetype.
Hit Class Mechanics
Base 75: Even the most competent of foes can occasionally whiff an attack. Everyone no matter their Archetype or job has a basic hit class of 75 at Tier 0.
-
Tier 2 DEF/EVA: +50
-
Tier 3 DEF/EVA: +100
-
Tier 4 DEF/EVA: +150
General Perks
Inner Guard: Every Tier, your Hit Class (HC) increases according to your archetype. (See above.)
Defend (StA): Forgoing an attack, you may instead enter a defensive posture to increase your hit class by an additional +100 and reduce damage taken by 1, to a minimum of 1. This effect ends if another StA is taken.
DEFENDER
ProvokeSwA :
Shoulder to ShoulderSwA :
Defender's BlinkRA :
Guardians's GiftPA :
If you would gain HC greater than the HC cap allows (650HC), you may "give" any excess HC you would gain to an ally within melee range of you. The HC given this way lasts only one round.
Stoic HeartPA :

Assailant
Best DefensePA :
Whenever you use the Defend ability, you also use the Concentrate ability at the same time.
Good OffenseStA :
Make a single target Basic Attack with up to +500 to hit. For every +100 added to this attack's roll, you lose 100 HC until the start of your next turn. You cannot spend more HC than you have in this way.
ReversalSwA :
Assailant's BlinkRA :
Bend & BreakRA :
HEALER
Hallowed BastionPA :
Whenever you use the Defend ability, you gain +1 to your next heal.
Guarded Seal StA :
Make a single target Basic Heal and then use the Defend ability.
UnionSwA :
Choose a single target (cannot be yourself). For three rounds, you and the chosen target gain the effect "Union" -whenever you directly heal another target that has the effect "Union", they are healed for an additional 2 Flat HP.
Healer's BlinkRA :
Aetheric TransferRA
GENERAL NOTICE:
Your Hit Class cannot exceed more than 650, even with additional bonuses from items, jobs, ect.
This is to prevent more seasoned players from becoming "unhittable" and protecting newer players from event runners having to adjust numbers just to deal damage.
SUPPORT
DirgeSwA :
The willing target of this ability (cannot target yourself) gains +50 HC for each tier of DEF/EVA you have and is less likely to be targeted by enemy attacks (DM discretion) for one round. Cannot coexist with Provoke and similar effects. [4 turn CD]
ForespokenPA :
Instead of its normal effects, you may use your Help ability to allow a willing target (cannot target yourself) to immediately use the Defend ability.
SirventeStA :
Support's BlinkRA :
VigilanceSwA :
"What Rolls Use This Stat?"
Defense/Evasion is one of the few Stats that don't usually require a roll. Instead, it is a flat number used to determine how "tanky" or "swift" you are. Either Defense and Evasion can be used to negate or dodge damage, respectively.
However, Defense/Evasion is also used to determine the bonuses in case of using Hide. See the section on Hide Mechanicsfor more information.
Investigation (INV)
Investigation Chart
| Tier 1 | Tier 2 | Tier 3 | Tier 4 | Tier 5 |
|---|---|---|---|---|
| Sharp Eyes | Second Pair of Eyes / +50 to rolls | Trailblazer / +100 to rolls | Target Lock / +150 to rolls | Master Detective |
Tier 1:
You gain +0 to your rolls.
You don’t particularly notice anything out of the ordinary most of the time. If you concentrate on something or someone hard enough you might get some details, but it does take some time... things out of your experience range will go right by you without you even noticing.
Perk: Sharp Eyes
Tier 2:
You gain +50 to your rolls.
When you look at an object or person, you start to notice little details about them. It takes considerably less time to read ordinary people or surroundings, but cleverer foes, such as seasoned thieves, will still be able to fool you sometimes.
Perk: Second Pair of Eyes
Tier 3:
You gain +100 to your rolls. It’s easy to read people or the tracks of a simple beast, and noticing things that you would have easily missed as an ordinary person. You are able to recall pieces of information from the past with much less difficulty than before.
Perk: Trailblazer
Tier 4:
You gain +150 to your rolls.
Master thieves and average assassins cannot escape your keen senses. You can recount several pages worth of information without much time to think.
Perk: Target Lock
Tier 5:
With the ultimate dedication to the craft, nothing escapes your gaze.
Perk: Master Detective
IN COMBAT: Allows for the use of three instances of Scan, instantly revealing all information about a single enemy.
NOTICE: This ability can be used once in combat and once out of combat.
INVESTIGATION vs. The Environment
Bob wants to know if there are traps nearby.
Bob rolls a 500. He has no points in Investigation.
500-100= 400
The traps nearby have an Investigation Rating of Tier 3. Bob would have to have rolled over 600 to see the traps.
Bob walks into the trap and is injured.
"What Rolls Use Investigation?"
Spotting Traps
Trying to find clues or other items
Tracking non-magical targets
Pressing "X" to doubt.

Reason (RSN)
Reason Chart
| Tier 1 | Tier 2 | Tier 3 | Tier 4 | Tier 5 |
|---|---|---|---|---|
| Quick Thinker | Logical Rescue / +50 to rolls | Field Lesson / +100 to rolls | Lesson Learned / +150 to rolls | Scholarly Network |
Tier 1:
You gain +0 to your rolls.
You're not the smartest Chocobo in the cookie shed, and that's okay. You can remember some things, though recalling more obscure information is difficult for you in some higher-pressure instances.
Perk: Quick Thinker
Tier 2:
You gain +50 to your rolls.
Your critical thinking skills have improved, allowing for you to think back on things you learned previously, or logically deducing something based on prior patterns.
Perk: Logical Rescue
Tier 3:
You gain +100 to your rolls.
You are much more easily able to remember information you haven't recently thought about, and your mental fortitude is incredibly sturdy in situations where things could rattle others.
Perk: Field Lesson
Tier 4:
You gain +150 to your rolls.
Where others might balk and recoil in the face of pressure, you maintain a cool head. Your mental strength is considerable, giving you the ability to think back on pieces of knowledge from some while ago, and to figure out complex puzzles.
Perk: Lesson Learned
Tier 5:
Your understanding of critical thinking, mental fortitude, and the ability to access information is nigh unmatched...and your peers certainly appreciate your aid in more difficult quandaries!
Perk: Scholar Network
NOTICE: This ability can be used once in combat and once out of combat.

"What Rolls Use Reason?"
Remembering things you may have learned about.
Critical Thinking Skills!
Mental Fortitude!
Getting hints on a tough puzzle!
Works in-tandem with Charisma to see through lies.
Charisma (CHA):
Charisma Chart
| Tier 1 | Tier 2 | Tier 3 | Tier 4 | Tier 5 |
|---|---|---|---|---|
| Silver Tongue | Smooth It Over / +50 to rolls | Inspiring Presence / +100 to rolls | Commanding Voice / +150 to rolls | Joint Relations |
Tier 1:
You gain +0 to your rolls.
You’re able to talk to most sensible people without much hassle. If someone is experiencing frustration or fear, you’re typically able to talk them into coming back around to logical thinking and calm.
Perk: Silver Tongue
Tier 2:
You gain +50 to your rolls.
Talking to people is much easier, and angry or frightened people come around to you much faster. It takes some work to make your foes your friends, however, and convincing more informed people that a lie is a truth is still a work in progress...
Perk: Smooth It Over
Tier 3:
You gain +100 to your rolls.
Holding a conversation with people and convincing them is simple for you against ordinary people. However, more intelligent or more informed individuals may be difficult for you to persuade.
Perk: Inspiring Presence
Tier 4:
You gain +150 to your rolls.
It is now a breeze to talk to everybody from the smallfolk to experienced and worldly adventurers. Some could say you can convince a wild chocobo to give you all their feathers with words alone. Scrutinous people will be hard for you to fool, but not impossible, and convincing people you’re someone you’re not is simple. You can now also cause major distractions, such as a stampeding crowd.
Commanding Voice
Tier 5:
You are a master of people. You could talk the Sultana out of her crown, if it suited you. Probably. If you choose, people cannot take their eyes off you, or you can blend seamlessly into groups without consequence. You can calm any soul with enough effort put into it.
Perk: Joint Relations
NOTICE: This ability can be used once in combat and once out of combat.

CHA vs. RSN
NPC Steve is panicked because he just saw a gruesome murder.
Bob tries to calm NPC Steve down.
Bob rolls a 400. He has bonuses to his roll because of his points in Charisma. (+200)
NPC Steve has a Reason Tier of 0.
NPC Steve rolls a 600.
(600 - 100) - (400+200) = 100 (Remember your PEMDAS, people.)
Bob successfully calms Steve down.
"What Rolls Use Charisma?"
Interacting with NPCs
Causing Distractions
Performances
Convincing people of something
Charming Spells
Creating Items & Rules
When you have put enough points into Creation, you can begin making items and effects that have unique and useful properties. There are also instances where you may examine the body of a fallen enemy, and gain an item from them! Items can be used to benefit yourself or party members, or potentially give disadvantages to your enemies. Players with the CREATION stat will be able to better utilize and create items with more powerful effects and utilize items to their fullest extent!
A Note on Items
ALL items are subject to tweaking or, in worst case scenarios, removal if staff feels they're overpowered or created incorrectly. Staff will attempt to work with players to remedy these situations as best they can.
Decisions about approval of items can be taken back. Sometimes items end up working differently in play than concept, so please bear with us as we try to make the system fair for everyone.
Augmenting Items:
Beginning at Tier 3, you can use a crafting slot to augment an existing item. The time spent augmenting is equal to the time needed to make the original item. Augmentation allows for you to add a secondary effect to the original one placed upon an object either making that effect stronger OR granting it a secondary ability. A secondary ability on an item cannot be triggered at the same time as the first ability on an item. (Meaning you must pick between the two which you'd like to activate.)
Carrying Your Items:
You can only carry so many things around with you at a time, no matter how big your pockets or strong your back may be. In order to maintain balance with items, 9.0 "Bygone Serenity" introduced the "Weight System" to ensure people aren't carrying everything they have, constantly.
"How to I know how much I can carry?"
Your Creation Tier allows you to carry
Your CRE Tier x 2 amount of items on your person when out in the field. (So if you have Tier 2 creation, you have a carry weight of 4!)
"How do I know how much my item weighs?"
Creation items will always be the same weight as the tier they were made at. (So Consumables will cost nothing to carry, while Rare Items will cost 3, and so on!)
Creation Quick-Chart
Below is each level of item you can make and what they typically can do. If you just pick abilities from the following lists, the item is considered an Orthodox item and only needs 1 DM approval. If you wish to get a bit more creative and go ‘off script’ you are more than welcome too, but the item will be an Unorthodox item and require 2 DMs approval to ensure balance. (Orthodox vs Unorthodox only affect the approval process and have no effect once the item is finished!). Items now have a Carrying Capacity, see your CRE stat tier to see how much you can carry.
T0 – Consumable Items:
A one use item (it is gone forever once used) that can:
- Give 1 Stat a +25 Bonus to 1 Roll.
- Increase your Hit Class +25 for 1 Turn.
- Allow an ability to be Elementally Aspected.
CRAFTING TIME: 2 weeks
T1 – Common Items:
These items have effects that last (typically) for 3 turns followed by a 3 turn cooldown that can:
- Give 1 Stat a +50 Bonus to Rolls.
- Increase your Hit Class +50.
- Aspect all abilities to an Element.
- Give one of the following status effects: Regen, Bravery, Faith, Libra, Stoneskin, Shell, Protect, or a 2 HP Shield.
CRAFTING TIME: 2 weeks
T2 – Uncommon Items:
These items have effects that last (typically) for 3 turns followed by a 3 turn cooldown that can:
- Give 1 Stat a +75 Bonus to Rolls.
- Increase your Hit Class +75.
- Give one of the following status effects: Poison, Oil, Bleed, Bind, Blind, Silence, Paralyze, Addle, Sleep, Elemental Weakness, or Elemental Curse.
CRAFTING TIME: 3 weeks
T3 – Rare Items:
These items have effects that last (at most) for 3 turns followed by a 3 turn cooldown that can:
- Give 1 Stat a +100 Bonus to Rolls.
- Increase your Hit Class +100.
- Give one of the following status effects: Daze (only 1 turn), Frenzy, Disable (1 turn), Pain (2 turns), NulElement, BarElement.
CRAFTING TIME: 4 weeks
T4 – Unique Items:
These items have effects that last (at most) for 3 turns followed by a 3 turn cooldown that can:
- Give 1 Stat a +125 Bonus to Rolls.
- Increase your Hit Class.
- Give one of the following status effects: Reflect (1 turn), Vanish (1 turn), Inspired, Haste (1 turn), or a 4 HP shield.
CRAFTING TIME: 4 Weeks & 4 Journal Posts
T5 – Masterpiece Items:
These items have effects that last for 3 turns followed by a 3 turn cooldown that can:
- Give 1 Stat a +150 Bonus to Rolls.
- Increase your Hit Class +150.
- Give one of the following status effects: Mini, Break (both make this an Unorthodox item as balance will be needed)
CRAFTING TIME: 6 weeks & 6 Journal Posts
A Note from Agine
I beg you, do not waste a Masterpiece slot on an Orthodox Item.
Creation (CRE):
Creation Chart
| Tier 0 | Tier 1 | Tier 2 | Tier 3 | Tier 4 | Tier 5 |
|---|---|---|---|---|---|
| Basic Crafting | Common Crafting | Uncommon Crafting | Rare Crafting | Expert Crafting | Master Crafting |
| Tiny Pockets | Small Pockets | Medium Pockets | Large Pockets | Extra Large Pockets | Giant Pockets |
| Entry Workshop | - | - | Craftsman Workshop | Personal Workshop | - |
| Progress Report | - | Alpha Augmentation | - | Beta Augmentation | Gamma Augmentation |
| Patron | - | +50 to rolls | +100 to rolls | +150 to rolls | - |
General Perks (Tier 0):
Entry Workshop:
You are given access to a small area of the COMET Workshop. You can work on 1 item at a time, posting the progress in #the-item-worshop in the RP Discord.
Basic Crafting:
You are able to craft basic, one-use Consumable Items. It takes 2 weeks to complete the item.
Tiny Pockets:
Your Carrying Capacity is 0.
Progress Report:
You may cut down any craft’s timer by 2 days by writing a journal entry about the creation. This process can be repeated, with up to half the crafting of time being cut.
Patron:
You may Commission another player with Tier 3 or higher crafting to make an item for you, using their abilities. Both of your journal entries count toward the craft, so collaborate! You must include at least 2 interactions: A record of the moment of Commission, and the Final Hand off. The Patron must also pay Commendations for the craft, with the crafter getting ⅕ of them.
| Item Type | Patron Pays: | Crafter Gains: |
|---|---|---|
| Consumable | 5 | 1 |
| Common | 20 | 4 |
| Uncommon | 50 | 10 |
| Rare & Onward | 100 | 20 |
Tier 1:
You are a beginner at making magical or exceptional items. They can provide a boon, but due to your inexperience these items don't have much of a charge and they break as they are used.
Perk: Common Crafting
You are now able to craft Common items. These items take 2 weeks to make.
Perk: Small Pockets
Your Carrying Capacity is 2.
Tier 2:
Perk: Uncommon Crafting
You are now able to craft Uncommon Items. These items take 3 weeks to craft.
Perk: Medium Pockets
Your Carrying Capacity is now 4
Tier 3:
Your mind has blossomed, allowing for you to create items that become a lasting part of who you are, methods to further develop your own individual flare.
Perk: Craftsman Workshop Access
You have been granted a larger area to work in the COMET workshop. You can now craft 2 items at a time, as well as 1 commission for another player.
Perk: Rare Crafting
You are now able to craft Rare items. These items take 4 weeks to make.
Perk: Alpha Augmentation
You are now able to Augment items you already have 1 time. Augmentation takes up 1 of your workshop slots and takes the same amount of time as the original item did. Augmentation gives another ability as an option for the item (Note: this is either/or not both/and. You give item X which already has ability A, a new ability B, and then can choose A or B when you use it.) Normal approval rules still apply.
Perk: Large Pockets
Your Carrying Capacity is now 6
Tier 4:
You have gained mastery over the creation of custom spells and abilities, giving yourself access to the creation of stronger versions of the abilities you have created.
Perk: Personal Workshop
You have been granted your own private Workshop in the Estate. You can now work on 3 items at a time (but only 1 Job/Masterpiece level item at a time), and take 2 commissions.
Perk: Expert Crafting
You are now able to make Unique Items. These items take 4 weeks plus at least 4 journal entries about the progress IC.
Perk: Beta Augmentation
You are now able to Augment items 2 times. (When using item X, you can now use ability A, B, or C, they do not stack)
Perk: Extra Large Pockets
Your Carrying Capacity is now 8.
Tier 5:
You have mastered creation to the point where it is a essential part of who you are.
Perk: Master Crafting
You are now able to make a Masterpiece level item. Masterpiece items, by their nature cannot be Augmented. Masterpiece items take 6 weeks plus at least 6 journal entries about the progress IC.
Perk: Gamma Augmentation
You are now able to Augment items 3 times. (When using item X, you can now use ability A, B, C, or D, they do not stack)
Perk: Giant Pockets
Your Carrying Capacity is now 10.

So how do I go about starting this process?:
We recommend creating a section to post ideas for items. COMET has the "Item Workshop" in their roleplaying discord, where players will post their ideas based on their current creation tier. In one's post, they must denote the flavor behind the item, the intended effect, and their tier in creation.
But they said no...
There may be some back and forth from the Creation DMs in regards to the balance of your item, but once the request is made, the timer for creating your item has begun! A portion of the reason for the length of crafting an item is so when it is finished, it would have sufficient time to be discussed so the final product is balanced and okay to be brought into the system!
Patron:
You may Commission another player with Tier 3 or higher crafting to make an item for you, using their abilities. Both of your journal entries count toward the craft, so collaborate! You must include at least 2 interactions: A record of the moment of Commission, and the Final Hand off. The Patron must also pay Commendations for the craft, with the crafter getting ⅕ of them.
| Item Type | Patron Pays: | Crafter Gains: |
|---|---|---|
| Consumable | 5 | 1 |
| Common | 20 | 4 |
| Uncommon | 50 | 10 |
| Rare & Onward | 100 | 20 |
Commissioning Items:
People with higher tiers of Creation can make items for those who don't have access to the stat, or don't have access to that particular tier of the stat. These items still follow all the same rules as creation items made by people for themselves and are still subject to Officer approval. This addition to the system is here to help others engage with the Creation system and to encourage player interaction outside of Leves. It is a collaboration between players to help futher enhance RP.
To commission a creation item you need to find someone who has the applicable Creation Tier to make the item, and the necessary specialties. Just like creating items for yourself, you can only make items for others that you have the specialties for. So those who have Leatherworking specialties can't make swords or new spells, just like those with Health, Alchemy, or Magic specialties can't make a set of leather armor.
Roleplaying can shorten your crafting time!
Once you have someone who has agreed to make an item for you, there are a few additional steps that need to be done. First off you must RP with the creator at least once to begin the process of creating the Item. Additionally, these items will cost Commendations to make.
Additionally, yourself or the creator can create a leve tied to the creation of this item (such as gathering materials, or slaying a monster for parts). Doing this will reduce the time needed to make the item by 1 week.

Item Listing on your Character Sheet:
You'll notice on your character sheet that there is a tab dedicated to listing out all of the items your character has on their person, and what they do! This is to prevent people from pulling items out of thin air at the exact moment they need it, and letting people running events plan ahead for potential situations.
What you need listed:
- Weapons - (Hidden weapons are included.)
- Research tools - (Paper, Vials/Jars, Components, ect.)
- Survival tools - (Tents, Rope, Rations, ect.)
- Creation Items - (Items made with Creation.)
- Specialty Items - (Items won from events or the Gambler's Wheel of Fate.)
- Companions - (Mammets, Summons, Ect.)
To make it easier, if your character is carrying it on their person, or owns it, it needs to be on your sheet.
Please note with Creation Items and Companions in this section, you must write down ALL abilities, tools, and/or gadgets that they have at their disposal. This is to keep people with specific items or companions from "suddenly remembering" they can do that specific thing.
Creation Items on Your Sheet:
You'll notice that your character sheet is broken down into different sections. Depending on your creation tier, you can hold a certain amount of items on your person at any given time.
Legendary Weapons
Purpose
When one has customized their character in all the manners in which they'll ever need as far as jobs, archetypes, and stat allotment one may choose to turn their commendation saving towards a weapon of their own, or, perhaps one would rather save for a weapon first while leaving their stats for later? Either is possible, but these weapons are intended to be a goal, something one saves a mountain of commendations for in order to further their character both in story and the system.
Cost
The initial cost of a legendary weapon is 100 commendations, after paying this initial fee one begins the long and arduous journey of acquiring their own weapon.
The hunt for materials
To create a legendary weapon one must gather materials in the form of "Glittering Shards", three of these special items are required in order to begin crafting one's weapon. To obtain these one must first attend an RP event at the end of which they may announce to the DM they would like to roll for their shard, at which point the player will have to roll over 700 in order to obtain a single shard and they may roll once for every event they attend.
Creation
Though the time it takes to gather materials for one's weapon may take the longest, this step of the journey is the most difficult. In order to obtain and finish one's weapon they will have to undertake a Levequest specifically tailored for them; this quest is incredibly difficult and one may only take their most trusted of comrades with them in order to achieve it. At the end, if successful the weapon will be created and one may name their weapon.
Worthy of a Name
Every legendary weapon is as unique as its wielder, a singular creation in the threads of time and as such they require a name, one must dub their weapon the moment they obtain it.
Customization
For fifty commendations one may affix an aetheric gem of great potency to their Legendary Weapon. This gem's power flows into the weapon allowing for an additional ability or trait to an already potent tool.
-
Power Slot - This gem allows for one to, once per event, increase the bonus of a particular type of stat roll by +200 for one roll. (PA)
-
Swiftness Slot - This gem once slotted into the legendary weapon will decrease the cooldown on the ability it contains by 10 days, giving it a 20 day rest period rather than 30.
-
Charge Slot - This gem grants additional flexibility to the Legendary Weapon and allows for another main ability to be available to choose from when using the legendary weapon.
Additional effect
This artificial power gem may be either of the power or swiftness variety; given it's forged nature and the fact its addition tests the very limits of the weapon it is of lesser potency than the initial upgrades. A second swiftness gem will only decrease the cooldown by another 5 days; a second power gem only affords a roll of +100.
One and Done
You may only have one legendary weapon per character.
Replace your weapon?
For a cost of forty commendations one may, with permission, cast aside their legendary weapon in order to acquire a new weapon. While they will not be required to find another group of materials they will be required to complete another difficult quest in order to earn their replacement.
What is the main ability?
The ability that you legendary weapon is capable of is something you will consult with an officer about after you have gathered your three glimmering shards! The flavor of what the effect will do and the image of what a legendary will do is up to you, and the conversation will ensure the effect is balanced and able to be used in our system!
Status effects:
There are a myriad of status effects in the world of Final Fantasy, and this system is no slouch on them! Status effects can be used to aid your allies, hinder your enemies, and turn the tide of battle in your favor, so pick them wisely and use them carefully!
Positive status effects:
-
Regen -- You are healed for 1 HP at the end of each of your turns. [3 rounds]
-
Bravery -- Grants one target +100 to STR rolls. [3 rounds]
-
Faith -- Grants one target +100 to MP rolls. [3 rounds]
-
Libra -- Grants one target +100 to DEX rolls. [3 rounds]
-
Haste -- Allows for the target to use two Standard Actions (StA). [1 round] [CD: 3 rounds]
Note -- The cooldown on Haste is based on the CASTER, not the RECIPIENT.
-
Stoneskin -- Clears a negative status effect upon the target, and prevents the next negative status effect the target would take. [3 Rounds]
-
Reflect -- Bounces attacks back to the caster. [1 round] [CD: 6 rounds]
-
Vanish -- Immune to everything, including heals and buffs, and cannot act until your next turn. [1 round] [CD: 6 rounds]
-
Shield -- An effect that protects you from a certain amount of damage, acting as a form of extra HP, until this HP is expended or the duration ends. The exact amount of HP depends on the ability that applied the Shield. [3 rounds]
-
Inspired -- Grants target +2 to damage on their attacks. [3 rounds]
-
Shell -- Take -1 damage from magical attacks. [3 rounds]
-
Protect -- Take -1 damage from physical attacks. [3 rounds]
-
Dedication -- Decreases the amount needed to roll a Limit Break from 950 to 900. [Passive, Special]
-
Trance -- You enter into a heightened state, allowing all of your attacks to hit for an additional +4 damage. [3 rounds] [Special]
Neutral status effects:
-
Reverse -- Reverses status effects: Regen becomes Poison, Fear becomes Bravery, damage becomes healing, and vice versa. Status effects with no opposite are nullified. [Lasts 2 turns for players -- Lasts 4 for bosses] (NPC ONLY)
-
Winded -- You are exhausted after exerting an incredible amount of energy. All of your rolls are given a -50 penalty. [Lasts 3 turns. THIS EFFECT CAN STACK. Granted in extreme cases or when reaching 0 HP. ]
-
Knockdown -- Rolling over a certain threshold will knock enemies equal or lower to your STR tier down to the ground, forcing them to take a turn to return to their feet if their END is not T3 or higher. [Cannot be used by players without T4 STR or higher--for details, see "Raw Power" perk.]
-
Spread -- Spreads a negative or positive status effect to up to 3 targets. The caster of spread is not automatically a recipient. [Lasts remaining duration]
Note -- Spread does not work with Creation items or status effects not listed in these charts.
- Hidden -- You are unable to be targeted by either allies or enemies. In addition, attacks made while Hidden are rolled at Advantage. If you aren't a Thief or Ninja, any action you take will remove Hidden and apply Visible. If you -are- a Thief or Ninja, at the end of each turn after applying Hidden, roll another Hide check as a Free Action to see if you can maintain this effect. If you fail, you lose Hidden and are afflicted with Visible.
Negative Status Effects:
-
Poison -- Deals 1 Poison damage at the end of the target's turn. [3 rounds]
-
Bleed -- Take 1 unaspected damage at the end of the target's turn. Can stack up to 3 times but maintains the same duration as when first applied. When Bleed is removed, all stacks are removed. [3 rounds]
-
Daze -- Unable to take Standard Actions (StA). [1 round]
-
Frenzy -- Gain +2 damage, +100 to attack, & you cannot miss. For the duration, you may only use your StA, SwA, and RA to either attempt to deal damage or enhance your own damage. (You cannot use your actions to heal, defend, etc.) Enemy attacks cannot miss you. [3 rounds]
-
Bind -- Target cannot move. [3 rounds]
-
Fear [NPC] -- Freezes the target in place, forcing them to cower in fear of the caster, or make them relive their worst fears. They are unable to move or act. [3 rounds]
-
Slow -- Your movement is halved, and you cannot use SwA or RA for 1 turn. (CD 3)
-
Stop -- You cannot perform any actions or move, or use RA for 1 turn (CD)
-
Blind -- Your attacks have a 50% chance to hit (Even roll = hit, odd roll = miss) [3 rounds]
-
Silence -- Prevents MP rolls. [3 rounds]
-
Paralyze -- Prevents STR rolls. [3 rounds]
-
Addle -- Prevents DEX rolls. [3 rounds]
-
Upheaval -- Target is thrown upwards, & may take fall damage. No melee attacks can be made during this time. [Time in the air is determined by the DM]
-
Sleep -- Target cannot move or act, and is unaware of anything while in deep slumber, decreasing HC by -100. If they are struck, they will awaken. [3 rounds]
-
Mini [NPC] -- Halves all rolls to effected players. [3 rounds]
-
Confusion -- The only action permitted is a Standard Action Basic Attack (no SwA, no RA, etc.). This attack has a 50% chance of hitting an ally or foe in range (odd roll = ally/self, even roll = foe). [3 rounds]
-
Oil -- Targets afflicted will take +2 more damage from Fire-based attacks. [3 rounds]
-
Charmed [NPC] -- Targets afflicted will fight on behalf of the entity that cast this effect. [3 rounds]
-
Lethal [NPC] -- The next attack made on this target will deal double damage. [1 round]
-
Break [NPC] -- Sets a timer, counting down on the caster's turn. Once it reaches 0, characters affected turn to stone, unable to move or act. This lasts until the end of combat, or until the affected character succeeds in making a StA STR roll of 700+ on their turn.
-
Disease [NPC]-- Forces a target's HP maximum to a total of 4. [3 rounds]
-
Sap -- Prevents Healing on the target. [3 rounds]
-
Doom -- Sets a timer ticking down on the caster's turn. Once the timer reaches 0, targets immediately have HP reduced to 0. Cannot be cleansed or delayed. [[Available to T7+ Bosses ONLY.]]
-
Disable -- Cuts the target's hit class in half. [1 round] [CD: 6 rounds]
-
Visible-- You have recently been spotted through your attempts to Hide, and cannot use the Hide action for 2 turns. [2 Rounds]
-
Pain -- Take +1 damage for every and any action you take. [2 Rounds]
-
Misdirection -- You're forced to move in a specified direction for 1 turn. Actions are performed at disadvantage during this turn.
Elemental Status Effects
-
Elemental Curse -- Deals specific elemental damage over time to an enemy. (Example: 1 fire damage per turn) [3 rounds]
-
Elemental Weakness -- Increases specific elemental damage taken by an enemy. (Example: +1 additional fire damage taken from all sources) [3 rounds]
-
Nul(?) -- Grants immunity to a type of damage, element, or status effect. (IE: NulFire, etc.) [3 rounds]
-
Bar(?) -- Prevents the use of a type of damage, element, or status effect (IE: BarFire, etc.) [3 rounds]
Elements:
- Fire
- Levin / Lightning
- Water
- Ice
- Earth
- Wind
- Light
- Darkness
- Poison ‡
- Dynamis ‡ (Soul)
- Time ‡
- Gravity ‡
- Unaspected (Raw Aether) ‡
[ ‡ These damage types are not technically elemental-based (as they have no natural opposites), and cannot be accessed by players, but are listed for clarification purposes.]
Status Effect Mechanics:
Given a number of difficulties members of COMET's leadership have noticed in the past, this page is devoted entirely to laying bare the mechanics used with status effects both positive and negative.
Maximums and Minimums
In order to prevent the abuse of buff-creeping and singular characters being the entire focus of a party's application of status effects a cap on +DMG.
-
From outside sources one cannot gain more than +4 DMG on their next attack, this does not include internal self-buffing from job benefits as we believe including that in the calculations would harm job flavor.
-
Buffs to hit class cannot exceed the cap (650).
-
The rules from +DMG also work in the reverse; an entity cannot be debuffed further than -4 DMG without DM intercession (Difficult encounters) In addition, only the largest -Hit effect will be in effect when the target attacks. (The debuffs will remain even if not in effect, in case some fall off sooner than others.)
-
Damage cannot be reduced below 1 (including DoTs) Regardless of how much mitigation the target may have. (Unless invulnerable.)
Buff stacking and refreshing:
Another noticeable issue with leaving things undefined is that members have been using positive status effects in a manner that either stacks or refreshes them, neither of these were intended and below are some guidelines to follow.
-
Positive status effects CANNOT stack, if one is already under the benefit of a buff like Haste, Haste cannot be cast on them in order to give them more attacks that turn. (This includes internalized self-buffs that a job may have).
-
Postive status effects MAY NOT be refreshed before the effect has fallen off; for example, if a player's haste is over in 1 turn, an ally MAY NOT apply it that turn, they must wait until the turn where it has fallen off and is no longer applied in order to place a new one.
-
In the event that a positive status effect has a degree of potency in its description only the highest of those applied will be counted; for example, if one player applies a +2 HP shield to the party and then another applies a +3, the shields are NOT cumulative and instead only the +3 HP shield will be counted.
Clarifications:
- Concerning Reflect: Reflect will not reflect back damage or status effects (including DoTs) that have been previously applied -- only things that are done after it has gone off.
- Stacking Damage: DoTs cannot stack with each other, with the exception of Bleed and other Unaspected DoTs.
- Spreading Effects: Spread will spread ALL effects on the original target, to all targets within significant range of the original intended target, and CANNOT spread ITEM EFFECTS.
- With Haste: Haste is based on the cooldown of the CASTER, not the recipient.
Definition of a "Turn"
This has been an issue of some confusion at times, therefore below are the two primary instances one uses when deciding what a "turn" is and when one has passed.
-
First, the overall "turn" for these purposes a "combat turn" is ended when the entire initiative order has been played through and it is once again the character with the highest initiative's action.
-
When figuring out what a "turn" is in respect to a party wide or event-wide effect (for example, +100 HC to the entire party for 2 turns) then a "turn" has passed when the initiative order has passed through that combat turn and back to the action of the original caster in the next combat turn.
-
When figuring the duration of a singular negative or positive status effect applied to one character in particular the "turn" is over when that character's next action is up (Examples 1 DMG DoT or a single target +100 to hit). Once cast by whoever is applying the buff or debuff, the next action for the target of such effect will be one a "turn" has passed for that effect, whether or not this falls within the same combat turn is irrelevant.
Confusion
If you are confused as to any of these, ask the current DM or other knowledgeable member for clarification, we understand sometimes things just slip the mind of a player.
Okay! My sheet is all done! Now what?
Once your character sheet is completed, congratulations -- You're all set to begin adventuring, COMET style! Make sure you get an officer to look over your sheet one last time juuuuuust to be sure, and make sure you put your stats in the QuickSheet to help your DM provide the smoothest experience for everybody!
Interacting with your world
During an episode or Levequest, you may ask your DM to do certain things, such as talk to NPCs, investigate areas, or other actions. Please make note that you NEED to emote what it is you're trying to do BEFORE you /random roll. If you roll...randomly...you will be ignored.
Roll Initiative
When your DM informs the party to "Roll Initiative" -- you will be asked to /random to determine the order in which characters, both your allies and enemies, will be attacking in. The higher you roll, the higher up on the list you will be.
Be polite: Prewrite!
To make sure that things go quickly, please ensure you have what you want your character to do written down BEFORE your turn comes along! Typing takes time, so please be considerate of others and think about your turn before it comes around. If the flow of battle changes and you see an opportunity, feel free to take it-- but think about things before you decide to act on the spot!
"What Can I Do On My Turn?"
During each of your character's turns, you can do one each of the following actions: a Standard Action, a Swift Action, a Movement Action and a Passive Action. You can also use one Reaction per round of combat, and most Reactions do not need to be used on your turn. For more information about these actions, please see the System Terminology section at the start of this book!
Most of the abilities that are used with these actions will come from your chosen Job(s), but you can also get some from the Archetype and Creation systems.
Every character also has access to the following list of Basic Abilities, no matter your Job or Archetype!:
Basic Abilities
| Ability | Effect |
|---|---|
| Basic Attack | (StA) Make an attack against a target that uses your MP, STR, or DEX bonus. |
| Basic Heal | (StA) Make a roll to heal a target with your MP, STR, or DEX bonus. |
| Concentrate | (SwA) Your next attack deals +1 damage. This effect can stack. |
| Scan | (StA) Uncover enemy information. Each use uncovers more information, to a max of 3 per target. |
| Item | (StA) Use a Normal or Creation item. |
| Hide | (StA) Make a roll to gain the Hidden status effect. |
| Dash | (StA) You gain an additional 2 seconds of movement this turn. |
| Flee | (StA) Run from the fight. Enemies may strike at you if you decide to run! |
Using Concentrate:
Concentrate allows you to charge up an attack, gaining a +1 damage bonus to your next attack, capping at +5 (if you were to use five Swift Actions in a row to Concentrate). Think of this as the "power up and use a big flavor text attack" option. Take note that Concentrate only affects your next attack, not all attacks on your next turn. Attacks made with Concentrate are also not guaranteed to hit.
When to Run:
A wise (and long-lived) man once claimed the most difficult thing in a battle is to know when to flee from it--and with the FLEE option, you most certainly can do so. By deciding to FLEE, you and your party may run from a dangerous encounter, but be warned...you may be struck from behind as you turn tail, so ensure your opponent is properly distracted, before you decide to bail!
TL;DR: Damage Calculation
Take your Hit Class (it depends on your DEF/EVA) and the number the enemy rolled, and subtract them. The difference of the two numbers will tell you how much damage you took.
Damage Calculation Chart
"Alright but what if the DM is wrong? How do I check?"
Good question. Here's a nifty chart to tell you exactly how we calculate our damage, both to players and NPCs.
Damage Calculation Table
| Difference | Damage Taken |
|---|---|
| 1-200 | -1 HP |
| 201-600 | -2 HP |
| 601-800 | -3 HP |
| 801-1000 | -4 HP |
| 1000+ | -5 HP |
Looks a lot easier now doesn't it?
As an example here...
Bob has T2 STR. He punches Frog A.
Frog A has DEF/EVA of T2
Bob rolls a 400. He gets +50 because of his STR.
(400 + 50 = 450)
Frog A has a Hit Class of 400 because of its DEF/EVA.
(450 - 400 = 50)
Bob deals -1 HP to Frog A.
"My Party is in DANGER how do I HEAL them?!"
Relax friend. We also have a chart for that, too!
Healing Calculation Table
| Difference | Damage Taken |
|---|---|
| 1-200 | +1 HP |
| 201-600 | +2 HP |
| 601-800 | +3 HP |
| 801-1000 | +4 HP |
| 1000+ | +5 HP |
IMPORTANT: ANYBODY CAN HEAL.
Whether through magic, potions, herbs, or magitech, ANY character is capable of healing their allies in combat! It's all about what kind of person your character is!
Official Chart: Damage, Healing, and More!
"Alright but what if I don't want to scroll through all this just to find these two charts? Or find out what these status effects do? My fingers are delicate."
No big deal.
Click This Link to get a copy of our "Cheat Sheet!"
AoEs
When you want to strike or heal multiple targets, this is considered an AOE or "Area of Effect".
AoEs for Damage
Without the Multi-Target Perk from having Tier 3 in either MP, STR, or DEX it is normally impossible to make an AoE attack without using an ability from a Job that is inherently AoE. With this Perk, you can make a basic attack that has -50 to the roll for each additional target beyond the first.
AoEs for Healing
The Multi-Target Perk is also needed to make basic heals that affect more than one target. However, unlike dealing damage, all Healing AoEs take -100 to their roll per additional target, in addition to HALF to the final healed amount, including bonuses before this.
EXAMPLE:
Bob rolls 550 to heal himself, Bill, and Ben.
Bob takes -100 per additional target as it is an AoE. (so 550 becomes 350 in this case)
Bob's 350 heal would normally heal each target for 2 HP. Bob has an inherent healing bonus of +1, boosting this to 3 HP.
However, this final number is cut in half.
We always round up in our system, so Bob, Ben, and Bill heal for 2 HP!
Limited Targeting for AoEs
All AoEs, whether they be healing or damage, can only target a MAXIMUM of FIVE TARGETS!
Falling Down!
Sometimes environmental hazards are just as dangerous as the monsters you'll face. Most people are not immune to the forces of gravity! Here's a list of raw damage you would take falling from a certain number of fulms (feet).
Fall Damage Chart
| Fulms Fallen | Damage Taken |
|---|---|
| 15-29 | 2 damage |
| 30-44 | 4 damage |
| 45-59 | 7 damage |
| 60-74 | 10 damage |
| 75-89 | 14 damage |
| 90-104 | 19 damage |
| 105+ | 25 damage |
You Just Reached 0 HP
Don't panic. 0 HP is not the end here at COMET. We take a very hard stance on ensuring that we do not kill of characters without permission from their owners. After all, fantasias and name changes don't come cheap, and it would be rather unfair to have to spend real cash because some video game dice weren't nice to you more than a few times, right? Thankfully, we've put some systems into place to make sure that doesn't happen unless you very purposely put yourself into danger.
| Your HP | The Effects |
|---|---|
| 0 HP | You're seriously injured...but nothing you can't shake off with enough effort. You are also inflicted with WINDED. |
| - 3 HP | You've received an injury bad enough to knock you out. You cannot respond, move, or do anything. |
| - 5 HP | You've been severely injured. Something is definitely broken, or worse, lost -- it's your call what that is. You still cannot move or act, and are still KO'd. |
| - 7 HP | You've been so badly injured that you're on the brink of death. Even should you survive this encounter, a stat will be reduced by -5 points! (DM's discretion) |
ANYBODY CAN HEAL.
You don't have to be a mage or a healer specifically in order to tend to the wounds of your allies! Potions, bandages, and other medical supplies can be used just as well as spells! Don't feel like you're limited just because of your class--if your character has basic first aid knowledge, they do their best to heal the wounds of their allies!
Limit Breaks:
These powerful abilities are meant to turn the tide of battle and be used in a dire situation. Limit Breaks are limited to the player's primary Archetype associated with that particular Limit Break, but are highly powerful abilities.
Earning a LIMIT BREAK
If you roll (natrually, without adding bonuses of any kind) a 950 or higher, you will be granted a LIMIT BREAK token. If the Dedication buff is in effect, this threshold is lowered to 900 or higher.
There are four different types of Limit Breaks that can be activated depending on your Archetypes. These are also known as "Limit Break 1" (LB1).
Limit Break Abilities
| Limit Break Name | Effect |
|---|---|
| Stalwart Barrier [Tanks] | (RA) Grants a +4 shield to all allies for the round's duration. |
| Touch of Life [Healers & Support] | (RA) Grants all allies +3 flat HP, revives KO'd allies to +1 HP, and removes 1 negative status effect from each player. |
| Miracle Weapon | (StA) Roll to make an attack that deals your bonuses +4 True damage on a single target. |
| Forbidden Chant | (StA) Inflicts 4 flat damage to all enemies. |
Sharing LB Tokens
You are allowed to use another player's LB token if they give you permission to do so. This is even required to perform more powerful Limit Breaks such as Limit Break 3 and Grand Summoning, which you'll read about soon!
Limit Break Cooldown
Activating a Limit Break has a personal cooldown of 6 turns; if a player uses a Limit Break then that particular player cannot initiate another for 6 turns. If you earn a Limit Break token and your ability to Limit Break is on cooldown, consider sharing your token!
Notice:
Healer Limit Breaks cannot be used for damage purposes in any way, regardless of any mechanics that allow healing to be used as damage.
Limit Break 3
In the event that you're ever in a really tight spot, the best way to endure adversity... is through teamwork! By combining the ambient aether you've all collected, the party can unleash much more powerful abilities!
Earning your LB3:
When you have stored up 3 Limit Breaks, you can combine these three Limit Breaks to perform a "LB3". These are more powerful than their normal counterparts, and can turn the tide of battle when things are looking particularly grim, or if you want to finish off a foe in an utterly spectacular manner. The question is, do you want to use your Limit Breaks sparingly, saving them for potential high damage or emergency protection...or, perhaps you would like to expend them immediately?
The choice is, ultimately, up to players to decide for themselves!
Note:
You do still need permission from all three people who rolled the stored Limit Breaks in order to use them.
| Limit Break Type | Effect |
|---|---|
| Defender | [RA] Complete immunity to damage and status effects for one (1) turn. |
| Assailant | [StA] Each party member executes a powerful attack, dealing 4 damage to each ally still above 0 HP. |
| Healer | [RA] Grants all allies +9 HP, revives KO'd allies up to +3, removes all negative status effects from the party. |
| Support | [StA] Grants all allies 2 positive status effects of their choice. (Except Trance) |
Nothing, after all, is stronger than the unity of our Seekers.
Note on Assailant LB:
A party of 10 players would deal 40 total damage for the assailant LB3! That's a lot of power!
The total DMG from a LB3 may be spread among enemies as the party wishes, but cannot exceed the total LB3 cap for that party.
General Questions:
"My class has a stance--can I switch between and then attack?"
Yes! Swapping stances is a Passive Action, and as such you can swap, then make your turn! Due to only having one Passive Action a turn, however, you may only do this once per turn!
NOTICE:
Don't forget to write out which stance you start in, if stances apply to the classes you've chosen.
"How much distance can I cover when I move around the battle during my turn?"
Two seconds IRL time is the amount of ground you can traverse with your movement action!
"When do things like DoTs and Regen tick? Is it on my turn, or the beginning of the turn order?"
These things all happen at the beginning of the turn. It's up to you as a player to keep track of when things like your cooldowns, status effects, ect go off. The DMs will help you, but it's important to remember when, for example, your poison gets off of your character or not.
"So I cast Regen on myself. Does the cooldown start this turn?"
For STATUS EFFECTS (like Regen and Poison) the cooldown starts AFTER THE EFFECT ENDS. So on the turn when your Regen comes off, the cooldown will start then.
For ABILITIES the cooldown happens right after the ability has gone off.
"So do I switch between the classes I have, or do I have access to everything?"
You have access to all your abilities at the same time. At the beginning of a fight, you should have access to at LEAST 10 abilities.
"How Many Things am I Allowed To Use Per Turn?"
• 1 Standard Action (StA)
• 1 Reaction (RA)
• 1 Swift Action (SwA)
• 1 Movement Action (MA)
• 1 Passive Action (PA)
"How Does Confuse / Frenzy / Blind Work? How Do I Know If I Hit My Ally Or Not?"
If you roll EVEN you will hit your ENEMY.
If you roll ODD you will hit your ALLY, or YOURSELF. If there is an ally beside you, you'll hit them. If not, you hit yourself.
In the case of BLIND, even numbers will cause you to miss.
"What's the Difference Between REFLECT and VANISH?"
REFLECT will reflect all enemy attacks back to the opponent for ONE turn.
VANISH makes you untargetable, negates any damage, and makes you unable to take actions for one turn.
"Can I use Multi-Target on Buffs or Debuffs?"
No, however, they CAN become multi-target if you SPREAD them.
"So Some of the Classes Have Specific Elements and Status Effects. What's the Difference Between Me Hitting Something With Fire, and Hitting Them With Something Else?"
Each kind of enemy has specific Element Strengths and Element Weaknesses. In the world of Final Fantasy XIV, all creatures are made up of a few various types of aether, attuned to specific elements--giving them abilities and strengths, but making them weak to other forms of aether.
There are some obvious ones, such as a LAVA SCORPION having a powerful Fire and Earth aether, and being weak to Wind and Water. Some of them are a little more obscure.
If you're not careful about which sorts of spells you and your team end up throwing at an opponent, you may be doing less damage, or worse, help your foes instead! Using the SCAN option in combat, combined with coordinating with your allies, will help you see the day won!
Foes struck by an Element Weakness will take +1 extra damage, whereas enemies struck by an Element Strength will take -1 damage to attack rolls. Some enemies may even have passives that allow it to ABSORB elemental damage as HP, so be careful!
"So Which Elements Are Weak to Which?"
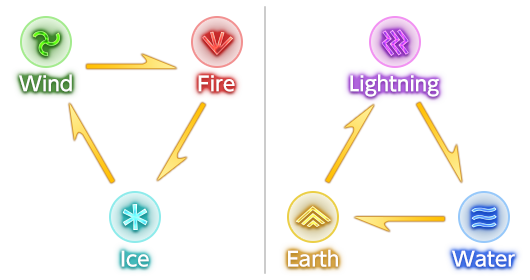
Element Weaknesses
| Element | Strong Against |
|---|---|
| Fire | Ice |
| Ice | Wind |
| Wind | Fire |
| Earth | Lightning |
| Lightning | Water |
| Water | Earth |
Time, Dynamis, & Gravity Elements:
Several elements are limited specifically to certain jobs, (such as Time for Time Mage or Gravity for Astrologians). These elements are unique to those jobs, but can also be utilized by DMs and event runners for more creative encounters for players.
Dynamis, however, is an elemental affinity type that is specific to NPCs and Bosses. For more information on the Dynamis Element, please consult the COMET DM Guidebook.
Status Resistance:
When casting debuffs and negative status effects on an opponent, it's important to coordinate with your teammates, otherwise you may end up wasting your turn!
Once an enemy recovers from a negative status effect, they gain RESISTANCE to that status effect.
Enemies with RESISTANCE to a status effect make a roll when the status effect is applied again. If they roll 500 or higher, the status effect is not applied. Otherwise, it is applied.
Any negative status effect, except for DoTs, job/perk abilities, or elemental debuffs can be resisted.
In other words, the following status effects can be resisted:
- Addle
- Bind
- Blind
- Confusion
- Curse
- Daze
- Disable
- Knockdown
- Paralyze
- Silence
- Sleep
Other status effects not listed here may be subject to RESISTANCE at staff or DM discretion.
Using Scan:
Sometimes, knowing an enemy's weakness can help you overcome them much quicker. By using your turn to SCAN the enemy, you can learn their strengths and their weak points. If you encounter this enemy again in the field, you may keep what information you know about them - and if you didn't finish Scan-ning them last time, you can Scan them even further to gain more hints!
When you use SCAN on an enemy, it will tell you information on that opponent. Please note that SCAN only works on ONE ENEMY AT A TIME!
• 1 Scan: You see your enemy's current and total HP.
• 2 Scans: You see your enemy's Hit Class.
• 3 Scans: Reveal Elemental strengths, weaknesses, and status effect immunities. (DM Discretion)
Additional Methods of Finding Weaknesses
There may be other ways for you to find other possible information on your enemies besides Scan...however, what these means entail is entirely up to the DM running your event - should they choose to add such additional means!
Nobody Likes Fractions
When encountering a fraction (such as 1/2 HP, ect) it is important to know how to deal with non-whole numbers. Therefore:
ALL FRACTIONS ARE ROUNDED DOWN TO THE NEAREST WHOLE NUMBER WHERE APPLICABLE.
Bar vs Nul
"What's the difference between Barfire, and Nulfire?"
BARFIRE and other "Bar" spells, are status effects on party members by enemies that prevent them from taking certain actions. NULFIRE and other "Nul" spells, are status effects typically cast by enemies and bosses that nullify damage of specific types.
Nonplussed on +X
When you see +[number] on any sort of skill, this implies that this is added damage, on top of a damage roll. These abilities are NOT guaranteed to hit their target! (Unless stated otherwise). If you roll under your target's HC, you'll still miss!
Hide (Stealth)
How Hide Works Out of Combat:
Once per scene (during an event), a player may roll to hide just as in combat, and must reroll per scene change in order to remain hidden, at the DM's discretion. (Scene change may be defined as entering a new room, or perhaps after a major event has happened depending on the DM)
Defense for Hide checks scales the same way non-combat stats do. Dex may also be used for hiding. If a player has ninja or thief as their job, they gain a +100 to all Hide rolls due to their job, no matter the stat used. This buff stacks.
DMs may choose to operate Hide mechanics differently for their events, or may choose to use different stats for the hide checks, always follow the DM's rules for out of combat encounters over what is written above.
Hide in Combat:
Any player may use the Hide action when in combat as a Standard Action, and makes either a DEF/EVA or DEX check in order to Hide on a combined roll of 600+. If successful, apply Hidden to yourself, stopping you from being able to be targetted by enemies OR allies. AoE attacks aimed at an area may still strike you, as well as skills that attack or heal -all- targets. While Hidden, all attacks are made at advantage. If a seeker using Hide isn't a thief or ninja, using any skill will remove hidden and apply Visible (Which stops the use of Hide for 2 rounds.) If the user -is- a thief or ninja however, at the end of each turn AFTER applying Hidden, they make another Hide Check at no action economy.
So how does it look in combat?
Turn 1: Billy the ninja/thief and Bob the chemist both use their StA's to Hide. Billy uses his DEX stat to gain +100 to his roll, being a ninja grants +100, and being a thief grants another +100. Billy has a +300 to their roll, while Bob uses their DEF/EVA stat of +150 to roll! They both succeed and gain Hidden
Turn 2: Billy attacks his foe with advantage due to him being hidden! Bob also attacks with advantage due to being hidden! Because Bob isn't a thief or ninja, Bob gains Visible (2), pulling him out of hiding! Because Billy -is- a thief or ninja (or in this case, both), he stays Hidden. At the end of his turn, Billy rolls to keep Hidden with his +300 from before! He rolls over 600, so he keeps the Hidden buff!
Turn 3: Bob has Visible so he cannot Hide again. But Billy makes another attack at advantage due to hidden. At the end of his turn...he sadly fails his roll, and gains Visible, as such, he must wait to Hide again!
Player vs Player Combat
Not every issue can be solved peacefully amongst players. Maybe you're in a scenario where you're forced to do battle with your companions, or sometimes a considerable distraction is needed -- to this end, the COMET PvP system was designed to make combat between players as fair and reasonable as we could manage without sacrificing the core components of the system to begin with -- allowing your character to be good at what they're good at, while not dragging things out.
This system is designed for a variety of rules and styles, but the basic functionality is the same across the board. This system even supports teams of players, and free-for-all battles!

Step 1: Agree on the Rules of Engagement
There are various ways you can agree to PvP combat, but we will go over the most common 3 here.
[Note: These rules can easily be used for free-for-all and teams of players. Adjust as you see fit.]
Blood Sport:
Players will fight until one of them reaches 0 HP. Blood sport uses the character's normal HP pool. Typically Blood Sport rules are for longer, more drawn-out combats.
Clean Sport:
Players will use their ENDURANCE (END) stat to determine how many hits they can take. [[For example, if a player has T5 END, they have 5 hits]] Clean Sport is the most commonly used type of engagement, as it resolves quicker than Blood Sport.
Friendly Sport:
Players will decide who will win the match based on how many rounds they win. [EXAMPLE: Best of 5, First to 20 wounds, ect.] Depending on how long the players agree to exchange blows, this can be longer or shorter than the other two options.
Step 2: Feint, Parry, Engage, Guard
Once players have determined the rules of engagement, they will need to decide their first move. THERE IS NO INITIATIVE ORDER IN PVP. Players will instead proclaim their moves at the same time.
In this style of PvP, there are FOUR types of abilities:
Feint:
Feints are typically used to trick your opponent into reacting to your movements in a predictable way, so you can maneuver in an unexpected direction. A Feint can be used to counter a Parry, but are weak to Engagements.
Parry:
A Parry is used to halt an attack you can see coming, and uses your momentum in defense to counter-attack. A Parry can counter an Engagement, but they are weak to Feints.
Engage:
Engaging the enemy directly can sometimes throw them off-guard, as they might be expecting a more complex attack pattern. An Engage counters Feints, but are weak to a Parry.
Guard:
Guarding yourself against your enemy won't do any damage, but you'll be able to avoid taking any hits! By using your DEFENSE/EVASION [DEF/EVA] Tier, you can guard up to as many hits as you have DEF/EVA tiers.
[EXAMPLE: If you have T3 DEF/EVA, you would be able to guard 3 attacks! It's that easy.]

Step 3: Pick Your Attack Stat
You can chose from ANY of the combat stats -- Strength, Dexterity, Magical Power, Endurance, and Defense/Evasion to apply to your Feint, Parry, Engage, or Guard.
As an Example:
Bill FEINTS, ducking underneath his opponent's sword to strike him in the face with his fist. [FEINT, STR]
"What if there's a tie?"
In the event two individuals tie (picking the same outcome), they will have to make a roll with the combat stat they chose to use for their ability.
As an Example:
Steve and Jim are fighting!
STEVE is using his T3 STRENGTH and JIM is using his T5 DEXTERITY!
Steve and Jim both try to FEINT. It's a tie! Since both players decided to make the same move, it's time to see who falters first!
Steve and Jim are asked to add their TIER BONUSES to a /random roll!
Steve has T3 and adds +150 to his roll. Jim has T5 and adds +200 to his roll.
Steve rolls 400! (150+400=550)
Jim rolls 100! (200+100=300)
STEVE wins the tie! JIM will take disadvantage the next time there's a tie! NO DAMAGE IS DEALT!
PvP with 2 or More Players:
There are a few different ways to deal with fights involving more than 2 players at a time. These include...
- Putting the players on teams and adding their HP together.
- Having each player have their own HP pool.
- Using the Player's Tiers, adding them together, and making that the "team HP". [EX: T5+T3 = 8]
AoEs:
You are ALLOWED to AoE if you have multiple targets -- while there IS NO PENALTY FOR AOE ATTACKS keep in mind you opponents may be using more than one type of strategem, and you could be countered!
Gear Sets:
With the release of patch 7.5 - "In the Balance", the option for your character to hold multiple jobs became available. Now you can more fully express your character in combat, or maybe even try something new! Think of it like equipping a new job stone in-game.
Unlocking Gear Sets:
To unlock a Gear Set, you will need to pay a specific amount of commendations in order to unlock them -- as you can see on your character sheet, you have two (2) Gear Sets available for you.
| Gear Set | Commendations needed |
|---|---|
| 1 | 100 |
| 2 | 200 |
Customizing Gear Sets
Once you've unlocked the Gear Sets, you can pick up to two (2) additional jobs. As always BOUND jobs remain unable to be combined with other jobs.
You CAN:
- Combine 2 Jobs (just like normal)
- Have a single Solo Job (you do NOT get the free archetype, stat points, or third creation slot)
- A Bound Job
You CANNOT:
- Combine 2 Bound Jobs
- Have the same job on multiple gear sets
- Use multiple gear sets at the same time
- Switch Gear Sets mid-event (or combat)
Equipping a Gear Set:
You must determine which Gear Set you are starting out your adventure with, as you CANNOT CHANGE once an event has started. If you are running in a Campaign, you will be equipped with whichever Gear Set you started the campaign with, and CANNOT CHANGE at any point.
This document may be subject to change.
Disclaimer:
The COMET system is a ever-evolving, ever changing thing, just like the game it's based off of! Things in this book will change, and have changed many times before the text you see above. Patches are released for this system sporadically (we do not have a release schedule) and can pop up from anywhere between 2 months to an entire year without an update.
It is STRONGLY recommended that you check the Public RP Discord for updates, news, and other important information concerning the COMET RP System.
Word to the wise:
Please do not forget (or "forget") to give credit to COMET of Mateus if you use any aspect of this system for your own roleplay group. Even if it's "inspired", (and especially if it's "evolved" in any way) it's polite to credit the creators who have worked hard to provide this to the public.
We have a credits page, which means if you're copying our stuff, you should be able to copy that too.
We didn't copyright this system for fun.